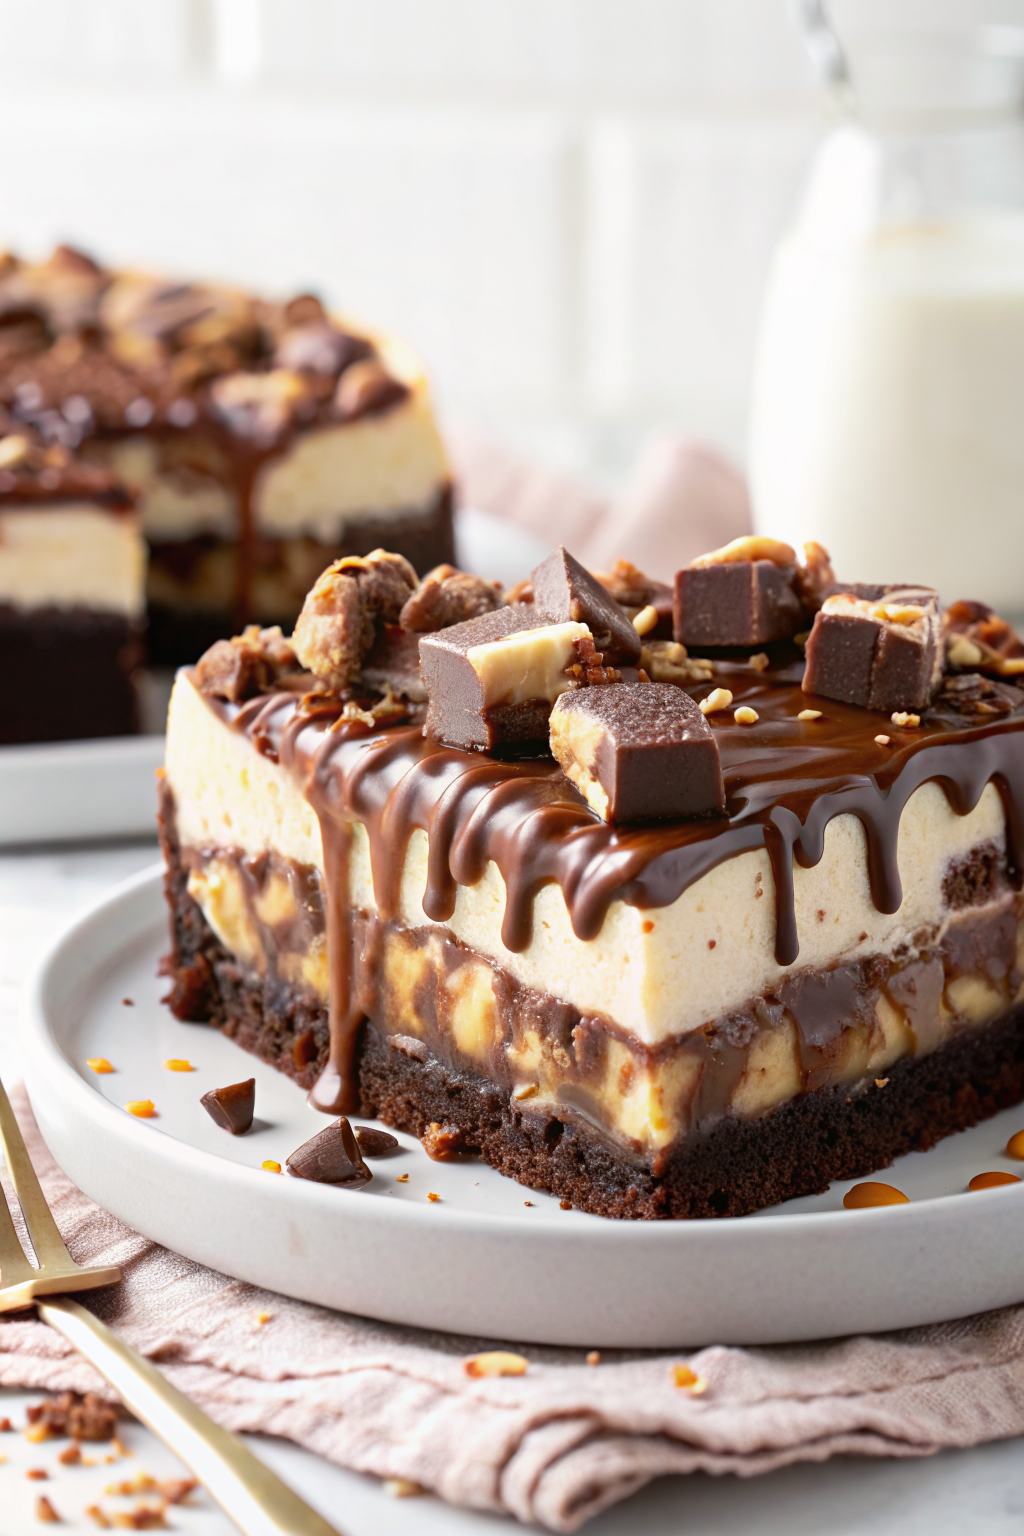
Snickers Peanut Butter Brownie Ice Cream Cake
If you’ve ever dreamed of turning your favorite candy bar into a show-stopping dessert that’s rich, creamy, and utterly indulgent—this is it. The Snickers Peanut Butter Brownie Ice Cream Cake isn’t just a treat; it’s an experience. Layers of fudgy brownie meet gooey caramel and chocolate sauces, studded with crunchy chopped Snickers bars and crowned with dreamy peanut butter ice cream. It’s decadent in the best way possible—perfect for birthdays, celebrations, or whenever you need a little sweetness to brighten your day. I made this once for a small group gathering, and honestly? Everyone thought I’d bought it from a fancy bakery. Little did they know I whipped it up from scratch using simple pantry staples. Trust me when I say, no ice cream machine required, and yes, even boxed brownie mix works wonders here. This cake practically begs to be shared (and devoured).
What Is Snickers Peanut Butter Brownie Ice Cream Cake?
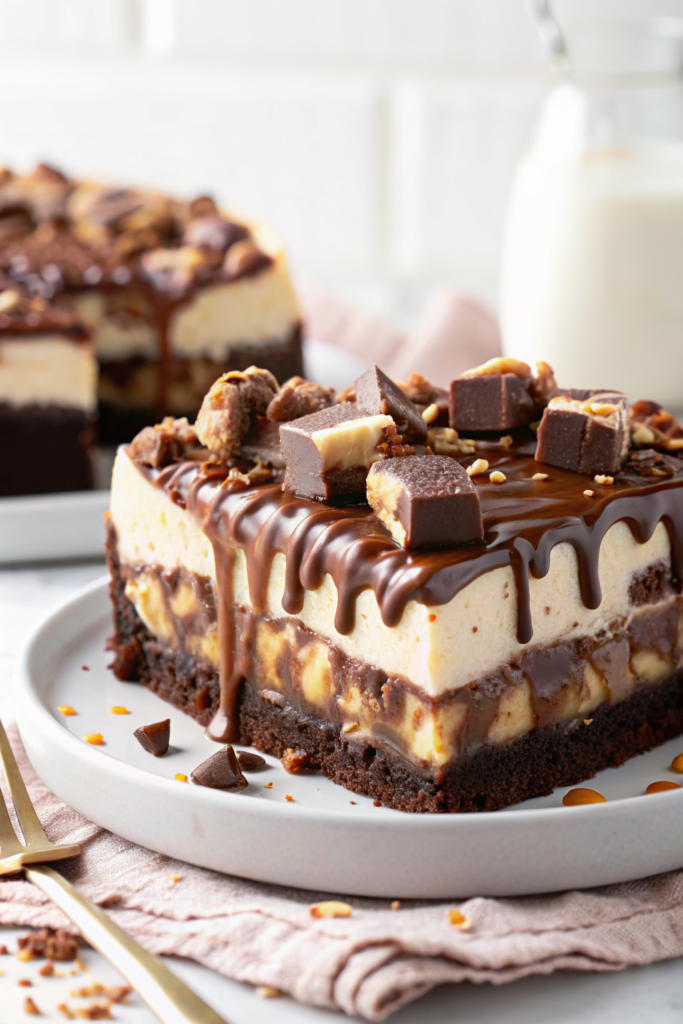
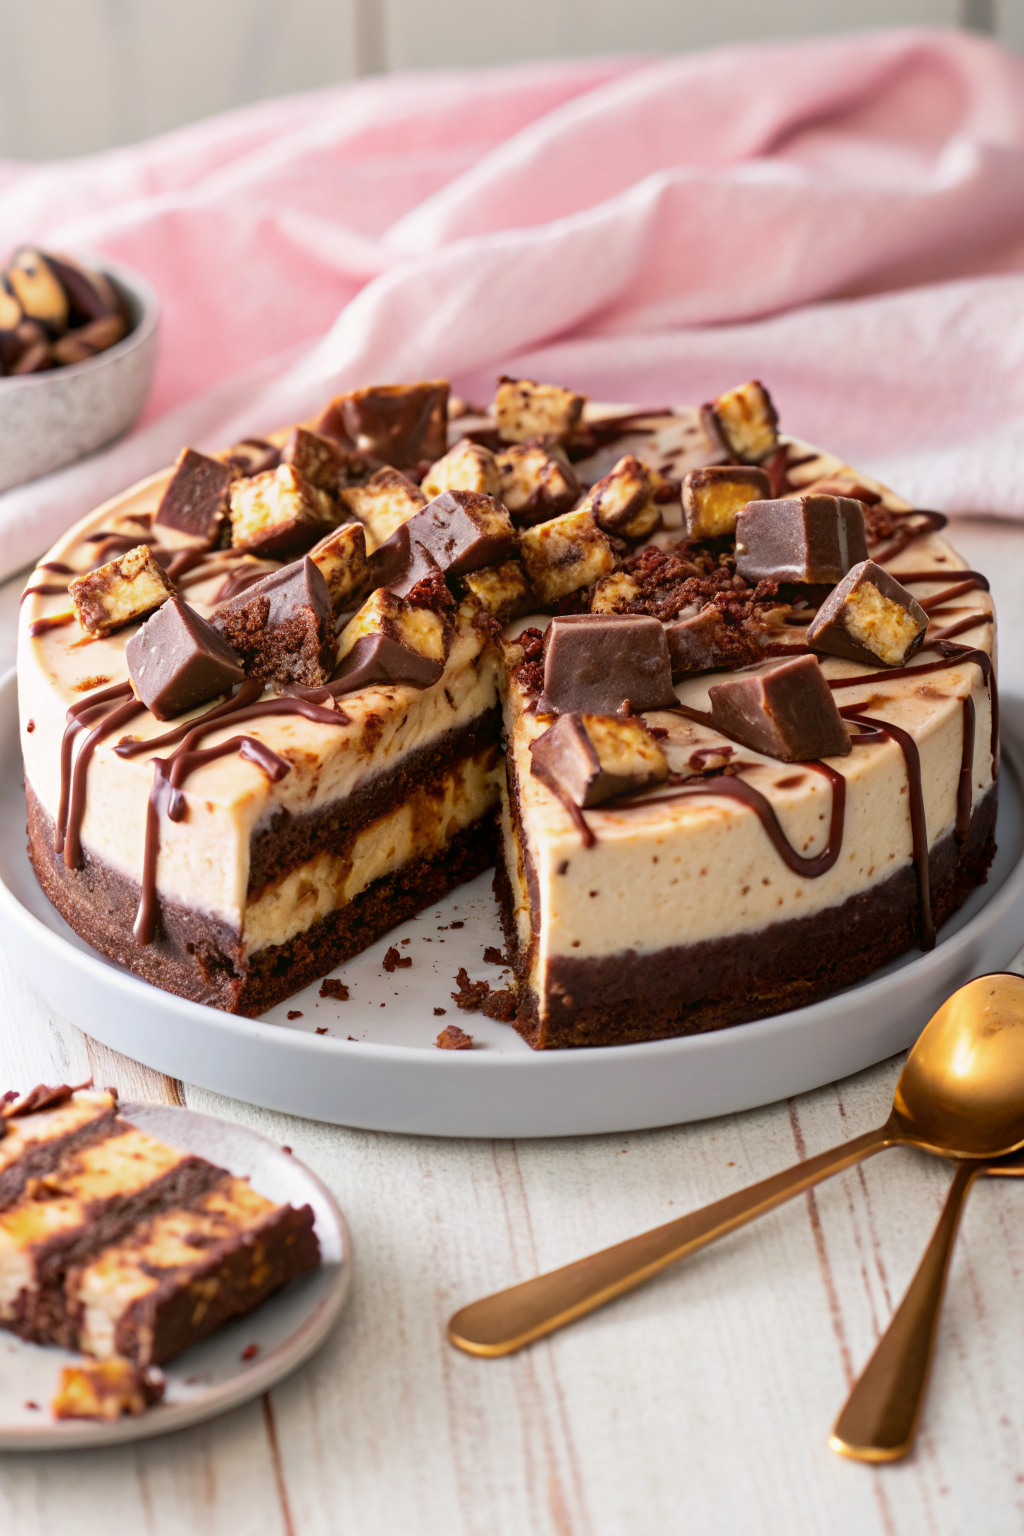
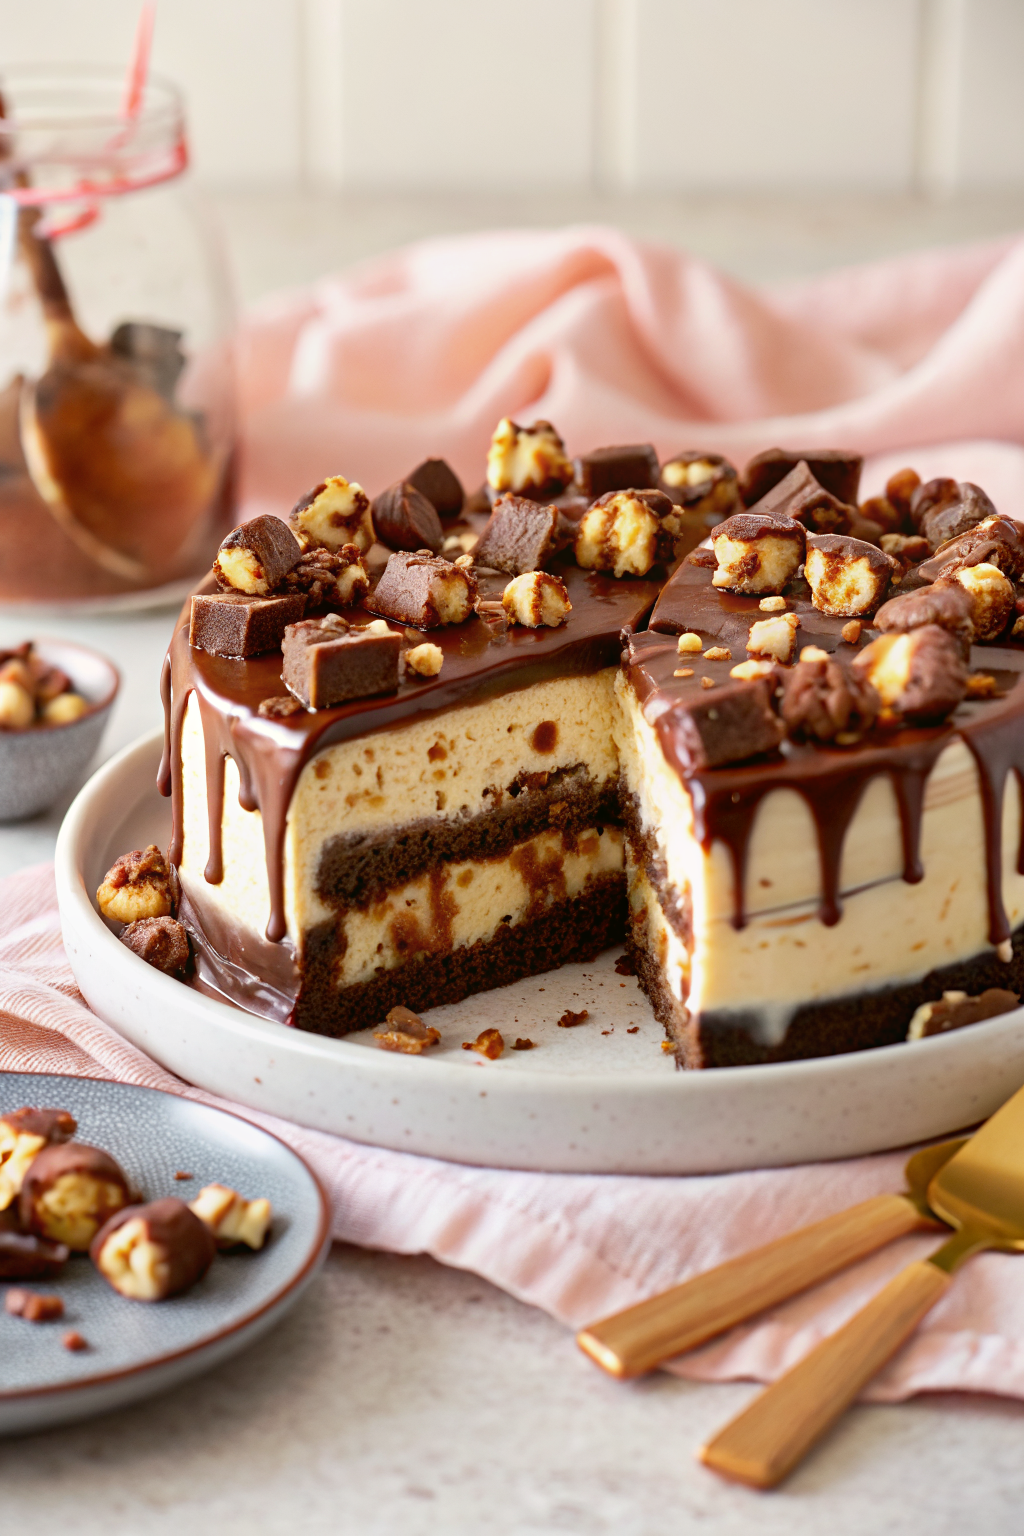
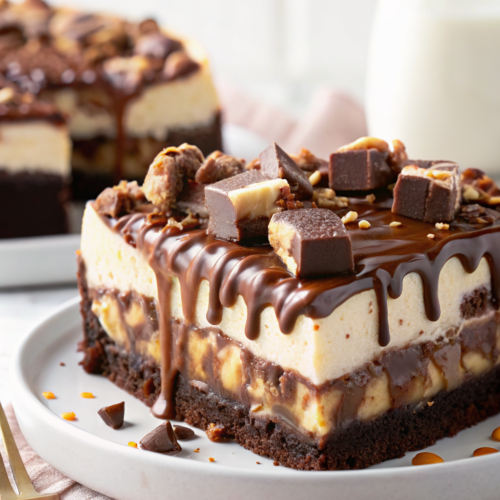
This ultra-rich frozen dessert combines four irresistible layers: a dense, fudgy brownie base, followed by a luscious spread of caramel and chocolate sauce, then generously topped with crushed Snickers bars and finished off with smooth peanut butter ice cream. Unlike traditional ice cream cakes that rely on pre-made components, this one builds flavor from the ground up—using store-bought shortcuts where helpful but never sacrificing taste. The result? A slice so satisfying it feels like biting into a candy bar… only better because it’s also cake and ice cream and everything good rolled into one glorious moment.
Why You’ll Love This Recipe
First off—it’s ridiculously easy to make. No piping skills needed, no fancy equipment beyond a stand mixer (though hand beaters work too), and absolutely no ice cream maker required. That’s right: you can craft this masterpiece using basic tools most home cooks already have. Second, every bite delivers that beloved Snickers flavor profile—crunchy peanuts, salty caramel, and melty nougat all wrapped up in creamy peanut butter goodness. And let’s not forget how stunning it looks! Whether you’re serving it at a party or just treating yourself after a long week, this cake always earns compliments. Plus, since it freezes solid, you can prep it ahead of time and pull it out minutes before guests arrive. Just remember: once people taste it, they’ll probably ask for seconds (or thirds).
How to Make Snickers Peanut Butter Brownie Ice Cream Cake
Quick Overview
Start by baking two 8-inch brownies (or one big one cut in half) using your favorite boxed mix. While those cool, prepare a silky peanut butter ice cream by blending softened cream cheese, sugar, peanut butter, milk, and Cool Whip until fluffy. Assemble everything inside a springform pan lined with parchment paper—layering brownie, sauces, Snickers chunks, and ice cream repeatedly until fully stacked. Freeze overnight (or at least 4–6 hours), then drizzle extra sauces over the top and garnish with more candy pieces. Slice, serve, and watch faces light up.
Ingredients
- 1 box brownie mix (plus ingredients listed on box)
- ¼ cup milk
- 8 oz cream cheese, softened
- ½ cup sugar
- 1½ cups peanut butter
- 8 oz Cool Whip, thawed (or homemade whipped cream)
- 1 (20 oz) bottle chocolate sundae syrup
- 1 (20 oz) bottle caramel sundae syrup
- 1 (11.5 oz) bag mini Snickers bars, chopped into thirds
Step-by-Step Instructions
- Make the brownies: Prepare dough per package directions. Grease two 8-inch pans (ideally springform) and line bottoms with parchment. Bake at recommended temp for ~20 minutes (less than usual) until edges are set but center still jiggles slightly. Let cool completely.
- Prepare peanut butter ice cream: In mixer bowl, combine milk, cream cheese, sugar, and peanut butter. Beat until smooth and creamy. Fold in thawed Cool Whip gently until fully incorporated.
- Set up assembly pan: Line sides of same 8-inch springform pan with parchment paper—leaving enough hanging over the top for easy removal later. Optional: place cardboard cake circle at bottom.
- Layer #1: Place first brownie layer at pan base. Spread ½ cup caramel and ½ cup chocolate syrup evenly across surface. Top with one-third of chopped Snickers.
- Layer #2: Add half the peanut butter ice cream mixture. Carefully place second brownie layer on top.
- Repeat: Drizzle another ½ cup each of caramel and chocolate sauce over brownie. Sprinkle second third of Snickers bars. Cover with remaining peanut butter ice cream.
- Freeze & finish: Transfer assembled cake to freezer for at least 6 hours (preferably overnight). Once solid, remove from pan using parchment handles. Drizzle additional sauces down sides. Top with final portion of chopped Snickers and extra drizzle if desired.
What to Serve It With
Serve this cake straight from the freezer—no thawing needed! For a festive touch, pair it with vanilla bean ice cream on the side (to balance the richness), fresh berries, or even a dusting of powdered sugar. If you’re hosting, consider offering espresso alongside—it cuts through the sweetness beautifully. And don’t skip the fork; this thing needs one to hold its shape when sliced.
Top Tips for Perfecting Your Snickers Peanut Butter Brownie Ice Cream Cake
- Always use an 8-inch springform pan—it makes removing the frozen cake effortless.
- Don’t rush the brownie cooling step. Warm brownies warp under heavy ice cream layers.
- Chop Snickers bars coarsely—not too fine, not too chunky. Think pea-sized bits for optimal texture.
- For cleaner slices, dip knife in warm water between cuts.
- If making ahead, cover tightly with plastic wrap before freezing to prevent freezer burn.
Storing and Reheating Tips
Keep leftover slices in the freezer for up to 2 weeks. To serve, let sit at room temperature for 5–10 minutes (just enough to soften edges without melting the ice cream). Never microwave—it turns icy and sad. Instead, unwrap slice and place on plate for ambient warming. Leftovers also freeze beautifully in individual portions wrapped in wax paper.
Frequently Asked Questions
Final Thoughts

This Snickers Peanut Butter Brownie Ice Cream Cake isn’t just a recipe—it’s proof that sometimes the simplest ingredients come together to create magic. Whether you’re celebrating someone special or just craving a little joy, this dessert delivers in every single bite. It’s rich, it’s crunchy, it’s creamy, and it’s guaranteed to make you smile. So go ahead—gather your friends, grab a spoon, and dig in. Your sweet tooth (and everyone else’s) will thank you.
Snickers Peanut Butter Brownie Ice Cream Cake
Ingredients
Main Ingredients
- 1 box brownie mix
- 0.25 cup milk
- 8 oz cream cheese, softened
- 0.5 cup sugar
- 1.5 cup peanut butter
- 8 oz Cool Whip, thawed
- 1 bottle chocolate sundae syrup
- 1 bottle caramel sundae syrup
- 11.5 oz mini snickers, chopped divided into three groups
Instructions
Preparation Steps
- NOTE: An 8-inch springform pan is best for this recipe so that you can easily remove the cake once it’s been assembled. If you do not have a springform pan, line your pan with clear wrap before adding your parchment paper and cake board. You can use the clear warp to lift your cake out of the pan once it’s assembled and frozen.
- Make brownie dough according to instructions on back of box.
- Grease two 8-inch pans (preferable springform pans) and line the bottoms with parchment paper. Bake at temperature on box, reducing baking time to about 20 minutes.
- When brownies are done baking, allow to completely cool.
- Combine milk, cream cheese, sugar and peanut butter together in the bowl of a stand mixer or with a hand mixer. Mix until completely combined.
- Fold in the cool whip.
- Line the sides of an 8-inch springform pan with parchment paper. The parchment paper should stick up above the top edge of the pan.
- Put the first brownie layer in the bottom of your pan.
- Spread 1/2 cup caramel sauce and 1/2 cup chocolate sauce over the brownie. Top with first group of chopped snickers.
- Top with half of the peanut butter ice cream.
- Add second brownie to the pan, on top of the ice cream.
- Again cover with 1/2 cup caramel sauce and 1/2 cup chocolate sauce. Top with second group of chopped snickers.
- Top with remaining peanut butter ice cream.
- Allow ice cream cake to freeze completely.
- When frozen, remove from springform pan and remove parchment paper from sides.
- Top with additional caramel sauce and chocolate sauce, allowing it to drizzle down the sides.
- Cover with remaining chopped snickers and a little more caramel and chocolate sauce.