


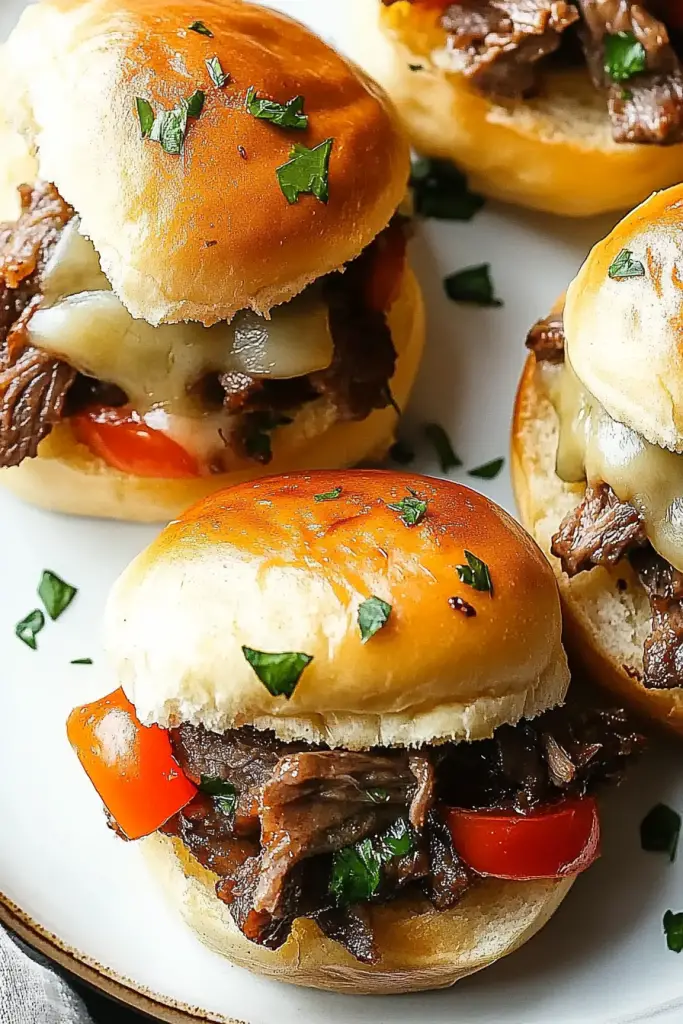
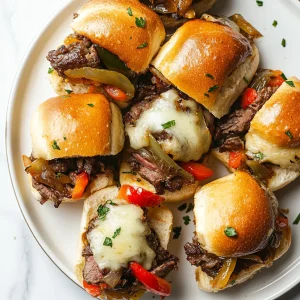
There’s something magical about a tray of warm sliders that instantly says “game night is on.” I still remember the first time I made Philly Cheesesteak Sliders for a crowd of hungry friends after a long day. The smell of caramelized onions meeting sizzling steak, the gooey provolone melting into soft, mini buns—it felt like a hug in edible form. This recipe is a riff on the classic Philly cheesesteak, packaged as bite-size indulgence that cooks faster than you can say “extra cheese, please.” It’s incredibly forgiving too: use leftover roast beef or steak, swap in peppers, and you’ll still land on something comforting and crowd-pleasing. If you’ve ever tried regular cheesesteaks, you know the trick is balance—hot meat, melty cheese, and a soft yet sturdy bun. Philly Cheesesteak Sliders nail that same harmony, just in slider form. This is a lifesaver on busy weeknights and a hit at potlucks. I’ve found myself reaching for these sliders when I need a quick kiss of nostalgia without turning the kitchen into a bakery.
What is Philly Cheesesteak Sliders?
Philly Cheesesteak Sliders are essentially a playful, mini version of the beloved Philly cheesesteak. Think: tender, thinly sliced beef, caramelized onions, and gooey cheese tucked into soft mini buns or slider rolls. The name nods to the origin city and its iconic sandwich, but these bite-sized heroes trade in patience for speed. Think of it as the same flavor profile you crave from a traditional cheesesteak—savory beef, sweet onions, mellow cheese—only more social and snackable. It’s a simple concept: you take the best parts of the classic sandwich and wrap them into little, shareable sums of happiness. My friends always call these the “little hugs from the kitchen,” and my kids snag two or three before I can plate the rest. If you’re hosting a game night, a party, or just a busy weeknight dinner, Philly Cheesesteak Sliders are the exact kind of crowd-pleaser that disappears in minutes.
Why you’ll love this recipe?
What I love most about Philly Cheesesteak Sliders is how they bring the whole comfort-food vibe into a compact form. They’re incredibly forgiving, which makes them perfect for cooks of all levels. Here’s why they’re a go-to in my kitchen:
- Flavor: The beef is deeply savory, the onions are sweet and caramelized, and the cheese gets silky and indulgent. It’s
- Simplicity: You can prep most components in advance, then assemble and bake. It’s a hands-off finish that still feels special.
- Cost-efficiency: Mini buns stretch the beef and cheese wonderfully, so you get more servings per pound of meat. Great for feeding a crowd without breaking the bank.
- Versatility: Swap in peppers for the classic, use different cheeses, or add mushrooms for an extra layer of savoriness. Leftovers? Perfect for lunch boxes or as a quick dinner the next night.
What I appreciate most is that this recipe is comforting without feeling heavy. It’s a little nostalgic, a little fun, and always a conversation starter around the table. If you like one-pan dinners, easy weeknights, or “make-ahead bites” for a party, Philly Cheesesteak Sliders fit the bill beautifully. My family’s not shy about saying, “these are the best sliders you’ve ever made,” and that keeps me coming back to this method again and again.
How to Make Philly Cheesesteak Sliders
Quick Overview
In short: whip up soft, golden slider buns from scratch, sauté thinly sliced beef with onions and peppers until the meat is tender and the vegetables are deeply flavored, layer everything with melty cheese, then bake until the cheese flows like a small river of comfort. The result is a tray of little sandwiches that pull apart with sticky, cheesy goodness, perfect for dipping or savoring bite by bite. The beauty is in the balance—crispy edges on the buns, juicy beef inside, and cheese that binds everything together without turning the filling into a grease trap. It’s really a straightforward, hands-on method that pays off with big flavor in minimal time.
Ingredients
For the Main Batter:
- 2 1/2 cups all-purpose flour
- 2 teaspoons instant yeast
- 1 cup warm milk (about 110°F / 43°C)
- 2 tablespoons sugar
- 2 tablespoons unsalted butter, melted
- 1 large egg
- 1/2 teaspoon salt
For the Filling:
- 12 ounces flank steak or ribeye, very thinly sliced
- 1 large onion, thinly sliced
- 1 green bell pepper, thinly sliced
- 2 cups provolone cheese slices or shredded mozzarella (your pick)
- 1 tablespoon olive oil
- 1 tablespoon Worcestershire sauce
- Salt and black pepper to taste
For the Glaze:
- 1/4 cup beef stock or water
- 1 tablespoon Worcestershire sauce
- 1/2 teaspoon sugar
- Pinch garlic powder
- Optional: a dash of hot sauce for a kick
Step-by-Step Instructions
Step 1: Preheat & Prep Pan
Heat your oven to 375°F (190°C). Line a large Sheet Pan with parchment or a silicone mat. This keeps the buns from sticking and makes cleanup a breeze—trust me, you’ll thank yourself later. If you’ve got a cast-iron skillet you adore, that’s a cozy alternative for finishing touches, too.
Step 2: Mix Dry Ingredients
In a big bowl, whisk together the flour, sugar, salt, and yeast. The yeast loves a little warmth, so nothing boiling, just a comfy lukewarm. I always pause to inhale a faint, yeasty aroma—it’s the kitchen’s little welcome party.
Step 3: Mix Wet Ingredients
In another bowl, whisk the warm milk, melted butter, and the egg until thoroughly combined. It should look smooth and a touch shiny—that gloss is what helps the buns stay tender as they bake.
Step 4: Combine
Pour the wet mix into the dry ingredients and stir with a wooden spoon until a ragged dough forms. Then switch to your hands and knead for about 6–8 minutes on a lightly floured surface. The dough should come together into a soft, springy ball. If it’s too sticky, dust with a touch more flour; if it’s dry and crumbly, add a teaspoon of milk at a time.
Step 5: Prepare Filling
While the dough rests, heat olive oil in a skillet over medium-high heat. Toss in the onions and peppers, season with a pinch of salt, and sauté until they’re deeply caramelized and sweet—about 8–10 minutes. Transfer to a plate. Add the sliced beef to the same skillet and cook quickly just until it’s browned but still juicy, about 2–3 minutes. Deglaze with Worcestershire sauce and a pinch of pepper. You want the meat to stay juicy because it’ll continue to cook in the oven.
Step 6: Layer & Swirl
Roll the dough into a large rectangle about 1/2 inch thick. Cut into 12–16 equal squares for your sliders. Place a spoonful of the beef mixture on each square, top with a slice or two of cheese, and gently fold the dough over to enclose the filling. Place the stuffed dough pockets seam-side down on the prepared sheet pan. If you want a little marbled cheese look, you can brush a touch of glaze over the tops and swirl in a second cheese layer before baking.
Step 7: Bake
Bake for 14–18 minutes, until the buns are golden and the cheese is bubbly. If you like a darker crust, give them a couple more minutes, but watch carefully to avoid over-browning. The tops should be lightly glossy and the insides perfectly tender—not dry, not soggy.
Step 8: Cool & Glaze
While they rest for about 5 minutes, whisk together your glaze ingredients. Brush a thin layer over the tops for a glossy finish and a little extra flavor. The glaze adds a subtle, savory-sweet zing that ties the whole sandwich together without overpowering the beefy goodness.
Step 9: Slice & Serve
Slice into 2-bite portions and arrange on a platter. They’re best warm, with the cheese still gooey and the bread just tender enough to hold its shape. If you’re serving a crowd, keep a warm tray in the oven on a low setting to maintain that irresistible pull of melted cheese as the last guest arrives.
What to Serve It With
These Philly Cheesesteak Sliders shine on their own, but a few thoughtful accompaniments can elevate them for breakfast, brunch, or a casual dinner party.
For Breakfast: A light herb scrambled egg slider alongside, plus a hot cup of coffee or a velvety latte. The savory bite pairs surprisingly well with a milky, aromatic morning brew.
For Brunch: A bright fruit salad and a tangy pickle riff—maybe cucumber-dill or cornichon—to cut through the richness. A simple mustard aioli dip on the side is a nice touch.
As Dessert: Okay, this is the oddball—how about a savory-cheesy meat dish as dessert-flavored with a maple onion glaze? Not quite traditional, but it makes a fun late-evening platter if you’re into bold contrasts. Or keep it classic: serve with a light raspberry yogurt sauce and something crispy on the side for texture contrast.
For Cozy Snacks: A warm nacho-style cheese dip for dipping the sliders, plus an extra stack of napkins because the first bite always invites a second one fast. My family loves this with a cold beer or a sparkling cider on the side; it feels like a little celebration every time.
Top Tips for Perfecting Your Philly Cheesesteak Sliders
These tips come from years of tweaking, tasting, and learning what makes these sliders sing.
Beef Prep: Slice the meat as thin as you can; it cooks in moments and stays juicy. If you’re using leftover roast beef, shred it a bit for easier layering. Don’t overcook the meat—overcooked beef dries out and becomes chewy, and we’re aiming for tender, almost-fall-apart slices.
Onions & Peppers: Caramelize slowly; patience is your friend here. A higher sugar content from the onions balances the savory meat and the cheese. If you’re short on time, you can sauté the onions and peppers together until soft, then set aside and mix in right before assembling.
Swirl & Pattern: If you like a marbled look, lightly swirl a bit of extra cheese into the dough before sealing. It looks gorgeous and adds a little extra cheesiness in every bite.
Ingredient Swaps: Swap in pepper jack for a little heat, or use Swiss for a mellower profile. If you’re dairy-free, try a sharp vegan cheese that melts well and add a dollop of dairy-free cream cheese to the glaze for richness.
Baking Tips: Bake on the middle rack so the bottoms don’t scorch before the centers are done. If your oven tends to run hot, drop the temperature 10–15°F and extend the bake time slightly. You want a light golden crust with a soft interior.
Glaze Variations: Try a balsamic onion glaze for extra depth, or a garlic-and-herb blend for a savory perfume that coats the bun. Keep it thin so you don’t soggy the bottoms—nobody likes a soggy bite.
Storing and Reheating Tips
These sliders store well, but a little care helps them stay tasty the next day or later in the week.
Room Temperature: If you’re serving right away, these are best the moment they come out of the oven. They’ll stay warm for a little while on the tray, but as they cool they firm up a touch, which is nice for slicing.
Refrigerator Storage: Store leftovers in an airtight container for up to 2 days. Reheat gently in a 350°F (175°C) oven for 8–10 minutes, or in a microwave with a damp paper towel to keep them from drying out.
Freezer Instructions: Freeze assembled sliders (before baking) on a sheet tray, then transfer to a freezer bag. Bake straight from the freezer, adding 5–7 minutes to the bake time. For best results, thaw in the fridge overnight before finishing in the oven.
Glaze Timing Advice: If you’re freezing, skip the glaze for the first bake and add a fresh glaze after reheating to preserve the sheen and texture. This keeps the glaze from becoming sticky and dull.
Frequently Asked Questions
Final Thoughts
Philly Cheesesteak Sliders aren’t just dinner; they’re a little celebration of flavor and speed. This recipe gives you a cozy, restaurant-like bite with a homey, hands-on process that makes you feel like you’re in your own kitchen’s best memories. The meat stays juicy, the onions glow sweet, and the cheese binds everything together into a perfect, shareable pack of happiness. If you’ve got a potluck, game night, or a family that loves a little crowd-pleasing indulgence, these sliders will become your go-to. I keep a tray in the oven during gatherings and watch the plates empty faster than I expected—proof that good food, shared with people you love, tastes even better when it comes in tiny, irresistible portions. I’d love to hear your twists—tell me what cheese you used or what glaze surprised you in the best way. Happy baking, and may your kitchen always smell like a warm welcome!
Philly Cheesesteak Sliders
Ingredients
Main Ingredients
- 1.5 pound thinly sliced ribeye steak
- 2 medium onions, thinly sliced
- 2 cloves garlic, minced
- 0.5 teaspoon salt
- 0.25 teaspoon black pepper
- 4 tablespoons butter, divided
- 1 package slider buns (12 count)
- 8 ounces provolone cheese slices
- 0.5 cup mayonnaise
Instructions
Preparation Steps
- In a large skillet, melt 2 tablespoons of butter over medium-high heat. Add the sliced steak, salt, and pepper. Cook, stirring occasionally, until browned and cooked through. Remove steak from skillet and set aside.
- Add the remaining 2 tablespoons of butter to the skillet. Add the sliced onions and bell pepper. Cook, stirring occasionally, until softened and lightly browned, about 5-7 minutes. Add the minced garlic and cook for 1 minute more until fragrant.
- Return the cooked steak to the skillet with the vegetables. Stir to combine and heat through.
- While the steak and vegetables are heating, slice the slider buns in half horizontally. Spread mayonnaise on the cut sides of the bottom buns.
- Arrange the provolone cheese slices over the steak and vegetable mixture in the skillet. Cover the skillet for about 1-2 minutes, or until the cheese is melted.
- Spoon the cheesesteak mixture evenly onto the bottom halves of the slider buns.
- Place the top halves of the slider buns over the filling. Serve immediately.


