


When the oven sighs open on a rainy Sunday, my kitchen fills with the scent of melted chocolate and vanilla, and I remember why this Chocolate Fudge pie is such a comfort staple. It’s not fussy or fussy-looking; it’s the kind of dessert that makes people grin before they even take a bite. It tastes like the best brownie and the creamiest pie had a deliciously decadent baby. I still swap stories with my sister while we wait for the crust to set, trading tips and little mistakes I’ve learned along the way. This pie is incredibly forgiving, and—trust me on this—it’s a lifesaver on busy nights when the craving for something chocolatey hits hard. My kids actually ask for this all the time, and I sometimes make it just for them as a surprise after school. If you’re craving something rich, glossy, and deeply chocolaty, you’ve found your new weeknight hero.
What is chocolate fudge pie?
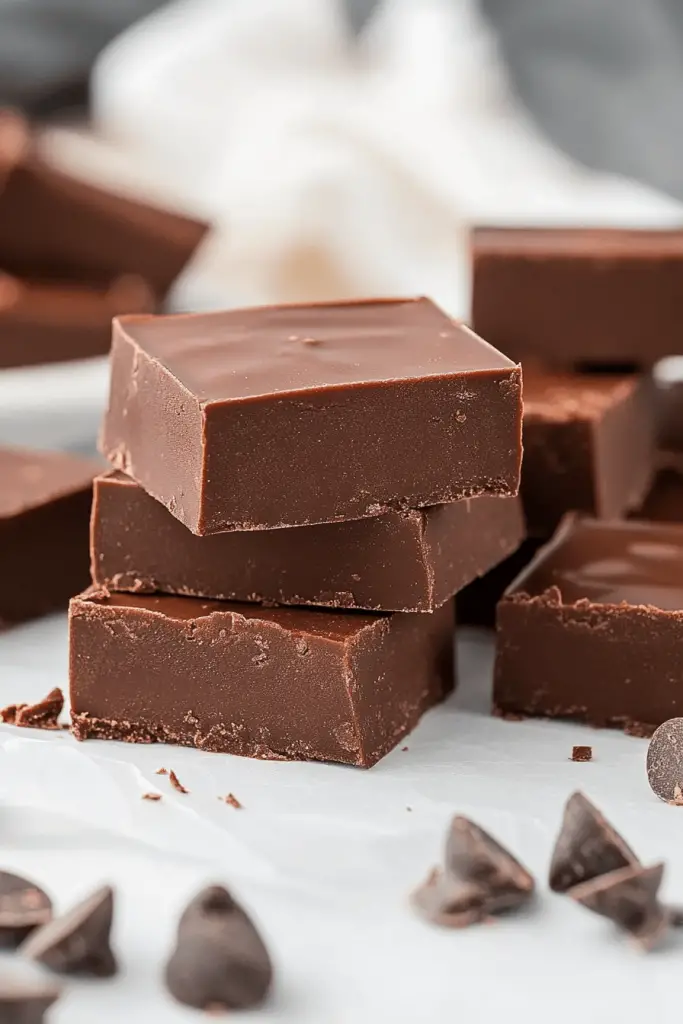
Think of Chocolate Fudge pie as the grown-up sibling of your best chocolate treats. It’s essentially a buttery crust, a thick, glossy fudge filling, and a chocolate glaze that makes the whole thing sparkle. The filling is fudgy and rich, yet it firms up just enough to slice neatly, like a cross between a dense brownie and a traditional custard-filled pie. The name says it all: it’s fudge-y, pie-form, and absolutely irresistible. The origin is humble—families gathered around a warm oven, sharing a slice with a mug of coffee or a splash of cream. This pie is meant to be shared, enjoyed slowly, and then noshed a second time the next day because even the best desserts taste better when you’ve had a moment to think about them, right?
Why you’ll love this recipe?
What I love about this chocolate fudge pie is how it hits all the right notes with minimal effort. indulgentWhat makes it special for me?
- Flavor: The crust brings a toasty, crumbly counterpoint to a deeply chocolatey, silky filling. The glaze adds a shiny finish and an extra hit of chocolate that makes every bite feel luxurious.
- Simplicity: This is one of those recipes you can assemble in under an hour and still feel like you’ve cooked something special. The technique is straightforward, and the steps flow nicely from crust to filling to glaze.
- Cost-efficiency: With pantry staples—crackers or cookies for crust, a small bar of chocolate, cream—the whole thing comes together without breaking the bank. It’s a classic crowd-pleaser that doesn’t demand fancy ingredients.
- Versatility: You can switch up flavors with espresso powder, a pinch of cinnamon, or even a splash of chili for a smoky warmth. Gluten-free? A crust swap to gluten-free cookies or crackers does the trick. It’s a dessert that invites experimentation without scaring you.
- Make-ahead magic: It holds beautifully in the fridge and even tastes better after a night’s rest, when the flavors have had a chance to mellow and mingle.
What I appreciate most is how the recipe supports your rhythm. If you’re tight on time, you can bake a shorter crust, mix the filling while the crust cools, and still end up with something that tells a story on the plate. If you’ve got a little more energy, you can temper the chocolate, whisk the egg into the glossy filling for a lighter texture, and really lean into the fudge factor. Either way, you’ll end up with a pie that feels like a warm hug in dessert form.
How to Make Chocolate Fudge Pie
Quick Overview
Here’s the short version: you start with a buttery crust, blind-bake it for a few minutes to set the base, then whip up a rich chocolate fudge filling that’s poured into the crust and baked until just set. A glossy chocolate glaze finishes the top and makes the whole pie look as good as it tastes. The beauty is in the balance—crisp crust, ultra-rich filling, and a finish that shines. This method keeps things simple, but the results feel deeply special every single time.
Ingredients
For the Main Crust:
- 1 1/2 cups (150 g) graham cracker crumbs or finely crushed Chocolate Cookies
- 1/4 cup (56 g) unsalted butter, melted
- 2 tablespoons granulated sugar (optional, depending on crust sweetness)
- A pinch of salt
For the Filling:
- 8 oz (225 g) semisweet chocolate, chopped
- 1/2 cup (120 ml) heavy cream
- 1/3 cup (65 g) granulated sugar
- 1/4 cup (57 g) unsalted butter
- 2 large eggs
- 1 teaspoon vanilla extract
- A pinch of salt
For the Glaze:
- 1/2 cup (120 ml) heavy cream
- 4 oz (115 g) Dark Chocolate, chopped
- 1 tablespoon light corn syrup or honey (optional, for shine)
- 1 teaspoon unsalted butter (optional, for extra gloss)
Step-by-Step Instructions
Step 1: Preheat & Prep Pan
Heat your oven to 350°F (175°C). If you’re using a store-bought pie crust, unroll and press it into a 9-inch pie pan, crimping the edges as you like. If you’re making your own crust, mix the crumbs, sugar, salt, and melted butter until it clumps together, then press evenly across the bottom and up the sides. Wrap the crust in parchment if you’re planning to chill it a bit before blind baking. Blind bake for 10 minutes, just until it starts to set and look a touch dry at the edges. Remove from the oven and let cool while you work on the filling.
Step 2: Mix Dry Ingredients
There aren’t a lot of dry ingredients in this pie, but a quick whisk of sugar and salt in the eggs helps keep the filling smooth when you fold in the hot chocolate mixture. This step also gives you a sense of how the batter will come together—slightly thick, glossy, and ready to pour without lumps.
Step 3: Mix Wet Ingredients
Place the chopped chocolate in a heatproof bowl. In a small saucepan, heat the cream until it just begins to simmer, then pour it over the chocolate. Let it sit for 1–2 minutes, then stir until smooth and shiny. Stir in the butter until it’s fully melted and glossy, then whisk in the vanilla and a pinch of salt. The ganache-like mixture will be velvety and fragrant, like a dream that you’re about to turn into pie form.
Step 4: Combine
In a separate bowl, whisk the eggs with the sugar until they’re pale and slightly thick. Temper the eggs by dripping a little of the hot chocolate mixture into the egg bowl, whisking constantly. Then pour the warmed egg mixture back into the chocolate and stir until fully combined. If you notice any tiny air bubbles, tap the bowl gently on the counter to pop them. This ensures a smooth filling that bakes evenly.
Step 5: Prepare Filling
Pour the chocolate mixture into the cooled crust. If you want to add a quick swirl, you can drop a spoonful of the ganache on top and swirl it with a toothpick for a marbled look. Bake in the preheated oven for 20–25 minutes. The center will still wobble slightly when you jiggle the pan—that’s how you know it’s set but not overbaked. If your oven runs hot, start checking at 18 minutes and go from there. You want a glossy, dense center that holds its shape when cooled.
Step 6: Layer & Swirl
While the pie bakes, prepare the glaze. Reheat the cream to just a simmer, remove from heat, and whisk in the chopped chocolate until smooth. Stir in the corn syrup and butter if you’re using them. The glaze should be pourable but not so thin that it runs off the pie. It should glossy-set as it cools on top of the warm pie, giving you that beautiful mirror-like finish.
Step 7: Bake
Once the filling is set around the edges, remove the pie from the oven. Let it rest on a rack for 15–20 minutes, then spoon or pour the glaze over the top, letting it flow to the edges. Return the pie to the oven for a quick, 2- to 3-minute glaze set if you want a thicker finish, or simply let it sit at room temperature and then chill for a few hours in the fridge to let the flavors deepen.
Step 8: Cool & Glaze
After glazing, cool the pie completely at room temperature, then refrigerate for at least 2 hours or overnight. The chilling helps the filling firm up so you can slice cleanly. The glaze on top will gleam in the light and catch a little sparkle from any caramelized edges. If you want an extra shine, give the pie a quick 5-minute chill in the fridge and a second, lighter glaze drizzle right before serving.
Step 9: Slice & Serve
When you’re ready to slice, run a sharp knife around the edge to loosen and then cut into clean wedges. Wipe the knife between slices for neat lines. Serve with a dollop of whipped cream, a sprinkle of flaky salt for a surprising finish, or a small scoop of vanilla ice cream if you’re feeling especially indulgent. I like a simple dusting of cocoa powder on the plate for a rustic touch. This chocolate fudge pie is rich enough to feel special on its own, but simple enough to make whenever you need a little comfort.
What to Serve It With
This pie shines in the right company. Here are a few ideas to elevate the moment, depending on the occasion:
For Breakfast: A bold cup of coffee, perhaps a splash of cream, and a slice served with a side of berries. The sweetness is tempered by the tang of coffee, and the richness feels decadent but still breakfast-appropriate when accompanied by fruit.
For Brunch: Present slices on a wooden board with crisp cookies, fresh whipped cream, and a few mint leaves for color. A light espresso or a cold brew on the side keeps things balanced.
As Dessert: Plate with a quenelle of vanilla bean whipped cream or a scoop of salted caramel ice cream. A pinch of flaky sea salt on top of the glaze makes the flavors pop and keeps the sweetness in check.
For Cozy Snacks: Warm slices with a mug of milk or hot chocolate. The pie pairs beautifully with a simple bowl of strawberries for a bright counterpoint, or just enjoy a slice solo with a good podcast.
Family tradition plays a big role here. I always serve this with a small bowl of fresh raspberries on the side—the tart bite is a perfect contrast to the deep chocolate. And when my sister-in-law visits, she’ll sneak an extra piece while we’re cleaning the plates. It’s funny how one dessert can become a tiny ritual in the middle of a busy week.
Top Tips for Perfecting Your Chocolate Fudge Pie
Here are some practical tweaks I’ve collected after years of baking this pie. They feel small, but they make a big difference when you’re chasing that perfect slice:
Crust Prep: If you’re using crushed cookies, toast the crumbs in a dry skillet for a few minutes to deepen the flavor before mixing with butter. A quick flash toasty note can elevate the entire pie. If you’re short on time, you can skip blind baking and rely on the crust to bake with the filling, but keep an eye on the edges; you may need to shield them with foil toward the end to prevent over-browning.
Mixing Advice: Don’t overbeat the eggs once you add them to the chocolate mixture. A few brisk folds are enough to incorporate without making the texture airy, which can lead to cracks or a looser set. If you see any lumps in the ganache, keep whisking—hot cream will smooth them out.
Swirl Customization: For a visual treat, reserve a small amount of the plain filling before you add the eggs, and swirl it through the top before baking. You’ll get a marbled effect that’s as pretty as it is delicious.
Ingredient Swaps: If you’re aiming for gluten-free, swap in gluten-free graham crackers or almond flour crust. You’ll still get that satisfying crunch with a rich chocolate center. For dairy-free friends, use coconut cream and dairy-free chocolate; the result is still lush and glossy, though you’ll notice a lighter mouthfeel.
Baking Tips: If you’re using a convection oven, lower the temperature by 25°F (about 15°C) and keep an eye on the crust edges so they don’t brown too quickly. If you’re unsure about doneness, a gentle shake of the pan should yield a slight jiggle in the center, which tells you it’s perfectly set after it cools.
Glaze Variations: Swap in peppermint extract for a festive twist, or add espresso powder to the glaze for a mocha-chocolate finish. For a dramatic look, brush the glaze across a warm pie and let it pool at the edges for a feathered effect. A sprinkle of flaky sea salt right before the glaze sets adds a surprising depth to the chocolate flavor.
Lessons learned? Don’t rush the glaze—let it reach a silky, pourable state. And yes, this pie will taste amazing even if you skip a garnish; the real magic lies in the filling and crust themselves. I’ve made this with almond milk in a pinch, and the result remains creamy and satisfying—just a touch lighter in mouthfeel, but still deeply chocolatey and lush.
Storing and Reheating Tips
The beauty of this pie is that it keeps well and tastes even better after a quiet rest in the fridge. Here’s how I handle it at my house:
Room Temperature: If you’re serving within a few hours of baking, you can keep the pie at room temperature for a couple of hours, loosely covered with foil. It won’t dry out, and the glossy glaze will still look inviting.
Refrigerator Storage: Store leftovers in a tightly covered container for up to 3–4 days. I’d recommend letting the pie sit at room temperature for 15–20 minutes before slicing again so the filling softens slightly for easy cutting.
Freezer Instructions: This pie freezes well for up to 2–3 months. Wrap the whole pie tightly in plastic wrap and then foil, or freeze individual slices for quick dessert portions. Thaw overnight in the fridge and bring to room temperature before serving for the best texture. The glaze might soften a bit; you can rewarm a slice gently in the microwave for a few seconds if needed.
Glaze Timing Advice: If you’re serving soon after baking, glaze while the pie is still slightly warm so the glaze sinks in for a perfect finish. If you’re chilling for a later time, glaze right before serving—the glossy top will look pristine and fresh. Either way, you’ll end up with a dessert that looks as good as it tastes.
In short, this chocolate fudge pie is forgiving, forgiving, forgiving. It’s a dessert that travels well through a busy week, and it still gets requested at family gatherings because it feels like a little celebration, even on a Tuesday night.
Final Thoughts
If you’re looking for a dessert that feels indulgent but isn’t intimidating, this chocolate fudge pie is the one. It’s every bit as comforting as you’d hope, with a crust that crunches softly, a filling that melts on your tongue, and a glaze that gleams like a midnight sky. I’ve made it countless times for friends who pop by with weekend errands or for casual dinners where someone brings a bottle of milk and a big smile. It never fails to charm the room, spark a quick conversation about favorite memories, and coax a chorus of “yum!” from even the most reserved guests. The best part is how it fits so many moods—quiet nights in, celebratory moments, or a spontaneous bake-with-me session that ends with sticky fingers and happy hearts. I’m confident you’ll fall for it just as I did, time and again. Happy baking, friends—and may your kitchen smell like cocoa and happiness tonight.
Frequently Asked Questions

chocolate fudge pie
Ingredients
Main Ingredients
- 1.5 cups semi-sweet chocolate chips divided
- 0.333 cup unsalted butter
- 0.75 cup sugar
- 2 tsp vanilla extract
- 2 large eggs
- 0.25 tsp salt
- 0.5 cup all-purpose flour
- 0.5 cup chopped walnuts optional
- 1 frozen 9 inch deep dish pie shell thawed
Instructions
Preparation Steps
- Preheat oven to 350°F (175°C).
- Melt 1 cup chocolate chips with butter in a medium saucepan set over medium-low heat. Remove from heat; cool for 5 minutes.
- Whisk in sugar and vanilla. Whisk in eggs, one at a time, until fully incorporated; add salt. Stir in flour until no dry streaks remain. Stir in remaining chocolate chips and walnuts (if using).
- Scrape batter into pie shell and smooth the top. Bake on the lowest rack for 35 minutes or until a toothpick inserted into the center comes out slightly moist.
- Let cool for 10 minutes before serving. Serve warm with whipped cream or ice cream.


