


I remember the very first time I tried Red Velvet Cheesecake—my Aunt Mary brought it to a family gathering, and honestly, my taste buds were blown away. That rich, luscious cream cheese filling swirling into vibrant, tender red velvet cake? It felt like the best parts of two desserts had come together in one magical bite. Since then, this recipe has become a staple for special occasions and frankly, those “I need a pick-me-up” days. It’s not your regular cheesecake, nor just a red velvet cake—it’s the love child of both, and let me tell you, it’s worth every moment in the kitchen. Whenever I slice into this, the smell alone has everyone wandering into the kitchen, like moths to a warm, sweet flame. So, if you’ve been on the hunt for a red velvet cheesecake that’s moist, creamy, and just the right amount of indulgent, you’re in the right place.
What is Red Velvet Cheesecake?
Think of Red Velvet Cheesecake as a hybrid dessert where the velvety softness of red velvet cake meets the tangy creaminess of a classic cheesecake. It’s essentially layers or swirls of red velvet cake batter and cheesecake filling baked to perfection. The gorgeous deep red hue comes from the cocoa and food coloring, adding that signature look and slight chocolate undertone. The name “red velvet” originally referred to its unique smooth texture and rich color, which perfectly complements the luscious cheesecake component. It’s not something you whip up every day, but honestly, it’s approachable enough for home cooks who want to impress without stress. Picture slicing through a dessert that’s both visually striking and lovingly comforting—no fancy equipment, just straightforward ingredients and lots of heart.
Why you’ll love this recipe?
What I love most about this Red Velvet Cheesecake is how it nails that dreamy balance of flavors and textures—it’s like the best of both worlds. First off, the taste: the slight cocoa hint from the red velvet pairs beautifully with the tangy richness of the cream cheese filling. It’s not sickly sweet, which is a blessing because some desserts just overwhelm your palate. Plus, the cake layer adds this soft crumb that makes every bite totally melt in your mouth.
On top of flavor, the recipe is surprisingly simple. You don’t have to be a pro baker or own fancy gadgets to pull it off. The ingredients are everyday staples—Cream Cheese, eggs, sugar, cocoa, buttermilk—you know, pantry-friendly stuff. And I swear, it comes together smoother than I expected the first time around. This one’s a lifesaver on busy nights when you want to bake something special but don’t have hours to spend.
Budget-wise, it’s super cost-efficient. No crazy exotic ingredients, and because you make the cheesecake and cake batter in one go, it saves both ingredients and time. Plus, the Red Velvet Cheesecake is versatile enough to serve at birthdays, holiday gatherings, or just a cozy weekend treat. You can dress it up with a dusting of powdered sugar, drizzle of cream cheese glaze, or even fresh berries. If you’ve ever loved classic red velvet cake or tried plain cheesecake, this is like the best remix you didn’t even know you needed but now can’t live without.
How do I make Red Velvet Cheesecake?
Quick Overview
This recipe comes together in layers: you prepare both the red velvet cake batter and the cheesecake filling separately, then you combine and bake. The process is straightforward enough that you can chat with a friend or sip your coffee while mixing away. What really makes this method stand out is the swirl technique, which gives the cake that gorgeous marble effect that always impresses guests. And don’t sweat it if your swirls aren’t perfect—that’s part of the homemade charm! You bake it all in one pan, which means less cleanup and more time to enjoy the amazing smell wafting through your home.
Ingredients
For the Red Velvet Batter: What is the Red Velvet Batter?
- 1 ½ cups all-purpose flour – fresh and sifted for the best texture
- 2 tablespoons unsweetened cocoa powder – not the sweetened kind, it gives that subtle chocolatey depth
- 1 cup granulated sugar – regular white sugar works perfectly here
- 1 teaspoon baking powder – to help it rise nice and fluffy
- ½ teaspoon salt – balances the sweetness
- 1 cup buttermilk – the tang adds moisture and helps tenderize the crumb
- 2 large eggs – room temperature for easy mixing
- 2 tablespoons vegetable oil – keeps the cake moist
- 1 teaspoon vanilla extract – because vanilla = happiness
- 1-2 teaspoons red food coloring – for that iconic red velvet hue. I usually go with 2, but use less if you want it subtler
- 1 teaspoon white vinegar – reacts with baking soda to give a tender crumb
- 1 teaspoon baking soda – works with vinegar for that lift
For the Cheesecake Filling:
- 16 oz cream cheese – soft and slightly tangy, the star of the show
- ¾ cup granulated sugar – just enough sweetness to balance creaminess
- 2 large eggs – room temperature for smooth mixing
- 1 teaspoon vanilla extract – enhances flavor
- 2 tablespoons sour cream or Greek yogurt – adds silkiness and slight tang
For the Glaze (Optional):
- ½ cup cream cheese, softened
- ¼ cup powdered sugar – adjust sweetness to taste
- 1-2 tablespoons milk – for the perfect drizzling consistency
- ½ teaspoon vanilla extract – a hint of flavor to finish
Step-by-Step Instructions
Step 1: Preheat & Prep Pan
Preheat your oven to 325°F (160°C). I prefer using a 9-inch springform pan—it makes removing the cake so much easier and keeps those beautiful sides intact. Grease the pan well with butter, then line the bottom with parchment paper to avoid sticking. This little prep saves so many headaches later when it’s time to slice.
Step 2: Mix Dry Ingredients
In a medium bowl, sift together the flour, cocoa powder, baking powder, baking soda, and salt. Sifting not only mixes everything evenly but breaks up any lumps, which means your velvet cake layer will be ultra smooth. I always give this a gentle whisk after sifting to make sure it’s perfectly combined.
Step 3: Mix Wet Ingredients
In a large bowl, beat the eggs, sugar, oil, vanilla extract, buttermilk, vinegar, and red food coloring until fully combined and slightly frothy. The mixture should be smooth and glossy. Room temperature eggs really help here, so if you remember to take them out ahead of time, it makes mixing much easier.
Step 4: Combine
Slowly add the dry ingredients into the wet mixture, folding gently until just combined. Don’t overmix or your batter could become tough. The batter should be thick but smooth, like a creamy frosting. If it looks dense or lumpy, keep folding gently—it’ll come together.
Step 5: Prepare Filling
Beat the cream cheese until light and fluffy, then gradually add sugar, eggs, vanilla, and sour cream, blending until the filling is smooth and creamy. I like to avoid overbeating here, or the mixture can get too airy and crack during baking. It should be velvety and just a bit thick—spreadable but not runny.
Step 6: Layer & Swirl
Pour half of the red velvet batter into the prepared pan and spread evenly. Next, dollop half of the cheesecake filling over the batter in spoonfuls, then pour over the remaining red velvet batter. Finally, spoon the rest of the cheesecake filling in little blobs on top. Take a butter knife or skewer and gently swirl through the layers to create that classic marbled effect—don’t overdo it or you’ll lose the contrast.
Step 7: Bake
Bake for about 50–60 minutes. The edges should be set but the center still slightly jiggly when you gently shake the pan. Oven baking times can vary, so start checking at 50 minutes and adjust accordingly. I like to place a baking sheet underneath to catch any drips.
Step 8: Cool & Glaze
Let the cheesecake cool in the pan on a wire rack for at least an hour—or better yet, overnight in the fridge for that firm, sliceable texture. If you’re feeling fancy, whip up the glaze by blending cream cheese with powdered sugar, vanilla, and milk until smooth, then drizzle over the top once chilled.
Step 9: Slice & Serve
When you’re ready to serve, run a warm, sharp knife around the edges to loosen the cake from the pan. Cut clean slices and watch the gorgeous red and cream swirls reveal themselves. This cake is best served slightly chilled—the flavors really shine and it’s easier to slice neat pieces.
What to Serve It With
For Breakfast: If you’re feeling a little indulgent with your morning coffee, a thin slice of this with a strong black coffee or a lightly frothed latte is pure happiness. The rich cream cheese filling plays beautifully with the bitterness of strong coffee, making your morning feel like a special occasion.
For Brunch: Serve red velvet cheesecake with a sprinkle of fresh berries—strawberries, raspberries, or blueberries add a burst of brightness and freshness. Pair with a mimosa or herbal tea, and suddenly, you’ve got a brunch centerpiece that doubles as dessert. It’s elegant but totally effortless.
As Dessert: For after-dinner treats, add a dollop of whipped cream or a scoop of vanilla bean ice cream. If you want to get fancy, drizzle with a little raspberry coulis or chocolate sauce. Warm spice teas or a glass of dessert wine compliment the tangy cheesecake layers wonderfully.
For Cozy Snacks: When you just want something sweet on a rainy afternoon, slice up a warm piece, and enjoy with a cup of hot cocoa. My kids always ask for seconds in these moments, so consider doubling the recipe!
One of my favorite family traditions is to pull this out around the holidays with a big pot of spiced chai. The air fills with cinnamon and vanilla, and the cheesecake feels like a warm hug. No matter how you serve it, this red velvet cheesecake never fails to bring smiles and second helpings.
Top Tips for Perfecting Your Red Velvet Cheesecake
Red Velvet Batter Prep: I’ve learned that fresh cocoa powder really makes a difference—avoid ones that are old or clumpy. Also, take your buttermilk out of the fridge an hour before mixing; it blends in better and helps that tender crumb.
Mixing Advice: One of my biggest mistakes early on was overmixing the batter, which led to a denser cake. Always fold the dry ingredients in gently and stop as soon as everything is combined. For the cheesecake filling, beat the cream cheese on medium speed until smooth and creamy—under-beating leaves lumps.
Swirl Customization: Don’t stress if your swirls aren’t picture perfect. I usually do a few large sweeps in an “S” shape with a skewer—this creates a natural marbled look. If you want more vivid stripes, add the batter and filling in smaller dollops and swirl less.
Ingredient Swaps: If you’re out of buttermilk, mixing a tablespoon of lemon juice or vinegar into regular milk and letting it sit for 5 minutes works great. I’ve also tested swapping Greek yogurt for sour cream in the cheesecake filling—it made the filling even silkier. For a vegan twist, you can try vegan cream cheese and a flax egg, but expect a slight change in texture.
Baking Tips: Oven temperatures can be tricky, so I always recommend checking doneness with a gentle jiggle—not a toothpick, because the cream cheese can make it look wet inside. Keep the cheesecake on the middle rack, and if you notice the edges browning too quickly, loosely cover the pan with foil.
Glaze Variations: You can skip the glaze, but if you want it, aim for a drizzle consistency—not too thick or it can overwhelm the swirls beneath. Adding a teaspoon of lemon zest to the glaze adds a lovely brightness, or a bit of almond extract for a nutty twist.
Trust me on these tips—they’ve saved many of my previous mishaps and turned them into beautiful red velvet cheesecakes that always vanish within minutes at my house.
Storing and Reheating Tips
Room Temperature: If you’re serving the same day, you can leave the cheesecake uncovered on the counter for up to 2 hours without worries. Just keep it away from direct sunlight or heat sources to prevent melting.
Refrigerator Storage: Store any leftovers in an airtight container or cover tightly with plastic wrap for up to 4-5 days. I always leave the glaze off if I plan to store it for a few days—it keeps better and looks fresher. When ready to serve, add the glaze fresh.
Freezer Instructions: Red velvet cheesecake freezes quite well—wrap it tightly in plastic wrap and then foil to prevent freezer burn. It’ll keep for up to 3 months. Thaw overnight in the fridge before serving. Avoid freezing the glaze; add it after thawing for the best taste and texture.
Glaze Timing Advice: If you’re planning to serve the cheesecake within a few hours, I say go ahead and add the glaze before refrigerating. But if it’s for longer storage, wait till the last minute—it keeps the glaze silky and prevents it from soaking in too much.
When reheating slices, I usually pop them in the fridge for a few hours to bring back firmness; warm cheesecake tends to lose its lovely texture. If you want a slightly warm dessert, let the slice sit at room temp for 20-30 minutes or serve with warm sauce or coffee.
Frequently Asked Questions
Final Thoughts
There’s something oddly comforting about a dessert that feels a little fancy but is totally doable with everyday ingredients. Red velvet cheesecake has become my go-to when I want a crowd-pleaser that’s both visual and delicious. It’s the sweet, tender hug of red velvet cake combined with the smooth, tangy joy of cheesecake—two favorites, soaring together. If you dive into this recipe and love it as much as my family does, I’d suggest trying a swirl cheesecake next or maybe even a pumpkin cheesecake swirl in the fall (that’s another win). Seriously, this dessert has become part of my kitchen storytelling, and I can’t wait to hear how yours turns out. Don’t forget to leave a comment or share your swirls and tweaks—I’m always here, baking alongside you. Happy baking!
red velvet cheesecake
Ingredients
Main Ingredients
- 15.25 ounce red velvet cake mix
- 8 ounce cream cheese softened
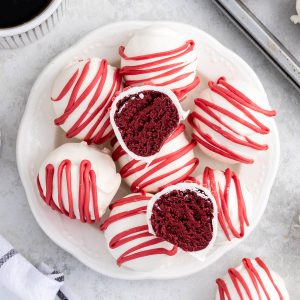
- 12 ounce white almond bark
- 0.75 cup red candy melts optional for striped garnish
Instructions
Preparation Steps
- Heat treat the dry cake mix by microwaving it in a medium bowl for two 30 second intervals, stirring in between. Let it cool completely before mixing with cream cheese.
- Beat the softened cream cheese with a handheld mixer on medium-high speed for 1.5 to 2 minutes until smooth.
- Sprinkle the cooled cake mix over the cream cheese and mix until just combined.
- Cover the cheesecake dough tightly and chill it in the refrigerator for 2 hours.
- Line a baking sheet with parchment paper and set aside.
- Scoop 1 tablespoon of the chilled dough, roll into a ball, and place on the prepared baking sheet. Repeat until all dough is used.
- Melt the white almond bark in 30 second microwave intervals, stirring thoroughly until smooth.
- Roll each cheesecake ball in the melted almond bark, tap off excess, and place back on the baking sheet. Use a toothpick to remove excess coating and secure the bite.
- Melt the red candy melts in 30 second intervals, stirring well until smooth.
- Drizzle the melted red candy melts in stripes over the coated bites. Let the coating harden before serving.


