


Growing up, citrus nights were a ritual in our kitchen. The lemon-y glow of a clean, sunny evening would drift in as my aunt whisked something bright on the counter, and I’d lean in to steal a taste “just to see if it’s ready.” This is where Key Lime Tartlets were born in my family—tiny, quivering tart shells filled with a tart, creamy lime curd that tastes like a bite of summer. They’re incredibly forgiving and surprisingly quick, which is why I reach for them on busy weeknights and when I’m hosting friends who pop by unannounced. The first bite always makes me smile, and the second bite makes me reach for another. If you’ve ever made a pie and found yourself chasing a slice around the plate, you’ll love how these little tartlets disappear in minutes. They’re bright, they’re cheerful, they’re the kind of dessert that earns a chorus of “yums” and questions about the crust the moment the plate hits the table. Key Lime Tartlets in mini form—it’s practically progress you can taste.
What is a Key Lime Tartlet?
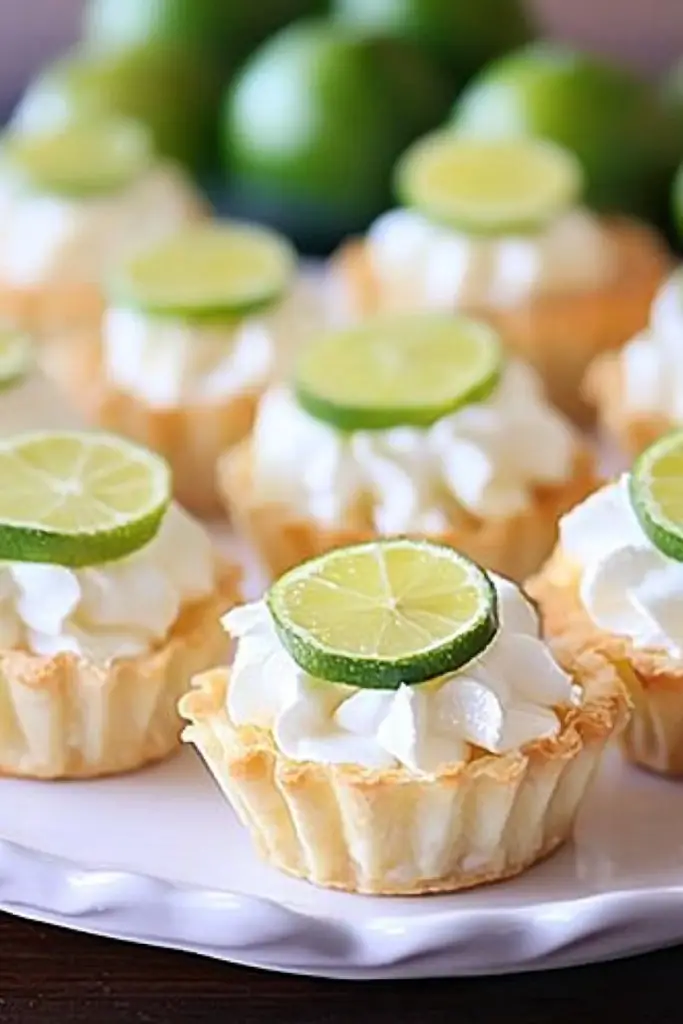
Think of Key Lime Tartlets as a mini pie, with a crust that crumbles just a touch like biscuits and a filling that delivers that bright, puckery lime hit without being overly sour. The name itself is an ode to the tiny, tart teal-green limes that grow along Florida’s coastline and the way they wake up a dessert like nothing else. It’s essentially a two-part show: a buttery crust that stays crisp even when you scoop a spoonful of the creamy lime filling, and a glossy lime filling that sets to a delicate jiggle. I love that it’s compact, elegant, and personality-filled—perfect for sharing after a weeknight dinner or packing for a sunny picnic. Think of it as lemon’s more adventurous cousin—tart, aromatic, and just the right amount of zing to lift your palate. My version leans into a classic shortcrust with a hint of vanilla, then a lime curd-style filling that’s silky, not heavy, and finished with a light glaze that adds a kiss of sweetness without dulling the lime brightness.
Why you’ll love this recipe?
What I love most about Key Lime Tartlets is how they feel like a little celebration in your hand. The crust has that gentle, sandy crunch that makes you want to bite with a calm, pleased sigh. The filling is tangy and creamy in the same bite, with enough lime aroma to transport you to a window seat overlooking a tropical garden. The aroma alone—citrus oil warming in butter, a whisper of vanilla—draws people into the kitchen, even if you’re just grabbing a bite before running out the door. They’re also wonderfully forgiving. If you’re new to working with custard fillings, these tartlets will feel friendly: the filling sets gently, so you’re not chasing a rigid center; you get that silky, nap-inducing mouthfeel without needing fancy equipment. On a budget, they’re kind to your pantry—crust ingredients sit happily with pantry staples, and you can swap in a few pantry-friendly tricks if needed. What I love most about this recipe is how flexible it is: you can switch up the citrus, use a store-bought crust in a pinch, or go all-in with a homemade crust for a more rustic, crackling edge. It’s a lifesaver on busy nights, and yet it tastes like you spent hours fussing. My kids actually ask for seconds, which is the highest compliment I can imagine in this kitchen. If you’re craving something bright after dinner but don’t want to bake a full cake, these tartlets are exactly what you need.
How do I make Key Lime Tartlets?
Quick Overview
You’ll start by forming a crisp, buttery crust, then blind-bake it just enough to set the edges. The filling comes together in one bowl: whisk the yolks, Condensed Milk, lime juice, and zest until smooth and glossy, then pour into the warm crusts. Bake gently until the centers barely jiggle, cool completely, and finish with a glaze that gleams. It’s straightforward, almost meditative in its simplicity, and the result is a bright, dessert-perfect bite every time.
Ingredients
For the Main Crust:
- 1 3/4 cups graham cracker crumbs (about 12 whole crackers), or digestive biscuits, crushed
- 1/4 cup granulated sugar
- 6 tablespoons unsalted butter, melted
- 1 teaspoon vanilla extract (optional, for extra depth)
For the Filling:
- 3 large egg yolks
- 1 cup sweetened condensed milk
- 1/2 cup fresh lime juice (Key lime juice if you have it; regular lime works too)
- 2 teaspoons finely grated lime zest
For the Glaze:
- 1/2 cup powdered sugar
- 1-2 tablespoons fresh lime juice (adjust for desired drizzle consistency)
- Optional: a pinch of zest for extra brightness
Step-by-Step Instructions
Step 1: Preheat & Prep Pan
Heat your oven to 350°F (175°C). Lightly grease a 12-cup mini tart pan or a muffin tin with butter, then line the cups with parchment rounds or settle for a simple grease-and-flour shuffle. I like to brush the insides with a little melted butter and dust with a touch of flour or sugar to ensure easy release. If you’re using a traditional crust, this is the moment you’ll appreciate that extra layer of preparation—the first step that keeps the crust from shrinking or separating from the sides as it bakes.
Step 2: Mix Dry Ingredients
In a bowl, whisk together the Graham Cracker crumbs, sugar, and vanilla. The dry mixture should look sandy and uniform, with no large clumps. The vanilla isn’t essential, but it deepens the crust’s flavor and gives it that whisper of warmth that pairs beautifully with lime. If you’re using a ready-made crust, skip this step and proceed to Step 3 for crust pre-baking.
Step 3: Mix Wet Ingredients
In a separate bowl, whisk the egg yolks just until they loosen slightly. Then whisk in the sweetened condensed milk, lime juice, and zest until you have a smooth, pale-green custard. The aroma is unmistakable—bright, fragrant, and a little tropical. If you want a softer, more creamy filling, you can whisk in a teaspoon of cream cheese for extra body, but I’ll warn you: it tightens up a bit as it cools, so taste and adjust before you bake.
Step 4: Combine
Pour the wet filling into the prepared crusts. If you see any bubbles or splashes on the crust edges, wipe them away with a damp towel so you don’t get over-browned edges. You want an even fill that comes up to about 1/4 inch below the rim of each tartlet. The goal is a gentle dome that will set evenly as it bakes, not a crack-prone volcano. Gently tap the pan on the counter to release any trapped air, and tilt the pan slightly to check that the filling sits evenly.
Step 5: Prepare Filling
As the crust bakes, the lime filling starts to set and becomes glossy. If you’re worried about a curdled look, remember: eggs are forgiving at this level of heat, and a slow, low bake works magic. If you notice a few tiny air pockets, don’t stress—these disappear with chilling and glaze. For a more intense lime flavor, you can reserve a splash of juice to brush over the surface after baking, but I prefer to keep the glaze simple and sweet to balance the tang.
Step 6: Layer & Swirl
Not every tart needs a swirl, but I love the look of a ribbon of lime glaze over the tartlets. If you decide to swirl, let the baked tartlets cool slightly while the glaze rests for a minute or two at room temperature, then drizzle in a quick circling motion across the surface. A toothpick swirled through the glaze creates a fun, marbled effect that hints at the lime’s brightness inside. If you’d rather keep things crisp and clean, skip the swirl and go with a neat glossy top instead.
Step 7: Bake
Slide the crusts into the oven and bake for 9–12 minutes, or until the filling is just set around the edges with a faint jiggle in the center. The exact time depends on your pan and oven, so start checking at 9 minutes. If you see puffing in the center, you’re close—give it a little extra time, then test again. Don’t overbake; you want that silky custard texture that shies away from dryness. If you’re using a full-size crust, the bake time will be a touch longer, but the same rules apply: set around the edges with a soft center.
Step 8: Cool & Glaze
Let the tartlets cool on a rack for about 20 minutes, then transfer to the fridge to chill for at least 2 hours. Chilling is where the magic happens—flavors meld, and the texture becomes sliceable without crumbling. For the glaze, whisk the powdered sugar with lime juice until it’s pourable but not runny. Drizzle or brush lightly over the cooled surfaces. The glaze adds a glossy finish and a touch more sweetness to balance the lime’s brightness. If you’re not glazing, a dusting of powdered sugar works beautifully too.
Step 9: Slice & Serve
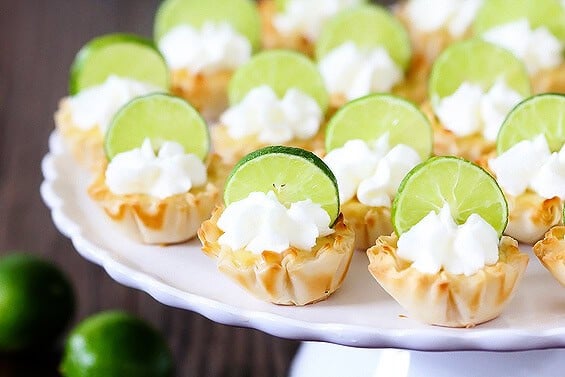
When you’re ready to serve, loosen the tartlets with a thin spatula and plate them with a little flourish. A tiny wedge of lime or a small mint leaf makes a fresh garnish that elevates the appearance and aroma. Serve chilled or at room temperature—both are delicious, but I find the texture to be best when the filling is well set and the crust remains crisp. These are perfect alongside a dollop of lightly whipped cream or a scoop of vanilla ice cream, if you’re feeling extra indulgent. My family loves them with a cup of coffee or a lightly sweet sparkling tea—the bite of citrus and the coolness of the cream are pretty irresistible together.
What to Serve It With
Key Lime Tartlets pair with more than you’d expect. They’re bright enough for breakfast or brunch, and elegant enough to finish a meal with flair. Here are some ideas to keep your plating fresh and your guests delighted:
For Breakfast: A small tartlet alongside a strong coffee or a lightly sweet iced chamomile tea. I like to set them on a simple white plate with a sprig of mint for color. It makes a weekday morning feel a little like a vacation.
For Brunch: Create a mini dessert board: tartlets, fresh berries, and a light yogurt dip with lemon zest. A sparkling limeade or a citrusy cocktail turns the table into a sunny little vignette.
As Dessert: Serve alongside poached pears or a light custard pastry to contrast textures. A dusting of extra zest over the top adds a bright aroma that carries through the room as people finish their meals.
For Cozy Snacks: Pair with a mug of black tea or Earl Grey. The citrusy tartness wakes up the palate while the crust’s warmth comforts the sighs after a long day.
We’ve made these for potlucks, birthdays, and just Sunday treat-time. A friend once told me they’d never say no to a tartlet when they’re craving something bright. I’m not sure that’s scientifically accurate, but it sure feels true in our kitchen. These little pies have a way of taking the edge off a hectic week, and they invite a second helping with a smile. My family’s tradition is to serve them with a little extra lime zest on top—a tiny perfume that makes the plate look extra festive and smell like summer.
Top Tips for Perfecting Your Key Lime Tartlets
Here are a few tricks I’ve learned after making these dozens of times. They’re simple, but they make a noticeable difference in texture and flavor.
Crust Handling: Toast the graham crumbs lightly in a dry pan for 2–3 minutes to deepen their flavor before mixing with butter. If you’re using a gluten-free crust, you may need an extra tablespoon of melted butter to help it hold together. Don’t press too hard when lining the pans; you want a light, tender crust that still has a little bite.
Mixing the Filling: Don’t overmix the filling; you want a smooth, glossy texture but no froth on top. If you see bubbles, give the mixture a gentle tap to release them or strain it through a fine sieve before pouring. A little zest goes a long way—too much zest can cause bitterness, so taste and adjust.
Swirl & Aesthetics: If you’re adding a glaze, a quick, even drizzle is all you need. A swirl pattern is pretty, but keep it tight so the lime color shows through. For a cleaner look, you can brush a thin layer of glaze over the crust edges alone before adding the filling for a defined, neat finish.
Ingredient Swaps: You can swap in almond flour for a nuttier crust or use a tablespoon of honey instead of sugar in the crust if you prefer a slightly different sweetness profile. For a dairy-free version, replace condensed milk with coconut cream and a splash of vanilla, but note that the texture will be a touch lighter and the flavor a touch coconut-forward.
Baking Tips: If your oven runs hot or uneven, use a baking stone or a heavy sheet pan to create a more even heat distribution. You can also place the tartlets on the middle rack with a foil tent if the tops brown too fast. Remember, jiggle is your friend—the goal is a center that wobbles just a touch, not a fully set, solid block.
Glaze Variations: For a fruitier glaze, whisk in a little lime marmalade or a drop of vanilla. If you want a glossier finish, add a pinch of cornstarch to the glaze and heat gently until clear and thickened, then cool before using. A cream cheese glaze is a delicious alternative, but it changes the texture and sweetness balance, so adjust sugar accordingly.
Storing and Reheating Tips
Key Lime Tartlets hold up nicely in the fridge, and they’re even better when the flavors have a chance to mingle. Here’s how I store and reheat them without losing that tender crust and bright filling.
Room Temperature: They’ll stay fresh for up to 2 hours on the counter, but I don’t recommend leaving them longer than that if your room is warm. If you’re serving guests later in the day, refrigerate until you’re ready to plate.
Refrigerator Storage: Store in an airtight container, preferably in a single layer to avoid sticking. They’ll stay fresh for 3–4 days. If you’ve glazed them, keep the glaze from getting watery by storing in a cool, dry place and reapplying a thin glaze just before serving if needed.
Freezer Instructions: You can freeze baked tartlets for up to 2 months. Wrap each tartlet individually in plastic wrap and place in an airtight container. Thaw in the fridge overnight, then bring to room temperature and re-glaze if desired. The crust holds up well, and the filling remains creamy when thawed properly.
Glaze Timing Advice: If you’re freezing, skip the glaze until you’re ready to serve. If you’re refrigerating, you can glaze the tartlets after chilling for a fresh, bright top. Glazes can soften slightly in the fridge—a quick 5–10 second re-warm in a low oven can help refresh the gloss just before serving.
Frequently Asked Questions
Final Thoughts
This recipe is one of those that feel like a warm hug wrapped in citrus. It’s bright enough to wake up a sleepy kitchen, and familiar enough to settle in with a family after a long day. The crust provides texture and a little sweetness, the filling delivers the lime punch, and the glaze ties everything together with a glossy finish that catches the light and tempts the eye. If you’re new to making tartlets, start with a few and soon you’ll be filling every pan you own with little sunshine in a crust. I’d love to hear how yours turn out—did you keep the glaze simple or go for extra zest on top? Did you swap lime for a different citrus and find a new favorite combination? Drop a comment, rate the recipe, or share a photo of your batch. Happy baking!
Key Lime Tartlets
Ingredients
For the Crust
- 2.5 cups graham cracker crumbs
- 0.5 cup granulated sugar
- 0.375 cup unsalted butter, melted
For the Filling
- 14 oz sweetened condensed milk
- 0.5 cup key lime juice freshly squeezed
- 1 teaspoon lime zest
For the Topping (Optional)
- 1 cup heavy cream
- 2 tablespoon powdered sugar
- 0.5 teaspoon vanilla extract
Instructions
Preparation Steps
- Preheat oven to 350°F (175°C). Lightly grease a 12-cup muffin tin.
- In a medium bowl, combine graham cracker crumbs and granulated sugar. Pour in melted butter and stir until combined.
- Press about 2 tablespoons of the crumb mixture into the bottom and up the sides of each muffin cup to form tartlet shells.
- Bake for 8-10 minutes, or until lightly golden. Let cool completely.
- While the crusts are cooling, prepare the filling. In a separate bowl, whisk together sweetened condensed milk, key lime juice, and lime zest until smooth.
- Spoon the filling into the cooled tartlet shells.
- Chill in the refrigerator for at least 2 hours, or until the filling is set.
- Optional: For the topping, whip heavy cream, powdered sugar, and vanilla extract until stiff peaks form. Dollop or pipe onto the tartlets before serving.


