


I still remember the first time I bit into a square topped with sunshine: Key Lime tang, creamy coconut, and bright strawberry swirls—all at once. It was a warm, late-spring afternoon, and my aunt handed me a crumbly, caramel-tinted bar that tasted like a vacation in a bite. Since then, I’ve chased that balance in my kitchen with a simple, forgiving recipe that’s equal parts dessert and sunshine. This version blends the zippy citrus of key lime, the tropical sweetness of coconut, and the juicy pop of strawberry into bars that are easy enough for a weeknight but special enough for weekend company. It’s a treat that’s disappeared in minutes at my house more times than I can count. If you’re craving something that feels celebratory without being fussy, this is your new go-to. And yes, I’ll be honest: the filling’s tangy lift and the gentle coconut aroma remind me of summer church picnics and grandma’s porch swing all at once. This key lime coconut strawberry idea isn’t just a flavor mashup—it’s a cozy, homemade moment you can share over coffee or a quick family friendly dessert after dinner.
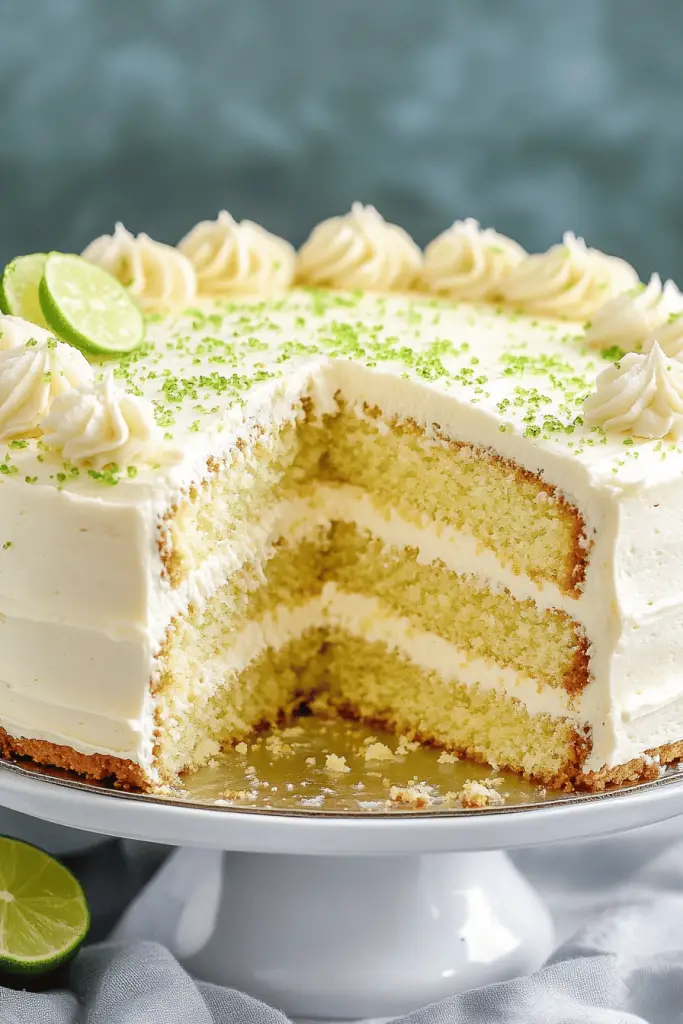
What is a Key Lime Coconut Strawberry Bar?
Think of these bars as a portable dessert that carries all the best bits of a tropical fruit salad and a custardy lime tart, but in a sturdy, slice-able bar form. It’s essentially a shortbread-like crust, a creamy lime-coconut batter, and a strawberry swirl that weaves through like ribbons of sunshine. The name tells you everything—Key Lime gives that bright sour note, coconut whispers in the background, and strawberry brings a fresh, fruity twist. I love that the concept stays simple: sweet, tart, creamy, and a little toasty from the bake. It’s a treat you can bake on a busy weeknight and still feel proud to plate for guests. If you’ve ever fallen for a lemon bar but wished for something more tropical, you’re about to meet your new favorite compromise. This recipe is approachable for home cooks of all levels, and the flavors feel polished without being precious.

Why you’ll love this recipe?
What I love most about this Key Lime coconut strawberry bar is how it manages to feel both indulgent and approachable. The flavor profile is tropical without being heavy, and the lime keeps everything vibrant even as the coconut softens the bite. The batter comes together with a few smart shortcuts I’ve learned from making too many casseroles and quick bakes: it’s forgiving, it doesn’t require fancy equipment, and you can shave minutes off the clock if you keep your ingredients nearby. These bars are a lifesaver on busy nights—mix, pour, swirl, bake, slice, and you’re done. They’re also budget-friendly: you can often find coconut and frozen strawberries on sale, and a little goes a long way because the lime’s brightness carries the flavor. And because it’s a sheet-pan style dessert, you can scale up for gatherings or cut into petite pieces for a tray of bite-sized snacks. My kids actually ask for seconds, and my friends always want the recipe, which is basically the sweetest compliment I could ask for. If you’re looking for a dessert that travels well and tastes like a vacation, this is it.
How do I make Key Lime Coconut Strawberry Bars?
Quick Overview
This is a straightforward bake with three simple layers: a shortbread crust, a tangy lime-coconut filling, and a strawberry swirl that brightens every bite. You’ll mix the crust, press it into a pan, whisk a creamy filling, pour it over, and then spoon or swirl the strawberry ribbons through before baking until just set. The result is a sturdy bar you can slice neatly, yet it feels almost ethereal with a soft, creamy center and a lightly browned edge. The method is reliable, and the flavors play nicely with a gentle, not-too-sweet glaze if you want extra shine. Trust me, you’ll keep coming back to this when you want something refined and comforting at the same time.
Ingredients
For the main battery (crust):
– 1 1/2 cups all-purpose flour
– 1/2 cup granulated sugar
– 1/2 cup unsalted butter, cold and cubed
– Pinch of salt
– 1/2 cup shredded sweetened coconut (optional but delicious)
For the Filling:
– 8 oz Cream Cheese, softened
– 2 large eggs
– 1/2 cup granulated sugar
– 1/4 cup key lime juice (about 4–5 small limes) + zest from 1 lime
– 1/4 cup sour cream or Greek yogurt
– 1/2 cup shredded coconut, sweetened or unsweetened (adjust to taste)
For the Glaze:
– 1/2 cup powdered sugar
– 1–2 tbsp Key Lime juice
– Zest of 1 lime (optional)
For the Strawberry Swirl:
– 1 cup fresh or frozen strawberries, chopped, plus 1–2 tbsp sugar (to taste) or use seedless puree
– A splash of lemon juice to brighten
Step-by-Step Instructions
Step 1: Preheat & Prep Pan
Heat the oven to 350°F (175°C). Line a 9×13 inch baking pan with parchment paper, leaving a little overhang for easy removal. If you don’t have parchment, grease well and dust with a light coating of flour to prevent sticking. I always do this when I’m short on time because it makes slicing later a breeze and saves me from cursing at stubborn bars.
Step 2: Mix Dry Ingredients
In a bowl, whisk together flour, sugar, salt, and shredded coconut if you’re using it. The texture should resemble a sandy mix that’s still a touch crumbly. A quick note: the coconut is optional, but it adds a toasty, chewy bite that I personally adore in these bars. If you skip it, you’ll still land a wonderful crust—just with a slightly crisper edge.
Step 3: Mix Wet Ingredients
In a separate bowl, blend cream cheese until smooth, then whisk in eggs, sugar, lime zest, and lime juice. The mixture should be glossy and thick enough to coat the back of a spoon. If you’re worried about lumps, give it a few vigorous whisk strokes or a quick handheld blender pass. I tested this with a touch of almond milk and it actually made the filling a touch creamier—feel free to experiment if you like, but don’t overdo the liquid.
Step 4: Combine
Pour the crumbly crust into the prepared pan and press it down evenly to form a compact base. Bake the crust for about 12 minutes until it just begins to set and turn a pale golden color. Remove from oven and let it cool while you whisk the filling. This step is crucial to prevent a soggy crust—the crust needs a head start to keep its structure when the creamy layer lands on top.
Step 5: Prepare Filling
Whip the filling ingredients together until smooth and integrated. You’re aiming for a silky texture that resembles a thick custard. Fold in the shredded coconut if you’re using it for texture. If you like a stronger coconut presence, you can increase it to 3/4 cup total. Taste a small spoonful of the filling—if you want more zing, add another squeeze of lime juice or a pinch more zest, but go gradual so the tang doesn’t overwhelm the coconut sweetness.
Step 6: Layer & Swirl
Spread the filling evenly over the warm crust. Now, prepare the strawberry swirl: gently toss the chopped strawberries with a tablespoon or two of sugar (or use a tiny bit of lemon juice to brighten) and mash a few pieces to release color. Drop spoonfuls of the strawberry mixture over the filling and swirl with a butter knife or a skewer to create ribbons and marbling. Don’t over-swirl—the idea is to keep something of that pretty, marbled look that hints at fruitiness without turning the entire surface pink.
Step 7: Bake
Return the pan to the oven and bake for 22–28 minutes. You’re looking for the edges to be set and the center just a touch jiggle when you give the pan a gentle shake. If you have a convection oven, you may want to reduce the bake time by about 5 minutes since the air circulation speeds things up. If the top starts to brown too quickly, loosely tent the pan with a sheet of foil for the last 5–10 minutes to avoid over-browning.
Step 8: Cool & Glaze
Let the bars cool in the pan on a rack for at least 2 hours, or refrigerate for a cleaner slice. For the glaze, whisk powdered sugar with lime juice until it’s pourable but not too thin. Drizzle or brush over the cooled bars; the glaze adds a glossy sheen and a bright lime accent that makes the bars feel party-ready. If you want a more natural look, skip the glaze and dust with a light coating of lime zest instead.
Step 9: Slice & Serve
When fully cooled, lift the bars from the pan using the parchment overhang and slice into even rectangles. I like a sharp knife warmed under hot water for clean cuts, then wiped dry for neat edges. Serve them at room temperature or slightly chilled—both are fantastic. My favorite presentation is a light dusting of lime zest and a few tiny strawberry slices fanned on top for color. These bars taste like a celebration but feel like something you could whip up after a long day, which is the sweet spot I’m always chasing.
What to Serve It With
These bars shine on any table, but here are a few ideas to make them sing for different occasions.
For Breakfast: Pair with a strong coffee or a citrusy green tea. I love a couple of crumbs on top of yogurt for a quick parfait, and a sprig of fresh mint adds a morning-refreshing twist.
For Brunch: Serve alongside a light sparkling drink—prosecco with a splash of elderflower looks gorgeous next to the lime-green glaze. A few candied lime wheels on the side elevate the presentation and tie the flavors together.
As Dessert: A dollop of whipped cream or a scoop of vanilla bean ice cream makes the citrus notes pop even more. A handful of toasted coconut flakes adds texture and a little extra aroma that reminds everyone of tropical holidays.
For Cozy Snacks: Cut into bite-sized squares and serve with tea or coffee during a chilly evening. The bright flavors cut through the chill, and the creaminess keeps it comforting when the house is quiet and everyone is winding down. This is a family favorite for movie nights, I’ll admit.
Top Tips for Perfecting Your Key Lime Coconut Strawberry Bars
Here are a few little tricks I’ve learned after baking this countless times. You’ll notice these adjustments make a big difference in texture and flavor, especially if you’re tweaking to suit what you’ve got on hand.
Zucchini Prep: Not relevant here, since we’re not making zucchini bars, but moisture balance is still key when you’re swapping ingredients. If you ever substitute, keep the moisture in check so the crust doesn’t get soggy.
Mixing Advice: Don’t overbeat the filling. A few gentle whisk strokes bring everything together without forcing air into the mixture, which can cause cracks during baking. If you see tiny bubbles, don’t worry—they’ll settle as the bars bake. If you overmix, the texture can get a little rubbery, which is not what we want for a creamy center.
Swirl Customization: For a more dramatic swirl, reserve a portion of the strawberry mixture and swirl it in after the main layer has settled for a couple of minutes in the oven. The heat will set the swirl visually while keeping its color.”
Ingredient Swaps: Coconut can be swapped for chopped, toasted almonds for a crunchy texture; both work beautifully, but the coconut adds that tropical vibe. If you’re avoiding dairy, you can use a dairy-free cream cheese substitute, but I’d test a small batch first to balance the acidity with the lime.
Baking Tips: Oven temperatures vary; if you’re on the cooler side, you might need an extra 5–7 minutes. If your oven runs hot, start checking at 18 minutes. Don’t over-bake; you want the center to be just set with a gentle jiggle. It’s a fine line between custardy and dry here.
Glaze Variations: You can switch the glaze to a simple dusting of powdered sugar and a little lime zest for a cleaner look, or you can mix the glaze with a teaspoon of coconut milk for extra creaminess. A little zest in the glaze makes the aroma even more enticing as you cut into the bars.
Lessons learned from years of tweaking this recipe: start with the base, taste as you go, and let the lime brightness guide you. If the filling tastes a touch too sweet, add a little more lime juice—you want that balance to be razor-sharp but not sour. If it’s too tart, a touch more sugar or a pinch more coconut can mellow it without losing the tart brightness. It’s all about adjusting in small increments until the dream texture and flavor come together.
Storing and Reheating Tips
These bars keep well, which is part of their charm. A little planning makes them even better because the flavors have time to mingle a touch more while resting. Here’s how I handle storage and reheating for best results.
Room Temperature: Store in an airtight container for up to 2 days. If you’re in a warm kitchen, a light layer of parchment between layers helps prevent sticking. The texture remains tender and the flavors stay fresh, as long as you don’t leave them out too long.
Refrigerator Storage: They hold up to 5 days in the fridge. Use a shallow container so the bars stay evenly chilled; the lime centers stay pleasantly creamy when cold, and the crust remains slightly crisper on the edges.
Freezer Instructions: These bars freeze beautifully for up to 2 months. Wrap individual bars tightly in plastic wrap and place in a freezer-safe bag. Thaw in the refrigerator or at room temperature for a quick dessert that still tastes fresh. If the glaze has softened, you can rebuild the shine with a quick fresh glaze or a light dusting of zest after thawing.
Glaze Timing Advice: If you’re storing the bars unglazed, add the glaze just before serving for a glossy finish and the freshest lime aroma. If you’re freezing, skip the glaze and apply after thawing to preserve texture and brilliance.
Frequently Asked Questions
Final Thoughts
This recipe is one of those crowd-pleasers you’ll reach for when you want something that feels special but isn’t a marathon to pull off. I love how the key lime lightens the coconut’s warmth and makes the strawberry ribbons feel like little bursts of sunshine in every bite. It’s a dessert that travels well, that nieces and nephews remember, and that friends request for potlucks or casual gatherings. I’ve tested this with varying levels of coconut and the flavor stays bright, while the texture can swing from center-silky to a touch fudgy depending on how long you bake. Either way, you’ll end with a tray of bars that disappear fast and leave everyone asking for the recipe. If you try a swap or tweak, I’d love to hear what you changed and how it turned out. Happy baking, and may your kitchen smell like a mini tropical vacation. Can’t wait to hear how yours turns out!


