


You know those days? The ones where you just need something sweet, something comforting, something that feels like a warm hug from the inside out? That’s exactly when my mind wanders to these incredible oatmeal caramel bars. Honestly, they’re the closest thing I’ve found to bottled sunshine that you can bake. Forget those fussy layered cakes that take hours; this recipe is my absolute go-to when I’m craving a treat that’s both unbelievably delicious and surprisingly simple. It’s like a No-Bake Cookie got a serious upgrade, all wrapped up in a chewy, caramelly hug. If you’ve ever loved a blondie or a really good shortbread, I promise you, these oatmeal caramel bars are going to steal your heart.
What are Oatmeal Caramel Bars?
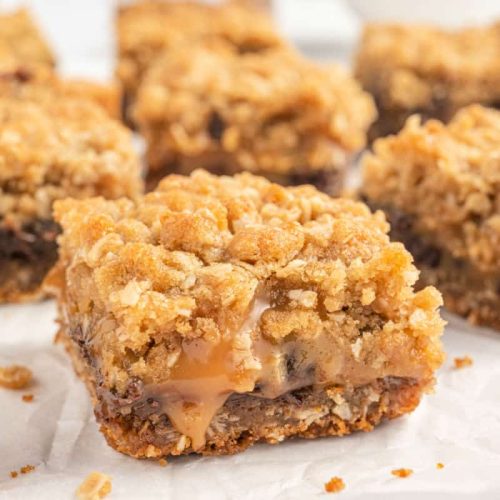
So, what exactly are these magical little squares? Think of them as a delightful mashup of everything wonderful in the dessert world. At their core, they’re a soft, chewy oatmeal base, much like a really fantastic oatmeal cookie but baked into a bar. Then, we layer that with a luscious, gooey caramel filling that’s not too hard, not too soft – just perfectly decadent. The whole thing is usually topped off with a simple, sweet glaze that adds that extra touch of elegance and flavor. The name itself, “oatmeal caramel bars,” really just says it all, doesn’t it? It’s straightforward, honest, and promises exactly the kind of comforting sweetness you’re looking for. It’s the kind of dessert that feels both homemade and a little bit special, perfect for sharing (or not!).
Why you’ll love this recipe?
There are so many reasons I keep coming back to this recipe, and I know you will too! First and foremost, the flavor is just out of this world. You get that wholesome, slightly nutty taste of oats, balanced perfectly by the rich, buttery sweetness of the caramel. Then, that hint of vanilla in the glaze just ties it all together. It’s not overly sweet, but it’s definitely sweet enough to satisfy any craving. And the texture? Oh, the texture! The base is chewy and satisfying, the caramel is gooey and melts in your mouth, and the glaze adds a delicate finish. It’s a symphony in every bite.
What I also absolutely adore about these oatmeal caramel bars is their sheer simplicity. You don’t need any fancy equipment, and the steps are so straightforward, even if you’re a beginner baker, you’ll nail this. Seriously, I’ve whipped these up on a Tuesday night when unexpected guests dropped by, and they were a lifesaver! The ingredients are also super common; you probably have most of them in your pantry right now. Plus, they’re incredibly cost-effective, which is always a win in my book. You get a ton of deliciousness for not a lot of fuss or money.
And the versatility! These are amazing as a breakfast treat (don’t judge, the oats make them practically healthy… right?), perfect for a brunch spread, a delightful after-dinner dessert, or just a mid-afternoon pick-me-up. I’ve even seen them disappear faster than I could serve them at kids’ birthday parties. They’re just universally loved. Compared to other treats, these offer that perfect balance of comforting familiarity and indulgent surprise. They don’t crumble apart like some cookies, and they’re much easier to transport and serve than a cake. What I love most is that they truly taste like they came from a loving home kitchen, which is exactly what I aim for with my baking.
How do I make Oatmeal Caramel Bars?
Quick Overview
The process is elegantly simple: you’ll mix up a quick oatmeal batter, press half into your pan, spread a rich caramel filling over it, top with the remaining batter, and bake until golden. Then, a drizzle of glaze finishes it off. It’s designed to be straightforward, minimizing fuss and maximizing deliciousness. The beauty of this method is that it yields a treat that’s both structurally sound for easy slicing and unbelievably tender and moist. Trust me, you’ll be amazed at how quickly these come together!
Ingredients
For the Main Batter:
You’ll need about 2 cups of all-purpose flour. Make sure it’s not packed too tightly in the measuring cup – spoon it in and level it off. I find using all-purpose flour gives the best structure for the base. You’ll also need 3 cups of rolled oats (old-fashioned oats work best here, not instant). They give that lovely texture and chewiness that’s essential. For sweetness, we’ll use 1.5 cups of packed Brown Sugar – the brown sugar is key for that classic caramel-oat flavor. And 1 teaspoon of baking soda to help it rise just a touch. Don’t forget a good pinch of salt, about 1 teaspoon, to balance all the sweetness. And for richness, 1 cup (2 sticks) of unsalted butter, softened. Using softened butter is crucial for getting a cohesive batter that’s easy to work with.
For the Filling:
This is where the magic happens! You’ll need about 1 cup of packed light Brown Sugar and 1/2 cup (1 stick) of unsalted butter. These two cooked together create the most wonderful caramel base. Then, we add 1/4 cup of corn syrup or golden syrup – this is what keeps the caramel from getting too hard and ensures it stays wonderfully gooey. And a teaspoon of vanilla extract to really bring out that caramel flavor. For a little extra depth, I sometimes add a pinch of salt here too, especially if my butter is unsalted.
For the Glaze:
This is super simple and really elevates the bars. You’ll need about 1 cup of powdered sugar. Sifted powdered sugar is best for a smooth glaze. Then, 2 to 3 tablespoons of milk or cream – I love using heavy cream for a richer glaze, but milk works perfectly fine too. And a teaspoon of vanilla extract for flavor. You can adjust the milk to get your desired consistency; you want it pourable but not watery.
Step-by-Step Instructions
Step 1: Preheat & Prep Pan
First things first, let’s get our oven ready. Preheat it to 350°F (175°C). This is a pretty standard baking temperature that works wonders for these bars, giving them a nice golden color without burning. Now, grab a 9×13 inch baking pan. I always like to line mine with parchment paper, leaving some overhang on the sides. This makes lifting the bars out so much easier later on, and cleanup is an absolute breeze. Just lightly grease the pan before you lay the parchment down so it sticks. Make sure the parchment covers the bottom and goes up the sides. This is a little trick I learned after a few sticky pan nightmares!
Step 2: Mix Dry Ingredients
In a large bowl, we’re going to whisk together all the dry ingredients for our base: the flour, rolled oats, brown sugar, baking soda, and salt. Give it a good whisk until everything is well combined. You want to make sure the baking soda and salt are evenly distributed so you don’t get any weird salty or flat spots in your bars. This step is super quick, but it ensures that every bite of your oatmeal caramel bars has the perfect balance of flavors and texture.
Step 3: Mix Wet Ingredients
Now, in a separate, medium-sized bowl, or even the bowl of a stand mixer if you have one, cream together the softened butter and the packed brown sugar for the base until it’s light and fluffy. This usually takes about 2-3 minutes. Scrape down the sides of the bowl a couple of times to make sure everything is incorporated. The mixture should be pale yellow and have a creamy texture. This creaming step is really important for developing the texture of the base – it incorporates air, which makes the bars tender.
Step 4: Combine
Gradually add the dry ingredients to the wet ingredients. Mix on low speed (or stir with a sturdy spoon) until just combined. Be careful not to overmix! Overmixing can develop the gluten in the flour too much, resulting in tough bars. You want the dough to just come together; there might still be a few streaks of flour, and that’s perfectly okay. It will be a thick, slightly crumbly dough, which is exactly what we’re looking for. This thickness is what allows us to press it into the pan effectively.
Step 5: Prepare Filling
While your oven is doing its thing and your base ingredients are ready, let’s whip up that glorious caramel filling. In a medium saucepan over medium heat, combine the brown sugar, butter, and corn syrup. Stir constantly until the butter is melted and the sugar is dissolved. Bring the mixture to a gentle boil and let it bubble for about 2 minutes, stirring all the time. You’re looking for it to thicken up slightly. After boiling, remove it from the heat and stir in the vanilla extract and a pinch of salt if you’re using it. It should smell heavenly!
Step 6: Layer & Swirl
Now for the fun part! Take about two-thirds of your oatmeal base mixture and press it evenly into the bottom of your prepared baking pan. Use your hands or the bottom of a glass to get a nice, even layer. Don’t worry if it’s not perfectly smooth; some texture is good! Then, gently pour or spread the caramel filling over this base layer. Try to get it as even as possible, but don’t fret about perfection. Finally, crumble the remaining one-third of the oatmeal base mixture over the top of the caramel. You can just sprinkle it on, or gently press it down a bit. It doesn’t need to form a complete second layer; a rustic topping is part of the charm.
Step 7: Bake
Pop the pan into your preheated oven. Bake for about 25-30 minutes, or until the topping is golden brown and the caramel is bubbly around the edges. Keep an eye on it, as ovens can vary. If the topping is browning too quickly but the caramel isn’t bubbly yet, you can loosely tent the pan with foil for the last 10 minutes of baking. The key is a golden-brown topping and visibly bubbly caramel, which indicates it’s cooked through.
Step 8: Cool & Glaze
Once baked, remove the pan from the oven and let it cool completely in the pan on a wire rack. This is SO important! If you try to cut them while they’re warm, the caramel will be too runny and make a huge mess. Patience is a virtue here! Once completely cool, let’s make the glaze. In a small bowl, whisk together the powdered sugar, vanilla extract, and 2 tablespoons of milk or cream. Add more milk, a teaspoon at a time, until you reach a pourable but not too thin consistency. Drizzle this glaze all over the cooled bars. Let the glaze set for about 15-20 minutes before slicing.
Step 9: Slice & Serve
Once the glaze has set, use the parchment paper overhang to lift the entire block out of the pan onto a cutting board. Then, using a sharp knife, cut the bars into squares. I usually aim for about 16-20 bars, depending on how big I want them. A hot knife dipped in water can help make cleaner cuts if your glaze is a bit stubborn. These are best served at room temperature, where the caramel is perfectly gooey. Enjoy the delightful combination of chewy oats, rich caramel, and sweet glaze!
What to Serve It With
These oatmeal caramel bars are so wonderfully versatile, they fit into almost any occasion. For a cozy breakfast, I love pairing them with a steaming mug of coffee or a warm glass of milk. They’re sweet enough to feel like a treat but have those hearty oats to keep you going. For a more elegant brunch spread, I’ll often cut them into smaller, bite-sized squares and arrange them artfully on a platter alongside fresh fruit like berries or sliced oranges. They add a touch of homemade charm that guests always appreciate.
As a dessert, they’re simply divine. Imagine serving a warm square with a scoop of vanilla bean Ice Cream melting into the gooey caramel – pure bliss! Or, for a lighter option, a dusting of powdered sugar and a few fresh raspberries on the side is lovely. For those moments when you just need a comforting snack, these bars are perfection. I often just grab one (or two!) with a cup of tea while I’m curled up with a good book. My family loves them after dinner, especially during the cooler months. They’re perfect with hot chocolate. My personal favorite way to serve them is warm, fresh from being glazed, with a glass of cold milk – it’s a classic combination that never fails to hit the spot.
Top Tips for Perfecting Your Oatmeal Caramel Bars
Over the years, I’ve learned a few tricks that make these oatmeal caramel bars consistently amazing. For the oats, I always use old-fashioned rolled oats. They hold their shape and give you that perfect chew. Instant oats tend to get mushy, which isn’t ideal for the texture we’re going for. When it comes to mixing the batter, remember: do not overmix! Once the flour is incorporated, stop. Overmixing develops gluten, which will make your bars tough instead of tender and chewy. It’s really tempting to keep mixing until it looks perfectly smooth, but trust me on this one – just combine.
For the caramel filling, the corn syrup is your friend! It prevents the caramel from crystallizing or becoming too hard. If you can’t find corn syrup, a good quality golden syrup works wonderfully as a substitute. Don’t boil the caramel for too long; just a gentle boil for 2 minutes is usually sufficient to thicken it nicely. If you’re worried about the topping browning too fast during baking, a simple solution is to loosely tent the pan with aluminum foil. This deflects some heat and prevents the oats from getting too dark while the caramel underneath finishes cooking.
When it comes to ingredient swaps, I’ve experimented a bit! You can definitely make these gluten-free by using a good quality gluten-free all-purpose flour blend and certified gluten-free rolled oats. The texture might be slightly different, but still delicious. For the glaze, if you don’t have milk or cream, even water will work in a pinch, though it won’t be as rich. You can also get creative with the glaze – a little lemon zest can add a nice zing, or a tiny bit of almond extract can be lovely. If you want a richer caramel, use dark brown sugar instead of light brown sugar for a deeper molasses flavor.
Cooling is key! Seriously, resist the urge to cut into these bars when they are warm. The caramel needs time to set properly. If you cut them too soon, you’ll have a gooey mess that’s hard to manage. I usually let them cool for at least 2-3 hours, or even overnight if I can be that patient! And for slicing, a sharp, clean knife is essential. Wiping the knife clean between cuts can help create those neat, professional-looking squares. My kids always ask for them after school, and they’re so easy to grab and go, which is a huge bonus for busy families.
Storing and Reheating Tips
These oatmeal caramel bars are fantastic for making ahead, which is a lifesaver for me! Once they’re completely cooled and the glaze has set, you can store them at room temperature. I usually keep them in an airtight container, layered between parchment paper to prevent sticking, for up to 3-4 days. They stay wonderfully soft and chewy. If your kitchen is particularly warm, you might find the caramel gets a little softer, but they’re still perfectly delicious.
For longer storage, the refrigerator is your best bet. I’ll pop them into an airtight container and they’ll keep well for about a week. The cold can sometimes firm up the caramel a bit, so if you prefer them softer, you can let them come to room temperature for about 30 minutes before serving. I’ve found that the texture remains excellent, and they’re still incredibly enjoyable straight from the fridge, especially on a hot day!
And yes, you can freeze these beauties! Wrap the cooled, un-glazed bars tightly in plastic wrap, then place them in a freezer-safe bag or container. They’ll keep in the freezer for up to 2-3 months. When you’re ready to enjoy them, thaw them overnight in the refrigerator, then bring them to room temperature. You can then add the glaze if you haven’t already, or just enjoy them as is. For a quick treat, you can even pop a frozen bar into the microwave for about 10-15 seconds to soften the caramel slightly. The glaze is best applied after the bars have cooled completely and before you store them for optimal freshness and appearance, but if you freeze them un-glazed, you can always add a fresh glaze when you thaw them.
Frequently Asked Questions
Final Thoughts
Seriously, if you’re looking for a treat that’s comforting, incredibly delicious, and surprisingly easy to make, you have to try these oatmeal caramel bars. They’ve become a staple in my kitchen for a reason – they always deliver smiles and satisfied sighs. The combination of chewy oats, gooey caramel, and that simple sweet glaze is just perfection. It’s the kind of recipe that makes you feel like a baking rockstar without a lot of fuss, and it’s perfect for any occasion, or no occasion at all!
If you love this recipe and are always on the hunt for more comforting baked goods, you might also enjoy my classic Chocolate Chip Cookies or my fudgy brownie recipe. They’re all tried-and-true family favorites. Give these oatmeal caramel bars a go, and please, please let me know how yours turn out! I absolutely love hearing your feedback and seeing your creations. Drop a comment below, share your variations, or tag me on social media. Happy baking, and I hope these bars bring as much joy to your kitchen as they do to mine!
Oatmeal Caramel Bars
Ingredients
Cookie Base and Topping
- 1 cup all-purpose flour
- 1 cup old fashioned oats
- 1 cup light brown sugar packed
- 1 teaspoon baking soda
- 0.5 teaspoon kosher salt
- 12 tablespoons unsalted butter melted
- 2 teaspoons vanilla extract
Caramel Layer
- 0.67 cup heavy whipping cream
Chocolate Layer
- 1 cup semi-sweet chocolate chips
Instructions
Preparation Steps
- Preheat oven to 350 degrees F. Line an 8 or 9-inch square baking dish with parchment paper. Set aside.
- Combine the flour, oats, brown sugar, baking soda and salt in a large mixing bowl. Pour in melted butter and vanilla, stir just until combined. Spoon half of the oat mixture into the bottom of the baking dish, pressing evenly into the bottom of the pan. Bake for 10 minutes.
- Combine unwrapped caramels with heavy whipping cream in a small saucepan. On medium heat, stir constantly until caramels are melted and sauce is creamy. Remove from heat and set aside.
- When cookie batter is done baking for ten minutes, remove from oven. Sprinkle immediately with chocolate chips then pour the caramel sauce over the chips.
- Add remaining half of the cookie dough to the top of the baking dish, crumbling it with your hands until it evenly covers the top of the caramel.
- Bake caramelita bars for an additional 15-18 minutes, until edges are brown and top is golden brown. Cool completely, then slice into bars.


