


You know those days when a craving hits, a serious, deep-seated craving for something sweet, something comforting, something that tastes like a warm hug on a crisp autumn day? That’s precisely when this apple pie fudge comes to the rescue. Forget everything you thought you knew about fudge; this isn’t your grandma’s super-sweet, grainy confection. This is something… more. It’s got the cozy, spiced essence of a perfect slice of apple pie, but in a bite-sized, ridiculously easy-to-make fudge form. I remember the first time I made this. It was a chaotic week, deadlines looming, kids bouncing off the walls, and I just needed a win in the kitchen. I stumbled upon a variation of this idea, and honestly, I was skeptical. Fudge that tastes like apple pie? Seemed a bit ambitious. But oh, was I wrong! The aroma that filled my kitchen as it set? Pure magic. It’s quickly become my secret weapon for potlucks, holiday goodie bags, and, let’s be honest, those late-night pantry raids. If you love apple pie, you are going to absolutely fall head over heels for this apple pie fudge.
What is Apple Pie Fudge?
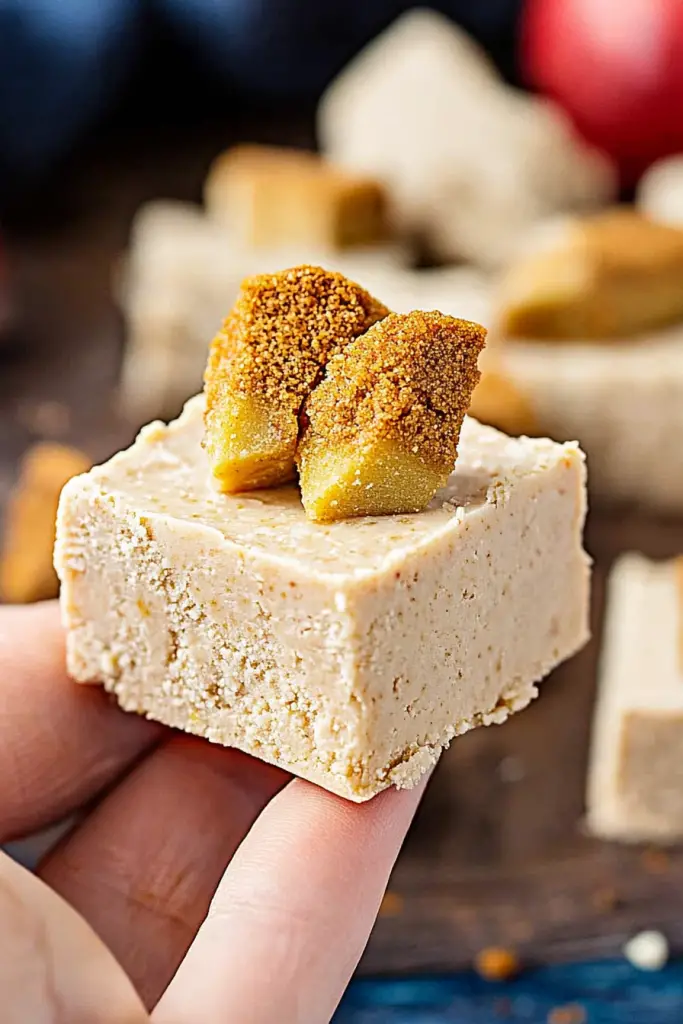
So, what exactly *is* apple pie fudge? Think of it as the best of both worlds, distilled into a rich, chewy, melt-in-your-mouth treat. We take the classic, comforting flavors of apple pie – think cinnamon, nutmeg, tender spiced apples – and infuse them into a creamy, dreamy fudge base. It’s not just a Chocolate Fudge with a hint of apple; it’s a true marriage of flavors. We’re talking about that perfect balance of sweet, slightly tart apple notes, warm spices, and that satisfyingly smooth, buttery fudge texture. The name itself, “apple pie fudge,” is pretty literal because that’s precisely what it delivers. It’s like getting a miniature, concentrated bite of your favorite pie, without any of the fuss of rolling dough or waiting for it to bake. It’s a modern twist on a beloved classic, designed for those of us who adore the taste of apple pie but might not always have the time or energy for the full baking production. It’s the sweet treat equivalent of a shortcut that doesn’t compromise on flavor.
Why you’ll love this recipe?
Honestly, there are so many reasons why this apple pie fudge has earned a permanent spot in my recipe rotation, and I have a feeling it will do the same for you! First and foremost, the **flavor**. It’s absolutely divine. You get that initial burst of sweet, spiced apple goodness, followed by the rich, creamy fudge. It’s not overly sweet, which is a huge plus for me. The warmth of the cinnamon and nutmeg feels like a cozy blanket, and it genuinely tastes like a miniature apple pie. Then there’s the **simplicity**. This is where this recipe truly shines. You don’t need any fancy equipment, no culinary degree required. It’s a one-pot wonder that comes together surprisingly fast. I often whip this up while I’m tidying up after dinner, and by the time I’m done, it’s cooling beautifully. It’s also incredibly **cost-efficient**. Most of the ingredients are pantry staples, and even the apples are usually quite budget-friendly, especially when they’re in season. Compared to buying artisanal fudge or even a really good slice of apple pie, this homemade version is a steal. And talk about **versatility**! While it’s incredible on its own, you can have fun with it. I’ve sprinkled chopped pecans on top just before it sets for an extra crunch, or even added a tiny pinch of cardamom for a more complex spice profile. It’s perfect for bake sales, holiday gifts, or just to have on hand when you need a little something sweet. What I love most about this apple pie fudge is that it hits that nostalgic sweet spot without feeling dated. It’s familiar, yet excitingly new. It’s the kind of recipe that makes people ask, “Wow, what IS this?” and then beg for the recipe. It’s a crowd-pleaser, through and through, and that’s a hard thing to find!
How do I make Apple Pie Fudge?
Quick Overview
Making this apple pie fudge is delightfully straightforward. We’ll start by gently cooking down some apples with warming spices, then combine that with a creamy, no-fuss fudge base. The magic happens when we swirl it all together and let it set into perfect, bite-sized pieces of pure joy. It’s so easy, you’ll feel like you’ve cheated your way to dessert perfection. The whole process, from start to finish (including cooling!), is incredibly manageable, making it ideal for busy bakers or those new to making their own candy.
Ingredients
For the Apple Filling:
2 medium apples (Honeycrisp or Gala work beautifully), peeled, cored, and finely diced (about 1.5 cups)
2 tablespoons unsalted butter
1/4 cup packed light Brown Sugar
1 teaspoon ground cinnamon
1/4 teaspoon ground nutmeg
1 tablespoon lemon juice (optional, but it brightens the flavor)
For the Fudge Base:
1 (14 ounce) can Sweetened Condensed Milk
12 ounces good quality white chocolate chips (I prefer Ghirardelli or Guittard for smoothness)
1 tablespoon unsalted butter
1/2 teaspoon vanilla extract
Pinch of salt
For the Garnish (Optional):
Extra cinnamon for dusting
Chopped toasted pecans or walnuts
Step-by-Step Instructions
Step 1: Preheat & Prep Pan
First things first, grab an 8×8 inch baking pan. Line it with parchment paper, making sure there’s a little overhang on the sides. This makes it SO much easier to lift the fudge out later. You can grease the parchment lightly with butter or non-stick spray if you’re feeling extra cautious, but usually, the parchment is enough. Set this aside while we get started.
Step 2: Mix Dry Ingredients
This step is actually for the apple filling, so let’s get those cozy flavors going! In a medium saucepan, melt the 2 tablespoons of butter over medium heat. Once melted, add your finely diced apples, Brown Sugar, cinnamon, nutmeg, and lemon juice (if using). Stir everything together until the apples are well coated. Cook this mixture, stirring occasionally, for about 5-7 minutes, or until the apples have softened slightly and the sauce has thickened a bit. You don’t want them mushy, just tender. Remove this from the heat and let it cool slightly while we prepare the fudge base.
Step 3: Mix Wet Ingredients
Now, for the creamy part! In a separate, clean medium saucepan (or a microwave-safe bowl if you prefer), combine the sweetened condensed milk, the 12 ounces of White Chocolate chips, and the 1 tablespoon of butter. If you’re using the stovetop method, melt this over low to medium-low heat, stirring constantly. You really want to be gentle here to prevent scorching. Keep stirring until everything is smooth and melted. If you’re microwaving, do it in 30-second intervals, stirring well after each one, until melted and smooth. Stir in the vanilla extract and the pinch of salt.
Step 4: Combine
Once your fudge base is smooth and melted, it’s time to bring in the stars of the show: the spiced apples! Gently fold the slightly cooled apple mixture into the melted white chocolate base. Be careful not to overmix at this stage; we want to keep that lovely texture. Just fold until it’s mostly incorporated. It’s okay if there are a few streaks; that adds to the rustic charm.
Step 5: Prepare Filling
The apple filling is already prepared in Step 2! It’s meant to be tender-crisp with those delicious spices clinging to the softened apple pieces. The flavor is concentrated, and the texture will add delightful little pockets of apple goodness throughout the fudge. If you find your apples are too watery, you can press them lightly in a fine-mesh sieve after cooking, but usually, the reduction in the pan takes care of any excess moisture.
Step 6: Layer & Swirl
Pour the combined fudge mixture into your prepared pan. Now for the fun part! If you’re adding any extra swirls of caramel or a bit more cinnamon, now’s the time. For this apple pie fudge, I usually just spread it evenly and then, if I feel like it, I might do a very light swirl with a toothpick. Some people like to reserve a small portion of the apple mixture and swirl it in at the end for more distinct apple pockets, which is a great idea! Once spread, you can sprinkle on any optional toppings like extra cinnamon or chopped nuts. Gently press them into the surface if you want them to stay put.
Step 7: Bake
Here’s a little secret: this apple pie fudge doesn’t actually need to be baked! That’s right, no oven required for this recipe. It sets up beautifully at room temperature or in the refrigerator. So, once it’s in the pan and topped, you can just set it aside to firm up.
Step 8: Cool & Glaze
This fudge sets best at room temperature for about 2-3 hours, or you can speed things up in the refrigerator for about 1-2 hours. Resist the urge to cut into it too early; it needs to be firm enough to slice cleanly. You can tell it’s ready when the top feels solid and slightly firm to the touch. There’s no glaze needed for this particular recipe, as the white chocolate base creates a beautiful, creamy finish. If you wanted to add a drizzle of white chocolate or a light dusting of powdered sugar, you could do that once it’s fully set, but it’s absolutely delicious just as it is!
Step 9: Slice & Serve
Once the fudge is completely firm, use the parchment paper overhang to lift the entire block out of the pan onto a cutting board. Use a sharp knife to cut it into small, bite-sized squares. I usually aim for about 1-inch cubes. Wipe your knife clean between cuts if you want super neat edges. This fudge is best served at room temperature, as it will be a little firmer and easier to handle. Enjoy the little bursts of apple and spice in every bite!
What to Serve It With
This apple pie fudge is incredibly versatile and fits into so many occasions! For a simple **breakfast** treat, I love cutting it into tiny cubes and serving a few alongside a hot cup of black coffee or a creamy latte. The sweetness is just enough to perk you up without being overwhelming. For a more elaborate **brunch**, I’ll arrange small pieces on a festive platter, maybe with some fresh fruit or yogurt parfaits. It adds a touch of elegance and a fun, unexpected flavor. As a **dessert**, it’s a dream. It’s the perfect end to a hearty meal, especially after a roast chicken or a savory stew. I like to serve a few pieces with a scoop of vanilla bean ice cream or a dollop of whipped cream – the contrast of warm and cold, or creamy and fudgy, is just heavenly. And for those spontaneous **cozy snacks**, this is my absolute go-to. When that 3 pm slump hits, or I just need a little something sweet while curling up with a book, a piece or two of this apple pie fudge is pure comfort. My kids adore it after school with a glass of milk. It’s the perfect bite to satisfy a sweet tooth without feeling like you’ve overdone it. We also have a family tradition of making this around Thanksgiving; it’s always a huge hit alongside the traditional pies, and sometimes, people even ask for seconds of the fudge!
Top Tips for Perfecting Your Apple Pie Fudge
Over the years, I’ve learned a few tricks that make this apple pie fudge turn out perfectly every single time. For the **apple prep**, I always make sure to dice the apples quite finely. This ensures they soften nicely without creating large, watery chunks in the fudge. Using apples with a good balance of tartness and sweetness, like Honeycrisp or Gala, really makes a difference in the overall flavor profile. Don’t be tempted to overcook the apples; they should be tender but still hold their shape. For the **mixing advice**, patience is key when melting the white chocolate. Use low heat and stir constantly to avoid overheating, which can cause the chocolate to seize up and become grainy. If you’re new to working with white chocolate, the microwave method in short bursts is often more forgiving. When it comes to **swirl customization**, remember that less is often more. A subtle swirl adds visual appeal without muddying the distinct apple and white chocolate flavors. If you decide to add extra elements like caramel, ensure it’s thick enough not to bleed too much into the fudge. For **ingredient swaps**, if you can’t find white chocolate chips, you can try using chopped white chocolate bars, but make sure they are good quality. For a dairy-free version, you can experiment with dairy-free white chocolate chips and a plant-based milk, though the texture might vary slightly. When it comes to **baking tips**, remember that this recipe doesn’t actually require baking! The setting process is crucial. Ensure your pan is lined properly, as this makes removing the fudge a breeze. Avoid the temptation to refrigerate it for too long if you want a softer, chewier fudge; 1-2 hours is usually sufficient. For the **glaze variations**, while this fudge is perfect as is, if you want to add a little something extra, a very thin drizzle of melted dark chocolate after it’s set can look striking, or a light dusting of powdered sugar can add a touch of elegance. Just make sure anything you add is applied when the fudge is completely cooled and set.
Storing and Reheating Tips
Keeping your apple pie fudge delicious is super simple, and it lasts quite a while, which is always a bonus! For **room temperature storage**, once the fudge is completely set and cut, you can store it in an airtight container. It stays perfectly good at room temperature for about 3-5 days, provided your kitchen isn’t too warm. The parchment paper lining the container can help prevent sticking. If your kitchen is on the warmer side, or if you’re in a very humid climate, **refrigerator storage** is your best bet. Place the cut fudge in an airtight container, and it will keep well for up to two weeks. When you take it out of the fridge, let it sit at room temperature for about 10-15 minutes before serving for the best texture; it can be a little firm straight from the cold. For longer storage, **freezer instructions** are a lifesaver. Wrap individual pieces tightly in plastic wrap, then place them in a freezer-safe bag or container. It can stay delicious in the freezer for up to 3 months. To thaw, simply transfer the wrapped fudge to the refrigerator overnight, then let it come to room temperature. The **glaze timing advice** is simple: there’s no glaze in this recipe. If you choose to add optional garnishes like nuts, it’s best to press them in *before* the fudge sets. If you are adding a chocolate drizzle, do that *after* the fudge is fully firm. The beauty of this fudge is its self-contained deliciousness!
Frequently Asked Questions
Final Thoughts
I really hope you give this apple pie fudge a try. It’s one of those recipes that feels like a little bit of magic, transforming simple ingredients into something truly special. It’s got that comforting, nostalgic flavor of apple pie, but in a format that’s incredibly easy to make and perfect for sharing (or not sharing, I won’t judge!). The fact that it doesn’t require baking is such a lifesaver, especially when you’re short on time but still want that homemade treat. It’s a delightful way to capture the essence of fall any time of year. If you enjoy this recipe, you might also love my spiced pear crumble or my easy caramel apple dip – they both have that wonderful cozy vibe! I can’t wait to hear what you think of this apple pie fudge. Please leave a comment below with your thoughts or any fun variations you tried. Happy fudge-making!
Apple Pie Fudge
Ingredients
Main Ingredients
- 0.5 cup unsalted butter
- 3.5 cups granulated sugar
- 1 can sweetened condensed milk 14 ounce
- 1 tablespoon apple pie spice
- 1 teaspoon vanilla extract
- 0.5 cup chopped pecans optional
Instructions
Preparation Steps
- Line an 8x8 inch baking dish with parchment paper, leaving an overhang on the sides.
- In a medium saucepan, melt the butter over medium heat.
- Add the granulated sugar and sweetened condensed milk to the saucepan. Stir constantly until the mixture comes to a boil.
- Boil for 5 minutes, stirring constantly.
- Remove from heat and stir in the apple pie spice and vanilla extract.
- If using, stir in the chopped pecans.
- Pour the mixture into the prepared baking dish and spread evenly.
- Let cool completely at room temperature, then cut into squares.


