


Oh my goodness, you guys, I’m so excited to share this recipe with you today! I’ve been meaning to get this down on “paper” for ages. You know those nights when you just want something seriously satisfying, something that tastes like pure comfort and happiness? That’s where these Philly Cheesesteak sliders come in. They’re a total game-changer, especially when you’re craving that iconic Philly flavor but don’t want to deal with a whole big, messy sandwich. Think of them as your favorite cheesesteak, all miniaturized and tucked into the softest little rolls, bursting with savory goodness. They’re so good, they practically disappear the second they hit the table. Honestly, they’re way easier than you might think, and my family devours them every single time. If you’re a fan of the classic cheesesteak, you are going to fall head over heels for these bite-sized beauties.
What are Philly Cheesesteak Sliders?
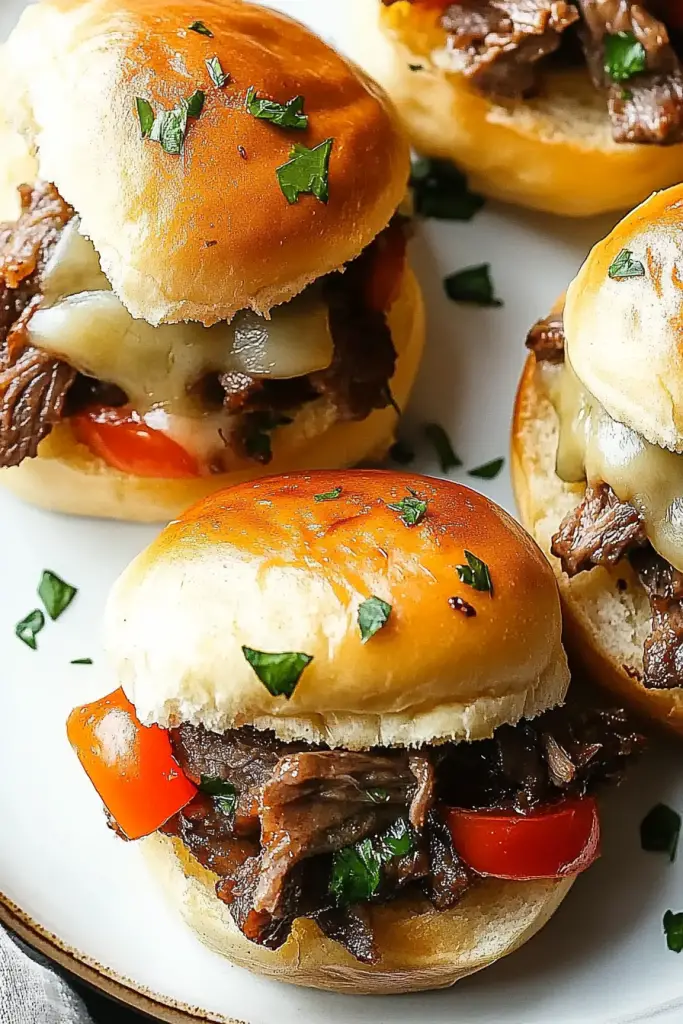
So, what exactly *are* Philly Cheesesteak sliders? Well, it’s pretty much in the name! We’re taking all the incredible, savory components of a classic Philadelphia cheesesteak – thinly sliced steak, caramelized onions, melty cheese – and transforming them into adorable, easy-to-eat slider form. Instead of a long roll, we use those wonderfully soft slider buns, and the magic happens when we pack all that delicious filling into them. It’s essentially all the best parts of a messy, glorious cheesesteak, but in a neat, convenient, and utterly irresistible package. They’re perfect for parties, game nights, or honestly, just when you want a seriously satisfying snack that feels like a treat. Think of it as the ultimate finger food, but with a flavor punch that’s anything but small!
Why you’ll love this recipe?
Let me tell you, there are so many reasons why this Philly Cheesesteak sliders recipe has become an absolute staple in my kitchen. First and foremost, the flavor is just out of this world. You get that deep, savory richness from the perfectly cooked steak, the sweetness from those beautifully caramelized onions, and of course, the gooey, melty cheese that ties it all together. It’s that classic, beloved cheesesteak taste in every single bite. And the best part? It’s surprisingly simple to make! Seriously, if you can chop an onion and cook some steak, you’ve got this. It’s a lifesaver on busy weeknights when you need something quick but still want to serve up something special. Plus, they’re incredibly budget-friendly. You can get a good amount of filling out of relatively few ingredients, making it a fantastic option when you’re trying to feed a crowd without breaking the bank. What I really love most, though, is their versatility. You can easily tweak them to your liking – add mushrooms, use a different cheese, or spice them up a bit. They’re just so forgiving and adaptable. Compared to trying to make a full-sized cheesesteak for everyone, these sliders are a dream. They’re less mess, more fun, and everyone gets their own perfect little sandwich. It’s a recipe that just brings smiles all around, and that’s what cooking is all about for me.
How do you make Philly Cheesesteak Sliders?
Quick Overview
The process is wonderfully straightforward, making these sliders a weeknight hero. We’ll start by sautéing some thinly sliced steak and onions until they’re tender and caramelized, then stir in your favorite cheese until it’s all gooey and melty. This delicious mixture gets piled into soft slider buns, which we’ll then bake for just a few minutes until they’re warm and the cheese is perfectly melted. The whole thing comes together in less time than it takes to order takeout, and the aroma that fills your kitchen is absolutely divine. It’s truly a foolproof method for delivering maximum flavor with minimal fuss.
Ingredients
For the Steak and Onion Filling:
1.5 pounds thinly sliced ribeye steak or sirloin steak (the thinner, the better for that classic cheesesteak texture!)
2 large yellow onions, thinly sliced into half-moons
2 tablespoons olive oil
1 tablespoon butter
1 teaspoon garlic powder
Salt and freshly ground Black Pepper to taste
1 cup shredded provolone cheese (or a mix of provolone and mozzarella, my personal favorite!)
1/2 cup shredded cheddar cheese (optional, for extra cheesiness!)
2 tablespoons Worcestershire sauce (this adds a secret depth of flavor!)
For the Slider Buns and Glaze:
1 package (12 count) slider buns or dinner rolls, split horizontally
1/2 cup unsalted butter, melted
1 teaspoon dried Italian seasoning or dried parsley
1/2 teaspoon garlic powder
Step-by-Step Instructions
Step 1: Preheat & Prep Pan
First things first, let’s get our oven preheated to 375°F (190°C). This is the perfect temperature for warming everything through and getting that beautiful golden-brown on the buns without drying them out. Grab a large, heavy-bottomed skillet or a cast-iron pan. You’ll also want to have a baking sheet ready. I usually line mine with parchment paper for super easy cleanup – trust me, it’s a lifesaver!
Step 2: Caramelize Those Onions
In your large skillet, heat the olive oil and butter over medium heat. Once the butter has melted and is slightly shimmering, add your thinly sliced onions. Now, this is where patience pays off. We want to cook these onions down slowly until they’re beautifully golden brown and wonderfully sweet. This can take anywhere from 15 to 25 minutes. Stir them occasionally, scraping up any browned bits from the bottom of the pan. They’ll shrink down significantly and develop this incredible sweetness that is just *essential* for a great cheesesteak flavor.
Step 3: Cook the Steak
Once the onions are beautifully caramelized, push them to one side of the skillet or remove them to a plate temporarily. If your skillet looks a little dry, you can add another tiny bit of oil or butter. Add your thinly sliced steak to the hot skillet. You might need to do this in batches depending on the size of your pan to avoid overcrowding, which can steam the meat instead of searing it. Cook the steak for just a few minutes per side until it’s nicely browned and no longer pink. It cooks really fast! Season it with a pinch of salt, pepper, and the garlic powder.
Step 4: Bring It All Together
Now, bring those gorgeous caramelized onions back into the skillet with the cooked steak. Add the Worcestershire sauce and stir everything together. Let it cook for another minute or two, allowing the flavors to meld. Taste it and adjust seasoning if needed. If you’re adding cheese now, sprinkle it over the top of the steak and onion mixture and let it melt slightly. This mixture is already smelling incredible, isn’t it?
Step 5: Prep the Buns
While the steak and onion mixture is resting for a moment, let’s get those slider buns ready. Carefully split all the buns horizontally. I like to keep them connected if possible, like a little pull-apart loaf, but splitting them individually works too. Arrange the bottom halves of the buns on your prepared baking sheet. This is where the magic of the glaze comes in! In a small bowl, whisk together the melted butter, Italian seasoning (or parsley), and the garlic powder. Brush this delicious mixture generously over the cut sides of both the bottom and top halves of the slider buns.
Step 6: Stuff and Assemble
Now, spoon that glorious steak and onion mixture evenly over the bottom halves of the slider buns on the baking sheet. Make sure to get a good amount of that cheesy, savory goodness onto each bun. Don’t be shy! If you haven’t added all your cheese to the skillet, you can sprinkle a little more over the filling now. Then, place the buttered top halves of the buns over the filling.
Step 7: Bake
Pop the baking sheet into your preheated oven. Bake for about 8-12 minutes, or until the buns are lightly golden brown and toasted, and the cheese is fully melted and gooey. Keep an eye on them, as ovens can vary, and we don’t want them to get too dark. The goal is warm, toasty, cheesy perfection!
Step 8: Cool and Glaze (Optional – for serving later)**
Once they’re out of the oven, let the sliders rest on the baking sheet for just a couple of minutes. This allows them to set up slightly and makes them easier to handle. If you want an extra pop of flavor and shine, you can brush a little more of that garlic butter mixture over the tops of the buns right after they come out of the oven. For the *absolute* best melt, if you’re not serving immediately, you can pop them back into the oven for a few more minutes just before serving to ensure everything is piping hot and the cheese is extra melty.
Step 9: Slice and Serve
If you kept your buns connected, you can slice the whole thing into individual sliders with a serrated knife. If you separated them earlier, they’re ready to go! Serve them warm and watch them disappear. The smell alone will have everyone lining up!
What to Serve It With
These Philly cheesesteak sliders are so flavorful on their own, but they also play wonderfully with a variety of sides, depending on the occasion. For a casual game day spread, I love serving them alongside a big bowl of crispy potato chips, some loaded tater tots, or even a classic macaroni salad. They’re also fantastic with some crunchy dill pickle spears on the side to cut through the richness. If you’re looking for something a little lighter, a fresh green salad with a tangy vinaigrette is a perfect contrast. And for a true comfort food meal, you absolutely can’t go wrong with a side of homemade French fries or sweet potato fries. My kids also love them with a side of ketchup for dipping, which always gets a giggle out of me. They’re truly that versatile!
Top Tips for Perfecting Your Philly Cheesesteak Sliders
Okay, so I’ve made these sliders more times than I can count, and over the years, I’ve picked up a few tricks that really elevate them. First, when it comes to the steak, don’t be afraid to ask your butcher to thinly slice it for you. If you’re slicing it yourself, pop it in the freezer for about 30 minutes beforehand – it makes it SO much easier to get those paper-thin slices that are key to that authentic cheesesteak texture. For the onions, the key is slow and low heat. Don’t rush the caramelization process; it’s worth every minute for that deep, sweet flavor. If your pan gets too dry while caramelizing, just add a splash of water or beef broth to help scrape up those delicious browned bits. When it comes to the cheese, I’ve found that a blend of provolone and mozzarella gives you the best of both worlds: the classic provolone tang and the amazing meltiness of mozzarella. But feel free to experiment! Some people love a sharp cheddar, and it’s delicious too. My absolute favorite cheese swap? A little bit of Gruyère added in. It’s fancy, but oh-so-worth-it. Remember to butter those buns generously! It’s what gives them that lovely crisp edge and helps them stand up to the filling. I learned this one the hard way – if you don’t butter them enough, they can get a bit soggy. And don’t be afraid to season everything as you go. A little salt and pepper at each stage makes a huge difference. Finally, for the most uniform melt, I often like to spread the steak and onion mixture evenly and then top with the cheese right in the pan, letting it get all gooey before spooning it onto the buns. It’s just an extra step that ensures cheesy perfection in every single slider!
Storing and Reheating Tips
These sliders are definitely best enjoyed fresh out of the oven when they’re warm and gooey, but life happens, and sometimes you have leftovers! If you have any that miraculously survive, here’s how to store and reheat them. For short-term storage, you can keep them in an airtight container at room temperature for up to 4 hours. However, for longer storage, I highly recommend popping them into the refrigerator. Place them in an airtight container or wrap them tightly in plastic wrap and foil. They should stay good in the fridge for about 2-3 days. When it comes to reheating, the oven is your best friend. Place them on a baking sheet and reheat at around 300°F (150°C) for about 8-10 minutes, or until they’re heated through and the cheese is melty again. You can also pop them in a toaster oven or even an air fryer at a similar temperature for a few minutes. I’ve even tried microwaving them in a pinch, but they can get a little soft, so I generally avoid that if I can. The key is to reheat them gently to avoid drying out the buns.
Frequently Asked Questions
Final Thoughts
So there you have it – my go-to recipe for Philly cheesesteak sliders! I truly believe this is one of those recipes that just makes everyone happy. It’s got that incredible, satisfying flavor profile that we all love in a classic cheesesteak, but in such a fun, easy-to-eat format. Whether you’re hosting a party, looking for a killer appetizer, or just craving something utterly delicious, these sliders are the answer. They’re a testament to how simple, good-quality ingredients and a little bit of love can create something truly special. I really hope you give these a try, and I can’t wait to hear what you think! If you make them, please let me know in the comments below how they turned out and any little twists you added. Your feedback always makes my day! Happy cooking!
Philly Cheesesteak Sliders
Ingredients
Main Ingredients
- 0.5 pound ribeye steak thinly sliced
- 1 medium onion thinly sliced
- 0.5 medium bell pepper thinly sliced, any color
- 0.5 cup Provolone cheese shredded
- 12 each slider rolls kings Hawaiian or similar
- 2 tablespoon butter
- 0.5 teaspoon garlic powder
- 0.25 teaspoon salt
- 0.25 teaspoon black pepper
Instructions
Preparation Steps
- In a large skillet, melt 1 tablespoon of butter over medium-high heat.
- Add the thinly sliced onion and bell pepper to the skillet. Cook until softened, about 5-7 minutes.
- Push the vegetables to one side of the skillet. Add the remaining 1 tablespoon of butter to the empty side. Add the thinly sliced ribeye steak, garlic powder, salt, and pepper.
- Cook the steak, stirring occasionally, until browned and cooked through. Mix the steak with the vegetables.
- Slice the slider rolls in half horizontally. Top the bottom halves of the rolls with the steak and vegetable mixture.
- Sprinkle the shredded Provolone cheese evenly over the mixture.
- Place the top halves of the rolls over the cheese. You can optionally brush the tops with melted butter or a little oil.
- Serve immediately.


