


Oh, Banana Bread. It’s more than just a baked good, isn’t it? For me, it’s the smell of home, the comfort of a lazy Sunday morning, and the magical way it can transform overripe bananas from something I’m about to compost into pure, unadulterated joy. If you’re anything like me, you probably have a banana or two lurking on your counter right now, getting a little too speckled for your liking. Don’t toss them! I’ve tried so many banana bread recipes over the years, searching for that elusive *perfect* one – the kind that’s incredibly moist, bursting with banana flavor, and just melts in your mouth. And you know what? I’ve finally landed on it. This isn’t just another banana bread recipe; it’s *the* banana bread recipe. It’s the one that my family requests constantly, the one that gets rave reviews from friends, and the one that makes even a stressful week feel a little bit brighter. It’s so good, it’s the only banana bread recipe I ever make now.
What is banana bread?
So, what exactly is this glorious thing we call Banana Bread? Think of it as a sweet, tender quick bread where ripe bananas are the star. It’s not quite a cake, and it’s definitely not a loaf of bread in the yeasty sense. It’s its own magical category! The bananas not only provide that signature sweet, caramelized flavor but also contribute so much moisture, making the bread incredibly tender. It’s essentially a fantastic vehicle for those overripe bananas that are begging for a purpose. My grandma used to make a version of this, and the aroma would fill our entire house. This recipe takes those comforting memories and elevates them with a few simple tweaks that make all the difference. It’s familiar, yet special.
Why you’ll love this recipe?
What is the best banana bread recipe?flavorIs banana-y, with just the right hint of cinnamon and vanilla. Every bite is a little taste of heaven.simplicity. Honestly, this recipe is a lifesaver on busy nights or when unexpected guests pop over. You can whip it up with basic pantry staples, and the steps are so straightforward, even a beginner baker can nail it. Plus, it’s wonderfully cost-efficient. Those sad, spotty bananas are the key ingredient, and they’re usually free or very cheap! It’s a fantastic way to reduce food waste and get something delicious in return. And the versatility! While it’s incredible on its own, it’s also a perfect base for add-ins like chocolate chips, nuts, or even a swirl of Peanut Butter. It’s the kind of recipe that can be dressed up or down, making it perfect for everything from a quick breakfast to a decadent dessert. What I love most about this recipe, though, is the texture – it’s impossibly moist and tender, never dry or crumbly, and that’s something that’s hard to achieve with banana bread.
How to Make Perfect Banana Bread
Quick Overview
The process for this perfect Banana Bread recipe is delightfully simple. You’ll mash your ripe bananas, whisk together some wet ingredients, combine them with your dry ingredients, and then bake until golden and fragrant. The magic happens in the careful measurement and the gentle mixing, which ensures maximum moisture and tenderness without developing a tough crumb. It’s a straightforward method that guarantees success, even if you’re short on time or kitchen experience. Trust me, the aroma alone is worth it.
Ingredients
For the Main Batter:
- 3 large, very ripe bananas: The browner and spottier, the better! They should practically be falling apart. This is where you get all that amazing flavor and moisture.
- 1/2 cup (1 stick) unsalted butter, melted: Using melted butter contributes to a moister crumb than creaming with sugar. Make sure it’s not piping hot when you add it to the eggs.
- 2 large eggs: Room temperature eggs incorporate more easily. If you forget to take them out, a quick soak in warm water for 10 minutes does the trick.
- 1 teaspoon vanilla extract: Pure vanilla extract makes a noticeable difference in flavor depth.
- 1 cup granulated sugar: This adds sweetness and helps with caramelization. You can reduce it slightly if you prefer, but don’t go too low or you might miss out on the ideal texture.
- 1/2 cup packed light brown sugar: The brown sugar adds a lovely caramel note and extra moisture.
- 1 1/2 cups all-purpose flour: Spooned and leveled, not scooped! Scooping can lead to too much flour and a dry bread.
- 1 teaspoon baking soda: This is the leavener that reacts with the acidic bananas and brown sugar to give it a good rise.
- 1/2 teaspoon salt: Balances the sweetness and enhances the other flavors.
- 1/2 teaspoon ground cinnamon: For that warm, cozy spice note that pairs so well with banana.
For Optional Add-ins (but highly recommended!):
- 1 cup chocolate chips: Semi-sweet or dark are my favorites.
- 1/2 cup chopped walnuts or pecans: For a delightful crunch.
Step-by-Step Instructions
Step 1: Preheat & Prep Pan
Start by preheating your oven to 350°F (175°C). Grease and flour a standard 9×5 inch loaf pan, or line it with parchment paper, leaving some overhang on the sides. This makes it super easy to lift the finished bread out. I always grease mine well and then give it a light dusting of flour – this prevents any sticking. If you’re using parchment, make sure it’s well-secured so it doesn’t flap around in the oven.
Step 2: Mix Dry Ingredients
In a medium bowl, whisk together the flour, baking soda, salt, and cinnamon. Whisking them together ensures that the leavening agent and salt are evenly distributed, which means you won’t end up with dense spots or a salty bite in your bread. Make sure there are no clumps of baking soda.
Step 3: Mix Wet Ingredients
In a large bowl, mash the ripe bananas with a fork until they’re fairly smooth but still have a few small chunks. Then, add the melted butter, eggs, vanilla extract, granulated sugar, and Brown Sugar to the mashed bananas. Stir everything together until it’s well combined and the sugars have started to dissolve. You want a lovely, homogenous mixture.
Step 4: Combine
Pour the dry ingredients into the wet ingredients. Now, this is crucial: mix until *just* combined. Seriously, don’t overmix! A few streaks of flour are perfectly fine. Overmixing develops the gluten in the flour, which can lead to a tough, dense bread. I usually use a spatula and gently fold the dry into the wet. If you’re adding chocolate chips or nuts, gently fold them in now.
Step 5: Prepare Filling (If Using Chocolate Chips/Nuts – See Step 6 for a Swirl)
If you’re just folding in chocolate chips or nuts, this step isn’t separate; you’d fold them in at the end of Step 4. However, if you want to make a decadent swirl, this is where you’d prepare your swirl mixture. For a chocolate swirl, you might mix a tablespoon or two of cocoa powder with a bit of sugar and cinnamon. For a cinnamon-sugar swirl, simply mix brown sugar and cinnamon. The goal here is to have something that can be layered and swirled into the batter.
Step 6: Layer & Swirl (Optional but Recommended for Extra Yumminess)
Pour about half of the banana bread batter into your prepared loaf pan. If you’re doing a swirl, sprinkle half of your chosen swirl mixture (like chocolate chips, or cinnamon-sugar) over this layer. Then, dollop the remaining batter on top and sprinkle the rest of your add-ins. If you want a distinct swirl, you can gently drag a knife or skewer through the batter a few times. Be careful not to over-mix; we want distinct ribbons of flavor!
Step 7: Bake
Bake in the preheated oven for 55-70 minutes, or until a wooden skewer or toothpick inserted into the center comes out clean, with just a few moist crumbs attached. Ovens can vary, so start checking around the 55-minute mark. If the top starts to brown too quickly, you can loosely tent it with aluminum foil. I always give mine a good 60 minutes before I even start to worry about checking it.
Step 8: Cool & Glaze (Optional)
Once baked, let the banana bread cool in the pan on a wire rack for about 15-20 minutes. This allows it to firm up. Then, carefully lift it out of the pan using the parchment paper overhangs (or invert it if you didn’t use parchment) and let it cool completely on the wire rack. This cooling process is super important for the texture. If you’re feeling fancy, you can whip up a simple glaze (powdered sugar, a splash of milk, and a tiny bit of vanilla) and drizzle it over the cooled loaf. It adds an extra touch of sweetness and elegance.
Step 9: Slice & Serve
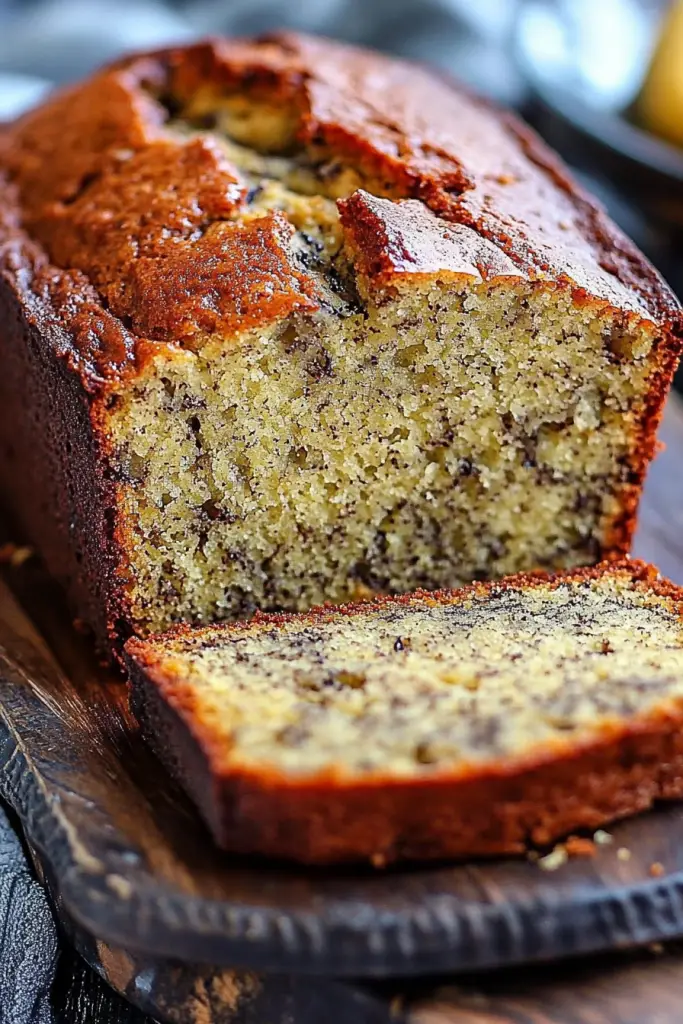
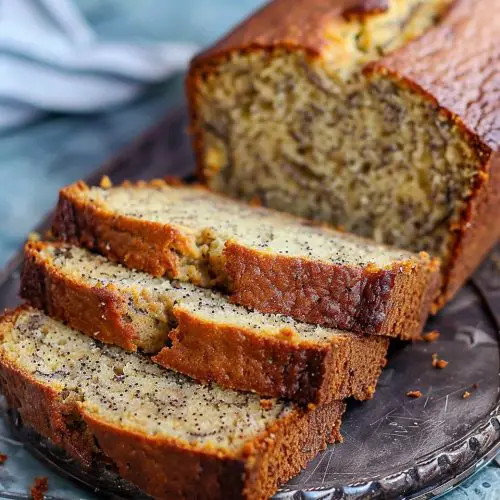
Once completely cooled, slice your perfect banana bread with a serrated knife for clean cuts. The best part is digging into that first slice, noticing the moist crumb and beautiful texture. It’s absolutely divine served at room temperature, but I won’t judge if you want to eat it warm!
What to Serve It With
This perfect banana bread recipe is incredibly versatile, fitting into any meal or craving. For a classic Breakfast, I love a thick slice toasted and slathered with a little butter. It pairs perfectly with a hot cup of coffee or a glass of cold milk. For a more leisurely Brunch, I’ll serve it alongside fresh fruit salad, a platter of scrambled eggs, and perhaps some crispy bacon. It adds a wonderful sweet element to the spread. As a simple yet elegant Dessert, a slice served warm with a scoop of vanilla bean ice cream or a dollop of whipped cream is pure bliss. And for those late-night cravings or a cozy afternoon snack, it’s simply perfect on its own, maybe with a mug of tea. My kids love taking a slice to school for lunch, and it always disappears first. One of my favorite family traditions is making a loaf on a rainy Saturday and watching a movie together, each of us with a giant slice.
Top Tips for Perfecting Your Banana Bread
I’ve made this banana bread more times than I can count, and along the way, I’ve picked up a few tricks that I think really elevate it. First, about banana prep: don’t skimp on ripeness! Those black, spotty bananas are packed with sugars and enzymes that make the bread moist and flavorful. If your bananas aren’t quite ripe enough, you can speed things up by baking them in their peels on a baking sheet at around 300°F (150°C) for 15-20 minutes until they’re soft and fragrant. For mixing advice, remember my mantra: don’t overmix! Overmixing is the number one enemy of tender baked goods. Mix until *just* combined, and don’t worry about a few flour streaks. For swirl customization, get creative! You can add a spoonful of peanut butter to the batter, or a mix of chopped dried fruit like cranberries or raisins. Just be sure to keep the ratios relatively balanced so the batter doesn’t become too wet. When it comes to ingredient swaps, if you’re out of brown sugar, you can substitute with an equal amount of granulated sugar plus an extra teaspoon of molasses, though the texture might be slightly different. For baking tips, always use the middle rack of your oven for even heat distribution. If you notice the top browning too quickly before the inside is cooked, cover it loosely with foil. And for glaze variations, you can make a cream cheese glaze by beating softened cream cheese with powdered sugar and a splash of milk for an extra decadent touch. Or, a simple dusting of powdered sugar is lovely and less sweet.
Storing and Reheating Tips
Keeping your perfect banana bread fresh is easy peasy! Stored at room temperature, it will stay wonderfully moist for about 2-3 days. Just wrap it tightly in plastic wrap or place it in an airtight container. Make sure it’s completely cooled before wrapping, otherwise, you’ll trap steam and it can get soggy. If you know you won’t get through it all in a few days, refrigerator storage is your best bet. It can last for about a week in the fridge, still maintaining its moisture. Again, an airtight container is key. For longer storage, this banana bread freezes beautifully! Wrap individual slices or the whole loaf tightly in plastic wrap, then in aluminum foil, or place them in a freezer-safe bag. It can stay frozen for up to 3 months. To thaw, simply leave it on the counter for a few hours or gently reheat it. For glaze timing, I highly recommend waiting until the bread is completely cool before glazing, especially if it’s a simple powdered sugar glaze. This prevents the glaze from melting into a puddle. If you’re freezing the glazed bread, the glaze might soften slightly upon thawing, but it’s still delicious.
Frequently Asked Questions
Final Thoughts
So there you have it – my ultimate, foolproof recipe for the perfect banana bread. It’s a recipe born from countless hours of baking, a little bit of experimentation, and a whole lot of love. It’s the kind of recipe that brings warmth to your kitchen and smiles to your family’s faces. It’s simple enough for a weeknight treat but special enough for company. If you love moist, flavorful baked goods, you’re going to adore this. For those of you who enjoyed this recipe, you might also love my recipe for {Link to another related recipe, e.g., “Moist Chocolate Chip Muffins”}. It’s that same level of comfort and deliciousness! I truly can’t wait to hear how your perfect banana bread turns out. Please share your thoughts, any variations you tried, or your own family traditions in the comments below! Happy baking!
Perfect Banana Bread Recipe
Ingredients
Main Ingredients
- 3 large ripe bananas mashed
- 0.5 cup unsalted butter melted
- 0.75 cup granulated sugar
- 1 large egg beaten
- 1 teaspoon vanilla extract
- 1.5 cup all-purpose flour
- 1 teaspoon baking soda
- 0.25 teaspoon salt
Instructions
Preparation Steps
- Preheat oven to 350°F (175°C). Grease and flour a 9x5 inch loaf pan.
- In a large bowl, mash the ripe bananas with a fork until smooth.3 large ripe bananas
- Stir in the melted butter and sugar.3 large ripe bananas
- Beat in the egg and vanilla extract.3 large ripe bananas
- In a separate bowl, whisk together the flour, baking soda, and salt.3 large ripe bananas
- Gradually add the dry ingredients to the wet ingredients, mixing until just combined. Do not overmix.
- Pour the batter into the prepared loaf pan.
- Bake for 55-65 minutes, or until a wooden skewer inserted into the center comes out clean.
- Let the banana bread cool in the pan for 10 minutes before transferring it to a wire rack to cool completely.


