


There are some desserts that just feel like a warm hug. You know, the kind that instantly transport you back to childhood, or the kind that make a regular Tuesday feel like a special occasion. This Peanut Butter Cup Brownie Trifle is *that* dessert for me. Seriously, if you’ve ever struggled with deciding between a brownie and a cheesecake, or a chocolate fix and a peanut butter craving, this is your answer. It’s a symphony of textures and flavors, all piled high in a glorious glass dish. I remember the first time I made this; my kids were practically fighting over who got the first spoonful. It’s become our go-to for potlucks and holiday gatherings, and honestly, it’s so easy that I’ve made it on a whim just because the craving hit after dinner. If you’re a fan of anything chocolate and peanut butter, this Peanut Butter Cup Brownie Trifle is going to be your new best friend. It’s like a no-bake cheesecake met a decadent brownie and they decided to have a delicious party in a trifle bowl!
What is a peanut butter cup brownie trif
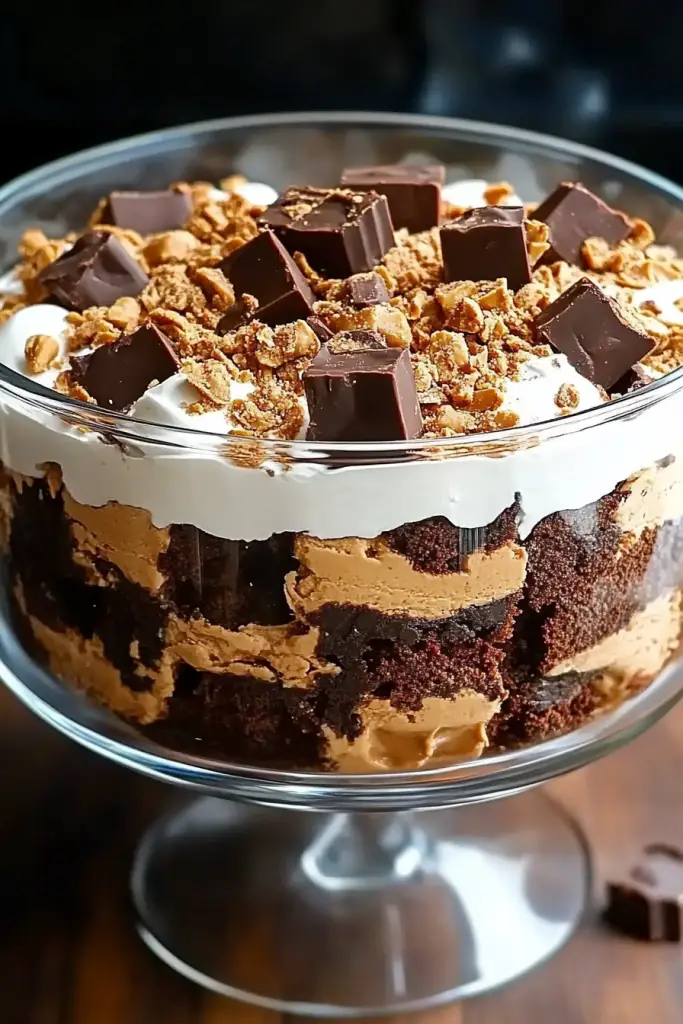
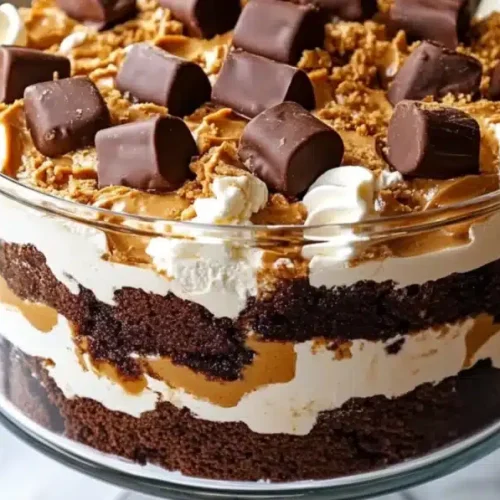
So, what exactly is a Peanut Butter Cup Brownie Trifle? Think of it as a deconstructed, ridiculously easy, and way more impressive version of your favorite candy bar, but in dessert form. It’s essentially layers of rich, fudgy brownie pieces, Creamy Peanut Butter mousse, a luscious chocolate pudding or ganache, and of course, chunks of real peanut butter cups. The beauty of a trifle is that you don’t need to be a master baker to make it look stunning. It’s all about the layers! The name itself just rolls off the tongue and hints at the deliciousness within. It’s a dessert that’s forgiving, adaptable, and always a crowd-pleaser. Forget complicated cake decorating; this is all about building flavor and texture, one scoop at a time. It’s less about precision and more about pure, unadulterated indulgence.
Why you’ll love this recipe?
Honestly, where do I even begin with why you’ll adore this Peanut Butter Cup Brownie Trifle? Let’s start with the obvious: the flavor combination. It’s a match made in heaven – rich, dark chocolate meets creamy, slightly salty peanut butter. Every bite is an explosion of familiar, comforting tastes that just work so well together. But it’s not just about the taste, it’s the textures too! You’ve got the soft, chewy brownie bits, the airy, light peanut butter mousse, and the smooth, decadent chocolate layer. It’s a party in your mouth!
And the simplicity? Oh my goodness, this is a lifesaver on busy nights or when you’re suddenly tasked with bringing a dessert to a gathering. You can even cheat a little by using store-bought brownies if you’re really pressed for time (though my homemade ones are pretty easy, I promise!). It feels fancy, but it’s surprisingly straightforward. This recipe is also incredibly budget-friendly, especially when you consider how decadent it tastes. You’re using simple pantry staples, and the result is something that looks and tastes like it came from a high-end bakery. What I love most about this is its versatility. You can swap out the type of brownie, change up the chocolate layer, or even add other goodies like crushed Oreos. It’s perfect for a casual family dessert night, but it also totally holds its own at a more formal dinner party. My kids ask for this all the time, and it’s usually gone in minutes at any event I bring it to!
How do I make a Peanut Butter Cup Browni
Quick Overview
Making this Peanut Butter Cup Brownie Trifle is all about building delicious layers. We’ll start with some easy homemade brownies (or your favorite store-bought ones!), whip up a creamy peanut butter filling, and then create a rich chocolate layer. Everything gets assembled in a beautiful glass trifle bowl, allowing those gorgeous layers to show off. It’s a no-bake assembly process, which means less time stressing in the kitchen and more time enjoying the anticipation of that first spoonful. The key is to let each layer set up slightly before adding the next, ensuring those distinct layers stay separate and stunning.
Ingredients
For the Fudgy Brownies:
* 1 cup (2 sticks) unsalted butter, melted
* 2 cups granulated sugar
* 4 large eggs
* 1 teaspoon vanilla extract
* 1 1/3 cups all-purpose flour
* 3/4 cup unsweetened cocoa powder (use a good quality one, it makes a difference!)
* 1/2 teaspoon baking powder
* 1/2 teaspoon salt
* 1 cup semi-sweet chocolate chips (optional, but highly recommended for extra gooeyness)
For the Creamy Peanut Butter Mousse:
* 8 ounces cream cheese, softened (full-fat is best for texture)
* 1 1/2 cups creamy peanut butter (natural or regular, your preference!)
* 1 cup powdered sugar, sifted
* 1 teaspoon vanilla extract
* 2 cups heavy whipping cream, cold
For the Rich Chocolate Pudding/Ganache:
* 3.4 ounces instant chocolate pudding mix (about 1 standard box)
* 3 cups milk (whole milk makes it extra creamy)
OR
* 8 ounces semi-sweet chocolate, finely chopped
* 1 cup heavy whipping cream
For Assembly & Topping:
* 12-16 peanut butter cups, roughly chopped (standard size)
Step-by-Step Instructions
Step 1: Preheat & Prep Pan
First things first, let’s get those brownies baking! Preheat your oven to 350°F (175°C). Grease and flour a 9×13 inch baking pan, or line it with parchment paper for easy removal. If you’re using parchment, make sure to leave some overhang on the sides – it’s a lifesaver for lifting the brownies out later. I always make sure my pan is thoroughly greased so I don’t have any sticky situations.
Step 2: Mix Dry Ingredients
In a medium bowl, whisk together the flour, cocoa powder, baking powder, and salt. Whisking them together ensures everything is evenly distributed, which means no pockets of baking powder or cocoa in your brownies. This is a small step, but it really helps with the overall texture and consistency of your final brownie layer.
Step 3: Mix Wet Ingredients
In a large bowl, whisk together the melted butter and granulated sugar until well combined. Then, beat in the eggs one at a time, followed by the vanilla extract. Make sure each egg is fully incorporated before adding the next. This process creates a smooth, glossy base for your brownie batter.
Step 4: Combine
Gradually add the dry ingredients to the wet ingredients, mixing on low speed or by hand until just combined. Be careful not to overmix here – that’s a surefire way to get tough brownies. A few streaks of flour are okay; they’ll disappear as you fold in the chocolate chips. If you’re using chocolate chips, gently fold them in now. Pour the batter into your prepared baking pan and spread it evenly. Bake for 30-35 minutes, or until a toothpick inserted into the center comes out with moist crumbs attached (not wet batter). Let them cool completely before cutting.
Step 5: Prepare Filling
While the brownies cool, let’s whip up that dreamy peanut butter mousse. In a large bowl, beat the softened cream cheese until smooth and creamy. Add the peanut butter and sifted powdered sugar, and beat again until well combined and fluffy. Stir in the vanilla extract. In a separate, clean bowl, whip the cold heavy cream until stiff peaks form. Gently fold about a third of the whipped cream into the peanut butter mixture to lighten it, then carefully fold in the remaining whipped cream until just combined. Don’t overmix, or you’ll deflate the airiness!
For the chocolate layer: If using instant pudding, whisk the pudding mix and milk together in a bowl until thickened, about 5 minutes. Let it sit for a few minutes. If making ganache, heat the heavy cream until it’s just simmering, then pour it over the finely chopped chocolate in a heatproof bowl. Let it sit for 5 minutes, then whisk until smooth and glossy. Let it cool slightly before assembling.
Step 6: Layer & Swirl
Now for the fun part – assembly! Cut your cooled brownies into bite-sized cubes. Grab your beautiful glass trifle bowl. Start with a layer of brownie cubes at the bottom. Spoon about half of the peanut butter mousse over the brownies, spreading it gently. Next, add a layer of the chocolate pudding or ganache. Sprinkle about half of the chopped peanut butter cups over the chocolate layer. Repeat with another layer of brownie cubes, the remaining peanut butter mousse, the remaining chocolate layer, and finally, top with the rest of the chopped peanut butter cups. If you’re feeling fancy, you can even reserve a few whole peanut butter cups for the very top!
Step 7: Bake
This step is actually for the brownies earlier on! Remember Step 4. For the trifle itself, there’s no baking required at this stage. Once assembled, cover the trifle bowl tightly with plastic wrap and refrigerate for at least 2-4 hours (or preferably overnight) to allow the flavors to meld and the layers to set. This chilling time is crucial for the best texture and taste.
Step 8: Cool & Glaze
The brownies need to cool completely before cubing and layering. Once the trifle is assembled, it needs to chill in the refrigerator to firm up. There’s no separate glaze for this trifle; the chocolate pudding or ganache acts as our rich topping, and the peanut butter cups add that extra bit of delightful crunch and flavor.
Step 9: Slice & Serve
To serve, use a large spoon to scoop down through all the layers, ensuring each serving gets a bit of everything. The visual appeal of the layers is part of the magic, so don’t be afraid to dig in deep! Serve chilled. It’s a decadent dessert that’s perfect on its own.
What to Serve It With
This Peanut Butter Cup Brownie Trifle is practically a meal in itself, but it also pairs beautifully with a few things depending on the occasion. For a casual morning treat or a mid-afternoon pick-me-up, I love it with a strong cup of coffee. The bitterness of the coffee cuts through the sweetness of the trifle perfectly. It’s also amazing with a glass of cold milk, just like you’d have with brownies.
If you’re serving this as a dessert after a meal, it needs very little accompaniment. Maybe a tiny dollop of whipped cream if you’re feeling extra, but honestly, it’s perfect as is. For brunch, it’s a showstopper! I’d serve it alongside some fresh fruit like berries to offer a lighter contrast. For a more elegant dessert setting, you could serve small individual portions in pretty glasses and pair it with a dessert wine or a rich coffee liqueur. My family loves it as a “special occasion” dessert after a big Sunday dinner. The key is that it’s so satisfying, it doesn’t need much else to shine!
Top Tips for Perfecting Your Peanut Butter Cup Brownie Trifle
I’ve made this Peanut Butter Cup Brownie Trifle more times than I can count, and I’ve learned a few tricks along the way that I think will really help you nail it. First, for the brownies: don’t overbake them! They should be slightly fudgy when they come out of the oven because they’ll continue to cook a little as they cool. Overbaked brownies will make your trifle dry. I always go by the moist crumbs rule.
When making the peanut butter mousse, make sure your cream cheese is truly softened. Cold cream cheese will result in lumps, and nobody wants a lumpy peanut butter layer. Also, don’t whip the heavy cream too much before folding it in. You want it to be light and airy, not grainy. For the chocolate layer, if you’re using pudding mix, make sure to let it thicken properly. If it’s too thin, your layers will get muddy. If you’re going the ganache route, using good quality chocolate really makes a difference in the richness and flavor.
Assembly is where you can really have fun. Don’t worry about perfect, uniform layers. The rustic look is part of its charm! I like to make sure each layer is distinct, so I’ll gently spread the mousse and pudding without letting them mix too much. For ingredient swaps, I’ve tried using almond butter, and it’s delicious, though it has a slightly different flavor profile. If you want a stronger chocolate flavor, use dark chocolate in the brownies and ganache. For a lighter option, you could try a vanilla pudding layer instead of chocolate. I’ve also used crushed chocolate chip cookies instead of brownies, and it was fantastic. The key is to have a good balance of textures and flavors in each spoonful. Trust me on this one, a little bit of planning and these tips will lead to trifle perfection!
Storing and Reheating Tips
Storing this Peanut Butter Cup Brownie Trifle is pretty straightforward, but there are a few things to keep in mind to maintain its deliciousness. If you have any leftovers (which is rare in my house!), cover the trifle bowl tightly with plastic wrap. It will keep well in the refrigerator for up to 3-4 days. The flavors actually get even better as it sits for a day, allowing everything to meld together beautifully.
I wouldn’t recommend leaving it at room temperature for too long because of the cream cheese and whipped cream in the mousse. A couple of hours is generally fine if it’s a cool environment, but for longer storage, the fridge is your best bet. If you happen to have enough leftovers to freeze, you can technically do it, but the texture might change a bit. If you do freeze it, I’d recommend covering individual servings tightly in plastic wrap and then foil, and thawing them slowly in the refrigerator overnight.
One thing to note: the peanut butter cups on top might soften slightly during storage, especially in the fridge. If you want that extra crunch, you can always add a fresh sprinkle of chopped peanut butter cups just before serving. Also, if you notice the chocolate layer seems a bit firm after chilling, just let it sit at room temperature for about 15-20 minutes before serving to soften slightly. It’s all about how you want to enjoy it!
Frequently Asked Questions
Final Thoughts
So there you have it – my absolute favorite Peanut Butter Cup Brownie Trifle! It’s more than just a dessert; it’s a guarantee of smiles, happy sighs, and maybe even a little bit of happy chaos at the dessert table. I truly believe this recipe is a keeper because it’s so incredibly forgiving and so utterly delicious. The combination of rich brownies, creamy peanut butter goodness, and decadent chocolate is simply irresistible. It’s the kind of dessert that makes people ask for the recipe, and it feels so rewarding when you tell them it was actually pretty easy to make!
If you’re someone who loves chocolate and peanut butter as much as I do, please, please give this a try. It’s perfect for holidays, parties, or just when you need a serious comfort food moment. And if you’re a fan of layered desserts, you might also enjoy my No-Bake Chocolate Eclair Cake or my Berry Trifle with Lemon Whipped Cream for other delicious layered creations. I can’t wait to hear what you think! Please leave a comment below and let me know how your Peanut Butter Cup Brownie Trifle turns out, or share any fun variations you come up with. Happy baking (or assembling!)!
Peanut Butter Cup Brownie Trifle
Ingredients
Brownie Layer
- 1 box Brownie Mix prepared according to package directions
Peanut Butter Mousse
- 1 cup Cream Cheese softened
- 0.5 cup Peanut Butter
- 0.5 cup Powdered Sugar
- 1 cup Heavy Cream whipped to stiff peaks
Chocolate Pudding Layer
- 1 box Chocolate Pudding Mix prepared according to package directions
Toppings
- 1 cup Peanut Butter Cups chopped
- 1 cup Whipped Cream
Instructions
Preparation Steps
- Prepare the brownie mix according to package directions and let it cool completely. Cut into bite-sized pieces.
- In a medium bowl, beat together the softened cream cheese and peanut butter until smooth. Gradually beat in the powdered sugar.
- Gently fold the whipped heavy cream into the cream cheese and peanut butter mixture until well combined.
- Prepare the chocolate pudding mix according to package directions and let it set.
- In a trifle dish or individual serving glasses, layer the brownie pieces, followed by the chocolate pudding, and then the peanut butter mousse. Repeat the layers if desired.
- Top with chopped peanut butter cups and whipped cream.
- Chill for at least 30 minutes before serving to allow the flavors to meld.


