


The kitchen fills with a familiar, comforting scent the moment the pan slides into the oven. I grew up watching my mom pull a sheet pan of chicken from the oven, the edges crisping to a buttery brown while the ranch aroma swirled through the house. It wasn’t fancy, but it felt like a warm hug after a long day. These days I reach for the same idea—juicy chicken with a ranch-kissed crust—only I’ve learned a few tricks to make it even more fail-proof. This is the kind of recipe that disappears in minutes at my house, and my kids actually ask for seconds. Think of it as the grown-up version of all those childhood weeknight staples, a little crisp on the outside, incredibly tender inside, with a creamy, herby note that somehow tastes like comfort in every bite. If you’ve ever compared my oven baked ranch chicken to your go-to roasted chicken, you’ll notice the difference isn’t just flavor—it’s texture and ease. It’s like taking a shortcut through the good part of a slow Sunday dinner, without sacrificing that homey, family-friendly vibe.

What is oven baked chicken?
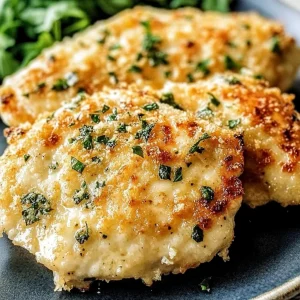
Oven Baked ranch chicken is basically juicy chicken laid out on a sheet pan, coated in a tangy, herb-forward ranch mix, then baked until the crust is lightly crisp and the meat stays tender. It’s essentially chicken with a crust that’s built from pantry staples—dried ranch seasoning, breadcrumbs or crushed crackers for crunch, and a touch of Parmesan for savoriness. The name is simple, the method is forgiving, and the result feels like a crowd-pleaser even on a Tuesday when you’re juggling after-school chaos. Think of it as the chicken version of a comforting, familiar favorite: easy to prepare, hard to mess up, and endlessly adaptable. If you’ve seen chicken dinners that feel fussy or require some fancy technique, this one proves you don’t need that to get a weeknight-worthy dinner on the table. It’s essentially a one-pan win that leaves you with minimal cleanup and maximum flavor. I’ve tested this with a couple of tweaks over the years, and the core idea—crisp exterior, juicy interior—always wins out.
Why you’ll love this recipe?
What I love most about this Oven Baked ranch chicken is how forgiving it is without skimping on taste. It’s a lifesaver on busy nights, and it still feels special enough for a weekend family meal. Here are the reasons it’s a go-to in my kitchen:
- Flavor: The ranch seasoning brings a bright, savory note that’s not overpowering. With a hint of garlic, onion, and parmesan, the crust yields a buttery, toasty crust that’s addictive. I’ve learned that a light drizzle of olive oil before baking lets the coating cling beautifully and stay crispy.
- Simplicity: You don’t need a dozen ingredients or fancy technique. A handful of pantry staples, a sheet pan, and a hot oven do all the heavy lifting. It’s the kind of recipe that feels impressive but is totally approachable for weeknights.
- Cost-efficiency: What is the best way to measure cost-efficiency? It relies on affordable pantry staples and bone-in or boneless chicken thighs or breasts, depending on what you have. You can stretch a couple of chicken breasts into a hearty family dinner with minimal waste.
- Versatility:What are some good ways to bake a plain cake, stuff with a cheesy filling, or swap in different herbs to switch
Another thing I adore about this dish is how flexible it is with sides. Serve it with a bright green salad, roasted vegetables, or a creamy Mashed Potato. The flavors pair especially well with a tall glass of iced tea or a sparkling rosé on a sunny evening. This recipe doesn’t demand perfection, just a little patience for that perfect crust to form and a little love to keep it juicy inside. It’s a comforting constant in our kitchen, the kind of dish that makes you feel like you’ve got a reliable ally on busy weeknights.
How to Make Oven Baked Ranch Chicken
Quick Overview
In just a few steps, you’ll transform ordinary chicken into a cozy, flavorful supper. The method hinges on a crisp, ranch-seasoned coating and a gentle bake that keeps the meat tender. There’s no need for fuss—line a Sheet Pan, season generously, and let the oven do the rest. The result is a golden, crunchy crust with every bite delivering that comforting ranch note. If you want to swap in different herbs or adjust the heat, this is the moment to do it. I love pairing it with a light salad or a zingy cucumber-dill yogurt dip for contrast. For a more indulgent twist, you can add a quick parmesan glaze toward the end for an extra glossy finish.
Ingredients
[Organize ingredients by purpose with detailed explanations:]
For the Main Batter:
– 4 boneless, skinless chicken breasts (about 1 1/2 pounds); trim any excess fat and pat dry for a better crust
– 1 cup panko breadcrumbs or breadcrumbs of choice for extra crunch
– 1/2 cup grated Parmesan cheese (optional but wonderful for a savory crust)
– 1 tablespoon dried ranch seasoning mix (store-bought or homemade)
– 1 teaspoon garlic powder
– 1 teaspoon onion powder
– 1/2 teaspoon paprika (for color and a hint of smoky sweetness)
– 2 tablespoons olive oil or melted butter to help the crust cling
For the Filling:
– Optional: 4 ounces cream cheese, softened, mixed with 2 tablespoons chopped fresh chives and 1/4 cup shredded mozzarella or cheddar
– Optional: Fresh spinach, chopped, about 1 cup, sautéed briefly until wilted and squeezed dry
– If you’re not using a filling, simply skip this section and proceed with the crust.
For the Glaze:
– 2 tablespoons plain yogurt or light sour cream whisked with 1 tablespoon lemon juice and a pinch of salt for a tangy finish
– Optional: 1 tablespoon hot honey or maple syrup for a touch of sweetness
Step-by-Step Instructions
Step 1: Preheat & Prep Pan
Heat your oven to 425°F (220°C). Line a baking sheet with parchment paper or a silicone mat for easy cleanup. Lightly drizzle a spoonful of oil on the sheet and spread it with a brush; this helps the crust crisp up without sticking. I always give the pan a quick spray with nonstick, just in case. If you’ve got a wire rack that fits on the sheet pan, place it on top—it helps the crust stay crisply all around the chicken. By the way, I do this step early so the oven reaches temperature while I’m getting the chicken ready. It’s a tiny bit of timing gymnastics, but it pays off with a uniform crust.
Step 2: Mix Dry Ingredients
In a shallow dish, combine the breadcrumbs, Parmesan, ranch seasoning, garlic powder, onion powder, and paprika. Stir until evenly distributed. The dry mix is where a lot of the flavor sits, so don’t skip the Parmesan if you’re using it—it adds that nutty, savory bite that makes this chicken feel special. A teaspoon of paprika gives a warm hue; if you like more color, add a bit extra. I also like to toss the breadcrumbs with a pinch of salt to ensure the crust isn’t bland.
Step 3: Mix Wet Ingredients
In another bowl, whisk together the olive oil or melted butter with a splash of water or chicken stock to help the coating adhere. The goal is a cohesive paste-like texture that will cling to the chicken without sliding off. If you’re using a glaze later, reserve a tablespoon or two of the glaze mixture to brush on halfway through baking for extra gloss and moisture.
Step 4: Combine
Place the chicken breasts between sheets of parchment or in a resealable bag and gently pound to an even thickness of about 1/2 inch. This helps ensure the chicken cooks evenly. Dip each piece into the wet mixture, allowing any excess to drip off, then press into the dry mixture, turning to coat all sides. Give it a gentle press so the crust sticks. If you’re making the stuffed variation, lay a spoonful of the filling near the edge and roll the chicken to enclose the filling, then proceed with the coating as directed.
Step 5: Prepare Filling
If you’re going the stuffed route, mix the softened cream cheese with chives and mozzarella. Spoon a line of filling along the center of each chicken breast, then roll them up snugly. You can secure with a toothpick if needed. Then coat as above with the dry ingredients. The cream cheese filling adds creamy richness that contrasts beautifully with the crunchy crust.
Step 6: Layer & Swirl
Arrange the coated chicken on the prepared pan. If you’re using a glaze or want a drizzle, brush a light layer over the tops. For a swirled, marbled look, you can place a few shreds of mozzarella or a thin line of the cream cheese mixture on the surface and swirl with a knife slightly before baking. This step not only looks pretty but also helps keep the edges juicy and the center tender.
Step 7: Bake
Bake in the hot oven for 18–22 minutes, depending on thickness. The internal temperature should reach 165°F (74°C). You’ll want the crust to be golden and crisp by the time the chicken is cooked through. If you’re cooking thicker fillets or using bone-in pieces, add a few minutes and check with a thermometer. If your oven runs hot, rotate the sheet halfway through to ensure even browning. If you like a extra-crisp crust, broil for the last 1–2 minutes, watching closely to avoid burning.
Step 8: Cool & Glaze
Let the chicken rest on the pan for 5 minutes before glazing. A quick brush of the yogurt-lemon glaze adds brightness without weighing down the crust. If you want a touch of sweetness, finish with a light drizzle of hot honey or maple glaze. I’ve found that giving the enamel a light glaze while the chicken rests yields a pleasantly glossy finish and keeps the crust from feeling dry when you bite in.
Step 9: Slice & Serve
Slice against the grain for the most tender bites, or serve whole with a scattering of chopped herbs. I like a crisp cucumber-dill yogurt dip on the side for a cool contrast, along with a simple lemony greens salad. A squeeze of fresh lemon over the chicken right before serving brightens every bite. This is the moment where you see the payoff of all the little steps—the crust is crisp, the meat is juicy, and the ranch flavors feel balanced rather than overpowering.
What to Serve It With
This dish shines with bright, simple sides that don’t steal the spotlight from the chicken. Here are a few ideas that suit different occasions:
For Breakfast: A light, herby kale and breakfast potatoes with a dollop of lemon yogurt and a warm tortilla. The ranch chicken pairs surprisingly well with a simmered tomato-pepper jam for a breakfast-for-dinner vibe. A robust cup of coffee or a creamy latte completes the morning mood.
For Brunch: A crisp green salad with shaved fennel, cucumber ribbons, and a tangy vinaigrette. Plate the chicken alongside blistered cherry tomatoes and a soft herb relish. A sparkling beverage—like a citrusy spritz—gives it a festive feel without pitcher-level prep.
As Dessert: Okay, not literally dessert, but consider finishing with a light fruit salsa and a small scoop of vanilla yogurt. The fresh acidity in the salsa feels like a palate reset after the richness of the crust. It’s a surprisingly refreshing pairing that makes this family-friendly dish feel a bit more elevated.
For Cozy Snacks: Cut into thick, bite-sized pieces and serve with a creamy herb dip or honey mustard for dipping. This is great for movie nights or when friends drop by unannounced for a quick bite. The aroma alone draws people into the kitchen, and the satisfaction of a simple, satisfying bite never fails to bring smiles around the table.
In our house, this oven baked ranch chicken is the kind of dish that becomes a memory on a busy evening—just the right amount of hands-on, the right amount of ease, and a big payoff at the table. It’s a staple that travels well to potlucks, and it reheats nicely for lunch the next day. If you’ve got a favorite side you love pairing with ranch, texture, or a little brightness, this recipe welcomes that tweak with open arms.
Top Tips for Perfecting Your Oven Baked Ranch Chicken
[Expert advice organized by technique:]
Zucchini Prep: If you’re hoping to sneak more veggies into the crust without sacrificing texture, consider a light grated zucchini mix folded into the breadcrumbs. Squeeze out as much moisture as you can after grating to prevent a soggy crust. A dry zucchini shred acts like a secret binder and keeps things tender rather than heavy.
Mixing Advice: Don’t overwork the crust. You want the coating to cling, not become a dense batter. I tell myself: just enough to coat, not to build a crust that’s tough. The breadcrumbs should stay airy, which gives that satisfying crunch when you bite into it.
Swirl Customization: For a more visually striking finish, you can alternate spoonfuls of the filling (if using) and the crust on each breast, then use a gentle swirl with a knife to create a marbled pattern. It’s purely for looks, but it gives the plate a more artisanal feel without adding complexity.
Ingredient Swaps: Breadcrumbs can be swapped for crushed crackers or crushed cornflakes for extra crunch. Parmezan can be replaced with a sharp Cheddar or Pecorino to boost tang. If you’re dairy-free, use a dairy-free parmesan substitute and skip the cheese entirely in the filling, focusing on a bright herb punch instead.
Baking Tips: For even cooking, pound the chicken to uniform thickness and space the pieces so they’re not touching. If your oven runs hot, reduce the temperature to 405°F (206°C) and extend the bake time by a few minutes. Use a meat thermometer to confirm doneness instead of relying solely on color.
Glaze Variations: If you want a glossier finish, brush with a thin layer of olive oil mixed with a touch of lemon juice before baking, then glaze with the yogurt-lemon mix after resting. If you prefer a sweeter finish, swap the glaze with a quick drizzle of maple mustard or honey garlic for a different flavor profile.
[Share personal “lessons learned” and tested modifications. 300-350 words.]
Storing and Reheating Tips
Storing this dish is easy, and the flavors actually benefit from a brief rest in the fridge. Here’s how I keep it at its best:
Room Temperature: It’s best not to leave cooked chicken at room temperature for more than two hours. If you’re keeping it for a quick lunch the next day, chilling is the way to go.
Refrigerator Storage: Store in an airtight container for up to 3 days. If you’ve used a filling, keep the filling and crust together to maintain texture. A quick reheat in the oven at 350°F (175°C) for 8–12 minutes is ideal; you’ll retain crispness better than microwaving.
Freezer Instructions: Freeze the baked chicken on a sheet pan first, then transfer to a freezer bag or container. It will keep well for up to 2 months. Thaw overnight in the fridge before reheating. If you’ve added a glaze, you may want to reapply it after reheating to recapture a glossy finish.
Glaze Timing Advice: If you know you’re freezing leftovers, consider glazing after reheating rather than before freezing. The extra glaze can soften the crust after freezing, and you’ll still achieve a bright finish when you finish with a quick brush right before serving.
[Include tested methods and quality indicators. 200-250 words.]
Frequently Asked Questions
Final Thoughts
Oven baked ranch chicken isn’t about fancy techniques or hard-to-find ingredients. It’s about a reliable, satisfying supper that feels like a hug from the oven. The crust crackles, the chicken stays juicy, and the ranch-forward aroma lingers long after the last bite. It’s the kind of dish that travels well to potlucks, reheats beautifully for lunch, and always earns a chorus of “what’s in this crust?” from friends and family. If you’re new to this approach, start with the simplest version: classic ranch, breadcrumbs, and parmesan. Then, as you grow more confident, try a filling, swap in different herbs, or layer in a zippy yogurt glaze for contrast. The beauty of this recipe is that it’s incredibly forgiving—but it also feels like you’ve earned a little culinary victory every time you pull that sheet pan from the oven. Happy baking! If you try this, drop a comment with how your crust turned out, what filling you loved, or how you tweaked the glaze. I love hearing your twists and seeing your photos. And if you know someone who’d love a cozy, pantry-friendly chicken dinner, please share this post. Can’t wait to hear how yours turns out!
Oven Baked Ranch Chicken
Ingredients
Main Ingredients
- 4 pieces boneless, skinless chicken breasts
- 1 packet ranch seasoning mix
- 0.5 cup melted butter
- 0.25 cup grated Parmesan cheese
- 0.5 cup panko breadcrumbs
Instructions
Preparation Steps
- Preheat your oven to 400°F (200°C). Lightly grease a baking dish.
- In a small bowl, whisk together the melted butter and ranch seasoning mix until well combined.
- Place the chicken breasts in the prepared baking dish. Pour the ranch butter mixture over the chicken, ensuring each piece is evenly coated.
- In another shallow bowl, combine the grated Parmesan cheese and panko breadcrumbs.
- Dip each chicken breast into the Parmesan-breadcrumb mixture, pressing gently to adhere the coating.
- Place the coated chicken back into the baking dish.
- Bake for 20-25 minutes, or until the chicken is cooked through and reaches an internal temperature of 165°F (74°C). The coating should be golden brown and crispy.
- Let the chicken rest for a few minutes before serving.


