


I’ll never forget the first time I made this Nutella school snack for my kids. It was one of those hectic mornings when breakfast barely happened, and I needed something quick, delicious, and a little bit fun for their lunch boxes. Honestly, it turned into a little magic trick in the kitchen—it’s like giving your kid a hug through food. The sweet, chocolatey swirls of Nutella paired with a soft, tender bread make it feel so indulgent, yet it’s super simple to whip up. Compared to the usual PB&J, this snack feels like a tiny celebration, perfect for brightening up an ordinary school day. I’ll admit, I was nervous at first whether it’d travel well or be too messy, but it’s held up beautifully every time.
What is Nutella School Snack?
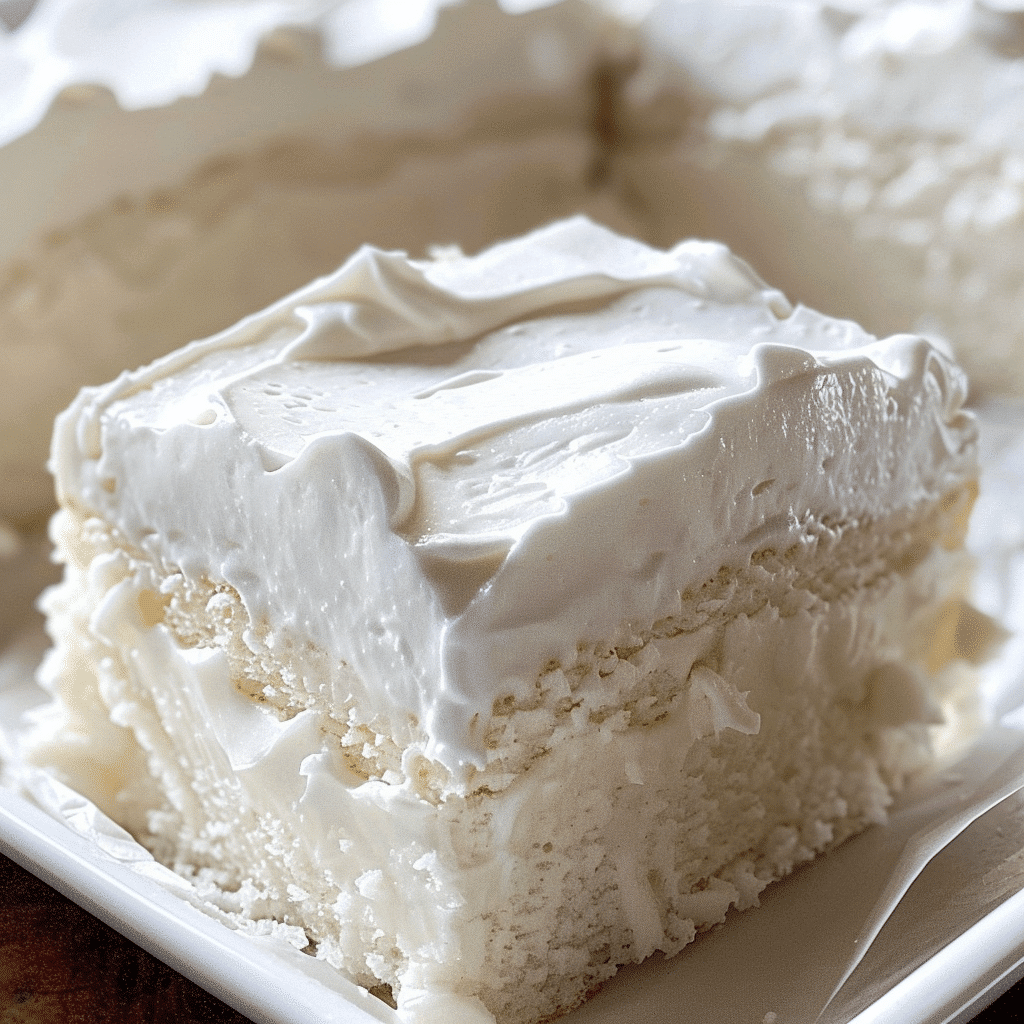
Think of a Nutella school snack as the ultimate handheld delight that combines the creamy richness of Nutella with a soft cake or bread base, paired with a just-right glaze to seal the deal. It’s essentially a small, portable sweet bread or snack bar swirled or layered with Nutella, made with simple pantry staples. The concept might remind you of a classic swirl bread or filled muffin, but this one has that luscious, slightly gooey center that kids go crazy for. It’s not just for school lunches either—great for after-school snacking, lazy weekend brunches, or when you need a comforting mid-afternoon pick-me-up. I’ve seen variations of this around, but this recipe is the one I keep coming back to because it strikes that perfect balance of sweet, soft, and nutty every single time.
Why you’ll love this recipe?
What I love most about this Nutella school snack is how it feels like a small indulgence that doesn’t require a ton of work or fancy ingredients. The flavor is seriously dreamy—creamy Nutella swirled through moist, tender bread with a hint of vanilla that makes every bite melt in your mouth. And let me tell you, the aroma filling your kitchen while it bakes? Pure happiness.
Sometimes, when I’m short on time, this recipe is a lifesaver. It’s straightforward enough that even my kids pitch in with spreading Nutella and swirling the batter. Plus, it’s made with ingredients you likely have hanging out in your pantry and fridge, so no need for last-minute trips to the store (hallelujah!). Compared to something like a typical granola bar, this feels way more special and homemade.
Another thing I adore is how versatile it is. You can make it with different nut butters or chocolate spreads if Nutella isn’t your thing. Sometimes, I sprinkle chopped nuts or a dash of cinnamon in the batter for a little twist. And because it’s not overly sweet, it works great for pairing with a glass of milk or a cup of tea, depending on whether it’s a lively school morning or a mellow weekend snack. My kids literally ask for this all the time now, which is a win in my book. There’s nothing like watching those faces light up with every bite.
How do you make Nutella school snacks?
Quick Overview
Making this snack is a breeze, honestly. You start by prepping a simple batter—think basic cake or Quick Bread vibes—then add your star player, Nutella, to the mix in a marbled swirl pattern. Basically, you pour the batter into a pan, dollop Nutella on top, and swirl it with a knife or skewer to create those beautiful ribbons of chocolatey goodness. Bake until it’s golden and toothpick-clean, then finish with a light glaze that adds a touch of shine and sweetness. The whole process feels like a little art project that ends in pure deliciousness. If you’ve ever assembled brownies with swirls or layered quick breads, you’re already halfway there!
Ingredients
For the Main Batter:
- 1 ½ cups all-purpose flour (sifted for extra fluffiness)
- 1 teaspoon baking powder (for that gentle raise)
- ½ teaspoon baking soda (to balance the acidity)
- ¼ teaspoon salt (brings everything together)
- 3 large eggs (room temp makes mixing smoother)
- ½ cup granulated sugar (adjustable to your sweetness preference)
- ½ cup vegetable oil or melted butter (I love butter for richness, oil for moistness)
- 1 teaspoon pure vanilla extract (trust me, it transforms the flavor)
- ½ cup milk (or almond milk—tested it, and it made it even creamier!)
For the Filling:
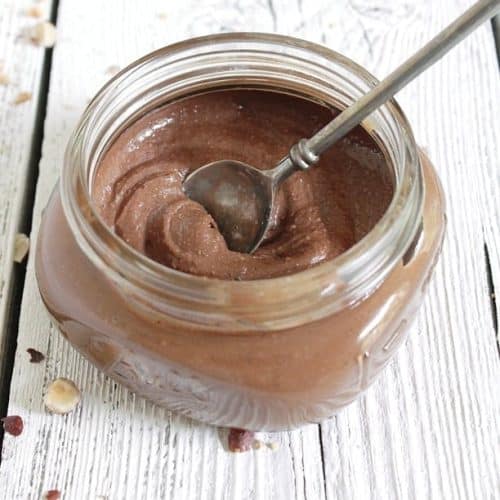
- ¾ cup Nutella (or your favorite hazelnut spread, but nothing beats classic Nutella)
For the Glaze:
- ½ cup powdered sugar (sifted to avoid lumps)
- 1-2 tablespoons milk or espresso (for a subtle coffee hint)
- ½ teaspoon vanilla extract (optional, but I always add)
Step-by-Step Instructions
Step 1: Preheat & Prep Pan
Set your oven to 350°F (175°C) and line an 8×8 inch baking pan with parchment paper, leaving a bit overhang on the sides. This makes lifting the finished snack out a breeze and prevents sticking. I learned the hard way once when it stuck tight—I don’t recommend scraping your pan with knives.
Step 2: Mix Dry Ingredients
In a medium bowl, whisk together the flour, baking powder, baking soda, and salt. Make sure you mix thoroughly so the leavening agents are evenly spread. This step might seem simple, but it’s your ticket to an even crumb and a loaf that rises nicely.
Step 3: Mix Wet Ingredients
In a large bowl, whisk the eggs and sugar together until it’s light and slightly frothy—this helps create that tender structure. Then add the oil (or melted butter) and vanilla extract, mixing until smooth. Slowly pour in the milk while continuing to whisk. You’ll notice the batter is silky and smooth, which is exactly what you want.
Step 4: Combine
Gently fold the dry ingredients into the wet, stirring just until everything is combined. Be careful not to overmix here; a few tiny pockets of flour are okay. Overmixing can make the bread tough and dense, which nobody wants for a school snack. If you’re anything like me, trying to get every speck combined perfectly is tempting—but trust me on this one.
Step 5: Prepare Filling
Spoon the Nutella into a microwave-safe bowl and warm it for about 10-15 seconds. This makes it easier to swirl without it clumping or tearing the batter. The consistency should be smooth and spreadable, not hot or runny. If you let it sit out too long and it gets too stiff, a quick zap in the microwave helps bring it back to life.
Step 6: Layer & Swirl
Pour half the batter into your prepared pan, then dollop the warmed Nutella in spoonfuls over the top. Carefully pour the remaining batter over the Nutella. Now comes the fun part—grab a skewer, chopstick, or butter knife and gently swirl the batter and Nutella together just once or twice. Don’t overdo it; you want beautiful, distinct ribbons of chocolate running through the bread, not a brown mess.
Step 7: Bake
Pop it in the oven for about 35-40 minutes. Start checking at 35 minutes with a toothpick inserted in the center—it should come out clean or with just a few moist crumbs. If it’s too gooey, give it a few more minutes, but be careful not to let the edges get too dark. Your kitchen will start smelling irresistible about halfway through baking.
Step 8: Cool & Glaze
Let the bread cool in the pan for 15-20 minutes before lifting it out with the parchment paper to cool completely on a wire rack. Once cool, whisk together your powdered sugar, milk, and vanilla to make a smooth glaze. Drizzle it over the top with a little spoon or fork—this adds a shiny, sweet coat that makes it feel a bit extra without being fussy. Pro tip: If your glaze is too thin, add more powdered sugar; if it’s too thick, a splash more milk.
Step 9: Slice & Serve
Use a sharp serrated knife for the cleanest cuts. I find slicing it slightly thinner works best for little hands and lunchboxes. Serve it as is or with a smear more Nutella or a dollop of yogurt on the side for a fun twist. At my house, slices don’t last long—usually disappear in minutes, which always feels like a small victory.
What to Serve It With
For Breakfast: Pair it with a steaming cup of coffee or a rich Hot Chocolate for those sleepy mornings. A side of fresh fruit like berries or sliced bananas adds just the right fresh contrast to the richness of the Nutella.
For Brunch: Slice it a bit thicker and serve it alongside whipped cream and a sprinkle of toasted hazelnuts. A mimosa or freshly squeezed orange juice brightens the plate and balances the sweetness nicely.
As Dessert: Warm it up slightly and serve with a scoop of vanilla Ice Cream or a drizzle of caramel sauce. You could even add a dusting of powdered sugar for an extra touch of charm.
For Cozy Snacks: Great on its own with a cold glass of milk or with a mug of tea on a rainy afternoon. This recipe has saved me on busy weeknights when everyone wants something sweet but nothing too heavy, and it holds up well whether eaten warm or at room temperature.
One of my favorite family traditions is packing a slice of this in lunchboxes alongside some cut-up Apple Slices and a small juice box. It feels like a secret treat that gets them through the day with a smile. If you try pairing it with fresh strawberries or toasted almonds, I’d love to hear how it goes!
Top Tips for Perfecting Your Nutella School Snack
Zucchini Prep: While this isn’t a zucchini-based recipe, if you want to experiment and add some shredded zucchini for extra moisture and nutrition, make sure to squeeze out as much water as possible with a clean towel. Too much moisture can make the bread soggy, and no one likes that.
Mixing Advice: When combining wet and dry ingredients, stirring just until everything is moist is your best friend. Overmixing makes the crumb tight and chewy, and this snack should be tender and soft. I learned that lesson after one batch ended up like Bread Sticks—not fun.
Swirl Customization: Don’t rush the swirling step. I usually do two to three gentle swirls, making sure to reach all parts of the pan so every piece gets some Nutella surprise. More swirling means the Nutella will be all blended, which is tasty, but misses out on that personalized marbled look.
Ingredient Swaps: Try almond or oat milk instead of dairy for a slightly nuttier or creamier twist. I’ve swapped in coconut oil for vegetable oil to bring a subtle tropical note that the kids surprisingly love. For a nut-free version, sunflower seed butter spread can be an interesting substitute.
Baking Tips: Oven temperatures can vary, so keep an eye after 30 minutes, with a tester ready. If the top browns too fast, loosely tent the bread with foil and allow the inside to keep baking without drying out. Positioning pans in the center rack helps promote even cooking.
Glaze Variations: Sometimes I swap milk for brewed espresso or strong tea in the glaze for an adult twist. Adding a pinch of cinnamon or a splash of rum extract can take the glaze from simple sweet to something a bit more special and sophisticated.
This recipe has been a trial-and-error journey, but it’s one of my favorites to share because it’s forgiving and fun. You’ll learn how your kitchen and oven like to play, and before long, the glazy, nutty scent filling your home will be your new favorite memory trigger.
Storing and Reheating Tips
Room Temperature: Keep this snack in an airtight container or wrapped in plastic wrap for up to 2 days. It stays wonderfully soft, and I often leave it out of the fridge when planning to eat it within a day to keep its fresh-from-the-oven texture.
Refrigerator Storage: For longer storage, pop it in the fridge wrapped tightly in foil or plastic wrap. It will last about 4-5 days, though it can firm up a bit, so warming in the microwave for 10-15 seconds before eating helps bring it back to life.
Freezer Instructions: Slice the bread first, then individually wrap each piece in parchment and foil or place in a freezer bag. It freezes well for up to 3 months. When ready to eat, thaw overnight in the fridge or at room temp, and warm briefly for that fresh-baked feel.
Glaze Timing Advice: If you plan to freeze or store longer, it’s best to glaze right before serving instead of before storing. This keeps the glaze fresh and prevents it from absorbing into the bread or becoming sticky during refrigeration.
I’ve wrapped, frozen, and thawed this snack more times than I can count, and with these methods, it’s never lost more than a smidge of its charm. Your lunchbox lifesaver right here!
Frequently Asked Questions
Final Thoughts
This Nutella school snack feels like my little kitchen secret to turning ordinary mornings into moments of joy. It’s one of those recipes that’s both kid-friendly and guilty-pleasure-worthy, without any complicated fuss. Whether you’re packing lunches, craving a comforting snack, or want something quick yet special, this has been my go-to time and again. The ease of making it, combined with the rich, nutty deliciousness, means it always gets devoured fast—sometimes before it even reaches the lunchbox!
If you’re here for more cozy, familiar treats, I’d recommend trying my cinnamon swirl banana bread or my quick peanut butter snack bars—they share that same homey vibe. I’m excited for you to make this recipe your own, maybe add your twists, and hopefully share it with friends and family just like I have. Drop your thoughts or variations below—I love hearing your stories. Happy baking and snack time vibes!
nutella school snack
Ingredients
Main Ingredients
- 1 cup hazelnuts toasted and skinned
- 12 oz milk chocolate chips
- 2 tablespoons canola oil
- 3 tablespoons powdered sugar
- 0.5 teaspoon pure vanilla extract
- 1 teaspoon salt
Instructions
Preparation Steps
- Preheat oven to 350°F.
- Spread the hazelnuts on a baking sheet and toast in the oven for 10 to 12 minutes until golden.
- Place toasted hazelnuts in a kitchen towel and rub to remove skins as much as possible.
- Melt the milk chocolate chips using a double boiler or microwave. Allow to cool completely.
- Process the skinned hazelnuts in a food processor until a smooth paste forms.
- Add canola oil, powdered sugar, vanilla extract, and salt to the hazelnut paste and mix well.
- Blend in the melted chocolate and continue processing until the mixture is smooth and creamy.
- Transfer the Nutella spread to a jar and let it cool to thicken before serving.
- Cover the jar or serve immediately with bread or snacks.


