


Oh, you guys! I have a confession to make. There are some recipes that I hold so dear, they feel like a warm hug from the inside out. And this, my friends, is one of them. When I first stumbled upon a version of these no bake cookies years ago, it was during a chaotic week where my oven decided to take an unscheduled vacation. I was desperate for something sweet, something that felt like a treat, but the thought of actually *baking* felt like climbing Mount Everest. Sound familiar? These no bake cookies were an absolute lifesaver that day, and honestly, they’ve been a staple in my kitchen ever since. They’re so simple, so ridiculously delicious, and they satisfy that sweet craving without any fuss. Forget complicated cake recipes or fussy cookies that require chilling time; these no bake cookies are the answer to your sweet tooth prayers on busy weeknights or when you just don’t feel like turning on the oven.

What is no bake cookie?
So, what exactly are these magical things? No bake cookies, at their heart, are a delightfully simple confection made without the need for an oven. Think of them as a fudgy, chocolatey, peanut buttery treat that comes together on the stovetop and then sets up on the counter or in the fridge. They usually have a base of sugar, butter, and milk that’s brought to a boil, then thickened with ingredients like oats and Peanut Butter. Some variations might add cocoa powder for that classic chocolate flavor, or even a touch of vanilla. The beauty of no bake cookies is that they capture that rich, decadent taste you’d expect from a baked treat, but with a wonderfully chewy, slightly soft texture that’s utterly irresistible. It’s like a candy bar and a cookie had a delicious baby, and I am HERE for it.
Why you’ll love this recipe?
There are so many reasons why I’ve made this recipe my go-to, and I just know you’re going to fall in love with them too. First off, the flavor! It’s that perfect balance of sweet, chocolatey, and a hint of salty from the peanut butter. It’s pure comfort in every bite. What I love most about these no bake cookies is how incredibly simple they are. You literally just mix a few things in a pot, boil it for a minute or two, and then stir in the rest. No fancy equipment, no creaming butter and sugar for ages. My kids actually ask for these all the time, and I can whip up a batch in under 15 minutes from start to finish. Plus, they’re super budget-friendly! You probably already have most of the ingredients in your pantry. And the versatility! While I adore them as is, you can totally play around with additions like chopped nuts or even a sprinkle of sea salt on top right after they set. If you love my fudgy brownie recipe or my easy Peanut butter blossoms, you’ll appreciate the quick and satisfying nature of these no bake cookies. They’re just honest-to-goodness deliciousness without the effort.
How do I make no bake cookies?
Quick Overview
This recipe is all about speed and simplicity. We’ll start by bringing a sugar, butter, and milk mixture to a boil on the stovetop. Once it reaches the right temperature (which we’ll talk about!), we’ll remove it from the heat and quickly stir in our cocoa powder, Peanut Butter, and vanilla until smooth and glossy. Finally, we fold in the oats, drop spoonfuls onto parchment paper, and let them work their magic as they cool and set. It’s honestly that easy! This method ensures a perfect texture every single time, avoiding any graininess or overly dry results.
Ingredients
For the Main Batter:
2 cups granulated sugar (I find this gives the best texture; less can make them a bit too soft)
1/2 cup (1 stick) unsalted butter (good quality butter makes a difference here!)
1/2 cup milk (whole milk is my preference for richness, but I’ve had success with 2% too)
1/4 cup unsweetened cocoa powder (use a good brand for the best chocolate flavor, trust me!)
1/2 cup Creamy Peanut Butter (Jif or Skippy are classics for a reason, but any creamy, unsweetened works)
1 teaspoon vanilla extract (don’t skimp here, it really rounds out the flavors)
3 cups old-fashioned rolled oats (quick oats can work but might give a softer, less distinct texture)

Step-by-Step Instructions
Step 1: Preheat & Prep Pan
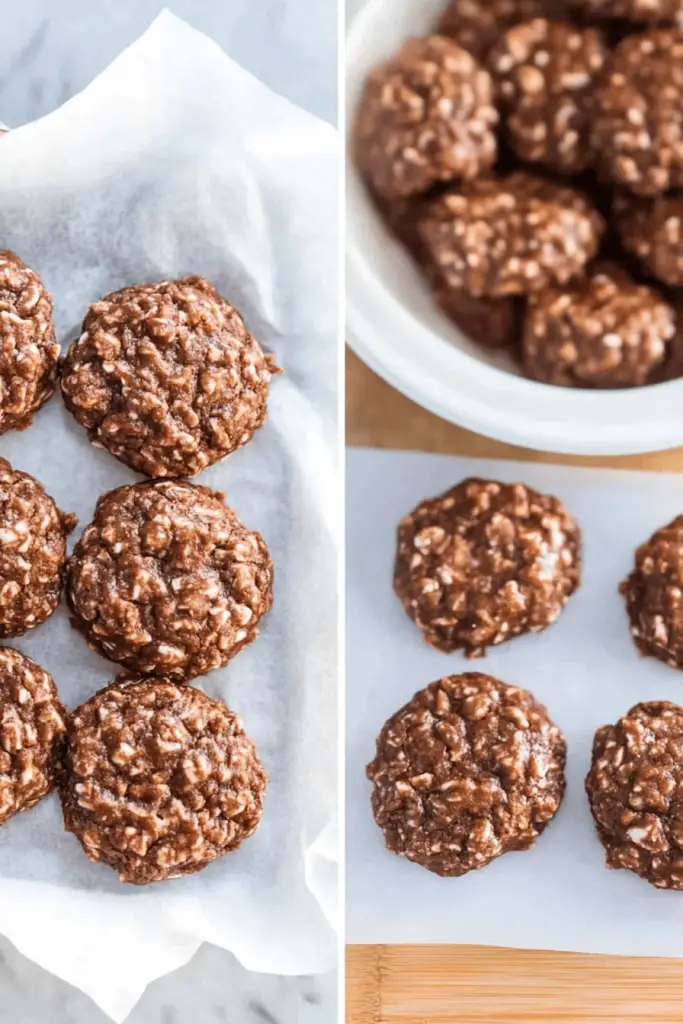
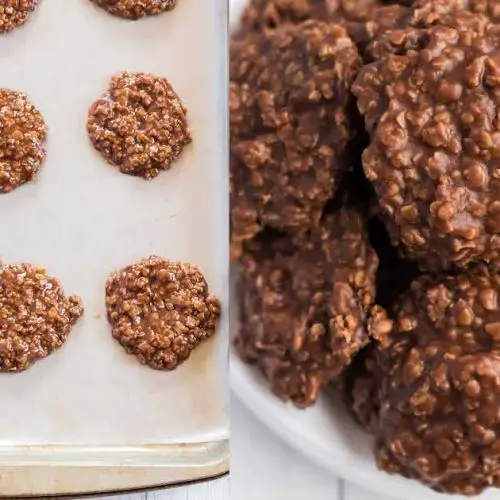
This is super simple. You don’t need to preheat an oven! All you need to do is line a baking sheet or a few large plates with parchment paper or wax paper. This is crucial because these little guys will stick like glue if you don’t. Make sure you have enough space to lay them out so they don’t touch too much as they set. I usually use a standard baking sheet, and it fits about 12-15 cookies, so have a couple ready if you’re making a big batch.
Step 2: Mix Dry Ingredients
Grab a medium bowl and add your rolled oats to it. Set that aside. In a separate bowl (or just have it handy), measure out your cocoa powder. Having everything measured and ready to go is key when working with recipes that come together quickly like this!
Step 3: Mix Wet Ingredients
In a medium saucepan, combine the granulated sugar, butter, and milk. Place the saucepan over medium heat. Stir constantly until the butter is melted and the sugar is dissolved. Once it’s bubbling, let it come to a rolling boil. This is where the magic happens! You need to let it boil for exactly 1 minute. I use a timer for this, and it’s important not to over or under-boil. If you boil it too short, they might be too soft; too long, and they can become crumbly.
Step 4: Combine
As soon as that 1 minute of boiling is up, remove the saucepan from the heat immediately. This is important so the cooking process stops. Now, quickly stir in the cocoa powder and the creamy Peanut Butter. Stir vigorously until both are completely melted and incorporated, and the mixture is smooth and glossy. It should look rich and decadent! If your peanut butter is really stiff, you might need to stir a little longer. Don’t worry if there are a few tiny lumps, it usually works itself out.
Step 5: Prepare Filling
Okay, now for the final step of mixing. Add the vanilla extract to the saucepan mixture and give it a quick stir. Then, add your measured rolled oats. Stir everything together until the oats are thoroughly coated. You want to work quickly here so the mixture doesn’t start to set up too much in the pot. The oats should be evenly distributed throughout the chocolatey goodness.
Step 6: Layer & Swirl
This is the fun part! Working fast, drop rounded spoonfuls of the mixture onto your prepared parchment paper. I usually use a tablespoon or a small cookie scoop. They don’t need to be perfectly shaped; a little rustic charm is part of their appeal! If you want them to spread a bit more, you can gently press down on them with the back of your spoon.
Step 7: Bake
Surprise! There’s no baking involved in this step. Once your cookies are dropped onto the parchment paper, just let them be. They need time to cool and set up. This usually takes about 30-60 minutes on the counter, depending on the room temperature. If you’re in a hurry or live in a very warm climate, you can pop them into the refrigerator for about 15-20 minutes to speed things up. They’re ready when they feel firm to the touch and no longer sticky.
Step 8: Cool & Glaze
Again, no glaze needed here! The beauty of these no bake cookies is their natural fudgy coating. Just let them cool completely on the parchment paper. Once they’re firm, you can gently peel them off the paper. If you want an extra fancy touch, you could always drizzle them with a little melted chocolate after they’ve set, but honestly, they are perfect just as they are.
Step 9: Slice & Serve
These are best served at room temperature or slightly chilled. They are ready to eat as soon as they are firm! Just pick them up and enjoy. They’re fantastic on their own, or with a tall glass of cold milk. I usually just arrange them on a plate, and they disappear in minutes at my house!
What to Serve It With
These no bake cookies are so versatile, they fit into almost any occasion! For breakfast, they’re a fun treat that even the pickiest eaters will devour. Pair them with a strong cup of coffee or a glass of fresh orange juice for a sweet start to the day. My kids sometimes sneak one before school and it makes their morning much happier. For brunch, imagine a platter of these alongside some fresh fruit and maybe some mini pancakes or waffles. They add a touch of homemade charm that guests will absolutely adore. As a dessert, they’re a fantastic alternative to cake or pie. Serve them with a scoop of vanilla ice cream or a drizzle of chocolate sauce for an extra indulgent treat. And for those cozy snack times? These are absolute perfection. They’re what I reach for when I’m curled up on the couch with a good book and a cup of tea. I’ve even brought them to potlucks, and they are always the first thing to go! My family loves having these on hand for any spontaneous sweet cravings. They truly make any moment a little bit more special.
Top Tips for Perfecting Your No Bake Cookies
I’ve made these no bake cookies so many times, I’ve learned a few tricks that really make a difference. First off, don’t rush the boiling step. That 1 minute of boiling is crucial for the right texture; it caramelizes the sugar just enough. I always use a kitchen timer for it. Also, make sure your peanut butter is at room temperature, or even slightly warmed, when you add it. It will incorporate much more smoothly into the hot mixture. If you find your mixture is too stiff to stir the oats in, you can put it back on *very* low heat for just a few seconds, stirring constantly, to loosen it up, but be super careful not to overdo it! When it comes to the oats, I really prefer old-fashioned rolled oats. Quick oats tend to dissolve more and can make the cookies a bit gummy, whereas the rolled oats give them a nice chew. For ingredient swaps, I’ve tried using different nut butters like almond butter, and it works wonderfully, though it can slightly change the flavor profile. If you’re dairy-free, you can try using a plant-based milk (like almond or oat milk) and a dairy-free butter substitute. I tested this with oat milk once and it actually made them even creamier! For a richer chocolate flavor, you can add a tiny pinch of espresso powder to the cocoa; it doesn’t make them taste like coffee, but it really deepens the chocolate. My biggest lesson learned over the years is to have *everything* measured and ready before you start cooking, because this recipe moves fast once it’s off the heat. And if they seem a little too soft when you think they should be done, don’t panic! Just give them a little more time to set on the counter or pop them in the fridge for an extra 10 minutes. Patience is key for perfect no bake cookies!
Storing and Reheating Tips
Storing these beauties is pretty straightforward, thankfully! At room temperature, they’ll stay fresh for about 3-4 days. Just make sure to keep them in an airtight container. I usually store them in a cookie tin or a plastic container with a tight-fitting lid. If you live in a really warm climate or notice they’re getting a bit soft on the counter, popping them in the refrigerator is a great option. In the fridge, they’ll last even longer, up to a week, and they stay nice and firm. I actually prefer them slightly chilled sometimes, it gives them a lovely dense texture. If you want to freeze them, which is a fantastic idea for having them on hand anytime, I recommend freezing them *before* they are fully set if possible, or just ensure they are completely firm. Wrap them individually in plastic wrap, then place them in a freezer-safe bag or container. They’ll keep well in the freezer for up to 2-3 months. To thaw, simply transfer them to the refrigerator overnight, or leave them on the counter for a few hours. For the glaze timing advice, if you plan to add any extra drizzle of chocolate or nuts, I always recommend doing that *after* the cookies have completely set and are firm, whether they’re at room temp or chilled, to prevent them from sliding off or melting. These no bake cookies are truly low-maintenance, which is one of the many reasons I adore them!
Frequently Asked Questions
Final Thoughts

Honestly, if you’re looking for a simple, crowd-pleasing treat that requires zero oven time, these no bake cookies are it. They embody everything I love about comfort food: easy to make, unbelievably delicious, and always bring a smile to people’s faces. They’re the perfect solution for those moments when you need a quick bake-sale contribution, a sweet treat for unexpected guests, or just a little something to brighten your day. I hope you give these a try and that they become as much of a treasured recipe in your home as they are in mine. If you loved these, you might also want to check out my recipe for no-churn ice cream or my easy stovetop caramel sauce for more no-fuss sweet treats! I’d absolutely love to hear how your no bake cookies turn out, so please leave a comment below and share your experience, or even your own fun variations. Happy cookie making!
No Bake Chocolate Peanut Butter Cookies
Ingredients
Main Ingredients
- 2 cups granulated sugar
- 0.5 cup butter
- 0.25 cup milk
- 0.25 cup unsweetened cocoa powder
- 1 teaspoon vanilla extract
- 3 tablespoons peanut butter
- 3 cups quick cooking oats
Instructions
Preparation Steps
- In a medium saucepan, combine the sugar, butter, milk, and cocoa powder. Bring to a rolling boil over medium heat, stirring constantly. Let it boil for exactly one minute.
- Remove the saucepan from the heat. Stir in the vanilla extract and peanut butter until well combined.
- Add the quick cooking oats and stir until they are fully coated.
- Drop spoonfuls of the mixture onto waxed paper. Let them cool completely before serving.


