


Oh, these cookies! They’re like little rays of sunshine you can hold in your hand. I can still remember the first time I made them for a neighborhood potluck. I was SO nervous because I’d never made Lemon Cookies from scratch before, and I just wanted something that tasted bright and cheerful without being too fussy. Well, let me tell you, these little gems were a HUGE hit. People were practically begging me for the recipe! What I love most is that they’re surprisingly simple, even for a weeknight treat. If you’ve ever thought about making cookies but felt intimidated by complicated steps or fancy ingredients, this is your recipe. They’re a fantastic alternative to those heavier, richer cookies, and they hit that sweet spot perfectly. Honestly, if you’re craving something that tastes like pure joy and only takes a little bit of effort, these easy lemon cookies are your answer.
What are easy lemon cookies?
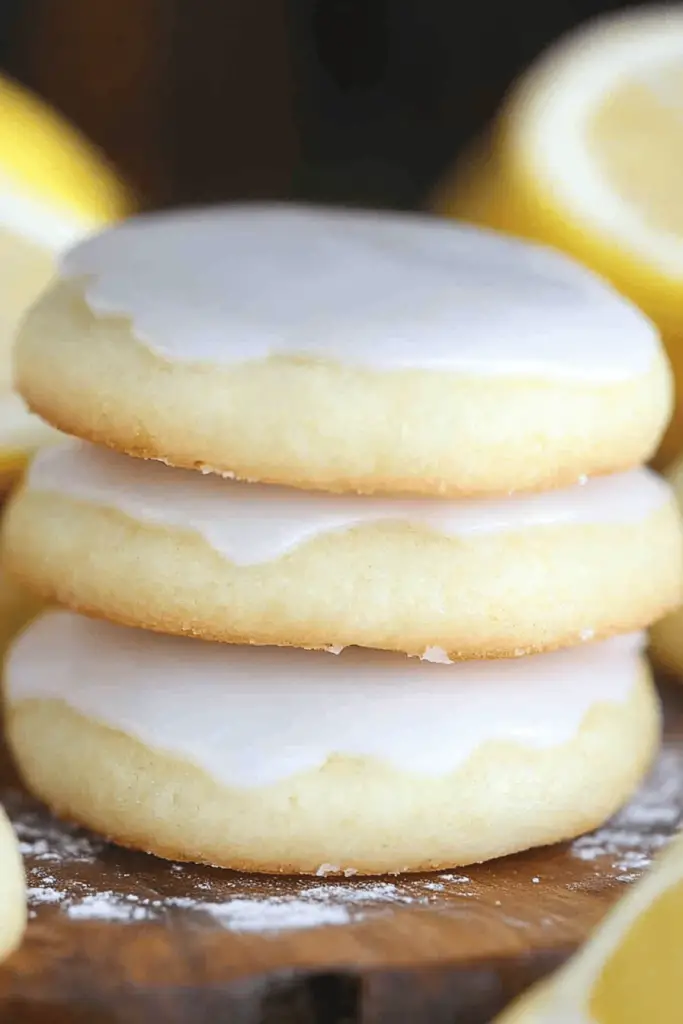
So, what exactly are these delightful little things? Think of them as the happy-go-lucky cousin of a Shortbread Cookie, but with a vibrant, zesty kick that makes them utterly addictive. They’re not overly complicated, and they don’t require any fancy techniques. The name really says it all: “easy lemon cookies” means just that – a straightforward recipe that delivers a burst of fresh lemon flavor without a fuss. They’re usually on the softer side, almost cakey, with a tender crumb that just melts in your mouth. The lemon flavor comes from both zest and juice, giving you that bright, tangy punch that’s balanced beautifully by the sweetness. They’re the kind of cookie that makes you close your eyes and smile after the first bite. They don’t require chilling the dough for hours or intricate shaping, which is a huge win in my book when I’m short on time but need a little sweetness.
Why you’ll love this recipe?
There are so many reasons why I keep coming back to this easy lemon Cookies Recipe, and I just know you’re going to fall in love with it too. First off, the FLAVOR is just out of this world. It’s this perfect harmony of sweet and tart that’s incredibly refreshing. It’s not an overpowering lemon, but a bright, happy note that sings. Imagine the taste of sunshine on a cloudy day – that’s what these cookies are like! Then there’s the SIMPLICITY. Seriously, this recipe is a lifesaver. You can whip up a batch from start to finish in less than an hour, and that includes baking time. No complicated steps, no weird ingredients you have to hunt down at a specialty store. Everything you need is probably already in your pantry. And let’s talk COST-EFFICIENCY. These cookies are made with basic, affordable ingredients. You don’t need to break the bank to make something absolutely delicious. They’re perfect for baking when you’re on a budget but still want to impress or just treat yourself. Plus, they are SO VERSATILE. You can enjoy them with a cup of tea, pack them in your kids’ lunchboxes, serve them at a party, or just munch on them while you’re catching up on your favorite show. They’re wonderful on their own, but a simple glaze takes them to a whole new level. If you’ve enjoyed my classic sugar cookies or my chocolate chip delights, you’ll find these lemon cookies offer a wonderfully different but equally satisfying experience. What I love most about this recipe, though, is the sheer happiness it brings. The aroma that fills your kitchen while they bake is intoxicating, and the look on people’s faces when they taste them is pure delight. It’s a simple pleasure that makes a big impact.
How do I make lemon cookies?
Quick Overview
Making these easy lemon cookies is a breeze! You’ll basically mix your dry ingredients, then your wet ingredients, combine them gently, form the dough into little mounds, and bake them until they’re lightly golden. The whole process is designed to be as straightforward as possible. You don’t need any special equipment, and the steps are intuitive. The result is a batch of soft, wonderfully flavored cookies that are perfect for any occasion. It’s one of those recipes that makes you feel like a baking pro without any of the stress.
Ingredients
For the Main Batter:
Here’s what you’ll need to get started. I always try to use good quality ingredients because it really does make a difference, but don’t worry if you don’t have everything perfect. Butter is key for richness, so I use unsalted so I can control the salt. Make sure your butter is softened, not melted – that’s a crucial step for getting that perfect texture. For the sugar, granulated sugar is what gives them that lovely sweetness and helps them spread just right. All-purpose flour is your workhorse here; just scoop and level it, no need to sift if you’re in a hurry, though sifting can make them a touch lighter. Baking powder is what gives them that little lift, so don’t skip it or use old baking powder. And for that essential lemon flavor, you’ll need fresh lemons! The zest carries the most aromatic oils, so don’t be shy with it. Fresh lemon juice adds that bright tang. And of course, a pinch of salt to balance everything out. For the eggs, one large egg usually does the trick to bind everything together.
For the Glaze:
This is totally optional, but oh-so-worth-it! You only need a little bit of powdered sugar, which gives the glaze its smooth texture. Then, you’ll add more fresh lemon juice – this is where you control how lemony and how thick your glaze is. Sometimes I like it thin and drippy, other times I make it a bit thicker so it almost sets like a shell. A tiny splash of milk or even water can also be used if you run out of lemon juice or want a less intense lemon flavor.
Step-by-Step Instructions
Step 1: Preheat & Prep Pan
First things first, let’s get our oven ready. Preheat it to 350 degrees Fahrenheit (175 degrees Celsius). This ensures your cookies bake evenly right from the moment they go in. While the oven is heating up, line your baking sheets with parchment paper. This is my absolute favorite trick for easy cleanup and preventing cookies from sticking. You can also use silicone baking mats if you have them. Make sure you have enough baking sheets ready to go, because these cookies bake relatively quickly, and you’ll want to get the next batch in right after the first one comes out.
Step 2: Mix Dry Ingredients
Grab a medium-sized bowl. Whisk together your all-purpose flour, baking powder, and salt. Just give it a good whisk until everything is well combined. This step might seem simple, but it’s important for ensuring your baking powder and salt are evenly distributed throughout the dough, which leads to a more consistent texture and rise in your cookies. I always give it a good minute of whisking to make sure there are no little clumps of baking powder lurking.
Step 3: Mix Wet Ingredients
In a separate, larger bowl, cream together your softened butter and granulated sugar. Beat them with an electric mixer (or a whisk and some serious arm power!) until the mixture is light and fluffy. This usually takes about 2-3 minutes. Then, beat in the egg until it’s fully incorporated. Now, stir in the fresh lemon zest and lemon juice. You’ll start to smell that wonderful lemon fragrance right away! Make sure your butter is truly softened – if it’s too cold, it won’t cream properly, and if it’s melted, your cookies might spread too much.
Step 4: Combine
Now, it’s time to bring everything together. Gradually add the dry ingredients to the wet ingredients, mixing on low speed (or stirring gently with a spatula) until just combined. Be careful not to overmix here! Overmixing can develop the gluten in the flour too much, resulting in tougher cookies. You want to mix just until you no longer see streaks of dry flour. The dough should be soft and slightly sticky. If it seems a bit too wet, you can add a tiny bit more flour, but usually, it’s perfect as is.
Step 5: Prepare Filling
This step is for the glaze, which we’ll apply after baking. So, for now, we’re actually done with preparing the Cookie Dough itself! The filling element is really the glaze that goes on top. We’ll get to that in Step 8. So, just focus on getting the dough ready for baking.
Step 6: Layer & Swirl
This step is actually for recipes that have a swirl or filling *within* the Cookie Dough itself. For these easy lemon cookies, we don’t have a layered or swirled component in the dough. Instead, we’ll simply scoop the dough. Drop rounded tablespoons of dough onto the prepared baking sheets, leaving about 2 inches between each cookie to allow for spreading. I like to use a cookie scoop for uniform size, but spoons work just fine too. You can also gently flatten them slightly with the palm of your hand or the bottom of a glass if you prefer a flatter cookie, but they bake up beautifully just as they are.
Step 7: Bake
Bake for 10-12 minutes, or until the edges are lightly golden brown and the centers look set. They might still look a little soft in the middle, but they will continue to firm up as they cool. Keep an eye on them, as oven temperatures can vary. If you bake a lot, you might find that rotating your baking sheets halfway through baking helps ensure even browning. Don’t overbake them if you want that lovely soft texture!
Step 8: Cool & Glaze
Let the cookies cool on the baking sheets for about 5 minutes before transferring them to a wire rack to cool completely. This allows them to firm up enough to move without breaking. Once they are completely cool, you can prepare the glaze. In a small bowl, whisk together the powdered sugar and lemon juice until smooth and pourable. If it’s too thick, add a tiny bit more lemon juice or water. If it’s too thin, add a bit more powdered sugar. Drizzle or spread the glaze over the cooled cookies. Let the glaze set before serving.
Step 9: Slice & Serve
These cookies are best served after the glaze has set, but honestly, who can wait that long? They’re perfect at room temperature. You can serve them as is, or arrange them on a pretty platter. They’re also fantastic with a cup of coffee or tea. The lemon flavor really shines through, making them a delightful treat any time of day.
What to Serve It With
These easy lemon cookies are so wonderfully versatile, they fit in almost anywhere! For a simple, cheerful BREAKFAST, I love pairing them with a hot cup of black coffee or a creamy latte. They’re a little treat that makes mornings feel special without being heavy. They’re also great to have on hand for kids’ breakfast on the go, just pop one in a baggie. For a lovely BRUNCH spread, these cookies add a burst of color and flavor. Imagine them nestled on a tiered stand with fresh berries, pastries, and maybe some mini quiches. They look so elegant when you arrange them nicely. They’re a great complement to other sweet and savory brunch items. As a simple DESSERT, they’re just heavenly. They’re perfect after a lighter meal, or even as a sweet end to a barbecue. I often serve them with a scoop of vanilla ice cream or a dollop of whipped cream for an extra treat. For those COZY SNACKS, which is probably my favorite way to enjoy them, they’re simply perfect with a mug of herbal tea on a rainy afternoon. They bring such a comforting brightness. My family loves them after school with a glass of milk; they disappear in minutes! I’ve also brought them to bake sales and potlucks, and they’re always the first to go. The bright citrus cuts through richer flavors, making them a crowd-pleaser. They’re really just a perfect little bite of happiness for any occasion.
Top Tips for Perfecting Your Easy Lemon Cookies
I’ve made these easy lemon cookies so many times, and I’ve picked up a few tricks along the way that I think really make them shine. First, for the lemon zest: use a microplane grater if you have one. It gets the most fragrant oils without grating any of the bitter white pith. I usually zest about two medium lemons to get a good amount of flavor. For the lemon juice, always opt for fresh lemons. Bottled lemon juice just doesn’t have the same bright, zesty punch. When you’re mixing the wet and dry ingredients, my biggest piece of advice is to NOT overmix. Seriously, this is where so many cookie recipes go wrong. Stop mixing as soon as you don’t see any dry flour streaks. A few little lumps are okay! Overmixing develops the gluten, making your cookies tough instead of tender. For the baking, I’ve found that using a cookie scoop (about 1.5 tablespoons) gives you perfectly uniform cookies that bake evenly. If your oven tends to run hot or cold, an oven thermometer is your best friend. It’s a small investment that makes a huge difference in baking consistency. If you want to customize the swirl (though this recipe doesn’t have one, it’s good to know for future baking!), I find a gentle swirl with a toothpick is all you need to create patterns without overworking the dough. For ingredient swaps, if you’re out of eggs, you can sometimes use a flax egg (1 tbsp ground flaxseed + 3 tbsp water, let sit for 5 mins) but the texture might be a little different. I’ve also successfully tested this with almond milk instead of regular milk in the glaze, and it made it even creamier! If you find your dough is a little too sticky to handle, pop it in the fridge for about 15-20 minutes. It makes it much easier to scoop. When it comes to the glaze, consistency is key. Start with less liquid than you think you need and add more slowly. It’s much easier to thin out a glaze than to thicken it up! I learned this the hard way when I ended up with a pool of lemon soup instead of a glaze once!
Storing and Reheating Tips
One of the best things about these easy lemon cookies is how well they store. If you find yourself with leftovers (which, let’s be honest, rarely happens in my house!), you’ve got a few options. For Room Temperature storage, I usually keep them in an airtight container for about 3-4 days. They stay nice and soft for the first couple of days, and then they might get a little firmer, but still delicious. If you’ve glazed them, make sure the glaze is completely set before you stack them or put them in a container. For Refrigerator Storage, you can keep them for up to a week, although I find their texture is best within the first 5 days. Storing them in the fridge can sometimes dry them out a bit, so I tend to avoid this unless it’s very warm and humid where you are. If you do refrigerate them, make sure they are in a well-sealed container. For Freezer Instructions, these cookies freeze beautifully, which is a lifesaver for busy weeks. Wrap them individually in plastic wrap, then place them in a freezer-safe bag or container. They can be stored in the freezer for up to 3 months. To thaw, simply bring them to room temperature for a few hours. They usually taste just as good as when they were freshly baked! If you decide to glaze them *after* freezing, wait until they are completely thawed and then apply the glaze. It ensures a fresh, vibrant finish. If they are already glazed, freezing can sometimes make the glaze a little less vibrant, but they’ll still be delicious.
Frequently Asked Questions
Final Thoughts
So there you have it – my absolute favorite recipe for easy lemon cookies! I really hope you give these a try. They’re more than just a cookie; they’re a little reminder that simple ingredients can create something truly magical. They’re perfect when you need a quick pick-me-up, a thoughtful treat for a friend, or just a reason to smile. The bright, zesty flavor is just so uplifting, and the fact that they’re so straightforward to make means you can enjoy them more often. If you love these, you might also enjoy my recipe for Lemon Blueberry Muffins, which have a similar sunny flavor profile, or my Simple Vanilla Sugar Cookies for another no-fuss classic. I can’t wait to hear what you think! Please leave a comment below and let me know how your easy lemon cookies turned out, or if you tried any fun variations. Your feedback truly makes my day! Happy baking, and may your kitchens be filled with the sweet scent of lemon!

Easy Lemon Cookies
Ingredients
Cookie Ingredients
- 2 cups all-purpose flour scoop and level to measure
- 0.5 tsp baking powder
- 0.5 tsp baking soda
- 0.25 tsp salt
- 1.25 cups granulated sugar
- 12 Tbsp unsalted butter at room temperature
- 1.5 Tbsp fresh lemon zest
- 1 large egg
- 1 large egg yolk
- 1.5 Tbsp fresh lemon juice
- 1 tsp vanilla extract
Lemon Glaze Ingredients
- 1.25 cups powdered sugar
- 2.5 Tbsp fresh lemon juice
Instructions
Preparation Steps
- In a large mixing bowl, whisk together flour, baking powder, baking soda, and salt.
- In a separate large mixing bowl, using an electric hand mixer, blend together granulated sugar, butter, and lemon zest until combined. Increase speed to high and whip for about 1 minute until slightly pale and fluffy.
- Mix in the egg and egg yolk, then blend in 1.5 Tbsp lemon juice and the vanilla extract. The mixture may look a little separated due to acidity; this is okay. If desired, add a little natural yellow food coloring for a more yellow cookie.
- Add the flour mixture to the butter mixture and mix on low speed until combined. Scrape down the bowl and fold the dough with a spatula a few times to ensure it's evenly combined. Spread the dough out evenly.
- Chill the dough in the refrigerator for 45 to 60 minutes, or until it's not too sticky to work with. Chilling will also help the cookies spread less.
- Preheat the oven to 350°F (175°C) during the last 10 minutes of chilling the cookies.
- Line rimmed 18 by 13-inch baking sheets with parchment paper. Scoop dough about 1.5 Tbsp each (approximately 28g) and roll into a ball (they should be about the size of a golf ball). Transfer 12 cookie dough balls to the prepared baking sheet, spaced evenly apart. Keep the remaining dough chilled.
- Bake in the preheated oven until slightly under-baked in the center, about 9 minutes. Let cool on the pan for 5 minutes, then transfer to a wire rack to cool completely. Repeat baking with the remaining cookie dough.
- Once the cookies have cooled, mix together the powdered sugar with 2.5 Tbsp lemon juice. The glaze should have a medium, creamy thickness, drippy but not runny. Either spoon the glaze over the cookies and spread into a circle, or pipe the glaze from a small resealable bag with the corner cut.
- Let the glaze set before storing the cookies.


