


There are certain recipes that just have a permanent spot in your heart, right? The ones you return to again and again, not just because they’re delicious, but because they bring back a flood of happy memories. For me, that’s absolutely my Hot Orange Chicken. It’s a dish that instantly transports me back to my childhood, to busy weeknights when Mom would whip this up, filling the house with the most incredible aroma. It’s that perfect balance of sweet, tangy, and just a little bit of heat that makes it irresistible. I’ve tried a lot of orange Chicken Recipes over the years, and while many are good, this one just hits different. It’s got a certain je ne sais quoi that makes it stand out from the rest, and trust me, once you try it, you’ll understand why it’s become such a staple in my kitchen. It’s definitely a crowd-pleaser, and if you’re anything like me, you’ll be reaching for this hot orange chicken recipe whenever you need a little bit of comfort and a whole lot of flavor.
What is hot orange chicken?
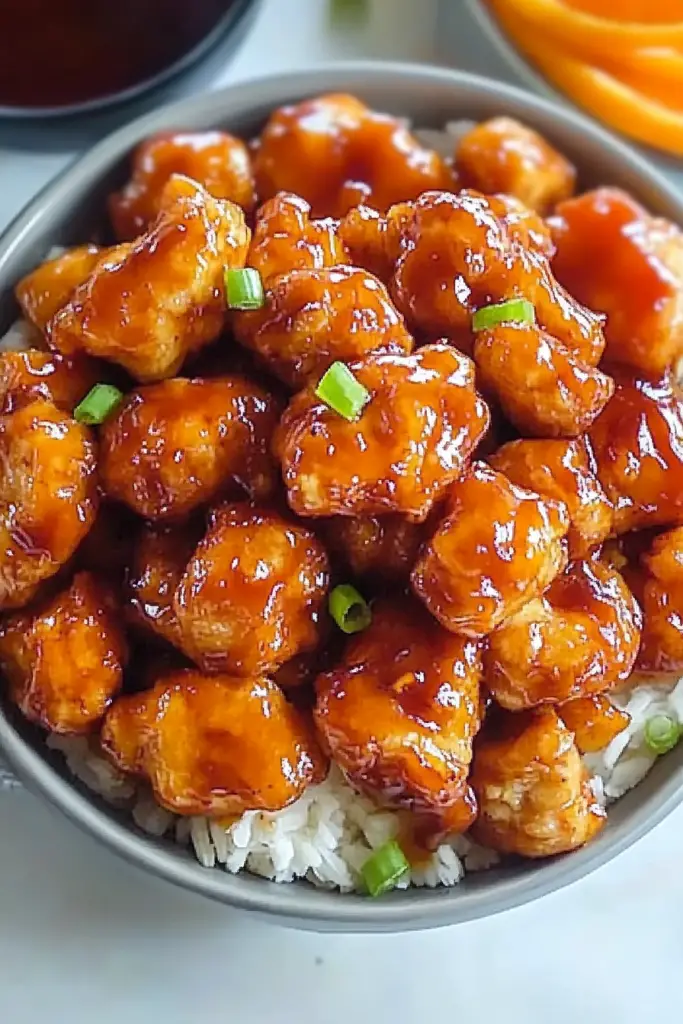
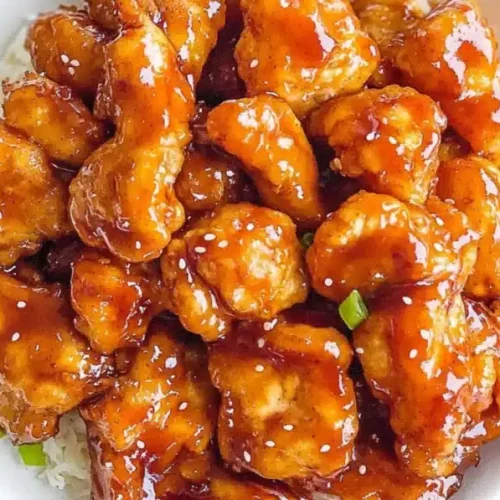
So, what exactly is this magical dish I keep raving about? Think of it as the beloved takeout favorite, orange chicken, but with a little fiery personality twist! It’s essentially tender pieces of chicken, coated in a light, crispy batter, and then tossed in a vibrant, sticky glaze that’s bursting with citrusy goodness. The “hot” part? That comes from a gentle kick of spice, usually from chili flakes or a touch of sriracha, that perfectly complements the sweetness of the orange. It’s not overwhelmingly spicy, mind you, but just enough to make your taste buds tingle with excitement. This dish is basically a flavor explosion in every bite – a symphony of sweet, sour, savory, and a hint of heat. It’s the kind of meal that feels both comforting and exciting, a true testament to how simple ingredients can come together to create something truly spectacular. It’s that familiar flavor profile we all know and love, elevated just a touch to make it uniquely ours.
Why you’ll love this recipe?
Honestly, where do I even begin with why this recipe is so fantastic? It’s got that perfect trifecta of amazing flavor, incredible ease, and budget-friendliness that every home cook dreams of. First off, the FLAVOR! Oh my goodness. That sauce is everything. It’s this luscious, glossy coating that clings to every piece of chicken. The bright, zesty orange flavor is front and center, balanced beautifully by a touch of sweetness and that ever-so-slight warmth that keeps you coming back for more. It’s that satisfying sweet-and-sour dance that’s just so addictive. Then there’s the SIMPLICITY. I’ve made this dish countless times, and it never fails to impress, even on those nights when I’m seriously short on time. The steps are straightforward, and you don’t need any fancy equipment or techniques. It’s genuinely achievable for even beginner cooks, and it always turns out beautifully. Plus, it’s incredibly COST-EFFECTIVE! The ingredients are all pantry staples or easy to find at your local grocery store without breaking the bank. You get that restaurant-quality taste without the restaurant price tag, which is a huge win in my book. And let’s not forget VERSATILITY! While it’s fantastic on its own, this hot orange chicken is also a chameleon. It’s amazing served over fluffy white rice, or even better, with some stir-fried veggies for a complete meal. It’s the kind of dish that makes everyone happy, from picky eaters to seasoned foodies. What I love most about this recipe is that it feels both special and accessible. It’s my go-to when I want to impress guests, but it’s also my weeknight savior when I need something comforting and delicious without a lot of fuss. It’s a winner, hands down.
How do I make hot orange chicken?
Quick Overview
Making this Hot Orange Chicken is surprisingly simple, and I’ve honed the process over the years to be as efficient as possible. The main idea is to get your chicken pieces perfectly crispy, then coat them in that irresistible tangy, slightly spicy orange glaze. You’ll be amazed at how quickly it all comes together, making it a perfect option for a weeknight dinner or even a last-minute appetizer. The key is in the preparation of each component, ensuring everything is ready to go when it’s time to combine them. Don’t worry, it’s much less intimidating than it sounds, and the results are absolutely worth it.
Ingredients
For the Main Batter:
I like to use boneless, skinless chicken thighs for this. They stay incredibly moist and tender, even after frying. If you prefer Chicken Breast, that works too, just be careful not to overcook it. You’ll need about 1.5 pounds, cut into bite-sized pieces. For the batter itself, it’s pretty basic but makes all the difference. I use about 1 cup of all-purpose flour, 1/4 cup of cornstarch (this is crucial for that super crispiness!), a teaspoon of baking powder for lightness, and about half a teaspoon each of salt and pepper. Whisk these together really well so there are no clumps.
For the Filling:
This is where the magic starts to happen! For the sauce, you’ll need the zest and juice of about 2-3 large oranges. I always use fresh oranges; the flavor is just so much brighter. You’ll also want 1/4 cup of rice vinegar for that essential tang, 1/2 cup of soy sauce (or tamari for gluten-free), 1/2 cup of Brown Sugar (you can adjust this to your sweetness preference), and a tablespoon of grated fresh ginger. For that lovely heat, I add about 1-2 teaspoons of red pepper flakes, or you can use a tablespoon of sriracha if you prefer. A tablespoon of garlic powder or a couple of cloves of minced garlic also works wonderfully.
For the Glaze:
This is pretty much the same as the filling, but we’ll thicken it up slightly. You’ll use the same orange juice, rice vinegar, soy sauce, Brown Sugar, ginger, and chili flakes. The secret to a glossy, thick glaze is a cornstarch slurry. I usually mix about 2 tablespoons of cornstarch with 3 tablespoons of cold water until smooth. This will be added at the end to thicken the sauce to that perfect, sticky consistency that coats the chicken beautifully. A little sesame oil at the very end for a nutty aroma is a nice touch, though entirely optional.
Step-by-Step Instructions
Step 1: Preheat & Prep Pan
First things first, let’s get everything ready. You’ll need a large skillet or wok for making the sauce and a separate large skillet or Dutch oven for frying the chicken. Fill the frying pan with about 2-3 inches of neutral oil, like vegetable or canola oil. We want to get this heated up to around 350°F (175°C). Using a thermometer is best, but you can test it by dropping a tiny bit of batter in; it should sizzle immediately. While the oil heats, make sure your chicken pieces are patted dry with paper towels. This is super important for getting them nice and crispy.
Step 2: Mix Dry Ingredients
In a medium bowl, whisk together the flour, cornstarch, baking powder, salt, and pepper. Make sure it’s all thoroughly combined so you don’t get pockets of unseasoned flour. Give it a good whisk for at least 30 seconds to ensure everything is evenly distributed. This dry mix is what’s going to give our chicken that delightful crisp.
Step 3: Mix Wet Ingredients
In a separate bowl, combine the orange juice, rice vinegar, soy sauce, brown sugar, grated ginger, and red pepper flakes (or sriracha). If you’re using fresh garlic, mince it finely and add it here. Whisk everything together until the brown sugar is mostly dissolved. This is your flavor base!
Step 4: Combine
Now, it’s time to get the chicken ready for frying. Add your patted-dry chicken pieces to the dry ingredient mixture. Toss them around until each piece is evenly coated. Don’t overwork it; just a gentle toss to ensure everything is covered. You want a light coating, not a thick paste.
Step 5: Prepare Filling
While the chicken is marinating slightly in the flour mixture, let’s get the sauce started. In your large skillet or wok, heat about a tablespoon of oil over medium heat. Pour in your wet ingredient mixture. Bring it to a gentle simmer, stirring occasionally. This is where you’ll add your cornstarch slurry (2 tbsp cornstarch mixed with 3 tbsp cold water) to thicken the sauce. Pour it in slowly while whisking continuously. You’ll see it start to thicken into a beautiful, glossy glaze within a minute or two. If it gets too thick, you can always add a splash more orange juice or water. Stir in the sesame oil now if you’re using it.
Step 6: Layer & Swirl
This step is more about combining the crispy chicken with the sauce. We’re not really “layering” in the traditional sense here, but we are going to coat the chicken beautifully. Once the sauce has thickened to your liking, reduce the heat to low. The chicken will be fried in batches in the hot oil until golden brown and cooked through – this usually takes about 3-4 minutes per batch. Don’t overcrowd the pan, or the chicken won’t get crispy. Once each batch is done, remove it with a slotted spoon and let it drain on a wire rack set over a baking sheet.
Step 7: Bake
Actually, we’re frying, not baking, the chicken for this recipe to get that perfect crisp! So, once your chicken is fried and drained, it’s time to toss it with that gorgeous glaze. Add the fried chicken pieces to the skillet with the sauce. Gently toss everything together until each piece of chicken is completely coated in the sticky, vibrant orange glaze. Do this right before serving so the chicken stays as crispy as possible. It takes just a minute or two to coat everything perfectly.
Step 8: Cool & Glaze
This step is for making sure your chicken is perfectly coated and ready to go. Once all the chicken is tossed in the glaze, it’s ready to be served. The “cooling” part is really just letting it sit for a minute or two to allow the glaze to perfectly adhere to the chicken. No need for a long cool-down period here!
Step 9: Slice & Serve
This hot orange chicken is best served immediately while the chicken is still wonderfully crispy. I love serving it hot over a bed of fluffy jasmine or basmati rice. Garnish with some toasted sesame seeds and thinly sliced green onions for a pop of color and extra flavor. It’s a complete meal that’s incredibly satisfying and always a huge hit. You can also serve it as an appetizer with toothpicks for easy snacking!
What to Serve It With
This Hot Orange Chicken is so versatile, it’s honestly good with just about anything! For a classic **Breakfast** feel, though unconventional, I sometimes love a small portion alongside some scrambled eggs and crispy hash browns. The sweet and savory notes can be surprisingly delightful! For **Brunch**, I often elevate it by serving it with a side of fluffy coconut rice and some steamed edamame or baby bok choy. It feels a bit more elegant and a delightful departure from traditional brunch fare. If you’re serving it as a main course **As Dessert**, which sounds odd but hear me out, a tiny bite after a lighter meal can be a sweet and tangy finish, especially if you slightly reduce the spice. It’s like a sweet and sour candy! However, my favorite way to enjoy it is **For Cozy Snacks** or weeknight dinners. It’s absolutely perfect piled high on a bed of steamed white rice. But if you want to get a little more adventurous, try it with fried rice, lo mein noodles, or even stuffed into soft bao buns. My family also loves it with a simple side of steamed broccoli or green beans to balance out the richness. Another family tradition is serving it with those little crispy fried wonton strips on the side for extra crunch!
Top Tips for Perfecting Your Hot Orange Chicken
I’ve been making this recipe for years, and let me tell you, I’ve learned a few tricks along the way that make all the difference in getting it just right. First, for the chicken prep: Make sure you pat your chicken pieces *really* dry before tossing them in the flour mixture. Moisture is the enemy of crispiness! I like to cut my chicken thighs into about 1-inch pieces, ensuring they’re relatively uniform so they cook evenly. For the mixing advice, don’t be tempted to overmix the batter once you combine the wet and dry ingredients, especially if you end up making a separate batter for frying. Just a few gentle stirs until *just* combined is key. You want it lumpy, not smooth – that’s how you avoid a tough coating. When it comes to the swirl customization, it’s all about the sauce. The cornstarch slurry is your best friend. Add it gradually while whisking and watch it transform into that beautiful, glossy glaze. Don’t be afraid to let it bubble and thicken for a minute or two. For ingredient swaps, if you can’t find fresh ginger, a teaspoon of ground ginger will work in a pinch, though fresh is always best for that vibrant zing. For baking tips, as I mentioned, we’re frying here for maximum crispiness! Ensure your oil is at the correct temperature before adding the chicken. Too low and it gets greasy; too high and it burns before cooking through. Test a small piece first if you’re unsure. Finally, glaze variations: While this orange glaze is divine, you can play with it! Add a splash of lime juice for extra zest, a tiny bit of honey for sweetness, or even a dash of soy sauce for more umami. The key is that balance of sweet, sour, and savory with that hint of heat.
Storing and Reheating Tips
This Hot Orange Chicken is truly best enjoyed fresh, right out of the pan, when that chicken is at its absolute crispiest. However, life happens, and sometimes you have leftovers! If you find yourself with some delicious remnants, here’s how to keep them tasting great. At **Room Temperature**, I wouldn’t leave it out for more than 2 hours, just to be safe. After that, it’s best to refrigerate it. For **Refrigerator Storage**, the key is an airtight container. I like to place parchment paper between layers if I have a lot, to prevent the pieces from sticking too much. It should stay good in the fridge for about 3-4 days. When it comes to **Freezer Instructions**, this is where it gets a little trickier because the crispiness of the chicken can be compromised. If you plan to freeze it, I highly recommend freezing the un-glazed fried chicken separately from the sauce. Once cooled completely, wrap the fried chicken pieces tightly in plastic wrap, then in foil, and place them in a freezer-safe bag. It can last in the freezer for about 2-3 months. Thawing should be done in the refrigerator overnight. For **Glaze Timing Advice**, if you know you’ll have leftovers, consider storing the sauce separately from the chicken. When you’re ready to reheat, you can gently warm the sauce, then toss the reheated chicken in it. Reheating the chicken in an oven or toaster oven at around 350°F (175°C) for about 5-10 minutes can help bring back some of that crispiness, then toss with warm sauce. Microwave reheating is quick but will result in softer chicken.
Frequently Asked Questions
Final Thoughts
So there you have it – my ultimate Hot Orange Chicken recipe! It’s more than just a meal; it’s a little slice of comfort, a burst of sunshine on a plate, and a guaranteed way to bring smiles to the table. I truly hope you give this recipe a try. It’s honestly one of my proudest creations, a dish that I’ve perfected over time and that I’m always excited to share. If you love this recipe, you might also enjoy my Sticky Honey Garlic Chicken or my Crispy General Tso’s Chicken – they have that same satisfying flavor profile! Don’t be shy about leaving a comment below to let me know how yours turns out, or if you have any fun variations you’ve tried. I absolutely love hearing from you all! Happy cooking, and enjoy every single delicious bite!
Hot Orange Chicken
Ingredients
Chicken Marinade
- 0.5 cup All-purpose flour
- 0.25 cup Cornstarch
- 1.5 teaspoon Salt
- 0.5 teaspoon Black pepper
- 1 pound Boneless, skinless chicken thighs Cut into bite-sized pieces
- 0.5 cup Vegetable oil For frying
Orange Sauce
- 0.5 cup Orange juice Freshly squeezed preferred
- 0.25 cup Soy sauce
- 3 tablespoon Rice vinegar
- 2 tablespoon Brown sugar
- 1 tablespoon Sesame oil
- 1 teaspoon Grated fresh ginger
- 1 clove Garlic Minced
- 1 teaspoon Red pepper flakes Adjust to taste
- 1 tablespoon Cornstarch
- 2 tablespoon Water
Garnish
- Sesame seeds
- Chopped green onions
Instructions
Preparation Steps
- In a medium bowl, combine flour, cornstarch, salt, and pepper. Add chicken pieces and toss to coat evenly.
- Heat vegetable oil in a large skillet or wok over medium-high heat. Fry chicken in batches until golden brown and cooked through. Remove chicken and drain on paper towels.
- In a separate bowl, whisk together orange juice, soy sauce, rice vinegar, brown sugar, sesame oil, ginger, garlic, and red pepper flakes.
- In a small bowl, whisk together cornstarch and water to create a slurry.
- Pour the orange sauce mixture into the skillet (wipe clean if needed) and bring to a simmer over medium heat. Stir in the cornstarch slurry and cook until the sauce thickens.
- Add the fried chicken to the thickened sauce and toss to coat. Cook for another minute until the chicken is heated through.
- Serve hot, garnished with sesame seeds and chopped green onions. This pairs well with steamed rice.


