


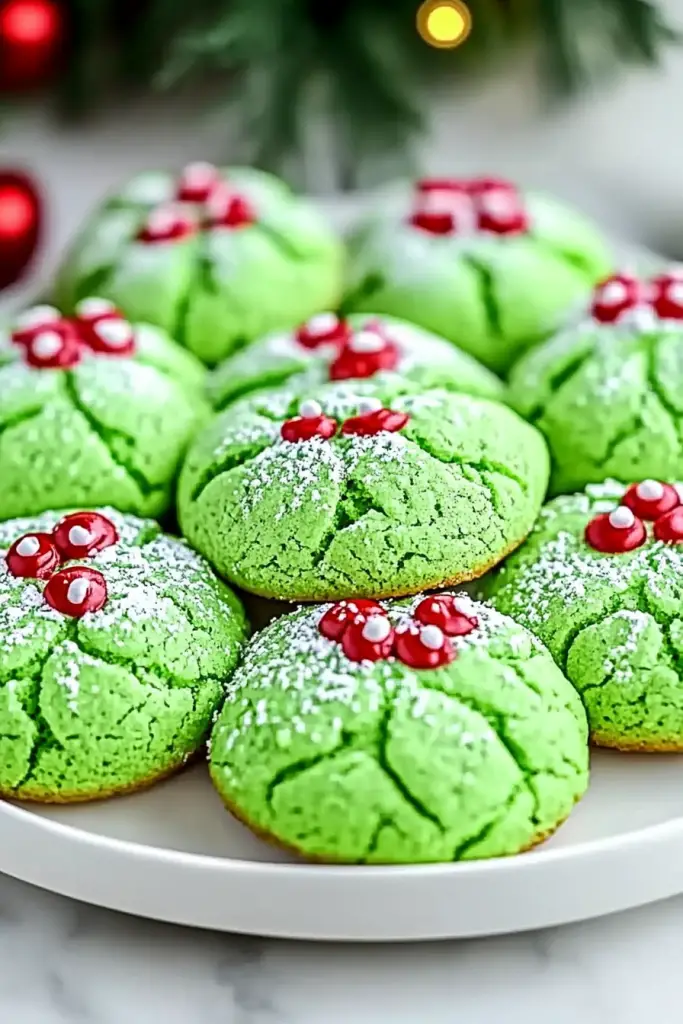
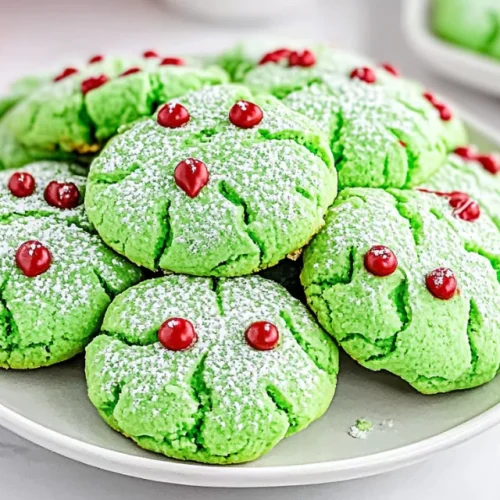
There are some recipes that just feel like a warm hug, aren’t there? The kind that bring back memories of childhood, of kitchens filled with laughter and the scent of something delicious baking. For me, that’s these Grinch cookies. Seriously, if you’re looking for a treat that’s a guaranteed crowd-pleaser, especially around the holidays, these are it. They’re bright green, studded with festive red and white, and have this wonderfully chewy texture that just makes you want to gobble them up. I know, I know, “Grinch cookies” might sound a little kitschy, but trust me, the flavor is anything but. They’re a delightful twist on a classic Chocolate Chip Cookie, but with that extra zing of holiday cheer. I’ve tried my fair share of holiday cookies over the years, from intricate gingerbread houses to delicate shortbread, but these Grinch cookies? They’ve become my absolute go-to. They’re surprisingly simple, incredibly forgiving, and the reaction you get when you pull these out of the oven is just priceless. My kids, who can sometimes be a tough crowd, literally ask for these by name every December. And honestly, the color alone is enough to make you smile, even on the grumpiest of days.
What are Grinch Cookies?
So, what exactly are these magical Grinch cookies? Think of them as your favorite chewy Sugar Cookie, but with a vibrant, festive makeover. The “Grinch” comes from that iconic, almost neon green hue that instantly screams holiday spirit, especially if you’re a fan of Dr. Seuss! They’re not just about looks, though. Beneath that cheerful green exterior lies a soft, chewy cookie that’s packed with flavor. We’re talking about a delightful balance of sweet and slightly tangy, with little bursts of sweetness from the colorful candies. It’s essentially a fun, edible celebration of the holidays. They’re not overly complicated; the green color comes from a touch of food coloring, and the red and white sprinkles or candies are what give them that distinctive speckle. They’re the perfect cookies to make when you want something that feels special and celebratory without spending hours in the kitchen wrestling with fancy techniques. It’s the kind of cookie that makes you feel like you’ve achieved something amazing, even if you’re just a beginner baker.
Why you’ll love this recipe?
What are some of the reasons why this Grflavor is just out of this world. They have that perfect soft, chewy center that I absolutely adore in a cookie, with slightly crisp edges. The hint of vanilla is classic, but the combination with the festive sprinkles makes each bite a little surprise. And then there’s the simplicity. Honestly, this recipe is a lifesaver when I’m short on time but still want to make something special. The steps are straightforward, and the dough comes together really quickly. I’ve made this with my kids helping, and they have so much fun adding the color and the candies. It’s also wonderfully cost-efficient. The ingredients are all pantry staples,versatility. While they’re perfect for holiday parties and cookie exchanges, they’re also just as good with a cup of tea on a chilly afternoon, or as a fun after-school treat. They’re not just for Christmas, either! You can easily adapt the colors for other holidays or celebrations. Compared to some more elaborate Cookie Recipes, these Grinch cookies are a breath of fresh air. They deliver maximum festive impact with minimal fuss. Plus, the sheer joy on people’s faces when they see these bright, cheerful cookies makes all the effort completely worthwhile.
How to Make Grinch Cookies
Quick Overview
Making these Grinch cookies is a delightful process that’s surprisingly easy. You’ll start by creaming together butter and sugar until light and fluffy, then incorporate your wet ingredients before gently folding in your dry. The magic happens when you add a touch of green food coloring to create that signature Grinch hue, followed by a generous swirl of festive red and white candies or sprinkles. The dough is then scooped and baked until perfectly golden and chewy. The best part? The whole process, from mixing to baking, is pretty quick, making them ideal for last-minute baking emergencies or just a spontaneous baking session. You’ll end up with a batch of stunning, delicious cookies that are guaranteed to bring smiles.
Ingredients
For the Main Batter:
1 cup (2 sticks) unsalted butter, softened (make sure it’s properly softened, not melted! It makes all the difference in texture.)
1 ½ cups granulated sugar (you can adjust this slightly if you prefer a less sweet cookie, but this is my go-to)
2 large eggs, at room temperature (room temp eggs incorporate better)
1 teaspoon vanilla extract (use a good quality one if you can!)
2 ½ cups all-purpose flour (spooned and leveled)
1 teaspoon baking soda
½ teaspoon salt
Green food coloring (gel or liquid, gel gives a more vibrant color)
For the Candies/Sprinkles:
½ cup red and white sprinkles or chopped hard candies (like peppermint or cinnamon candies for a little zing!)
For the Glaze (Optional, but highly recommended!):
1 cup powdered sugar
2-3 tablespoons milk (start with 2 and add more until you reach your desired consistency)
½ teaspoon vanilla extract (optional, for extra flavor)
Step-by-Step Instructions
Step 1: Preheat & Prep Pan
First things first, let’s get your oven ready. Preheat it to 350°F (175°C). While the oven is heating up, grab your baking sheets and line them with parchment paper. This is my number one tip for easy cleanup and perfectly baked cookies – nothing sticks! Make sure you have enough space on your counter for cooling later.
Step 2: Mix Dry Ingredients
In a medium bowl, whisk together the all-purpose flour, baking soda, and salt. Give it a good whisk until everything is well combined. This step ensures your leavening agents are evenly distributed, which helps the cookies rise properly and gives them that wonderful texture we’re after. Don’t skip this little step; it’s a game-changer for consistent results.
Step 3: Mix Wet Ingredients
In a large bowl, using an electric mixer (or a stand mixer with the paddle attachment), cream together the softened unsalted butter and granulated sugar. Beat them on medium speed until the mixture is light, fluffy, and pale yellow. This usually takes about 3-5 minutes. Then, beat in the eggs one at a time, making sure to scrape down the sides of the bowl after each addition. Stir in the vanilla extract. You want this mixture to be smooth and well-emulsified.
Step 4: Combine
Gradually add the dry ingredients to the wet ingredients, mixing on low speed until just combined. Be careful not to overmix here! Overmixing can lead to tough cookies, and we want these to be wonderfully chewy. Stop mixing as soon as you no longer see streaks of flour. The dough will be thick.
Step 5: Add the Green Magic!
Now for the fun part! Add a few drops of green food coloring to the dough. Start with about 4-6 drops of gel food coloring and mix it in. You can add more if you want a brighter, more intense green. The goal is a cheerful, vibrant Grinch green! Once you’ve achieved your desired color, gently fold in the red and white sprinkles or chopped candies. Make sure they’re evenly distributed throughout the dough. This is where the festive speckle comes from!
Step 6: Scoop the Dough
Using a cookie scoop (a 1.5 to 2-tablespoon scoop works great for uniform cookies), drop rounded balls of dough onto your prepared baking sheets, leaving about 2 inches between each cookie to allow for spreading. I always like to leave a little extra space, just to be safe.
Step 7: Bake
Bake for 9-12 minutes, or until the edges are lightly golden and the centers are still slightly soft. They’ll continue to bake a little on the hot baking sheet after you take them out of the oven, which helps achieve that perfect chewy texture. Keep an eye on them, as oven temperatures can vary.
Step 8: Cool & Glaze (Optional)
Let the cookies cool on the baking sheets for about 5 minutes before transferring them to a wire rack to cool completely. While they’re cooling, you can whip up the glaze. In a small bowl, whisk together the powdered sugar, milk, and vanilla extract until smooth and drizzly. Once the cookies are completely cool, drizzle the glaze over them. You can use a spoon or a piping bag for this. Let the glaze set before serving or storing.
Step 9: Slice & Serve
Once the glaze is set (if you used it), your Grinch cookies are ready to be devoured! They are best served at room temperature. Arrange them on a festive platter and watch them disappear!
What to Serve It With
These Grinch cookies are so versatile, they fit into pretty much any occasion! For Breakfast, honestly, I sometimes sneak one (or two!) with my morning coffee. The bright color is such a cheerful start to the day, and they’re not overly sweet, so they don’t feel too much like a dessert. For Brunch, I love arranging them on a tiered stand with other pastries and fruit. They add such a pop of color and fun to the spread. For Dessert, they’re a fantastic addition to any holiday cookie platter. They stand out amongst the chocolate and gingerbread, and they’re always a hit with both kids and adults. I also find they’re perfect for Cozy Snacks. Picture this: a comfy blanket, a good book, and a plate of these amazing cookies with a glass of cold milk. Pure bliss! My family loves having them as a special treat after dinner, especially when it’s chilly outside and we’re all curled up watching movies. They also pair beautifully with a simple scoop of vanilla Ice Cream if you’re feeling extra indulgent. My daughter insists that the red and white candies get a bit softer and chewier when they’re served slightly warm with the glaze, so that’s another way to enjoy them!
Top Tips for Perfecting Your Grinch Cookies
Over the years of making these, I’ve picked up a few little tricks that I think make all the difference. First, regarding the food coloring: always use gel food coloring if you can. It’s more concentrated, meaning you need less to achieve that vibrant green, and it won’t add extra liquid to your dough, which could affect the texture. A little goes a long way! For the candies and sprinkles, make sure they are relatively small, or chop them up. Large chunks can make the cookies uneven and cause them to bake improperly. I personally love using chopped peppermint candies for a little festive kick that complements the sweetness beautifully. When it comes to mixing, seriously, don’t overdo it once the flour is added. I’ve learned the hard way that overmixing develops the gluten too much, leading to tough cookies. Mix until *just* combined, and you’ll have perfectly tender Grinch cookies. For achieving that classic chewy texture, the key is not to overbake them. Pull them out when the edges are set but the centers still look a little soft. They will continue to firm up as they cool on the baking sheet. If you want to get creative with the swirl, you can reserve a small portion of the dough before adding the green coloring, then swirl in green into the main batch and dot the uncolored dough on top before gently swirling with a toothpick. It creates a marbled effect! If you don’t have butter, I’ve tried using a good quality margarine, and it works in a pinch, though the flavor and texture are definitely better with real butter. For the glaze, the consistency is key. If it’s too thick, add milk a teaspoon at a time. If it’s too thin, add more powdered sugar. I like a slightly thicker glaze that holds its shape but is still easy to drizzle.
Storing and Reheating Tips
These Grinch cookies are fantastic for making ahead, which is a lifesaver during the busy holiday season! When it comes to room temperature storage, make sure the glaze is completely set. You can store them in an airtight container for up to 3-4 days. If you stacked them, place a piece of parchment paper between layers to prevent sticking. For refrigerator storage, they’ll last a bit longer, about 5-7 days. Again, an airtight container is your best friend. The cold can sometimes slightly alter the texture, making them a bit firmer, but they’ll still be delicious. When you want to enjoy them from the fridge, just let them sit at room temperature for about 20-30 minutes to soften up. If you need to freeze these cookies, it’s best to do it before glazing. Wrap them tightly in plastic wrap, then place them in a freezer-safe bag or container. They’ll keep well for up to 2-3 months. To thaw, simply unwrap them and let them come to room temperature on a wire rack, then you can add the glaze. If you’ve already glazed them, freezing is still an option, but be aware that the glaze might crack a bit upon thawing. For reheating, if you want to revive a cookie that’s gotten a little stale, you can pop it in a warm oven (around 300°F or 150°C) for just 3-5 minutes. It helps to bring back some of that fresh-baked softness. Honestly though, these are so good they rarely last long enough to need reheating!
Frequently Asked Questions
Final Thoughts
So there you have it – my recipe for Grinch cookies, a little piece of my kitchen to yours. I truly believe that food has a way of bringing people together, and these cookies are a perfect example of that. They’re not just a treat; they’re a mood booster, a conversation starter, and a reminder of the simple joys in life. The vibrant green, the cheerful speckles, and that perfect chewy texture all come together to create something truly special. I hope you give these Grinch cookies a try and that they bring as much joy to your home as they do to mine. If you loved these, you might also enjoy my recipes for classic Sugar Cookies or festive holiday gingerbread! Don’t be shy about leaving a comment below to let me know how your cookies turned out, or if you have any fun variations you tried. I can’t wait to hear all about it! Happy baking, friends!
Grinch Cookies
Ingredients
Cookie Dough
- 0.5 cup unsalted butter, softened
- 1 cup granulated sugar
- 1 large egg
- 1 teaspoon vanilla extract
- 2.5 cups all-purpose flour
- 0.5 teaspoon baking soda
- 0.25 teaspoon salt
- 1 drop green food coloring gel food coloring recommended
Frosting and Decoration
- 1 cup powdered sugar
- 1 tablespoon milk or cream
- 0.5 teaspoon vanilla extract
- count red candy melts or frosting for Grinch's Santa hat
- count white sprinkles or coconut flakes for Santa hat trim
Instructions
Preparation Steps
- In a large bowl, cream together the softened butter and granulated sugar until light and fluffy.
- Beat in the egg and vanilla extract until well combined.
- In a separate bowl, whisk together the flour, baking soda, and salt.
- Gradually add the dry ingredients to the wet ingredients, mixing until just combined. Do not overmix.
- Add the green food coloring and mix until the dough is evenly colored.
- Cover the dough and chill in the refrigerator for at least 30 minutes.
- Preheat oven to 350°F (175°C) and line baking sheets with parchment paper.
- Roll the dough into 1-inch balls and place them on the prepared baking sheets, about 2 inches apart.
- Bake for 8-10 minutes, or until the edges are lightly golden.
- Let the cookies cool on the baking sheets for a few minutes before transferring them to a wire rack to cool completely.
- While the cookies cool, prepare the frosting by whisking together powdered sugar, milk, and vanilla extract until smooth. Add more milk for a thinner consistency if needed.
- Once the cookies are completely cool, spread a thin layer of green frosting on each cookie.
- To create the Grinch's face, use a small amount of red candy melts or frosting to form a Santa hat shape at the top of each cookie. Decorate the hat with white sprinkles or shredded coconut.
- Allow the frosting to set before serving.


