


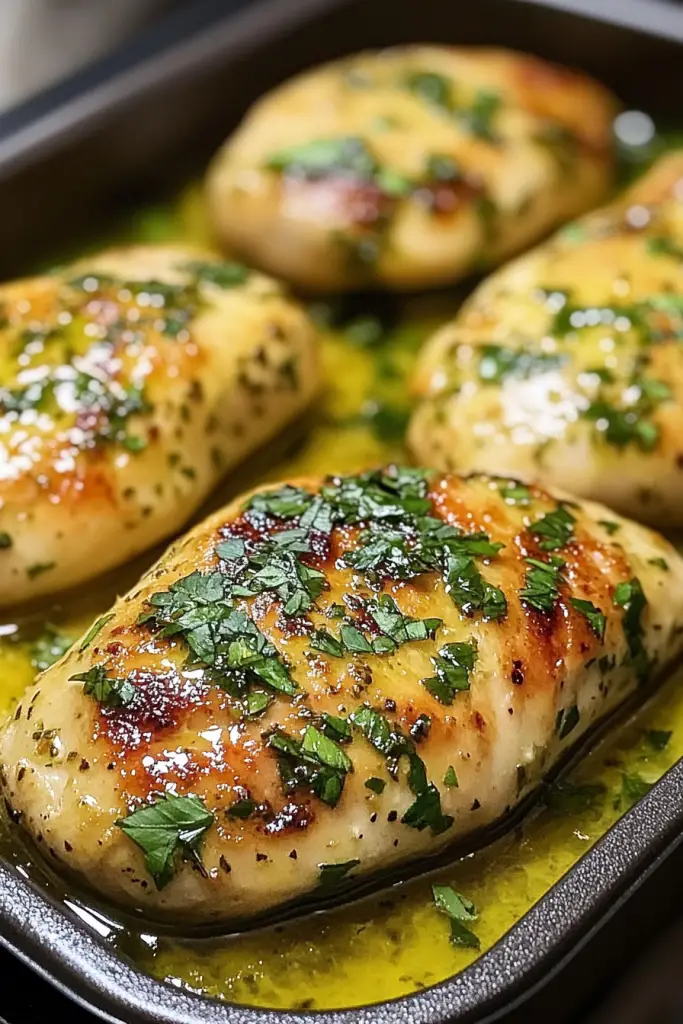
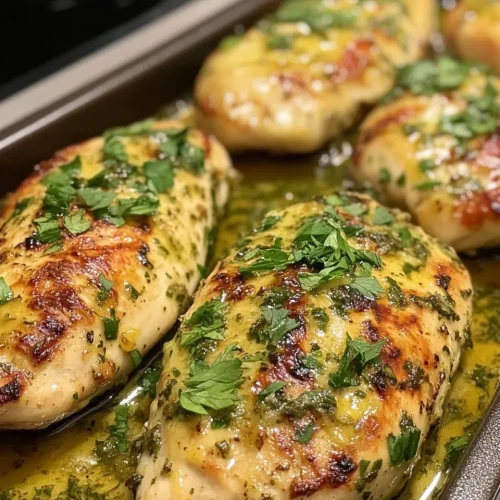
I still remember the first time the apartment smelled like a garlic cloud and buttery sunshine drifting from the stove. It wasn’t a fancy dinner, just a skillet and a handful of everyday ingredients, and somehow it felt like a celebration. This Garlic Butter Chicken became my family’s go-to when life got busy, when the timer buzzed and I needed something comforting in minutes. The aroma alone makes the room feel bigger, and every bite tastes like a hug from someone who’s cooked for you a hundred times. It’s incredibly flavorful, but the simplicity is what keeps me coming back—the sizzling chicken, the lemon brightness, the glossy sauce that clings to every piece. I always do this when I want a dish that feels special without a long list of tasks. This one’s a lifesaver on busy nights, and yes, my kids ask for seconds every single time. If you’re craving something cozy but not fussy, you’re in the right kitchen.
What is garlic butter chicken?
Think of Garlic Butter Chicken as a bright, weeknight-friendly take on a classic skillet dinner. It’s essentially chicken thighs or breasts browned in a hot pan, then bathed in a velvety garlic butter sauce that gets lemony and herby in a heartbeat. The name says it all: garlic + butter + chicken. The beauty lies in layering flavor—season the meat well, develop a crisp crust, and finish with a rich, fragrant sauce that clings to every bite. It’s flexible too: you can swap cuts, adjust the garlic level, or toss in a splash of wine or cream for extra richness. It’s not fancy, but the end result feels like you spent hours coaxing flavor from a single skillet. My favorite part is that it comes together fast, so you actually get to sit down to dinner with the family rather than standing at the stove all night.
Why you’ll love this recipe?
What I love most about this Garlic Butter Chicken is how forgiving it is—a few simple steps and you end up with something that tastes like it was plated at a restaurant, but feels totally homey. Here are the big reasons this one sticks around:
- Flavor:What are the ingredients in this creamy sauce?
- Simplicity:One skillet, quick pan-searing, and a few quick steps to finish. It doesn’t require a long list of
- Cost-efficiency: Chicken thighs are wallet-friendly, and pantry staples like garlic, butter, and lemon keep the price down without sacrificing flavor. You’re getting a big flavor payoff for a modest budget.
- Versatility: The same base recipe adapts to thighs or breasts, and you can tweak the garlic level, add a splash of wine, or lighten with a splash of cream if you like. It also plays nicely with sides from potatoes to quick greens.
- Make-ahead friendliness: It reheats beautifully, so you can cook once and enjoy leftovers for lunches or a quick dinner later in the week.
What I’ve learned over the years is that the magic happens when the pan is hot enough to crisp the edges while the butter delivers that satin-smooth sauce. I’ve tested this with a squeeze of lemon at the end, with a tiny splash of cream for extra richness, and even a pinch of chili flakes for a gentle kick. Each tweak feels personal, like you’re shaping the dish to your mood. This is the recipe I reach for when I want to feed a crowd without stressing out—the kitchen just becomes this warm, scented hub where everyone slows down and smiles.
How to Make Garlic Butter Chicken
Quick Overview
Here’s the quick version: pat dry the chicken, rub it with a simple dry mix, and sear in a hot skillet until deeply golden. Remove the chicken, then build a Garlic Butter sauce in the same pan. Return the chicken to the pan, baste with the butter, and finish with a bright kiss of lemon and a splash of stock or wine. The whole process stays in one pan, which means easy cleanup and maximum flavor in minimal time. If you want extra depth, you can finish in a hot oven for a few minutes to crisp the crust even more, but it’s absolutely delicious straight from the stove as well.
Ingredients
For the Main Batter:
- 4 boneless, skin-on chicken thighs (or 2 large chicken breasts), patted dry
- 1–2 tablespoons olive oil
- 1 teaspoon kosher salt (adjust to taste)
- 1/2 teaspoon freshly ground black pepper
- 1/2 teaspoon paprika
- 1/4 teaspoon garlic powder
- 1/4 teaspoon onion powder
- A pinch of dried thyme or oregano (optional)
For the Filling:
- 4 tablespoons unsalted butter, divided
- 3–4 garlic cloves, finely minced
- 1 lemon (zest 1/2, juice 1–2 tablespoons)
- 1/4 cup chicken stock or dry white wine
- 1–2 tablespoons chopped fresh parsley
- Salt and freshly ground black pepper to taste
- Optional: pinch of red pepper flakes for a gentle kiss of heat
For the Glaze:
- 2 tablespoons unsalted butter, cut into chunks
- 1 tablespoon fresh lemon juice
- 1 teaspoon honey or maple syrup (optional, for a touch of sweetness)
- Salt to taste
- Additional chopped parsley for finish
Step-by-Step Instructions
Step 1: Preheat & Prep Pan
Heat a large skillet over medium-high heat and let it get nice and hot. While it’s warming up, pat the chicken dry with paper towels—wet chicken sticks to the pan and you want a deep golden crust. Salt and season both sides generously, then set the pieces on a plate. If you’re using a mix of thighs and breasts, keep the thighs for juiciness and the breasts for a leaner option. You want that sizzle when it hits the pan, so don’t rush the heat. Add a thin coat of olive oil to the pan and let it shimmer before laying the chicken in. You’ll hear that satisfying hiss—the sign you’re on the right track.
Step 2: Mix Dry Ingredients
In a small bowl, whisk together the paprika, garlic powder, onion powder, salt, and pepper. This is your dry rub, and it’s what gives the chicken that gorgeous, flavorful crust. I love the paprika’s warm hue and a touch of garlic powder for aroma. If you’ve got a favorite blend—like a little ground coriander or thyme—feel free to tuck it in. The trick is to do this in advance so the flavors adhere to the meat as soon as it hits the hot surface.
Step 3: Mix Wet Ingredients
In another small bowl, melt 2 tablespoons of butter and whisk in the lemon juice and stock or wine. The lemon brightens the dish, and the stock or wine brings a lovely pan sauce with depth. This is the moment to decide how saucy you want things: a minimal glaze with just enough liquid to coat the chicken, or a more generous pool you can spoon over each bite. The butter will emulsify with the lemon and stock as it cooks, turning silky and glossy in the pan.
Step 4: Combine
When the pan is hot and the oil shimmers, add the chicken, skin-side down if you’re using thighs. Sear without moving for 3–4 minutes, until a deep golden crust forms. Flip and sear the other side for 2–3 minutes. Sprinkle the dry rub over the top as it cooks. Pour the wet mixture into the pan, then tilt the pan and spoon the butter over the chicken as it braises. The idea is to let the pieces soak in the garlicky butter while the sauce develops. If the pan starts to look dry, add a splash more stock to keep things saucy but not soupy.
Step 5: Prepare Filling
Meanwhile, in a small skillet or the same pan, melt the remaining 2 tablespoons of butter and add the minced garlic. Sauté for 30–60 seconds, just until the garlic too becomes fragrant and golden around the edges. Pour in the stock or wine and bring to a gentle simmer. Let it reduce by about a third, so you’ve got a flavorful base ready to cling to the chicken. Stir in the lemon zest and chopped parsley, tasting for balance. If you like a little heat, toss in the red pepper flakes now. This filling acts as the real flavor engine for the pan sauce—don’t skip it.
Step 6: Layer & Swirl
Return the chicken to the pan if you’ve removed it to build the sauce separately, or keep it in the pan and start swirling. Swirl in the remaining butter pieces so they melt into the sauce, creating a glossy, luscious finish. Tilt the pan and spoon the bubbling butter over the tops of the chicken pieces. You’re aiming for a sauce that lightly coats the chicken rather than pools on the plate. If you want extra richness, let the sauce simmer a touch longer until slightly thickened, then taste and adjust salt as needed.
Step 7: Bake
If you’re cooking entirely on the stove, you can skip this step. If you prefer a crisper crust or you’re using thicker pieces, preheat the oven to 400°F (200°C) and transfer the pan to bake for 5–7 minutes after searing. This optional finish helps set the crust and ensures the chicken is cooked through without drying out. If you bake, keep an eye on it and use a thermometer to aim for an internal temperature of 165°F (74°C).
Step 8: Cool & Glaze
Remove the pan from heat and let the chicken rest for 3–5 minutes. This rest is the secret to juicy meat—the juices redistribute and stay where you want them. In the meantime, whisk together the glaze ingredients, and then swirl or brush a light layer over the chicken. The lemony butter glaze adds a final shine and a touch of citrus brightness. If you’ve baked the chicken, spoon a bit of the glaze over the pieces and drizzle any extra sauce around the plate for a pretty finish. Garnish with a little extra chopped parsley for color and freshness.
Step 9: Slice & Serve
Slice the chicken against the grain to keep it tender, then plate with a generous spoonful of that glossy sauce. The aroma should be rich and citrusy with a hint of butter dancing through the air. I love serving this with mashed potatoes, a crisp green salad, or roasted vegetables that soak up the leftover sauce. If you’ve got a little extra lemon zest on hand, a tiny sprinkle over the chicken right before serving is a bright finale that makes the dish feel downright polished.
What to Serve It With
This Garlic Butter Chicken is a crowd-pleaser, so you’ll want sides that complement its richness without stealing the show. Here are a few ideas that I’ve tested and loved, organized by mood:
For Breakfast: Slice the leftovers thin and fold into a quick breakfast hash with potatoes, peppers, and a couple of sunny-side-up eggs. Serve with a bright, strong coffee to cut through the richness. The garlic and lemon carry through nicely, waking up the flavors in the morning.
For Brunch: A simple herb-parmesan potato sayreau (crispy potatoes, herbs, and a light lemon-y note) alongside a crisp green salad makes for a sunny brunch plate. A sparkling water with a squeeze of lemon mirrors the dish’s brightness and keeps things lively.
As Dessert: This dish isn’t dessert, but if you’re craving something sweet afterward, keep it separate: finish the supper with a lemon sorbet or a light yogurt-pistachio parfait to clear the palate. The idea is to keep the garlic-butter romance intact for the next day’s lunch or dinner.
For Cozy Snacks: Warm up a small plate with seared chicken pieces, a handful of crusty bread, and a tiny bowl of extra glaze for dipping. It’s the kind of snack that feels indulgent but casual, perfect for a movie night or a late-night chat with coffee or tea.
Personally, I’ve found that this dish shines when paired with sides that soak up the sauce—creamy mashed potatoes, or a simple roasted vegetable medley—and a crisp green salad to balance the richness. It’s the kind of meal that looks effortless on the table but carries real comfort in every bite.
Top Tips for Perfecting Your Garlic Butter Chicken
These are the little tricks I’ve learned after making this countless times. They’re simple tweaks that elevate every panful of chicken to a keep-it-in-rotation recipe.
Garlic Prep: mince it finely so it dissolves into the butter rather than sticking to your knife. A quick smash with the flat of a knife before mincing helps release more aroma. If you’re distracted, you can add the garlic later in the pan for a milder note; just know you’ll miss a bit of the fragrance that hits the room the moment it meets hot butter.
Butter Handling: use unsalted butter so you control the salt level. Add butter in two stages: one for searing the chicken and another for finishing the sauce. The second pat of butter is what makes the glaze glossy and the sauce incredibly creamy.
Avoiding Soggy Chicken: pat dry thoroughly and don’t overcrowd the pan. If you crowd the pan, the chicken will steam instead of sear, and you’ll lose that crisp exterior. Work in batches if needed, letting the pieces have space to kiss the hot surface.
Mixing Advice: keep your dry rub simple and well-distributed. The moment the chicken hits the pan, you want the surface to begin caramelizing. If the pan looks dry, splash a little stock to lift the fond from the bottom and create a quick pan sauce.
Swirl Customization: after you add the butter, swirl the pan rather than constantly stirring. This helps the sauce emulsify with the natural juices, producing a silkier texture and a prettier coat on the chicken pieces.
Ingredient Swaps: you can swap in lemon zest for extra brightness or add a dash of cream to the sauce if you like it extra indulgent. If you’re avoiding dairy, you can use a splash of olive oil plus a bit of white wine to loosen the sauce and maintain richness.
Baking Tips: if you finish in the oven, place the pan in a hot oven (400°F/200°C) for 5–7 minutes to crisp the crust. Use a thermometer to test for doneness instead of relying only on time. Juices should run clear at the thickest part, and the internal temperature should read 165°F (74°C).
Glaze Variations: the glaze is flexible. For a dairy-free version, skip the butter and use olive oil to finish the sauce with lemon. You can add a teaspoon of honey for a subtle sweetness or a pinch of chili flakes for a gentle heat that lingers on the palate.
Lessons learned: the first time I rushed this, I ended up with a piece of chicken that was perfectly cooked on the outside but dry on the inside. The second time I let the pan rest for a minute before adding the sauce, and I kept the heat steady rather than blasting it. The difference was dramatic—juicy chicken, glossy sauce, and a scent that made the entire house feel like it deserved a standing ovation. Trust me on this one—the rhythm matters, and the aroma is a promise you’ll want to keep.
Storing and Reheating Tips
Leftovers are rare in our house, but when they happen, they’re a joy to rehear. Here’s how I handle garlic butter chicken so it stays tender and flavorful.
Room Temperature: don’t leave cooked chicken out for more than two hours. If you’re serving a crowd, keep portions warm in a low oven (around 200°F/93°C) or cover and keep them in a warmed serving dish to preserve moisture without drying out.
Refrigerator Storage: transfer leftovers to an airtight container within two hours of cooking. They’ll keep well for 3–4 days. Reheat gently on the stove over low heat with a splash of stock or water to loosen the sauce if it thickens too much. You want the chicken to stay juicy and the sauce to remain glossy, not greasy.
Freezer Instructions: I don’t typically freeze garlic butter chicken with the glaze, but the chicken itself freezes well if cooled completely and stored in a freezer-safe container for up to 2–3 months. Thaw overnight in the fridge, then reheat gently with a splash of stock. If you’re reheating from frozen, add a little extra lemon juice or stock to rehydrate the sauce as it comes back to life.
Glaze Timing Advice: if you know you’ll be freezing leftovers, hold back the glaze and reheat the chicken first, then whisk the glaze in at the end. This keeps the glaze from breaking and maintains that shiny, silky finish.
Quality indicators: the chicken should stay moist, the sauce should be glossy, and the garlic should still smell fragrant rather than burnt. If you notice any dryness, add a splash of stock, broth, or a touch of water to loosen the sauce and refresh the moisture level.
Frequently Asked Questions
Final Thoughts
Garlic Butter Chicken isn’t just a recipe—it’s a memory in a skillet. It’s our family’s version of comfort on a busy night, the dish that invites slow conversations at the table and makes room for a lingering hug of aroma as the butter melts away the day’s stress. It’s also incredibly forgiving: you can swap cuts, tweak the lemon, or skip the oven finish and still end up with a plate that feels special. If you’re new to weeknight cooking, this is the one to start with because it builds confidence and proves you don’t need to spend hours in the kitchen to create something memorable. I’d love to hear how you customize it—whether you add a pinch of chili, a splash of cream, or a different herb. Share your variations in the comments, rate the recipe, and tell me what you served it with. Happy cooking, friends, and may your skillet always glow with golden, garlic-scented goodness!
Garlic Butter Chicken
Ingredients
Main Ingredients
- 0.5 kilograms boneless, skinless chicken breasts cut into 1-inch pieces
- 4 tablespoons unsalted butter
- 4 cloves garlic minced
- 0.5 teaspoon dried oregano
- 0.5 teaspoon salt
- 0.25 teaspoon black pepper
- 0.25 cup chicken broth
- 2 tablespoons fresh parsley chopped, for garnish
Instructions
Preparation Steps
- Pat the chicken dry and season with salt and pepper.
- Melt butter in a large skillet over medium-high heat.
- Add chicken to the skillet and cook for 6-8 minutes, flipping halfway through, until golden brown and cooked through.
- Add minced garlic and dried oregano to the skillet and cook for 1 minute until fragrant, stirring constantly.
- Pour in chicken broth and scrape up any browned bits from the bottom of the skillet.
- Simmer for 2-3 minutes, allowing the sauce to thicken slightly.
- Garnish with fresh parsley before serving.


