


You know those recipes that just feel like coming home? The ones you pull out when you need a little extra comfort, or when you want to impress someone without breaking a sweat? Well, this snowman dessert recipe is exactly that for me. It’s not just a dessert; it’s pure nostalgia baked into a cozy, delicious hug. I remember making this with my grandma on snowy afternoons, the scent of cinnamon and warm apples filling her tiny kitchen, and us giggling as we tried to make the little snowman shapes. Now, I make it with my own kids, and seeing their faces light up just like mine used to… it’s everything. It’s like a spiced apple cake had a baby with a comforting crumble, all rolled into a delightful little package. Honestly, if you’ve ever loved a good Apple Crumble or a perfectly moist spice cake, this snowman dessert recipe is going to be your new best friend. It’s surprisingly simple, incredibly forgiving, and always, always a crowd-pleaser. Forget those fussy holiday bakes; this one’s a lifesaver and tastes like a warm hug on a chilly day.
What is this snowman dessert?
So, what exactly *is* this magical snowman dessert recipe? Think of it as a wonderfully moist spiced cake, almost like a tender gingerbread or a spiced apple cake, but with a charming twist. We bake it in a way that creates little “snowmen” clusters, where each bite is a perfect mix of soft cake and a hint of delightful crunch from the topping. It’s not a SHEET CAKE, and it’s not individual cupcakes – it’s something wonderfully in between. The name, “snowman dessert,” comes from how the batter bakes up into cute, rounded little mounds that, when drizzled with a simple glaze, totally resemble little snowmen dusted with powdered sugar. It’s essentially a comforting, spiced cake baked into adorable, bite-sized (or slightly bigger!) shapes that are just begging to be shared. It’s the kind of dessert that brings smiles without any fuss, and that’s exactly why I adore it so much. It’s simple, it’s sweet, and it’s undeniably charming, making it perfect for any gathering or just a quiet evening treat.
Why you’ll love this recipe?
What are some of the best snowman dessert recipes?flavor. It’s like a warm hug from the inside out. The spices – cinnamon, nutmeg, a touch of ginger – are just perfect, especially when paired with that subtle sweetness that never overpowers. It’s comforting and festive all at once. Then there’s the simplicity. Seriously, this recipe is a game-changer. If you can stir ingredients together, you can make this. There’s no complicated creaming of butter and sugar, no delicate folding. It’s wonderfully straightforward, which is a lifesaver on busy weeknights when the craving for something sweet hits hard. And speaking of cravings, this is perfect when you don’t want to bake a whole cake but need a special treat. It’s also incredibly cost-efficient. You probably have most of the ingredients in your pantry right now! No need for fancy, expensive additions. Plus, it’s so darversatile. You can drizzle it with a simple powdered sugar glaze, or go a little wild with a Cream Cheese Frosting or even a caramel sauce. It’s fantastic served warm, straight from the oven, or even at room temperature. What I love most about this snowman dessert recipe is its ability to evoke pure joy. It’s that feeling of a cozy winter day, a bit of playful fun, and a whole lot of deliciousness all rolled into one. It’s a bit like my tried-and-true apple cinnamon bread, but with an extra dose of charm and ease. It’s the dessert that makes everyone ask for the recipe, and you can proudly say, “Oh, this old thing? It’s so simple!”
How to Make This Snowman Dessert
Quick Overview
Making these adorable snowmen is a breeze! You’ll simply mix up a wonderfully spiced batter, dollop it onto a baking sheet to form cute mounds, and bake until golden. While they bake, you’ll whip up a quick, sweet glaze. Once cooled slightly, a drizzle of that glaze brings our little snowmen to life! It’s a straightforward process that guarantees a delightful result, perfect for kids and adults alike. The beauty is in its simplicity; minimal effort for maximum cozy charm.
Ingredients
For the Main Batter:
You’ll need about 2 cups of all-purpose flour. I always sift mine just to make sure there are no lumps, but it’s not strictly necessary if you’re in a hurry. Make sure it’s fresh! I also use 1 teaspoon of baking soda and half a teaspoon of baking powder – this combo gives us that perfect lift and tender crumb. For the spices, which are the heart and soul here, I use 1 ½ teaspoons of ground cinnamon, ½ teaspoon of ground nutmeg, and a tiny pinch (just a ¼ teaspoon) of ground ginger. If you’re feeling adventurous, a little pinch of ground cloves can be lovely too! For sweetness, we’re using 1 cup of granulated sugar, and I sometimes sneak in an extra tablespoon if my apples are particularly tart. Then come the wet ingredients: 2 large eggs, beaten just enough to combine. Melted butter is key here; ½ cup (that’s one stick) of unsalted butter, melted and slightly cooled so it doesn’t cook the eggs. And for that irresistible moisture, we need ½ cup of milk. I usually use whole milk for richness, but I’ve tested this with almond milk and it actually made it even creamier! Finally, the secret ingredient that keeps these so wonderfully moist and flavorful: 1 cup of finely grated zucchini. Don’t worry, you won’t taste it; it just lends a beautiful texture and keeps things tender. Make sure to squeeze out any excess moisture after grating!
For the Crumble Topping (optional but highly recommended!):
If you want that little bit of crunch, you’ll need ½ cup of all-purpose flour, ¼ cup of granulated sugar, and 1 teaspoon of ground cinnamon. I also like to toss in about ¼ cup of chopped pecans or walnuts for extra texture and flavor – they’re totally optional but so good! You’ll also need about 3 tablespoons of cold, unsalted butter, cut into small cubes.
For the Simple Glaze:
This is as easy as it gets. You’ll need about 1 ½ cups of powdered sugar, sifted to avoid lumps. Then, you’ll add 2-3 tablespoons of milk or cream. For a hint of flavor, I like to add ½ teaspoon of vanilla extract. If you want to make it a bit more festive, a tiny drop of almond extract is divine, or even a splash of lemon juice for a slight tang. The goal is a smooth, drizzle-able consistency – not too thin, not too thick.
Step-by-Step Instructions
Step 1: Preheat & Prep Pan
Alright, first things first, let’s get our oven preheated to 375°F (190°C). This is a pretty forgiving temperature, so even if your oven runs a little hot or cool, you should be okay. Now, grab a couple of large baking sheets and line them with parchment paper. Trust me on this one; it makes cleanup an absolute breeze and prevents any sticking. You want the parchment paper to lie flat, so if it’s curling up, you can tuck the edges under the baking sheet. Give yourself plenty of space, as the batter will spread a little.
Step 2: Mix Dry Ingredients
In a large mixing bowl, whisk together your sifted all-purpose flour, baking soda, baking powder, cinnamon, nutmeg, and ginger. Whisking them together ensures all those lovely spices are evenly distributed throughout the batter, so you get that consistent warm flavor in every bite. You’re looking for a uniform color and no visible clumps of leavening agents. This step might seem small, but it’s crucial for a well-balanced cake texture.
Step 3: Mix Wet Ingredients
In a separate medium bowl, whisk your beaten eggs until they’re just combined. Then, pour in your slightly cooled melted butter and milk. Whisk these together until everything is nicely emulsified. If you’re using vanilla or almond extract, this is a good time to add it to the wet ingredients. Make sure the butter isn’t too hot, or it might scramble your eggs – we want smooth, luscious wet ingredients ready to marry the dry.
Step 4: Combine
Now for the magic! Pour the wet ingredients into the bowl with the dry ingredients. Add your finely grated and squeezed zucchini as well. Using a rubber spatula or a wooden spoon, gently fold everything together. Be careful not to overmix! You want to mix just until there are no dry streaks of flour left. A few small lumps are perfectly fine – actually, they’re preferable to an overmixed batter, which can lead to a tough cake. We’re aiming for a thick, slightly lumpy batter that’s wonderfully fragrant.
Step 5: Prepare Filling (for Crumble Topping)
If you’re making the crumble topping, now’s the time. In a small bowl, combine the ½ cup flour, ¼ cup sugar, and 1 teaspoon cinnamon. If you’re adding nuts, stir them in now. Add the cold, cubed butter. Using your fingertips or a pastry blender, work the butter into the dry ingredients until the mixture resembles coarse crumbs. Some larger pea-sized pieces of butter are good; they help create those lovely pockets of texture when baked.
Step 6: Layer & Swirl (Dollop Batter)
Here’s where we make our little snowmen! Drop rounded tablespoons of the batter onto your prepared baking sheets, leaving about 2 inches between each dollop. They should be loosely shaped mounds. If you’re adding the crumble topping, gently sprinkle a little bit over the top of each mound. Don’t cover them completely, just a light dusting. They’ll spread a bit as they bake, so give them room to grow into their adorable snowman shapes.
Step 7: Bake
Pop those baking sheets into your preheated oven. Bake for about 15-20 minutes. The exact time will depend on the size of your dollops and your oven. You’re looking for them to be lightly golden brown around the edges and mostly firm to the touch. A toothpick inserted into the center should come out clean, or with just a few moist crumbs attached. Overbaking will make them dry, so keep an eye on them, especially towards the end. They should smell absolutely heavenly!
Step 8: Cool & Glaze
Once baked, let the snowman desserts cool on the baking sheets for about 5-10 minutes. This allows them to set up a bit more. Then, carefully transfer them to a wire rack to cool further. While they’re cooling, whisk together the powdered sugar, vanilla extract, and 2 tablespoons of milk in a small bowl. Add more milk, a teaspoon at a time, until you reach a thick but pourable consistency. It should be fluid enough to drizzle but not so thin that it all runs off. Once the snowman desserts are mostly cool (warm, but not hot), you can start drizzling!
Step 9: Slice & Serve
These are best served slightly warm or at room temperature. If you want them to look extra cute, you can use a piping bag with a thin tip, or even a Ziploc bag with a corner snipped off, to drizzle the glaze in zig-zag patterns over the snowman mounds. You can also just use a spoon for a more rustic look. They are perfect on their own, or you can serve them with a dollop of whipped cream or a scoop of vanilla Ice Cream. The glaze will harden slightly as it sits, giving them that lovely finished look. Enjoy the magic!
What to Serve It With
These delightful snowmen are so versatile, they fit into almost any meal or occasion! For Breakfast, they’re a dream. Imagine serving them warm with a steaming mug of coffee or a creamy latte. A simple dusting of powdered sugar before serving is elegant enough for a weekend treat. For Brunch, they’re a showstopper. Arrange them on a tiered stand with fresh berries and maybe a small bowl of Greek yogurt for dipping. They add such a charming, homemade touch that guests will rave about. When serving them as Dessert, they are truly magical. A drizzle of warm caramel sauce over the glazed snowmen is divine, or pair them with a scoop of salted caramel ice cream for a flavor explosion. They also go beautifully with a dessert wine or a rich hot chocolate. And for those Cozy Snacks, they are absolute perfection. Grab one (or two!) with a glass of milk after dinner, or serve them to the kids as an after-school surprise. They’re so comforting and satisfying. My personal family tradition is to have these on Christmas morning while we open presents – the warm, spiced scent just makes the whole day feel extra special. I’ve also found they’re fantastic with a spiced APPLE CIDER or a warm cup of chai tea. Honestly, they’re so good, they don’t need much, but a little something extra can elevate them even further.
Top Tips for Perfecting Your Snowman Dessert
I’ve made this snowman dessert recipe more times than I can count, and through all those batches, I’ve picked up a few tricks that really make a difference. For Zucchini Prep, grating it finely is key, and you absolutely must squeeze out as much moisture as you can. Use your hands, a clean kitchen towel, or even a potato ricer. Excess water will make your batter too thin and can result in a gummy texture. Fresh zucchini is always best; it has less moisture and a milder flavor. When it comes to Mixing Advice, remember my earlier point: don’t overmix! Overmixing develops the gluten in the flour, leading to a tough, dense cake. Stop as soon as you don’t see any dry flour. Lumps are your friend here! For Swirl Customization (if you decide to swirl a little something in your batter, like melted chocolate or a bit of jam), do it gently. Don’t over-swirl, or you’ll muddy the flavors and textures. Aim for distinct ribbons. I’ve learned that when adding a swirl, it’s best done just before dolloping onto the pan. For Ingredient Swaps, I’ve experimented quite a bit! If you don’t have milk, a plant-based milk like oat or soy works beautifully. For a richer flavor, you can use buttermilk. If you find you’re sensitive to gluten, I’ve had success using a good quality gluten-free all-purpose flour blend, though you might need a touch more liquid, so watch the batter consistency. For Baking Tips, always remember ovens vary. Start checking for doneness around the 15-minute mark. If your baking sheets are dark, they might cook faster, so keep an eye on the bottoms. Placing the oven rack in the center usually ensures even cooking. And for Glaze Variations, play around! A touch of orange zest in the glaze adds a lovely brightness. For a thicker glaze, use less liquid; for a thinner one, add a bit more. You can also use a simple lemon juice and powdered sugar mix for a tangy kick. My kids sometimes ask for a chocolate glaze, which is just cocoa powder whisked into the powdered sugar and milk mixture – they disappear even faster then!
Storing and Reheating Tips
Knowing how to store these little beauties is just as important as making them! For Room Temperature Storage, if they’re glazed, I’d say they’re best eaten within a day or two. Make sure they’re completely cool before covering them loosely with plastic wrap or storing them in an airtight container. They tend to stay lovely for up to 3 days this way, especially if you’ve got that little crumble topping for texture. If you’re thinking about Refrigerator Storage, they’ll last even longer, up to a week. Store them in an airtight container, and if they start to feel a little dry, you can pop them in the microwave for about 10-15 seconds before serving. It’s amazing how that little bit of warmth revives them! For Freezer Instructions, these freeze surprisingly well, even with the glaze. Let them cool completely, then wrap them individually in plastic wrap, followed by a layer of foil or a freezer-safe bag. They can be kept frozen for up to 2-3 months. To thaw, simply bring them to room temperature for a few hours, or pop them into the fridge overnight. For Glaze Timing Advice, I usually glaze them just before serving for the freshest, prettiest look. However, if you know you’ll be freezing them, it’s often best to store them *un-glazed* and add the glaze after thawing. If you do glaze them before freezing, be aware that condensation can sometimes make the glaze a little sticky when thawed, but they’ll still taste delicious!
Frequently Asked Questions
Final Thoughts
Honestly, I could talk about this snowman dessert recipe all day! It’s more than just a treat; it’s a little slice of happy. The combination of warm spices, that wonderfully tender, moist cake, and the cute little snowman shape just makes everything feel a bit brighter. It’s the perfect example of how simple ingredients and a little bit of love can create something truly magical. Whether you’re baking for a special occasion or just need a comforting pick-me-up, this recipe is guaranteed to deliver smiles. I really hope you give it a try! If you enjoyed this, you might also love my recipe for Cozy Apple Crumble Bars or my Chewy Ginger Molasses Cookies – they have that same warm, comforting vibe. I can’t wait to hear what you think of these snowmen! Please leave a comment below and tell me how yours turned out, or if you tried any fun variations. And if you loved it, share it with your friends – baking is always better when it’s shared! Happy baking, everyone!
Snowman Dessert Recipe
Ingredients
For the Snowman Body
- 0.5 cup vanilla ice cream
- 1 tablespoon chocolate syrup
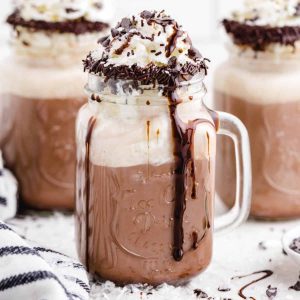
For the Frosty Topping
- 1 cup hot chocolate prepared and warm
- 0.25 cup Kahlua
- 1 tablespoon dark creme de cacao liqueur
- whipped cream for topping
- chocolate chips mini, for garnish
- chocolate sprinkles for garnish
Instructions
Assembly
- On a small plate, spread the chocolate syrup. Dip the rim of your serving glass or mug into the chocolate syrup to coat.
- In a shallow tray, place the chocolate sprinkles. Roll the chocolate-syrup-coated rim into the sprinkles until it is well-coated.
- Place one scoop of vanilla ice cream into the bottom of the prepared glass or mug.
- Pour the Kahlua and dark creme de cacao liqueur over the ice cream.
- Carefully pour the warm hot chocolate over the ice cream and liqueurs, filling the glass or mug.
- Top generously with whipped cream. Garnish with mini chocolate chips and chocolate sprinkles to resemble a snowman's features.


