


There’s something incredibly comforting about that rich, fudgy chocolate smell wafting through the kitchen — it instantly feels like a hug. I remember those nights when I’d crave brownies so badly but didn’t want to fuss with the oven or dirty a mountain of bowls. Enter my go-to microwave brownies. They’re quick, chocolaty, and totally satisfying without any of the stress. Honestly, this recipe has saved me more times than I can count when my kids suddenly decided it was “brownie o’clock” late at night or when I needed a sweet pick-me-up in a flash. If you love the deep, gooey texture of a classic homemade brownie but want it in a snap, this microwave version is your new best friend. It’s basically like magic in a cup — just a few simple ingredients, a minute or two, and you’re set. Nothing beats that first warm bite with chocolate melting on your tongue.
What is microwave brownies?
So, microwave brownies are exactly what they sound like — brownies made with the microwave instead of baking in the oven. Think of it as a mini fudgy brownie whipped up in a mug or small dish, perfect for when you’re craving something sweet but either short on time or don’t want to heat up the whole kitchen. It’s essentially a single-serving brownie that cooks in just a minute or two, coming out with that rich, chewy feel we all love. This treat first popped up in the wave of mug cakes, where comfort food gets an instant upgrade using your microwave. Whether you’re a college student in a dorm or a busy parent needing a fast fix, microwave brownies are a game-changer. The best part? You don’t have to be a seasoned baker to nail it — it’s really that simple.
Why you’ll love this recipe?
What I love most about these microwave brownies is how they deliver maximum chocolatey goodness with minimal effort. If you’ve ever had one, you know how comforting a warm brownie can be, but who has time to wait 30+ minutes for it to bake? This recipe hands you those chewy, fudgy bites in under five minutes total – prep and cook time included. It’s like having your cake and eating it too, without any guilt or frustration. The ingredients are pantry staples, so you don’t have to make a special trip to the store, which is a lifesaver. Plus, it’s wildly versatile – you can toss in nuts, chunks of chocolate, or swirl in some peanut butter or cream cheese if you want to jazz it up. My kids actually beg me for these during homework breaks, and sometimes I sneak some almond milk instead of regular milk, which makes it even creamier (seriously!). If you’ve played with mug cakes before, this brownie recipe is an easy step up with a denser texture that feels genuinely indulgent. It’s quick, wallet-friendly, and hits the sweet spot every single time.
How do you make microwave brownies?
Quick Overview
Microwaving brownies might sound almost too easy, but that’s what makes it so brilliant. You combine your dry ingredients and wet ones separately, then bring them together just until smooth. The batter goes into a microwave-safe dish or mug, and in about 90 seconds, you have rich, fudgy brownies that still manage to taste homemade. The whole process takes less time than getting your delivery order! The trick is not to overcook, so the brownies stay moist and tender, and the texture is spot-on. Trust me, it’s truly the easiest way to get your chocolate fix without sacrificing flavor or texture.
Ingredients
For the Main Batter:
- 1/4 cup all-purpose flour — sifted if you want a smoother texture
- 2 tablespoons unsweetened cocoa powder — use a good quality brand for the best chocolate punch
- 1/4 teaspoon baking powder — just a little lift to keep it from getting too dense
- Pinch of salt — enhances the chocolate, never skip this
- 1/4 cup granulated sugar — you can swap part with brown sugar for a slight caramel note
- 2 tablespoons melted butter — or coconut oil if you prefer
- 3 tablespoons milk — any kind works, almond or oat even add a lovely creaminess
- 1/2 teaspoon vanilla extract — this little touch pulls everything together
For the Filling:
- 1 tablespoon peanut butter, jam, or cream cheese — optional but highly recommended for a luscious surprise
- Chopped walnuts or chocolate chips — toss in 1 tablespoon if you want crunch or gooey pockets
For the Glaze:
- 2 tablespoons powdered sugar
- 1 teaspoon cocoa powder — to keep the chocolate theme going
- 1 teaspoon milk — adjust to get a pourable glaze
- A few drops of vanilla or melted chocolate for a flavor twist
Step-by-Step Instructions
Step 1: Preheat & Prep Pan
No oven preheating here, which is my favorite part! Just grab a microwave-safe mug or small bowl that’s greased lightly with butter or non-stick spray. I always use butter because it adds a little richness around the edges and stops sticking. You want a dish that’s about 8 ounces so your brownie has enough height and doesn’t run over while cooking.
Step 2: Mix Dry Ingredients
In a small bowl, whisk together your flour, cocoa powder, baking powder, salt, and sugar. Mixing these dry ingredients well is key — it helps to avoid those cocoa clumps and ensures your brownie will have an even crumb. Don’t just dump them all in; take a minute to sift if you can. It makes a subtle but noticeable difference in smoothness.
Step 3: Mix Wet Ingredients
In another bowl, combine melted butter, milk, and vanilla extract. The butter needs to be lukewarm but not hot, or it’ll start to cook the eggs and mess with the texture. Stir until everything blends smoothly — it should look silky and inviting. I usually taste a tiny bit here to make sure the vanilla is just right.
Step 4: Combine
Slowly pour the wet mixture into the dry ingredients, stirring gently. Don’t overmix; just combines until you don’t see any dry flour patches. The batter will be thick but smooth and shiny. I learned the hard way that overmixing can make the brownie tough, which is the last thing you want here. If it looks a little too thick, whisk in a splash more milk.
Step 5: Prepare Filling
This is where your microwave brownies get personal. If you want that classic peanut butter swirl or a surprise jam center, dollop it now but don’t mix it in fully. For chocolate chips or nuts, stir them evenly into the batter. I love the peanut butter twist for that salty-sweet magic — it’s like a little hug inside your brownie.
Step 6: Layer & Swirl
Pour half the batter into your greased mug. Drop the filling (if using) in the middle, then spoon the remaining batter over it. Take a toothpick or knife and swirl gently to create those pretty marble patterns. It looks fancy but takes two seconds – just careful not to overdo it or you’ll lose the layers.
Step 7: Bake
Pop your mug into the microwave on high for about 60 to 90 seconds. This time varies depending on your microwave’s power — my 1000W unit takes 70 seconds, so I watch closely after the minute mark. The top should look set but slightly glossy; it firms up more as it cools. Don’t overcook or your brownie will dry out; trust me, halfway moist is the goal here.
Step 8: Cool & Glaze
Let the brownie sit for about 3-5 minutes to cool enough for handling. Meanwhile, mix your glaze ingredients until smooth, adding milk little by little so it’s just right — not too thick, not too runny. Pour it over your warm brownie and watch it melt down slightly for that beautiful shiny finish. The glaze adds a sweet, silky touch that makes these feel truly indulgent.
Step 9: Slice & Serve
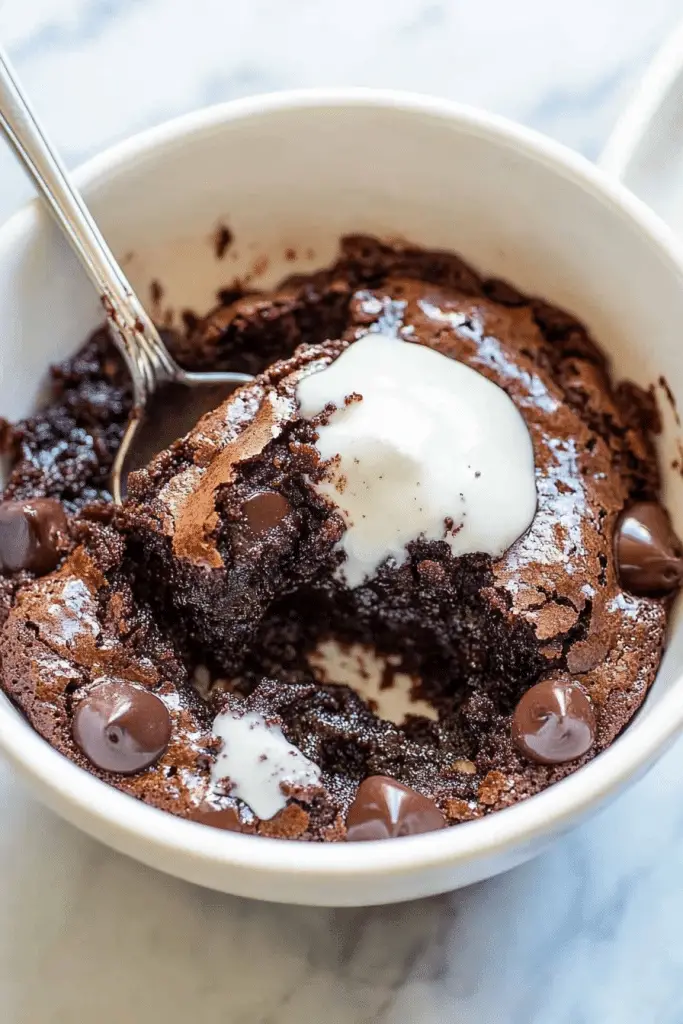
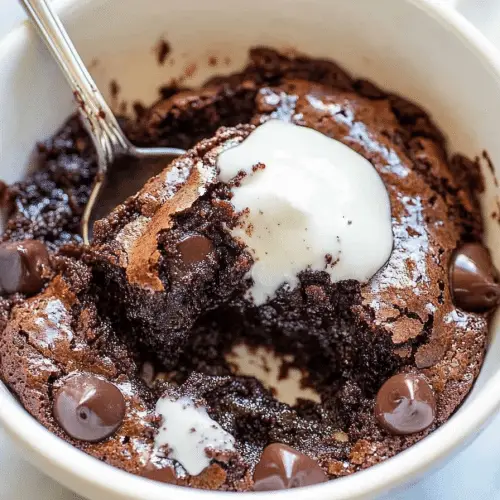
If you made this in a mug, just eat with a spoon straight away — warm, gooey heaven! If you used a small baking dish, gently slice into squares with a warm knife for clean cuts and serve at room temperature or slightly warmed. Add a scoop of vanilla ice cream or a dollop of whipped cream if you’re feeling decadent. I love pairing mine with a strong cup of coffee or a splash of cold milk.
What to Serve It With
For Breakfast: A few brownie bites with your morning coffee or latte make a sweet little indulgence—perfect for weekend mornings when you want to treat yourself but keep it easy.
For Brunch: Serve warm brownies with fresh berries and a dollop of mascarpone or ricotta. Add a mimosa or sparkling water with lemon, and you’ve got a casual yet elegant spread that surprises your guests.
As Dessert: This is where microwave brownies really shine. Warm and drizzled with chocolate or caramel sauce, they pair beautifully with vanilla ice cream and a sprinkle of toasted nuts. My family loves ours topped with a spoonful of salted peanut butter for extra richness.
For Cozy Snacks: Nothing beats these brownies straight from the microwave on a cold afternoon, wrapped in a cozy blanket with a mug of cocoa or chai tea. The smell alone will call your family to the kitchen—they disappear fast!
Honestly, the memories my family has around these quick brownies—snacking after school, last-minute dessert emergencies, even baking night “experiments”—make them feel like more than just a recipe. It’s those warm, gooey moments together that really stick.
Top Tips for Perfecting Your Microwave Brownies
Mixing Advice: Be gentle. Mixing your wet and dry ingredients just until combined keeps the brownies tender. Always avoid over-stirring which makes them gummy instead of fudgy.
Glaze Variations: You can play around with the glaze by adding espresso powder for a mocha twist or a pinch of cayenne for a subtle kick. If you want to skip glaze, a light dusting of powdered sugar and cinnamon works wonders too.
Ingredient Swaps: Swap regular milk for almond or oat milk to add creaminess and a slightly nutty flavor. Use melted coconut oil in place of butter for a dairy-free option that keeps the texture dreamy. If you want to go gluten-free, I tried a 1:1 gluten-free baking mix with great results, just keep an eye on the moisture and microwave time.
Swirl Customization: When adding your chosen filling, try swirling peanut butter and chocolate chips to create a marbled masterpiece. Use a toothpick dipped in water to get smooth, clean swirls.
Baking Tips: Every microwave’s power differs, so start with shorter bursts and add 10-second increments to avoid overcooking. Place your mug or dish nearer to the center and rotate halfway if your microwave can’t do that automatically to ensure even cooking.
These little tweaks saved me from many batches that came out either too dry or undercooked, and once you master them, microwave brownie perfection is just a minute away.
Storing and Reheating Tips
Room Temperature: Keep brownies in an airtight container for up to 2 days. If it’s humid, a paper towel on bottom helps absorb any moisture to keep them from getting soggy.
Refrigerator Storage: If you want them to last a little longer, store brownies in a sealed container for up to 5 days. Bring back to room temperature or zap in the microwave for 15-20 seconds for a warm treat.
Freezer Instructions: Wrap brownies tightly in plastic wrap and place them in a freezer-safe bag or container. They keep well for up to 3 months. Thaw overnight in the fridge or microwave gently from frozen for 30 seconds.
Glaze Timing Advice: If you’re storing brownies without glaze, add it fresh before serving. For glazed brownies, store uncovered after glaze sets so it doesn’t get slimy. Reheat gently to keep that fudgy texture perfect.
Frequently Asked Questions
Final Thoughts
Microwave brownies have become my little secret weapon in the kitchen — they bring instant joy, require zero baking hassle, and somehow taste like they took way longer to prepare. If you like chocolate and you value your time, you’re going to find yourself making these over and over again, just like me. They’re perfect for those midnight cravings, quick sweets after the kids go to bed, or spontaneous “I need chocolate now” moments. Don’t be shy about mixing up fillings or toppings — that’s the fun part! And if you love this recipe, you should definitely check out my microwave mug cakes or the classic oven-baked brownies for those days when you have a little extra time. Can’t wait to hear how your microwave brownies turn out — drop me a comment below or share your own twists. Happy baking and sweet snacking, friend!
microwave brownies
Ingredients
Main Ingredients
- 0.25 cup granulated sugar
- 3 tablespoon unsweetened natural cocoa powder
- 3 tablespoon water
- 2 tablespoon canola or vegetable oil
- 2 tablespoon light brown sugar, packed
- 0.5 teaspoon vanilla extract
- pinch salt to taste
- 0.25 cup all-purpose flour
- 0.33 cup semi-sweet chocolate chips *optional
Instructions
Preparation Steps
- In a small microwave-safe bowl, whisk together granulated sugar, cocoa powder, water, canola oil, brown sugar, vanilla extract, and a pinch of salt until fully combined.
- Add the all-purpose flour and stir until just combined, being careful not to overmix.
- Stir in the semi-sweet chocolate chips evenly into the batter.
- Microwave on high power for about 1 minute, or until the brownie is set in the center to your desired doneness. Check at 45 seconds and adjust cooking time if needed in 15-second intervals.
- Optionally top with ice cream or whipped topping and serve immediately. Best enjoyed warm and fresh.


