


The scent of butter and vanilla always takes me back to Saturday mornings at grandma’s house, when trays of something sweet would come out of the oven just as the day began. This time, I’m sharing my go-to Edible Cookie Dough treat that you can make right on a weeknight and still feel like you treated yourself. It’s not your average cookie dough—this version is designed to be safe to eat raw, with no eggs and flour that’s been heat-treated so you can enjoy every lick and crumb without worry. Think of it as a comforting, dairy-sweet slice of nostalgia that comes together in one pan, then turns into bars or squares you can slice for sharing. It’s incredibly satisfying, but the real magic is how simple it is—I joke that this is my “lifesaver on busy nights” recipe, because yes, it’s delicious, and no, it doesn’t demand hours in the kitchen. I’ve fed it to friends, and their eyes light up the moment the first bite hits the tongue. This edible cookie dough is something I reach for when a craving hits after dinner, or when the kids beg for something sweet but I’m not in the mood to bake a whole batch. And yes, I’ve tested it with almond milk, and yep, it makes the texture even creamier. Trust me on this one: it’s absolutely worth keeping a pan of this in the fridge for emergencies—and for moments when you just need a little dessert magic.
What is Creamy Edible Cookie Dough?
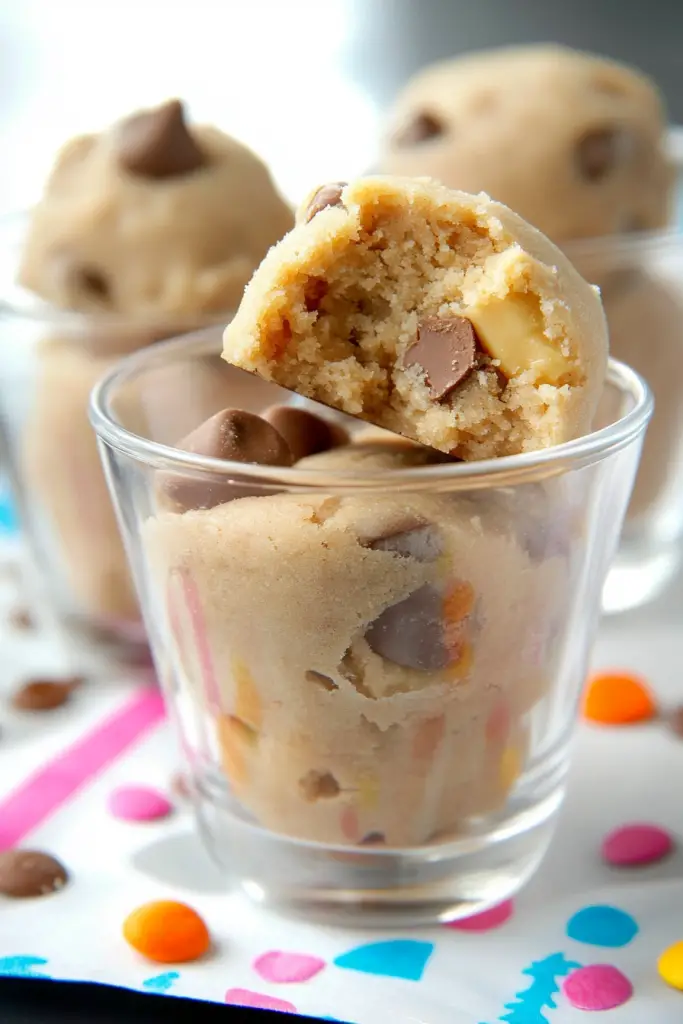
Think of creamy edible cookie dough as the best kind of snack you can scoop straight from the bowl, with all the cozy flavors you love from cookies but without the raw egg risk or the need to bake. It’s essentially a safe-to-eat dough built on heat-treated flour, butter, sugar, vanilla, and a splash of milk to loosen it up. The name is a bit misleading—it’s not a traditional cookie dough you’d bake into cookies; it’s a dessert component that you can spoon, swirl, or slice. The concept grew from a simple craving: the world wanted the flavor of cookie dough, minus the worry. I love how the texture can be creamy yet sturdy enough to hold a swirl, and the flavor is rich but adaptable. You can fold in chocolate chips, peanut butter, or a ribbon of Cream Cheese Frosting to create layers that feel like a grown-up treat and a kid-friendly snack at the same time. It’s essentially a playful, indulgent treat that fits into the “edible cookie dough” family without sacrificing safety or flavor.
Why you’ll love this recipe?
What I love most about this edible cookie dough is how flexible it feels in the kitchen. It’s not a rigid, one-size-fits-all dessert; it invites you to improvise and tailor it to your mood or what’s in your pantry. Flavor-wise, the base batter delivers that creamy, vanilla-scented punch with a buttery sweetness that coats your tongue in the best possible way. The texture is something I crave—a balance between scoopable and slice-able, a little crumbly where it should be and velvety where it matters. Simplicity is a big win here: you whisk or beat a handful of pantry staples, press the dough into a pan, and you’re minutes away from a panful of dessert that’s ready to enjoy. And it won’t break the bank—the flavors come from everyday ingredients, so you’re not chasing exotic items. Versatility is the real standout: you can serve it as bars for a casual party, layered into jars for gifts, or folded with swirls of fudge or Peanut Butter to create a showpiece that tastes like a cup of cookie-dough dreams. What I love most about this recipe is how forgiving it feels; a dash of extra vanilla or a splash more milk can adjust the consistency perfectly. If you’ve ever said, “I wish I could have cookie dough on a weeknight,” this answer is for you. It’s a crowd-pleaser, a comfort bite, and a pantry-friendly way to indulge without guilt.
How do I make a creamy cookie dough?
Quick Overview
This is a straightforward bake-free/bake-if-you-want version of dessert magic. You’ll heat-treat the flour so it’s safe to eat raw, whip up a silky batter with butter and sugars, and fold in a few goodies for texture and personality. The fun part is layering in a filling and finishing with a glossy glaze so every bite feels complete. The method keeps things quick and forgiving: you press the dough into a pan, bake if you’re making bars, or simply chill for no-bake version vibes. The beauty is that you can have a pan ready in under an hour and a half, including chilling time if you choose the no-bake path.
Ingredients
For the Main Batter:
– 1 cup heat-treated all-purpose flour (instructions below)
– 1/2 cup unsalted butter, softened to room temperature
– 1/2 cup light Brown Sugar, packed
– 1/4 cup granulated sugar
– 2 teaspoons vanilla extract
– 1/4 teaspoon kosher salt
– 2–3 tablespoons milk (dairy or plant-based)
– 1/2 cup mini chocolate chips (optional, but highly recommended)
– A pinch of espresso powder (optional, enhances chocolate flavor)
For the Filling:
– 1/2 cup Creamy Peanut Butter or Nutella for a swirl alternative
– 2 tablespoons powdered sugar (adjust for sweetness)
– 1–2 tablespoons milk to loosen the filling, if needed
– Optional: 1/4 cup cream cheese, softened, for a richer swirl
For the Glaze:
– 3/4 cup chocolate chips or chopped chocolate
– 2–3 tablespoons heavy cream or milk
– 1/2 teaspoon vanilla extract
– Pinch of salt (optional)
Step-by-Step Instructions
Step 1: Preheat & Prep Pan
Heat your oven to 350°F (175°C) if you’re baking the bars, or skip the oven entirely if you’re going no-bake and plan to chill. Line a 9×9-inch pan with parchment or lightly grease it. If you’re going no-bake, you’ll press the dough into the pan and chill it instead of baking, which is honestly the easiest route on a busy weeknight. I always like to touch the pan with a little extra butter so the edges come away cleanly later. The scent of vanilla right now is a reminder that sweet moments are just minutes away.
Step 2: Mix Dry Ingredients
In a small bowl, whisk heat-treated flour, salt, and espresso powder if you’re using it. The heat-treated flour is the backbone here—safe to eat raw but still giving you that familiar cookie-dough bite. If you don’t have heat-treated flour, you can heat flour in a saucepan for a few minutes to kill any stray bacteria, then cool completely before using. This step matters because it keeps the texture cohesive while keeping safety at the forefront.
Step 3: Mix Wet Ingredients
In a larger bowl, beat the softened butter with both sugars until light and fluffy. I use a handheld mixer or a sturdy wooden spoon if I’m in a pinch. Add vanilla and a pinch of salt, then beat again until the mixture looks glossy and pale. The aroma of vanilla will start to fill the kitchen here, and you’ll know you’re on the right track. If your butter is too stiff, give it a minute to soften more or add a splash of milk to loosen.
Step 4: Combine
Gradually add the dry ingredients to the wet mixture, alternating with small splashes of milk. Beat on low speed until just combined. You’re aiming for a dough that’s thick but scoopable. If you overmix, you’ll risk a tougher texture; stop as soon as you see everything come together. Fold in the mini chocolate chips if you’re using them, and taste a tiny bit—this is the moment to decide if you want a touch more vanilla, a pinch more salt, or a splash more milk for smoother texture.
Step 5: Prepare Filling
For a classic swirl, whisk together the peanut butter, powdered sugar, and a small amount of milk until smooth and pourable. If you want a cream cheese swirl, combine cream cheese with powdered sugar and a tiny bit of milk until you have a soft, pipeable texture. The filling should be thick enough to hold a line or two of drizzle but soft enough to swirl through the batter. If you’re using Nutella, a quick stir with a teaspoon of milk helps loosen it to a ribbon-like consistency.
Step 6: Layer & Swirl
Spread half of the main batter into the prepared pan, smoothing the surface. Dollop the filling in lines across the batter, then swirl with a knife or skewer to create pretty marbling. Spoon the remaining batter on top and smooth again. For a dramatic look, drizzle in more of the topping and swirl once more—the eye loves a good pattern as much as the tongue loves the flavor.
Step 7: Bake
If you’re baking, slide the pan into the oven and bake for 18–22 minutes, or until the edges are set and a toothpick comes out with a few moist crumbs. If no-bake is your path, chill the pan in the fridge for at least 1 hour, until the dough is firm and slice-ready. I’ve found that chilling not only makes slicing easier but also enhances the flavor as the dough rests, kind of like a mini flavor party in the fridge.
Step 8: Cool & Glaze
Let the bars cool in the pan on a rack for about 15–20 minutes, then either pop them into the fridge to finish firming up or transfer to a cutting board once fully cooled. For glaze, melt chocolate with cream until glossy, then whisk in vanilla and a pinch of salt. Drizzle over the cooled bars, then return to the fridge for the glaze to set. The glaze is optional, but I adore the shiny finish and extra chocolate kiss on top. If you’re short on time, a simple sprinkle of sea salt or a dusting of powdered sugar can be a fine finish, too.
Step 9: Slice & Serve
Once everything is set, lift the bars from the pan using the parchment, slice into 9 generous squares or more delicate rectangles, and plate with a flourish. The first bite should be a creamy, melt-in-your-mouth moment with a little chewy edge and a hint of chocolate. My kids actually ask for seconds every time, and I’m not mad about it—the sweetness level feels balanced, not cloying, and the texture remains inviting. The beauty of these edible cookie dough bars is that they keep beautifully in the fridge for up to 5 days, or you can freeze portions for longer storage.
What to Serve It With
This isn’t a show-off dessert that needs a parade of sides, but a few thoughtful pairings never hurt. I like to keep this simple and flexible, so you can tailor it to your moment.
For Breakfast: A small square beside a latte or cappuccino, with a dusting of cocoa or cinnamon to wake up the senses. It feels like a little indulgence that doesn’t derail your morning routine.
For Brunch: Arrange bars on a white platter with fresh berries and mint leaves for color. A light pour of vanilla almond milk over coffee makes the table feel like a cozy café moment.
As Dessert: Serve warm with a scoop of vanilla ice cream or a dollop of whipped cream. A few fresh strawberries can cut the richness nicely.
For Cozy Snacks: Keep a tray handy in the fridge for quick bites after school or during movie night. Add a handful of chopped nuts or a swirl of peanut butter on top for a more rustic presentation. This is the kind of treat that disappears in minutes at my house—people can’t resist that creamy bite.
Top Tips for Perfecting Your Creamy Edible Cookie Dough
Here are the little tricks I’ve learned after making this countless times. They’re small adjustments that make a big difference in texture and flavor.
Heat-Treating Flour: If you don’t have access to heat-treated flour, you can heat 1 cup of flour in a small pan over medium-low heat, stirring constantly for 2–3 minutes, then let it cool completely. It’s worth the extra minute to ensure safety without sacrificing texture.
Mixing Technique: Don’t overmix once the dry ingredients go in. This keeps the dough tender and avoids a tough bite. If you hear a pasty sound or feel the dough tighten, stop and walk away for a minute before finishing.
Swirl Customization: For a dramatic look, reserve a small portion of the batter before you add the filling, then swirl the two separately to create layers that look like marble art once sliced. You can also color the batter with a drop of food coloring to suit holidays or celebrations.
Ingredient Swaps: Almond butter instead of peanut butter creates a more delicate flavor; swap in white chocolate chips for a lighter sweetness; add espresso powder for a mocha twist. Each swap shifts the profile in a delicious way, so don’t be afraid to experiment.
Baking Tips: If your oven runs hot, check the bars at 14–16 minutes and rotate the pan for even browning. For a truly fudgy center, you can bake a touch shorter, then finish under a broiler for a few seconds to set the top.
Glaze Variations: A white chocolate glaze with a splash of vanilla is wonderful for a lighter finish. A peanut butter glaze adds another layer of richness. If you’re watching sugar, you can skip the glaze and finish with a light dusting of cocoa powder or powdered sugar.
Lessons learned: I’ve found that chilling the dough for 30–60 minutes before glazing gives the glaze a smoother surface and easier distribution. The longer the bar rests, the more the flavors mingle and the creaminess intensifies.
Storing and Reheating Tips
Storage is one of the best parts about this recipe. It travels well, stays tasty, and you can portion it out for future cravings. Here’s how I keep it at its best.
Room Temperature: If you plan to eat within a day, you can keep the bars covered at room temperature for up to 24 hours, though I don’t recommend leaving dairy-based components out longer than a few hours.
Refrigerator Storage: Wrap tightly or store in an airtight container for up to 5 days. The flavors deepen with time, and the texture remains pleasantly soft.
Freezer Instructions: For longer storage, freeze individual bars wrapped in plastic and placed in a freezer bag for up to 3 months. Thaw in the fridge or at room temperature for about 30–45 minutes before serving. I love this trick for when I want a quick dessert after dinner but don’t want to cook.
Glaze Timing Advice: If you’re refrigerating, add the glaze once the bars are fully cooled and about to serve; glazing too early can cause the glaze to seize or get dull. If you’re freezing, you can glaze after thawing to keep the look sharp.
Frequently Asked Questions
Final Thoughts
If you’re in the mood for something comforting, quick, and a little bit fancy, this creamy edible cookie dough recipe is a total winner. It gives you that familiar cookie-dough flavor with a texture you can slice and share, and it’s flexible enough to adapt to your pantry and cravings. I always keep a pan ready in the fridge so I can cut a square after dinner and feel like I’ve rewarded myself for a day well done. My family loves watching for the glossy glaze catching the light as I pull the tray from the fridge, and I never get tired of seeing their eyes light up when they bite in. If you try this, come back and tell me which variation you loved—peanut butter swirl, Nutella ribbon, or a white-chocolate twist. Happy baking, or rather, happy slicing and enjoying. I can’t wait to hear how yours turns out!
Edible Cookie Dough
Ingredients
Main Ingredients
- 1 cup all-purpose flour heat-treated
- 0.5 cup unsalted butter softened
- 0.5 cup granulated sugar
- 0.25 cup brown sugar packed
- 1 teaspoon vanilla extract
- 0.03 cup milk
- 0.5 cup chocolate chips
Instructions
Preparation Steps
- To heat-treat the flour, spread it on a baking sheet and bake at 350°F (175°C) for 5-7 minutes, or microwave until it reaches 165°F (74°C). Let it cool completely.
- In a large bowl, cream together the softened butter, granulated sugar, and brown sugar until light and fluffy.1 cup all-purpose flour
- Stir in the vanilla extract and milk until well combined.1 cup all-purpose flour
- Gradually add the cooled, heat-treated flour and mix until just combined. Be careful not to overmix.1 cup all-purpose flour
- Fold in the chocolate chips.1 cup all-purpose flour
- Serve immediately or store in an airtight container in the refrigerator.


