


On those evenings when the clock seems to tick twice as fast, I grab a mug of coffee, and memories of Sundays in the kitchen bubble up. This whole idea—Korean beef freezer meals—started as a quick fix for busy weeknights and somehow blossomed into a family ritual. I’ll admit it: the first time I pulled a pan of this out of the freezer, the aroma of sesame, garlic, and a kiss of gochujang filled the house and instantly felt like a warm hug. It’s not just dinner; it’s a moment we all exhale together. Think of it as a love-child between a savory meatloaf and a cozy bibimbap: layers, warmth, and a glaze that makes the edges sing. This recipe is forgiving, flavorful, and surprisingly simple to keep in the freezer for nights when you’re limping in from practice, early shifts, or that stubborn pile of laundry that never ends. If you’ve got a craving for something deeply Korean-inspired but still easy enough for a Monday, this is the one you’ll reach for again and again.
What is a Korean Beef Freezer Meal?
What I’m calling Korean beef freezer meals is basically a layered, bake-and-freeze beef dish that captures a lot of Korean flavors in a cozy, sliceable loaf. It’s essentially a marinated beef mix pressed into a loaf and swirled with a kimchi-fueled filling, then baked with a glossy gochujang glaze. The idea behind it is simple: you assemble once, freeze in portions, and bake or reheat as needed. It’s a technique I learned after years of juggling takeout bills and late-night cravings—a way to have hot, comforting Korean-inspired food without scrambling for ingredients at the last minute. Think of it as your go-to make-ahead weeknight savior, with a texture that’s tender from the rice and beef, and a glaze that brightens every bite. I love that this recipe aligns with my love for both freezer meals and bold flavors, so you get the best of both worlds in a single loaf.
Why you’ll love this recipe?
What I love about this Korean beef freezer meals approach is the way it marries flavor with practicality. It’s a dish your future self will
- Flavor: The beef gets a gentle boost from soy, sesame, garlic, and a touch of ginger, while the kimchi-filling layer offers bright acidity and a bit of heat. The glaze—sweet, savory, and spicy all at once—clings to the crusty edges and makes every slice exciting.
- Simplicity: You mix, layer, and bake once, then portion and freeze. Reheat is as simple as a quick bake or a quick skillet finish with a dab more glaze. It’s a lifesaver on busy nights, and my kids actually look forward to the “meatloaf night” because of the glaze’s shine and the swirl of flavors.
- Cost-efficiency: What is the best way to measure cost-efficiency?: Ground beef plus a handful of pantry staples keeps the budget-friendly vibe strong. Rice, kimchi, and a few pantry sauces stretch in smart, comforting ways, so you get big flavor without breaking the bank.
- Versatility: This loaf slices beautifully for plates, but you can also crumble it over rice for a quick bibimbap-inspired bowl, or stuff it into peppers for a different presentation. If you’re craving it, you can adapt the glaze to be spicier, sweeter, or tangier—the base is forgiving, and that’s precisely why it stays in rotation.
My relatives always ask for seconds when I bring this to potlucks, and I hear the same line from friends: “Trust me, you’ll want this in your freezer.” It’s the kind of recipe that earns its keep on the shelf and in the skillet. And yes, it freezes brilliantly—it’s a lifesaver on busy nights, a guaranteed crowd-pleaser, and a dish that travels well if you’re ever hosting friends for a weekend away.
How to Make Korean Beef Freezer Meals
Quick Overview
This is a two-phase bake-and-freeze meat loaf with a bright, spicy glaze. You’ll mix a seasoned beef layer with cooked rice for moisture and a gentle bite, swirl in a kimchi-infused filling for brightness, bake until just set, then brush with a gochujang glaze that caramelizes beautifully as it cools. The trick is not overworking the meat; you want a tender loaf that holds its shape when sliced. If you’re freezing, portion before baking, or bake a full loaf, cool, and then freeze, wrapped securely. When you reheat, you’ll whisk a quick extra glaze and brush on to bring back that glossy finish and a quick heat-up boost. This method keeps the comfort of a familiar loaf while delivering a bold, Korean-inspired punch in every bite.
Ingredients
[Organize ingredients by purpose with detailed explanations:]
For the Main Layer (Meat Mixture):
– 1.5 pounds ground beef (85% lean)
– 1 cup cooked jasmine rice, cooled
– 1 small onion, finely minced
– 2 cloves garlic, minced
– 1 large egg
– 2 tablespoons soy sauce
– 1 tablespoon sesame oil
– 1 teaspoon grated fresh ginger
– 1 teaspoon sugar or mirin (optional, to balance salt)
– Salt and Black Pepper to taste
For the Filling (Kimchi Swirl):
– 1 cup finely chopped kimchi, squeezed dry
– 1/2 cup finely shredded carrot (optional for color)
– 2 tablespoons chopped green onions
– 1 teaspoon sesame seeds (optional)
For the Glaze (Gochujang Glaze):
– 3 tablespoons gochujang (adjust to heat tolerance)
– 2 tablespoons honey or rice syrup
– 1 tablespoon rice vinegar or mirin
– 1 teaspoon sesame oil
– 1 teaspoon sesame seeds (to finish)
Step-by-Step Instructions
Step 1: Preheat & Prep Pan
Preheat your oven to 375°F (190°C). Lightly grease a loaf pan or line with parchment for easy unmolding. If you’re freezing portions, you can prepare a parchment-lined Sheet Pan and shape the loaf freehand for easier cutting after thawing. I like to have the glaze ready to brush, so it’s at room temperature rather than icy cold—that way it brushes on smoothly and doesn’t clump.
Step 2: Mix Dry Ingredients
In a small bowl, whisk together salt, pepper, and a pinch of sugar. This is your base seasoning—the salt wakes up the soy and the sugar helps balance the heat from the gochujang later. You’ll fold this into the beef with the rice and onion so the loaf stays juicy rather than dense.
Step 3: Mix Wet Ingredients
In another bowl, beat the egg with soy sauce, sesame oil, minced garlic, and grated ginger. Stir in the honey or mirin if you’re using it. This wet mix will mingle with the beef and rice, giving the loaf a gentle cohesion without feeling like a meatball packed too tight.
Step 4: Combine
Dump the beef into a large bowl, add the cooled rice, onion, and the wet mixture. Sprinkle the dry seasoning over the top. Gently mix with your hands or a spatula until just combined. Do not overwork—the less you handle it, the more tender the loaf will be. If you’ve got a kitchen scale, you can portion the mixture into two even loaves for easier freezing and future slicing.
Step 5: Prepare Filling
In a separate bowl, combine kimchi, carrot, and green onions. If you like a milder filling, squeeze a little more moisture from the kimchi and add a teaspoon of water to loosen it slightly. This filling brings brightness and a little tang that contrasts beautifully with the meat’s richness. If you’re freezing, you can portion out the filling as a separate layer to spread through the loaf later, or you can mix it in for a more marbled swirl.
Step 6: Layer & Swirl
Press half of the meat mixture into the loaf pan to make an even base. Spoon the kimchi filling over the layer, then cover with the remaining meat mixture. To create a swirl effect, use a knife or spatula to gently marble the filling into the surface without tearing the meat. If you’re using individual portions, press the meat into a flat shape, dollop the filling, and roll it into a log to mimic a swirl when sliced.
Step 7: Bake
Bake for 50–60 minutes, or until an internal thermometer reads 160°F (71°C) and the juices run clear when you cut into the loaf. If you’re freezing, you can bake partially and finish later, or bake the whole loaf, cool fully, and slice before freezing. The edges should look lightly bronzed and the loaf will feel firm to the touch. If you want a deeper crust, switch to a convection setting for the last 5–7 minutes, keeping an eye so it doesn’t dry out.
Step 8: Cool & Glaze
Let the loaf rest for about 10 minutes before glazing. In a small bowl, whisk gochujang, honey, rice vinegar, and sesame oil until smooth. Brush a thin coat over the top; the heat from the loaf will help the glaze set, creating a glossy finish. If you’re freezing, you can glaze the top before wrapping to lock in flavor and moisture. Sprinkle sesame seeds over the glaze for added crunch and aroma.
Step 9: Slice & Serve
Slice the loaf with a sharp serrated knife into thick rounds. The texture should be nicely layered, with a glossy glaze catching the light. Serve with steamed rice, a quick Cucumber Salad, and a few quick pickles if you’ve got them. The loaf re-heats beautifully in a 350°F (175°C) oven for about 12–15 minutes or in a skillet with a splash of water to help rehydrate the edges. My family loves this with a quick dollop of extra glaze on the plate—trust me, it makes the plate feel complete.
What to Serve It With
Now, this dish shines with a few well-chosen accompaniments. Here are some ideas that keep the meal feeling distinctly Korean-inspired while staying comfy and accessible for weeknights.
For Dinner: A small bowl of steamed jasmine rice, a crisp Cucumber Salad with a light sesame vinaigrette, and a scoop of quick kimchi. The rice soaks up a little of the glaze, and the cucumber salad gives a refreshing bite that clears the palate between slices.
For Brunch: Think of a savory brunch plate with a soft-boiled egg, rice, and lightly dressed greens. The kimchi swirl in the loaf adds a surprising brightness, making this a stand-out option for weekend gatherings.
As Dessert: Not applicable here, but you can switch gears later in the day with a kimchi-flecked lavender honey yogurt parfait for something totally different—just to keep your palate adventurous.
For Cozy Snacks: Slice thin and serve on toasted sesame buns with a smear of mayo-kimchi sauce for little sliders. It’s a crowd-pleaser at game nights or casual gatherings, and the portions freeze neatly for future snacky moments.
Personally, I love pairing it with a simple sesame cucumber salad—thinly sliced cucumber, splash of rice vinegar, pinch of sugar, and a few sesame seeds. The cool crunch against the warm loaf is addictive, and it’s a nice balance to the heat from gochujang.
Top Tips for Perfecting Your Korean Beef Freezer Meals
These aren’t trick questions, just small refinements that change how the dish turns out in your kitchen.
Beef Prep: Use 85% lean beef for juicy slices. If you find the loaf a little pale, a pinch of sugar or a splash of mirin in the wet mix can encourage deeper browning. Don’t overwork the meat; a light hand yields a more tender slice.
Mixing Advice: When you combine the rice, beef, and aromatics, stop as soon as everything holds together. If you overmix, you’ll get a denser loaf instead of a tender, almost pillow-y texture. If you like a looser texture, add a tablespoon of milk or water to loosen the mixture slightly before shaping.
Swirl Customization: The kimchi swirl is optional for some. If you’re unsure about the heat, start with half a cup of chopped kimchi and taste the filling component as you layer. If you’re feeding kids, you can reduce the gochujang by half in the glaze and still get a nice flavor pull.
Ingredient Swaps: Ground Turkey or pork can work in a pinch, but you’ll want to adjust the fat content and maybe add a splash more oil. If you don’t have jasmine rice, short-grain rice or sticky rice also behaves well in the loaf and helps keep moisture in. For a gluten-free option, ensure the soy sauce is tamari or another gluten-free alternative.
Baking Tips: If you’re baking from frozen, increase the bake time by about 15–20 minutes, and cover loosely with foil to prevent over-browning. Check the internal temperature in the center to ensure you’re hitting 160°F (71°C). For a crisper top, finish under broil for 1–2 minutes, watching closely so it doesn’t burn.
Glaze Variations: For a milder glaze, whisk a little more honey into the gochujang. For a more dynamic punch, add a teaspoon of sriracha or a splash of rice vinegar to brighten without introducing extra heat. You can also finish with finely chopped scallions for a green note on top.
Over the years I’ve learned that the best freezer meals still feel vibrant after thawing. Freeze the loaf in individual portions or as a full loaf, depending on your family size. When you reheat, you’ll notice the glaze may thicken—just brush on a touch of warm water or a little extra glaze to refresh the surface. The aroma alone is a reminder that you’re about to eat something comforting and exciting at the same time. This recipe wasn’t a single breakthrough moment; it’s the result of dozens of small tweaks that finally rang true for my kitchen rhythm—and I’m thrilled to share it with you now.
Storing and Reheating Tips
Make-ahead meals deserve proper care. Here’s how I keep this Korean beef freezer meals tasting fresh from freezer to plate.
Room Temperature: If you’re serving a portion right away, let it rest for 5–10 minutes after baking so the juices redistribute and the glaze sets. This also makes slicing neater.
Refrigerator Storage: Wrap the cooled loaf tightly in plastic wrap or place it in an airtight container. It will stay good for up to 3–4 days. Reheat gently in a 325°F (160°C) oven for 12–15 minutes, brushing with a little extra glaze to refresh the surface.
Freezer Instructions: Freeze the full loaf wrapped well, or freeze individual slices in a freezer-safe bag or container. For best texture, freeze cooled slices flat so you can separate portions easily. Label with date and whether you’ve added extra glaze. Thaw overnight in the fridge or reheat from frozen at 350°F (175°C) for 20–25 minutes (covered) and finish by brushing on glaze for the last 5 minutes.
Glaze Timing Advice: If you’re reheating from frozen, add the glaze in the final 5–7 minutes so it frosts beautifully without burning. If you’re reheating from the fridge, you can brush on glaze before the final 7–10 minutes to keep that lacquered look.
Storage and reheating trials are a big part of why this recipe works for us. It keeps the flavors intact the second time around, so a freezer meal feels just as vibrant as a freshly made one.
Frequently Asked Questions
Final Thoughts
This loaf has become a quiet staple in our kitchen because it respects time while delivering a satisfying, deeply comforting flavor. The layers—beef, rice, kimchi, and that glossy glow—feel like a little celebration in a dish. It’s the kind of recipe you can hand to a friend to say, “Here, you’ll love this, and it’ll keep you fed on a night when you’re running late.” If you’re chasing a freezer-friendly meal that still tastes like it took real effort, this is your go-to. I’ve cooked it countless times and never grow tired of the aroma that fills the house as it bakes, or the smile on a friend’s face when they take that first bite. I’d love to hear how yours turns out—share your tweaks, your favorite sides, and your go-to way to reheat. Happy baking, friends, and may your freezer always have a little joy tucked inside. Don’t forget to rate the recipe and drop your own variations in the comments below!
Korean Beef Freezer Meals
Ingredients
Main Ingredients
- 2 pounds top sirloin steak trimmed of excess fat and cut into large chunks
- 0.5 cup soy sauce
- 0.5 cup brown sugar
- 1 tablespoon sesame oil
- 2 inches fresh ginger peeled and roughly chopped
- 4 cloves garlic peeled
- 1 14-ounce can pears drained (fresh pears also work)
For Serving
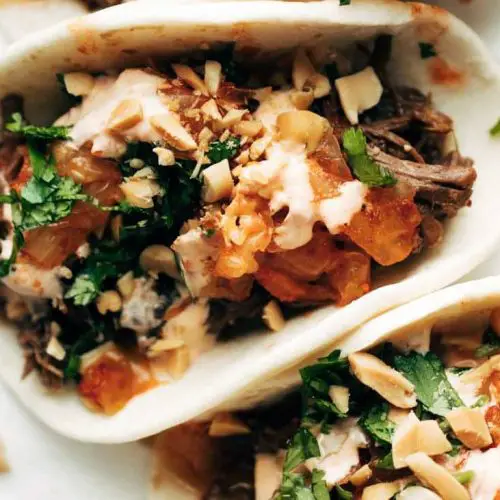
- flour tortillas
- chopped cilantro
- chopped peanuts
- kimchi or a slaw mix
- sriracha mayo or yum yum sauce
Instructions
Preparation Steps
- In a blender or food processor, combine the drained pears, chopped ginger, peeled garlic cloves, soy sauce, brown sugar, and sesame oil. Blend until mostly smooth. Reserve half of this sauce for later use.
- Place the chunks of top sirloin steak in your Instant Pot. Pour the reserved half of the sauce over the meat. Secure the lid and cook on high pressure (manual setting) for 45 minutes. Once done, perform a quick release of the steam. Shred the beef directly in the Instant Pot using two forks.
- To serve, warm the flour tortillas. Fill each tortilla with the shredded Korean beef, and top with chopped cilantro, chopped peanuts, kimchi (or slaw), and a drizzle of sriracha mayo (or yum yum sauce).


