


I still remember the first time my aunt handed me a pan of easy jam bars from her kitchen cabinet, still warm and smelling like vanilla and sun-warmed berries. The crust was buttery and just shy of crumble-y, the jam bright and glossy, and the bite felt like a quick memory from summer afternoons of running between fruit stands and garden hedges. It’s amazing how something so simple can taste like a hug in a square. This one’s a lifesaver on busy nights, because, honestly, I just mix, bake, and slice—and somehow everyone thinks I spent hours fussing in the kitchen. My kids ask for this all the time, and I’m not going to argue with a tray of sunshine. When I want something that feels comforting but easy, I reach for these jam bars—the kind of recipe you can pull off with what’s left in the pantry and still get a smile at the table. This is my version of a cozy, homemade treat that doesn’t demand a whole afternoon, just a little patience and a lot of love.
What is an easy jam bar?
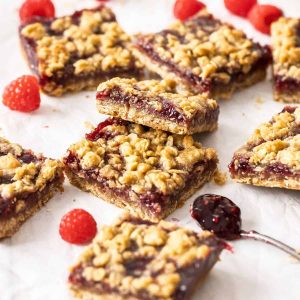
Think of easy jam bars as a delicious marriage of shortbread and fruit-forward nostalgia. It’s essentially a buttery crust that’s thick enough to hold its shape, topped with a glossy ribbon of jam and, if you like, a light glaze that brings the whole thing together with a touch of sweetness. The name says it all: simple, approachable, and perfect for sharing. I like to tell people that the crust is like a sturdy cookie base—crisp at the edges, tender in the middle—while the jam melts just enough to create a jammy center that tastes like fruit preserves, not jam straight from a jar. It’s a nod to home-baked bar cookies you’d find cooling on a rack after school, a little more grown-up in flavor but just as forgiving to beginners. The best part? You don’t need fancy equipment or a bakery-level pantry. This recipe, in its essence, is about using what you already have and making something that feels like a party in your kitchen without the fuss.
Why you’ll love this recipe?
I’ve said this out loud more times than I can count: what I love most about easy jam bars is that they’re reliable. They don’t crumble into a crumbly disaster, they don’t require a babysitting oven, and they adapt to what you’ve got on hand. Here’s why this one sticks with me—and with my family.
- Flavor: The crust carries a whisper of vanilla and a touch of salt, which makes the fruit
- Simplicity: A few pantry staples, a single bowl for the batter, and a pan.
- Cost-efficiency: The ingredients are humble—flour, butter, sugar, jam—and you probably have most of them. It’s a big flavor payoff for a small grocery bill.
- Versatility: Swap in raspberry, strawberry, blueberry, or a mixed jam for a different mood. You can even swirl in a little lemon zest for brightness or add chopped nuts for crunch.
- Make-ahead magic: The bars taste even better after they rest. They cut neatly, stack beautifully, and travel well for picnics or potlucks.
What I love most about this recipe is how forgiving it is. If a week got away from you, you can still pull this together on a weeknight. If you forget to pull the butter out early, a quick zap in the microwave softens it enough to blend. If you’re feeling fancy, you can jazz up the glaze or switch jams mid-batch and you’ll still end up with something that feels special. This is the kind of recipe that earns footnotes in my notebook—little tweaks I’ve learned from years of baking and tasting with friends and family. This dish is more than dessert; it’s a memory in a pan, and it’s always ready when someone asks for seconds.
How to Make Easy Jam Bars
Quick Overview
Here’s the fast path: you whip up a sturdy, crumbly crust, press it into a lined pan, spread a generous layer of jam over the hot crust, and bake until the edges look set and the center still holds a soft wobble. A simple glaze on top brings it all together, but you can skip the glaze if you’re counting sugar. The method is forgiving: you don’t need to be perfect with the crust thickness, and you can use any jam you adore. This is where you’ll realize why these bars are a favorite in my kitchen: they come together quickly, bake evenly, and slice cleanly for sharing with friends and neighbors.
Ingredients
For the Main Batter:
– 2 cups all-purpose flour
– 3/4 cup granulated sugar
– 1 cup (2 sticks) unsalted butter, softened
– 1/4 teaspoon salt
– 1 teaspoon vanilla extract
For the Filling:
– 1 cup fruit jam or preserves (strawberry, raspberry, or your favorite flavor)
– Optional: 1 teaspoon lemon juice or zest to brighten the jam
For the Glaze:
– 1 cup powdered sugar
– 1-2 tablespoons milk or cream, plus more as needed
– Optional: 1/2 teaspoon vanilla extract or citrus zest
Step-by-Step Instructions
Step 1: Preheat & Prep Pan
Heat your oven to 350°F (175°C). Line a 9-inch square pan with parchment paper, letting the edges overhang a bit for easy removal. This is the moment I always double-check I’ve got a sharp knife ready—these bars slice cleanest when they’re fully cooled. If you’re anything like me, you’ll want to sample a corner while you wait for the crust to set. Patience, they say, makes the best crumb, and I’ve learned that gentle patience truly pays off here.
Step 2: Mix Dry Ingredients
In a medium bowl, whisk together flour, sugar, and salt. The dry mix should look uniform and a touch sandy, which is exactly what we want for a crumby crust. I like to whisk for about 20 seconds to distribute the sugar evenly; a little air helps when you combine with butter later. Pro tip: sifting isn’t mandatory here, but a quick whisk makes for a smoother crust texture.
Step 3: Mix Wet Ingredients
In a separate bowl, beat the butter with vanilla until it’s pale and fluffy. This is where you’ll hear the butter soften into a creamy, almost cloud-like texture. If you want to add a tiny extra vanilla note or a pinch of almond extract, this is the moment—just a whisper, not a shout. Then stir in about half of the dry mix to start forming a soft crumble, adding the rest gradually until the dough just holds together when pinched.
Step 4: Combine
Press the dough into the prepared pan, moving from the center outward to make a uniform layer. If the crust feels a little crumbly, don’t worry—a few folds and pressings will bring it together. Bake for about 18-22 minutes, just until the edges are softly golden. The scent of butter and vanilla will fill the kitchen, and trust me, that moment is a kitchen memory you’ll chase again and again.
Step 5: Prepare Filling
While the crust bakes, stir the jam with a squeeze of lemon juice or a touch of zest if you like brightness. If your jam is a bit thick, warm it for a minute to loosen it up so it spreads evenly. The jam should be glossy, not runny; we want a ribbon, not a pool, on top of the crust.
Step 6: Layer & Swirl
Once the crust is out of the oven and still warm, spread the jam in a thick, even layer. If you want a little marble effect, you can dollop extra jam in random spots and swirl with the tip of a knife, but don’t overdo it—we’re aiming for a pretty, even layer with pockets of jam peeking through.
Step 7: Bake
Return the pan to the oven and bake another 12-15 minutes, or until the jam is set and the edges of the crust are a deeper golden. The center should still have a slight jiggle when you move the pan, which means it will set beautifully as it cools. If you’re using a different jam, start checking at the 12-minute mark; ovens are like personalities—some run fast, some slow.
Step 8: Cool & Glaze
Let the bars cool completely in the pan on a rack. This is the hardest part—my hands itch to slice while it’s still warm, but the cleanest cuts come from patience. Once cooled, whisk together powdered sugar with enough milk to make a drizzly glaze. A splash of vanilla or citrus zest can brighten the glaze nicely. Drizzle over the bars in a light, even pattern, then let the glaze set for about 15 minutes before slicing. The glaze is optional, but I loved the glossy finish it gives to the finished bars.
Step 9: Slice & Serve
Using a sharp knife, cut into 8-16 squares depending on how generously you want to portion them. For clean edges, wipe the knife between slices. I like to serve a dusting of zest or a light glaze on top for a more festive look. These bars are wonderfully portable—the perfect accompaniment to a morning coffee or a late-night cup of tea. My family tradition is a plate of warm bars still slightly pink from the jam, with a dollop of whipped cream on the side for the rare extra-special moment.
What to Serve It With
These jam bars are versatile enough to pair with a lot of different moments. Here are a few ideas that feel like a celebration, not a plan.
For Breakfast: A steaming mug of coffee or black tea; a smear of ricotta or Cream Cheese on top for extra richness; a few fresh berries to echo the jam’s fruit notes. I often pair them with a yogurt parfait and call it a balanced start to a busy day. The jam’s sweetness sits nicely against tangy yogurt and a little crunch from toasted granola.
For Brunch: A brunch board with sliced jam bars, lemon muffins, and a pitcher of citrusy sparkling water. I love arranging them on a wooden board with a few sprigs of mint and some edible flowers for a light, cheerful presentation. It’s a simple centerpiece that makes guests feel cared for.
As Dessert: Serve warm with a scoop of vanilla Ice Cream or a drizzle of extra glaze. The contrast between the cold ice cream and the warm crust is magical, like a tiny, delicious argument between textures. It’s also excellent with a cup of dessert wine or a bold espresso for an after-dinner moment.
For Cozy Snacks: Pack a few bars in a tin for a comforting afternoon treat. They travel well, so they’re fantastic for road trips, book club nights, or a quick bite after school. In my house, these bars disappear in minutes at gatherings because they’re just that comforting and easy to share.
When I’m in a hurry, I’ll bake a batch on Sunday and portion them into little snack-size bags. A batch can be scaled up for get-togethers or scaled down for quiet nights at home. It’s a recipe that travels well, and it always feels like I’ve tucked a little love into each square.
Top Tips for Perfecting Your Easy Jam Bars
These tips come from years of baking and a few happy kitchen experiments. They’ll help you dial in texture, sweetness, and that magical flavor balance that keeps people coming back for more.
Crust Texture: If you like a firmer crust, bake a little longer until the edges are deeply golden. For a softer bite, pull it out sooner. Don’t worry about perfection—crusts are resilient and forgiving here.
Mixing Advice: Overmixing can lead to a tougher crust. Mix just until the dough comes together, then press gently into the pan. It should hold its shape with light pressure, not spring back like bread dough.
Swirl Customization: To create a prettier jam swirl, dot the jam in large spoonfuls, then drag a knife through in a few sweeping motions. If you have a favorite seasonal jam, use it—the bars thrive on fruity brightness.
Ingredient Swaps: You can swap butter for an equal amount of light margarine or a plant-based butter for a dairy-free version. Use 1:1 applesauce in place of part of the butter to reduce fat, but note that it will change texture slightly. For a gluten-free option, use a 1:1 gluten-free all-purpose flour blend and add an extra tablespoon of cornstarch to mimic that shortbread crumble.
Baking Tips: Oven temperatures vary—if your oven runs hot, reduce to 325°F and bake a bit longer. Check doneness by looking for a glossy jam layer and slightly set edges. Don’t be afraid to test with a toothpick; it should come out clean with a few sticky jam bits, not raw batter.
Glaze Variations: For a thinner glaze, add more milk; for a bold glaze, use a splash of lemon juice or vanilla. If you want color, a drop of fruit puree or a pinch of colored sugar will do the trick. Glaze can be omitted entirely if you’re watching sugar, and the bars will still taste great with just jam and crust.
One lesson I keep repeating is to let the bars rest fully before slicing. The jam needs time to set and the crust needs a chance to firm up. I’ve learned the hard way that rushing this step yields softer, less tidy bars. Now, I plan for a quiet half-hour after they come out of the oven, giving myself a breather and letting the whole kitchen breathe in the butter and jam aroma one last time before we cut into them.
Storing and Reheating Tips
Storing jam bars is as simple as baking them: you want them to stay moist but not soggy, and you want to be able to pull them out and enjoy them for several days or even freeze a batch for later. Here’s how I keep them fresh and tasty.
Room Temperature: Store in an airtight container for up to 3 days. A parchment layer between layers helps prevent sticking. If you’re not planning to glaze yet, you can skip the glaze entirely and keep the bars covered to maintain a soft, tender bite.
Refrigerator Storage: In the fridge, they’ll stay fresh for up to 5 days in an airtight container. The crust will firm up a little, which some people love—great for packing into lunch boxes or on-the-go snacks. Bring to room temperature for the best texture before serving.
Freezer Instructions: Freeze individual bars wrapped well in plastic or stored in an airtight container for up to 2 months. Thaw at room temperature and, if you like, rewarm gently in the microwave for a warm, comforting bite. If you’re freezing with glaze, freeze without glaze and add it after thawing for the freshest finish.
Glaze Timing Advice: If you plan to freeze, hold the glaze for presentation after thawing; you can re-glaze just before serving for a crisp, glossy finish. Alternatively, keep the glaze separate and drizzle right before serving for an extra-fresh look and feel.
These bars age well—they mellow into a deeper fruit-and-butter flavor after a day or two. The edges stay crisp, and the center stays tender. It’s a perfect balance of textures that keeps me reaching for a square instead of something fancier, especially on nights when I just want a small, cozy moment with a cup of tea.
Frequently Asked Questions
Final Thoughts
If you’re searching for a recipe that feels like a warm hug and still respects your time, this easy jam Bars Recipe is the one I keep returning to. It’s a faithful companion for quiet mornings, weekend gatherings, and after-school treats that disappear before you know it. The crust is forgiving, the jam sings with brightness, and the optional glaze adds a little party sparkle. It’s a recipe I’ve shared with friends and neighbors, and the feedback always comes back with happy sighs and plans for another batch. Give it a try, adapt it to your pantry, and let me know how your version turns out. Happy baking, friends! I’d love to hear which jam you picked and how you styled your bars—leave a comment with your favorite tweak or a photo of your golden-crusted squares.
easy jam bars
Ingredients
Main Ingredients
- 1.5 cups all-purpose flour
- 0.75 cup granulated sugar
- 1 cup unsalted butter cold, cubed
- 0.5 teaspoon baking powder
- 1 teaspoon vanilla extract
- 0.5 cup seedless raspberry jam or flavor of choice
Instructions
Preparation Steps
- Preheat oven to 350°F (175°C). Grease an 8x8-inch baking pan or line it with parchment paper.
- In a large bowl, mix flour, sugar, baking powder, and cold cubed butter. Use a pastry cutter or hands to blend until mixture resembles coarse crumbs.
- Press half of the mixture into the prepared baking pan to form an even layer.
- Spread the jam evenly over the base layer.
- Add vanilla extract to the remaining crumb mixture and sprinkle it evenly over the jam layer.
- Bake in preheated oven for 35 minutes, or until top is lightly golden.
- Cool completely in the pan on a wire rack, then cut into 16 squares.


