


I still remember the first time I tasted a truly good donut. It wasn’t from a fancy shop, but from my grandma’s kitchen. The smell of cinnamon and sugar wafted through the house, and the little donut holes she’d pull from the oven were warm, fluffy, and utterly irresistible. Fast forward a few decades, and while I love a classic cake donut as much as the next person, there’s something about a homemade baked donut recipe that just hits different. It’s that perfect blend of Comfort Food and a treat that feels a little special, without all the fuss of frying. Honestly, if you’re craving that sweet, satisfying donut experience but don’t want the mess or the potential for greasy fingers (though let’s be honest, I don’t mind a little grease!), then you absolutely *have* to try this baked donuts recipe. It’s the one I whip up when the kids are clamoring for a sweet surprise, or when I just need a little pick-me-up on a rainy afternoon. Think of it as a warm, comforting hug from your oven.
What is baked donuts?
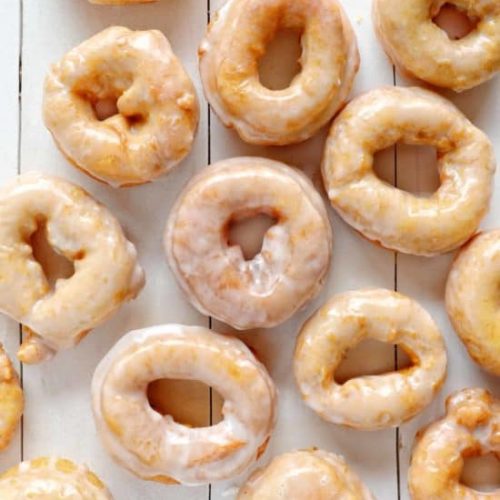
So, what exactly are baked donuts? Imagine all the deliciousness of a traditional fried donut – that tender crumb, the sweet glaze, the satisfying chew – but made in the oven. Instead of submerging them in hot oil, we bake them in a donut pan, which gives them that signature ring shape and allows for a much lighter texture. They’re essentially little cakes baked in a donut mold, and honestly, they’re a total game-changer. The name itself, “baked donuts,” is pretty straightforward, but the magic lies in how they transform simple batter into these delightful, airy rings. They’re essentially a more fun, portable, and dare I say, healthier version of a cupcake, designed specifically for donut lovers. It’s like taking your favorite Cake Batter, giving it a whimsical shape, and then decorating it to perfection. It’s less about the indulgence of deep-frying and more about the pure joy of a home-baked treat.
Why you’ll love this recipe?
Let me tell you, there are so many reasons why this baked donuts recipe has become a staple in my kitchen, and I just know you’re going to love it too. First off, the flavor is just incredible. We’re talking about a tender, cake-like donut that’s not too sweet on its own, making it the perfect canvas for all sorts of delicious toppings and glazes. The texture is spot on – light, airy, and wonderfully moist. It’s the kind of donut that melts in your mouth. Then there’s the simplicity. Seriously, if you can mix up a batch of pancakes, you can make these! There’s no messy frying involved, which is a huge win in my book, especially on busy weeknights or when I’m short on time. You just mix, bake, and glaze. It’s that easy! And speaking of easy, this recipe is surprisingly budget-friendly. Most of the ingredients are pantry staples, so you likely already have them on hand, meaning you can whip these up whenever the craving strikes without a special trip to the grocery store. What I love most about this recipe, though, is its versatility. You can keep them simple with a classic vanilla glaze, or get creative with chocolate, lemon, or even a maple-bacon topping. They’re perfect for breakfast, a fun after-school snack, or even a delightful dessert. I’ve even seen people make savory versions, but for me, the sweet ones are pure comfort. If you enjoy recipes like my “Never Fail Chocolate Chip Cookies” or my “Quick and Easy Blueberry Muffins,” you’ll adore these baked donuts. They share that same spirit of home-baked goodness that’s both accessible and incredibly rewarding.
How do you make baked donuts?
Quick Overview
Making these baked donuts is a breeze! You’ll whisk together your dry ingredients, then your wet ingredients, combine them gently, fill your donut pan, and bake. While they cool slightly, you’ll whip up a quick glaze, and then it’s a race to get them decorated before they disappear! The whole process, from start to finish, takes less than an hour, making it an ideal treat for any day of the week. The key is not to overmix, and to have your donut pan ready to go. It really is that straightforward, and the results are always spectacular.
Ingredients
For the Main Batter:
- 2 cups all-purpose flour: I always use a good quality all-purpose flour. You can also try a 1:1 gluten-free blend if you need to, but results might vary slightly in texture.
- 1 teaspoon baking powder: This is crucial for that lovely lift and fluffy texture. Make sure it’s fresh!
- 1/2 teaspoon baking soda: Works with the baking powder to give us that perfect rise.
- 1/4 teaspoon salt: Balances out the sweetness and enhances the flavors.
- 1/2 teaspoon ground cinnamon: This adds a warm, subtle spice that’s just lovely, even if you’re not going for a cinnamon-sugar donut.
- 1/2 cup (1 stick) unsalted butter, softened: Make sure it’s softened, not melted, for the best texture.
- 3/4 cup granulated sugar: For sweetness. You can slightly reduce this if you prefer a less sweet donut or a very sweet glaze.
- 2 large eggs: At room temperature is best for proper emulsification.
- 1 teaspoon vanilla extract: A good quality vanilla makes a big difference!
- 3/4 cup milk: Whole milk gives the best richness, but I’ve tested this with almond milk and it actually made it even creamier!
For the Glaze:
- 1 1/2 cups powdered sugar: Sifted, if you want to be extra fancy and avoid lumps.
- 2-3 tablespoons milk (or water): Start with 2 and add more until you reach your desired consistency.
- 1/2 teaspoon vanilla extract: Or other flavorings like almond extract or lemon zest.
For Optional Toppings:
- Sprinkles
- Chocolate chips
- Chopped nuts
- Cinnamon-sugar mixture (1/4 cup sugar + 1 tsp cinnamon)
Step-by-Step Instructions
Step 1: Preheat & Prep Pan
First things first, get your oven preheating to 350°F (175°C). This is super important because you want that oven nice and hot when the batter is ready. Then, grab your donut pan – the kind with the little circular molds. You need to grease it really well. I usually use a non-stick baking spray or a little bit of softened butter and flour it. Make sure you get into all the nooks and crannies so those beautiful donuts slide right out. If you don’t have a donut pan, you can try making donut muffins, but the shape will be different!
Step 2: Mix Dry Ingredients
In a medium bowl, whisk together the all-purpose flour, baking powder, baking soda, salt, and cinnamon. Give it a good whisk until everything is evenly distributed. This ensures that your leavening agents are spread out, so you get an even rise on all your donuts. It also helps prevent any pockets of baking soda or powder, which can sometimes lead to an odd taste. I like to do this first because it’s simple and sets me up for the next steps.
Step 3: Mix Wet Ingredients
In a separate large bowl, cream together the softened butter and granulated sugar until light and fluffy. This usually takes a couple of minutes with an electric mixer, or a bit longer if you’re doing it by hand. Then, beat in the eggs one at a time, making sure each one is fully incorporated before adding the next. Stir in the vanilla extract. This step is key to getting a tender donut; creaming the butter and sugar incorporates air, which contributes to the light texture.
Step 4: Combine
Now, we’re going to add the dry ingredients to the wet ingredients, alternating with the milk. Start by adding about a third of the dry ingredients to the wet mixture and mix on low speed (or gently by hand) until just combined. Then, add half of the milk and mix. Repeat, adding another third of the dry ingredients, then the remaining milk, and finally the last of the dry ingredients. Mix only until *just* combined. Seriously, do NOT overmix. A few small lumps are perfectly fine. Overmixing develops the gluten in the flour, which can make your donuts tough and dense, and we definitely don’t want that!
Step 5: Prepare Filling
This step is technically the ‘batter filling’ for the donut pan, but I often prepare any optional fillings here if I’m doing something special, like a swirl. For this basic recipe, we’re just filling the donut molds. A piping bag makes this super easy and less messy, but you can also just use a spoon. Fill each mold about two-thirds of the way full. You don’t want to overfill them, or they’ll spread too much and lose their shape.
Step 6: Layer & Swirl
If you’re just making plain baked donuts, you’ll simply fill the donut molds as described in Step 5. If you’re feeling fancy, this is where you could add a dollop of jam, some chocolate chips, or a swirl of cookie butter into the center of the batter before baking. For a simple marble effect, you could reserve a small portion of the batter, mix it with a bit of cocoa powder or food coloring, and then dollop that on top of the main batter before gently swirling with a toothpick.
Step 7: Bake
Pop those prepared donut pans into your preheated oven. Bake for about 10-14 minutes, or until a toothpick inserted into the center of a donut comes out clean. The exact time will depend on your oven and how full you filled the molds, so keep an eye on them. You want them to be lightly golden brown and spring back when you gently touch the top. Overbaking will result in dry donuts, and nobody wants that!
Step 8: Cool & Glaze
Once they’re done baking, let the donuts cool in the pan for about 5-10 minutes. This helps them firm up a bit. Then, carefully invert the pan onto a wire rack to release the donuts. While they’re still warm (but not piping hot!), it’s time to make the glaze. Whisk together the powdered sugar, vanilla, and milk (or water) until you have a smooth, pourable glaze. The consistency is key here – you want it thick enough to coat but thin enough to drizzle. Dip the tops of the warm donuts into the glaze, or drizzle it over them. The warmth of the donut will help the glaze set nicely.
Step 9: Slice & Serve
Once the glaze has set, your delicious baked donuts are ready to be enjoyed! They are best served fresh, while they still have that lovely warm, cakey texture. You can also add sprinkles or other toppings right after glazing while the glaze is still wet. Slice one in half if you want to see that beautiful interior crumb – it’s so satisfying. These are perfect enjoyed with a cup of coffee or a glass of milk. My kids usually devour them within minutes of them cooling!
What to Serve It With
These baked donuts are pretty much a meal in themselves, but they also pair beautifully with a variety of beverages and other treats, depending on the occasion. For breakfast, they’re a fantastic alternative to pastries or even toast. I love them with a steaming mug of coffee – the richness of the coffee complements the sweetness of the donut perfectly. A tall glass of cold milk is also a classic and kid-approved choice. For a more festive brunch spread, imagine these arranged on a beautiful platter alongside fresh fruit, yogurt parfaits, and maybe some mini quiches. They add a touch of homemade charm that everyone will appreciate. As a dessert, these baked donuts are surprisingly elegant, especially with a decadent chocolate glaze or a dusting of powdered sugar. They’re perfect after a hearty meal, offering a sweet finish without being too heavy. And for those cozy snack times, there’s nothing better than curling up on the couch with a warm baked donut and a good book. My family has a tradition of having “donut night” on Fridays, where we make a batch and have a family movie. It’s such a simple thing, but it always feels special. Honestly, these donuts are so adaptable; they fit into any meal or occasion you can dream up!
Top Tips for Perfecting Your Baked Donuts
I’ve made these baked donuts more times than I can count, and over the years, I’ve picked up a few tricks that I think will really help you get them just right. First, and this is a big one, don’t overmix the batter. I know I said it in the instructions, but it’s worth repeating! As soon as the dry and wet ingredients are just combined, stop mixing. A few tiny lumps are better than a tough donut. Second, make sure your donut pan is really well-greased. I’ve had them stick before, and it’s heartbreaking to pull out a beautiful donut mold and only get half a donut. A good quality non-stick spray or buttering and flouring thoroughly is your best friend here. For mixing, I often use a spatula to gently fold everything together after the initial mixing, just to be sure I haven’t overdone it. When it comes to the swirl (if you’re doing one!), a little goes a long way. Don’t try to pack too much in, or it might weigh down the donut and prevent it from rising properly. For baking, ovens can be tricky. I always recommend checking for doneness a minute or two before the recipe suggests, just in case your oven runs hot. A toothpick test is fail-proof! If you’re looking to switch things up, my favorite ingredient swap is using melted coconut oil instead of butter – it gives a slightly different, but equally delicious, flavor. And for the glaze, remember that consistency is key. If it’s too thick, add milk a teaspoon at a time until it’s just right for dipping or drizzling. If it’s too thin, add more powdered sugar, a tablespoon at a time.
Storing and Reheating Tips
Now, let’s talk about what to do with any leftover baked donuts, though honestly, I rarely have any! If you find yourself with a few extras, storing them properly is key to maintaining their freshness. For room temperature storage, I like to keep them in an airtight container. They’ll stay good for about 2-3 days this way, but they are definitely best eaten within the first day or two. If you’ve glazed them, the glaze can sometimes get a little sticky if they’re packed too tightly, so try to give them a little space. For longer storage, the refrigerator is your friend. Store them in an airtight container or wrap them well in plastic wrap, then place them in a container. They’ll keep in the fridge for up to a week. However, refrigeration can sometimes dry out baked goods, so I always recommend bringing them back to room temperature before eating, or giving them a quick reheat. If you want to freeze them, this recipe freezes beautifully! Wrap each cooled, unglazed donut individually in plastic wrap, then place them in a freezer-safe bag or container. They can stay in the freezer for up to 2-3 months. When you’re ready to eat them, just thaw them on the counter for a few hours. If you’ve already glazed them before freezing, they’ll still be delicious, but the glaze might be a little softer after thawing. My preferred method is to freeze them unglazed, then glaze them after thawing for the best texture and appearance. If you’re reheating, a few seconds in the microwave is usually all it takes to bring them back to that just-baked warmth and softness.
Frequently Asked Questions
Final Thoughts
I truly hope you give this baked donuts recipe a try. It’s one of those recipes that’s become a cherished part of my baking repertoire because it’s so reliably delicious, wonderfully simple, and brings so much joy to my family. It’s proof that you don’t need a fancy bakery to enjoy a truly satisfying donut experience. The aroma that fills your kitchen while these bake is just incredible, and the taste is even better. It’s a hug in every bite, as I like to say. If you love this recipe, you might also enjoy my “Lemon Poppy Seed Muffins” for another bright, zesty treat, or my “Easy Homemade Brownies” for a richer, fudgier indulgence. These baked donuts are perfect for so many moments – a weekend treat, a special breakfast, or just because you deserve something sweet. I can’t wait to hear how yours turn out! Please leave a comment below to share your experience or any creative topping ideas you come up with. Happy baking!
Baked Donuts Recipe
Ingredients
Donut Dough
- 2.5 cups all-purpose flour
- 0.33 cup granulated sugar
- 2 teaspoons baking powder
- 0.5 teaspoon salt
- 0.125 teaspoon nutmeg
- 1 cup milk
- 1 large egg, room temperature and lightly beaten
- 5 tablespoons unsalted butter, melted
- 2 teaspoons vanilla extract
Glaze
- 2 cups confectioners' sugar
- 2 teaspoons corn syrup
- 0.5 teaspoon vanilla extract
- 0.25 teaspoon salt
- 0.25 cup milk or more, as needed for consistency
Instructions
Preparation Steps
- Preheat oven to 375°F (190°C). Grease and flour a donut pan or use a non-stick cooking spray.
- In a large bowl, whisk together the flour, granulated sugar, baking powder, salt, and nutmeg.
- In a separate bowl, whisk together the milk, egg, melted butter, and vanilla extract.
- Pour the wet ingredients into the dry ingredients and stir until just combined. Do not overmix.
- Spoon or pipe the batter into the prepared donut pan, filling each cavity about two-thirds full.
- Bake for 12-15 minutes, or until a toothpick inserted into the center comes out clean.
- Let the donuts cool in the pan for a few minutes before inverting them onto a wire rack to cool completely.
- While the donuts are cooling, prepare the glaze. In a medium bowl, whisk together confectioners' sugar, corn syrup, vanilla extract, and salt.
- Gradually add milk, one tablespoon at a time, until the glaze reaches your desired consistency. It should be thick but pourable.
- Once the donuts are completely cool, dip the tops into the glaze. Let excess glaze drip off.
- Place the glazed donuts back on the wire rack to allow the glaze to set.


