


You know those days? The ones where you’re hit with a serious craving for something rich, chocolatey, and utterly comforting, but the thought of a complicated baking project just makes you want to curl up on the couch with a good book instead? Yeah, those days. Well, I’ve got the answer, and it’s this incredible, ridiculously easy chocolate pie. It’s the kind of dessert that looks like you spent hours slaving away in the kitchen, but in reality, it comes together with minimal fuss, using ingredients you probably already have on hand. It’s smoother than any store-bought pie and way more satisfying because you made it yourself. Honestly, it’s a lifesaver on busy weeknights and a guaranteed crowd-pleaser at any gathering. If you’ve ever felt intimidated by pie crusts or finicky fillings, this recipe is your new best friend. It’s so simple, even my pre-teen nephew can whip it up with just a little supervision, and the results are always, *always* spectacular. This is the chocolate pie that made me fall in love with making dessert from scratch.
What is this amazing chocolate pie?
So, what exactly is this magical concoction I keep raving about? Think of it as your ultimate shortcut to chocolatey bliss. This isn’t your grandma’s traditional baked custard pie, though those are wonderful in their own right. This is more of a no-bake, set-and-forget kind of wonder, relying on a few key ingredients and a bit of chilling time to achieve its glorious texture. It’s essentially a velvety smooth, intensely chocolate filling nestled into a pre-made or quickly assembled crust, topped with a cloud of whipped cream or a glossy chocolate ganache. The name “easy chocolate pie” really does it justice because it strips away all the fuss and delivers pure, unadulterated chocolate flavor. It’s the perfect antidote to a stressful day, a sweet ending to a casual dinner, or even a delightful pick-me-up when you just need a little chocolate hug. It’s approachable, forgiving, and utterly delicious.
Why you’ll love this recipe?
Oh, where do I even begin with why you’ll adore this easy chocolate pie? Let’s start with the taste, because that’s paramount, right? The flavor is deep, rich, and wonderfully chocolatey without being overly sweet. It hits that perfect balance that makes you want just one more bite, and then another. What I love most about this is how shockingly simple it is. You don’t need any special equipment, no fancy techniques, and definitely no hours spent hovering over a double boiler. Most of the magic happens in the mixing bowl and then in the refrigerator! It’s seriously that straightforward. And budget-friendly? Absolutely! You won’t need to hunt down obscure ingredients; everything is usually found in the pantry or a quick trip to the grocery store. This pie is also incredibly versatile. While I have my favorite way to make it, you can totally play around with it. Add a splash of coffee liqueur to the filling for an adult twist, or swirl in some caramel sauce for extra decadence. Compared to baking a layered Chocolate Cake, which can take all afternoon, this pie is ready to impress in a fraction of the time. It’s the kind of recipe that earns you rave reviews without breaking a sweat. It’s just pure joy in pie form.
How do I make a delicious chocolate pie?
Quick Overview
This recipe is all about effortless indulgence. We’re talking about whipping up a luscious chocolate filling that comes together in minutes, pouring it into a ready-made crust, and letting time and the fridge do the rest of the work. The beauty lies in its simplicity, requiring minimal active cooking time. It’s perfect for those moments when you need a showstopper dessert without the stress. You’ll be amazed at how something so easy can taste so incredibly gourmet.
Ingredients
For the Crust:
You’ve got options here! My go-to is a store-bought graham cracker crust because, hello, ease! But if you’re feeling ambitious, a homemade chocolate cookie crust or even a simple Butter Cookie crust works beautifully. Just make sure it’s blind-baked if you’re using a traditional pastry crust to avoid sogginess.
What is the Luscious Chocolate Filling?
* Unsweetened Cocoa Powder: This is where the deep chocolate flavor comes from, so use a good quality one. Dutch-processed cocoa tends to give a smoother, less acidic flavor profile, but regular unsweetened works too.
* Granulated Sugar: Just enough to balance the bitterness of the cocoa.
* Cornstarch: Our magic thickener! It gives the filling that signature silky, pudding-like texture. Don’t skip this or try to substitute it with flour, as it won’t yield the same results.
* Salt: A pinch of salt enhances all the chocolatey goodness and prevents it from tasting flat.
* Milk: Whole milk makes it extra creamy, but I’ve tested this with 2% and even a good quality almond milk, and it turned out wonderfully rich. The key is to avoid skim milk if possible.
* Large Egg Yolks: These add richness and help create that luxuriously smooth texture. Make sure they’re fresh!
* Unsalted Butter: A few tablespoons of softened butter stirred in at the end add incredible sheen and melt-in-your-mouth richness.
* Vanilla Extract: A splash of good quality vanilla extract rounds out the flavors beautifully.
* Semi-sweet Chocolate Chips or Chopped Chocolate: This is my secret weapon for extra chocolate intensity and a super smooth finish. Use your favorite kind – milk chocolate will make it sweeter, while Dark Chocolate will make it more intensely chocolatey.
For the Optional Topping:
* Heavy Whipping Cream: For a classic, cloud-like whipped cream topping. Make sure it’s cold for best results.
* Powdered Sugar: Just a touch to sweeten the whipped cream.
* Chocolate Shavings or Cocoa Powder: For that final flourish!
Step-by-Step Instructions
Step 1: Prepare Your Crust
If you’re using a store-bought crust, you’re already ahead of the game! If you’re making your own, follow your recipe’s instructions for preparing and blind-baking. Let it cool completely before you start on the filling. This is crucial to prevent a soggy bottom!
Step 2: Whisk Together Dry Ingredients
In a medium saucepan (make sure it’s heavy-bottomed to prevent scorching), whisk together the unsweetened cocoa powder, granulated sugar, cornstarch, and salt. Whisking them together now ensures there are no lumps of cornstarch or cocoa powder when you add the wet ingredients, which is super important for a smooth filling.
Step 3: Whisk in Wet Ingredients
Gradually whisk in the milk until everything is smooth and well combined. Then, whisk in the egg yolks until the mixture is uniform. It will look a bit thin at this stage, which is totally normal.
Step 4: Cook the Filling
Place the saucepan over medium heat. Cook, stirring constantly with a whisk or a heatproof spatula, until the mixture thickens significantly and begins to bubble. This usually takes about 5-8 minutes. Once it starts to bubble, continue to cook and stir for another 1-2 minutes to ensure the cornstarch is fully cooked and the filling won’t taste starchy. It should be thick enough to coat the back of a spoon.
Step 5: Stir in Butter and Chocolate
Remove the saucepan from the heat. Add the softened unsalted butter and the semi-sweet chocolate chips (or chopped chocolate). Let them sit for a minute to start melting, then stir gently until the butter is fully incorporated and the chocolate is completely melted, creating a wonderfully smooth and glossy filling. Stir in the vanilla extract.
Step 6: Pour into Crust
Carefully pour the Hot Chocolate filling into your prepared pie crust. Use a spatula to spread it evenly. You want it to fill the crust all the way to the edges.
Step 7: Chill to Set
This is the hardest part – waiting! Cover the pie with plastic wrap, pressing it gently directly onto the surface of the filling. This prevents a skin from forming. Refrigerate for at least 4-6 hours, or preferably overnight, until the pie is firm and set. The longer it chills, the better it sets up.
Step 8: Prepare Topping (Optional)
If you’re adding whipped cream, whip the cold heavy cream with powdered sugar in a chilled bowl until stiff peaks form. Don’t over-whip, or you’ll get butter!
Step 9: Garnish and Serve
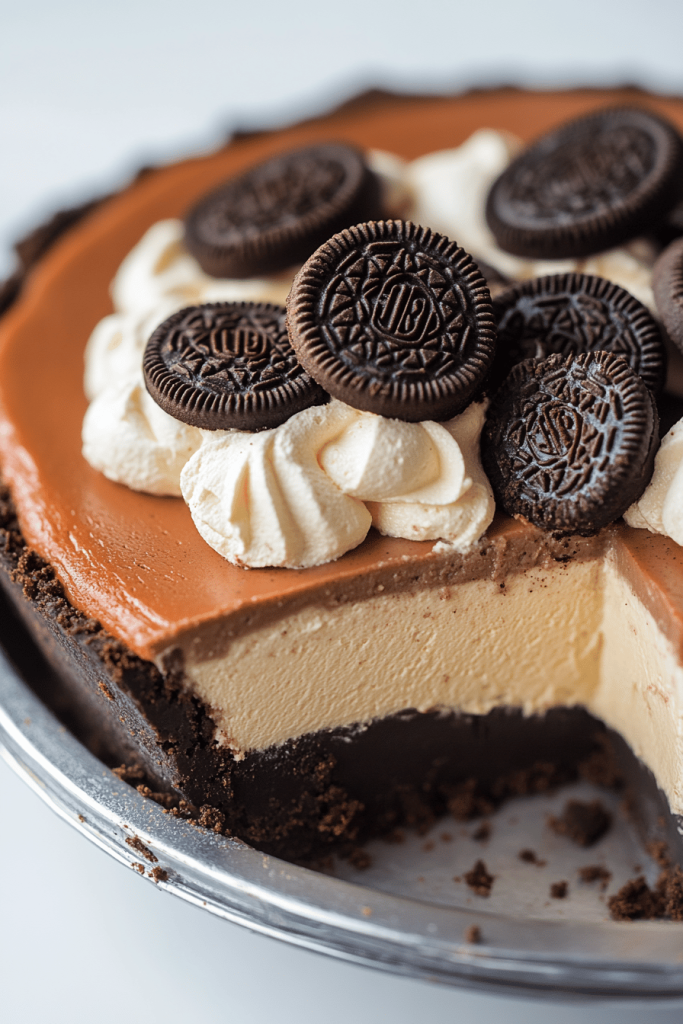
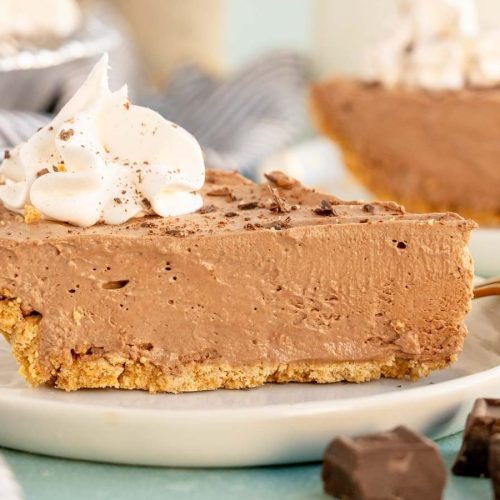
Once the pie is fully set, remove the plastic wrap. Dollop or pipe the whipped cream over the top. Garnish with chocolate shavings, a dusting of cocoa powder, or a few chocolate curls. Slice and serve chilled. Trust me, it’s divine!
What to Serve It With
This easy chocolate pie is so versatile, it fits into almost any occasion! For a cozy breakfast (yes, I said breakfast – it’s that good and doesn’t feel overly decadent if you skip the whipped cream!), a thin slice pairs wonderfully with a strong cup of coffee. The slight bitterness of the coffee cuts through the sweetness, making it a surprisingly delightful morning treat. For a more elegant brunch, serve it slightly chilled with a dollop of the whipped cream and maybe a few fresh berries like raspberries or strawberries on the side for a pop of color and freshness. If you’re serving it as a dessert after dinner, it’s pure indulgence. A small slice alongside a scoop of vanilla bean ice cream or a drizzle of raspberry coulis is absolute heaven. And for those truly cozy snack moments, when you just need something comforting? A generous slice, maybe warm it up for just 10 seconds in the microwave to make it extra melty, with a tall glass of cold milk is perfection. My family loves it after a Sunday supper, and I often bring it to potlucks because it travels so well and always disappears in minutes.
Top Tips for Perfecting Your Easy Chocolate Pie
I’ve made this easy chocolate pie more times than I can count, and over the years, I’ve picked up a few tricks that make it even better. When it comes to the cocoa powder, using a good quality, unsweetened variety is key. Dutch-processed cocoa gives a smoother, less acidic flavor that I personally prefer, but if you only have regular unsweetened, it’ll still be delicious. Make sure to whisk the dry ingredients together really thoroughly before adding the wet ingredients. This prevents any pockets of cornstarch or cocoa powder, ensuring a silky-smooth filling. When you’re cooking the filling on the stovetop, keep stirring constantly! That heavy-bottomed saucepan is your friend here; it distributes heat evenly and helps prevent scorching. Don’t be tempted to rush this part. Cooking it until it bubbles and thickens properly is crucial for the cornstarch to do its job and for the pie to set up beautifully. I learned this lesson the hard way once when I didn’t cook it long enough, and I ended up with a slightly soft pie – still tasty, but not quite right. For the chocolate, I always add semi-sweet chocolate chips or chopped chocolate right after taking it off the heat. The residual heat melts them perfectly, making the filling extra rich and glossy. If you want an even more intense chocolate flavor, you can use a good quality bittersweet chocolate. When it comes to chilling, patience is a virtue! While 4-6 hours is the minimum, letting it chill overnight makes a world of difference in achieving that perfect, firm texture. It’s worth the wait, I promise! If you find your pie is a bit soft even after chilling, don’t despair! You can still serve it in bowls with a spoon, and it’s still absolutely delicious. For variations, I’ve found that adding a teaspoon of instant espresso powder along with the dry ingredients really deepens the chocolate flavor without making it taste like coffee. And if you’re not a fan of whipped cream, a dollop of sour cream or Greek yogurt can add a lovely tang that complements the chocolate.
Storing and Reheating Tips
One of the best things about this easy chocolate pie is how well it keeps! Once it’s fully set, you can store it at room temperature if it’s not too warm and if it doesn’t have a dairy-based topping like whipped cream. In a cool pantry, it should be fine for a few hours. However, for optimal freshness and to ensure it stays perfectly set, I always recommend refrigerator storage. Cover the pie tightly with plastic wrap or transfer it to an airtight container. It will keep beautifully in the fridge for about 3-4 days. The texture might soften slightly the longer it sits, but the flavor remains fantastic. If you’ve topped it with whipped cream, definitely keep it refrigerated. Freezing is also an option! You can freeze the pie unfrosted. Wrap it very well in several layers of plastic wrap, followed by a layer of aluminum foil, or place it in a freezer-safe container. It can be stored in the freezer for up to 1-2 months. To thaw, transfer the pie to the refrigerator overnight. For reheating, I rarely do, as it’s best served chilled. But if you absolutely want it warm, you can gently warm a slice in the microwave for about 10-15 seconds. Be careful not to overheat, as it can become too liquidy. If you’re storing it with the intention of adding a topping later, like whipped cream or ganache, I’d recommend adding that just before serving if you’ve chilled it, or letting it come to room temperature slightly before applying if it’s been refrigerated.
Frequently Asked Questions
Final Thoughts
So there you have it – my ridiculously easy, unbelievably delicious chocolate pie. It’s the kind of recipe that makes you feel like a baking superstar without any of the stress. I truly believe everyone needs a go-to dessert that’s both impressive and simple, and this pie fits the bill perfectly. It’s that comforting, familiar flavor that never fails to satisfy a craving. If you love chocolate and appreciate a dessert that comes together without a fuss, you’ve got to give this one a try. I can’t wait to hear what you think! If you end up making it, please tag me on social media or leave a comment below – I’d love to see your creations and hear your own family’s reactions. And if you enjoyed this recipe, you might also love my no-bake cheesecake or my fudgy brownie recipe for more effortless indulgence! Happy baking, my friends!
Easy Chocolate Pie
Ingredients
Pie Filling
- 4 oz semi-sweet baker's chocolate
- 3 oz cream cheese softened
- 0.166667 cup milk divided (2 TBS + 3 TBS & 1 tsp)
- 2 TBS sugar
- 8 oz Cool Whip
Crust and Garnish
- 1 pre-made graham cracker crust
- whipped cream optional garnish
Instructions
Preparation Steps
- Heat chocolate and 2 TBS of milk in a saucepan over low heat, stirring until melted.
- Allow the chocolate mixture to cool completely.
- Beat the sugar into the softened cream cheese until smooth.
- Add the remaining milk and the cooled chocolate mixture to the cream cheese mixture. Beat until smooth.
- Gently fold the chocolate mixture into the Cool Whip, blending until smooth.
- Spoon the filling into the graham cracker crust. Freeze until firm, at least four hours.
- Garnish with whipped cream before serving, if desired.


