


You know those recipes that just *feel* like home? The ones you can whip up without even looking at the instructions because you’ve made them so many times? For me, that’s this incredibly easy cherry sauce. It’s not just a sauce; it’s a little jar of sunshine, a shortcut to dessert happiness, and honestly, a total lifesaver on those nights when everyone’s craving something sweet but the thought of baking a whole cake just feels overwhelming. I’ve been making this for years, and it’s one of those things my family requests constantly. It’s so much better than anything store-bought, and the best part is, you probably already have most of the ingredients. It’s my secret weapon when I want a little something special without any fuss. It’s like a hug in a bowl, really. If you love cherries as much as I do, or if you’re looking for a simple way to elevate your Ice Cream, pancakes, or even a simple yogurt parfait, you’re in for a treat. This easy cherry sauce is the answer!
What is easy cherry sauce?
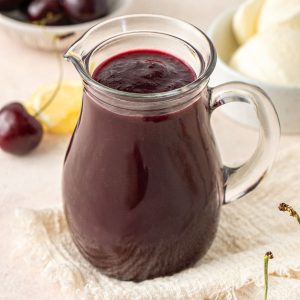
So, what exactly is this magical concoction? Think of it as the distilled essence of summer cherries, simmered down into a glossy, ruby-red sauce that’s bursting with flavor. It’s essentially fresh or frozen cherries, cooked down with a little sugar and liquid until they break down and thicken into a spoonable delight. It’s not complicated, it’s not fussy, and that’s precisely why I adore it. It’s less about fancy techniques and more about letting the beautiful, natural sweetness of the cherries shine through. Some people might compare it to a cherry pie filling, and while it shares that wonderful cherry goodness, this sauce is a bit more versatile and often a touch lighter. It’s that perfect balance between tart and sweet, with a hint of something extra that just makes you close your eyes and savor the moment. It’s the simplest way to get that delicious cherry flavor onto anything you can imagine.
Why you’ll love this recipe?
Honestly, where do I even begin with why this easy cherry sauce is a kitchen staple for me? First and foremost, the flavor. Oh, the flavor! It’s like capturing a perfect summer day in a jar. The cherries bring a bright, slightly tart, wonderfully sweet profile that’s just irresistible. It’s so much more vibrant and fresh than anything you’d find pre-made. Then there’s the sheer simplicity of it all. I’m talking about a recipe that takes maybe 15-20 minutes from start to finish, and that includes the time it takes to pit cherries if you’re using fresh ones (though frozen are a fantastic shortcut here!). It’s seriously that easy. Cost-wise, it’s a winner too. Cherries can sometimes seem like a luxury, but when you buy them in season or grab a bag of frozen ones, this sauce becomes incredibly budget-friendly, especially considering how far it goes. And versatility? That’s where this recipe truly shines. It’s not just for dessert, though it’s divine on ice cream or cheesecake. I’ve spooned it over my morning pancakes, swirled it into yogurt, used it as a topping for Pork Chops (don’t knock it till you try it!), and even stirred it into oatmeal for a special breakfast treat. What I love most is that it feels indulgent and homemade without requiring a ton of effort or special ingredients. It’s the kind of recipe that makes you feel like a kitchen wizard, even on your busiest days. It’s proof that delicious doesn’t have to be complicated!
How do I make easy cherry sauce?
Quick Overview
This recipe is all about simplicity and speed. You’ll basically be simmering cherries with sugar and a touch of liquid until they soften and create a luscious sauce. We’ll thicken it slightly with a cornstarch slurry at the end for that perfect, pourable consistency. It’s a one-pot wonder that’s incredibly forgiving, meaning even if you’re new to the kitchen, you’ll nail this. The whole process is quick, clean, and delivers maximum flavor with minimal effort, making it perfect for weeknights or spontaneous dessert cravings.
Ingredients
What is the main sauce?
4 cups pitted cherries (fresh or frozen) – If using fresh, I like to buy them when they’re in peak season and freeze them myself in a single layer on a baking sheet before bagging them up. This makes pitting easier later and ensures I have them on hand year-round. Frozen cherries are an excellent, often more budget-friendly option and work just as beautifully here. You don’t even need to thaw them completely before starting.
1/2 cup granulated sugar, or to taste – The amount of sugar really depends on how sweet your cherries are and your personal preference. I always start with 1/2 cup and then taste and adjust. You can also use Brown Sugar for a slightly deeper flavor profile.
1/4 cup water or cherry juice – Water works perfectly fine, but if you have some extra cherry juice from a can of pie filling or a carton, using that will amp up the cherry flavor even more.
1 tablespoon fresh lemon juice – This is a secret weapon! It brightens up the cherry flavor and balances the sweetness. Don’t skip it!
1/2 teaspoon pure vanilla extract – Adds a lovely warmth and depth.
Pinch of salt – Just a tiny pinch helps to enhance all the other flavors.
For Thickening:
1 tablespoon cornstarch – This is our thickening agent. Make sure it’s cornstarch and not corn flour.
2 tablespoons cold water – This is mixed with the cornstarch to create a slurry. Using cold water prevents lumps.
Step-by-Step Instructions
Step 1: Preheat & Prep Pan
Grab a medium-sized saucepan. You don’t need to grease or prepare it in any special way since everything is going into the pot. Just make sure it’s clean and ready to go. I usually have my ingredients measured out and ready to toss in before I even turn on the stove, as things move pretty quickly with this recipe.
Step 2: Mix Dry Ingredients
Add your pitted cherries (fresh or frozen) directly into the saucepan. Sprinkle the granulated sugar evenly over the cherries. If you’re using fresh cherries and they’re a bit tart, you might lean towards the higher end of the sugar range. Give it a gentle stir to combine the cherries and sugar.
Step 3: Mix Wet Ingredients
Pour the 1/4 cup of water (or cherry juice) into the saucepan with the cherries and sugar. Add the pinch of salt. Give it another gentle stir. The liquid will help the sugar dissolve and the cherries start to soften as they cook.
Step 4: Combine
This step is essentially already done by adding everything into the pot! The key is just to ensure the sugar is distributed well amongst the cherries and the liquid is evenly spread. I like to give it one final gentle swirl before placing the pot on the stove.
Step 5: Prepare Filling
The “filling” in this case is just the simmering cherry mixture itself. As it cooks, the cherries will start to release their juices and soften beautifully. Keep an eye on it, and give it a stir occasionally to prevent any sticking and to help the cherries break down evenly. This is where the magic starts to happen, and the aroma will fill your kitchen!
Step 6: Layer & Swirl
There’s no layering or swirling required for the sauce itself! The cherries will naturally break down and meld together. However, if you’re using this for a more decorative dessert like a swirled cheesecake or cake, you’d do your swirling at that stage. For the sauce itself, we’re aiming for a beautiful, cohesive mixture of softened cherries and delicious syrupy liquid.
Step 7: Bake
This recipe doesn’t actually go in the oven; it’s made entirely on the stovetop. Bring the cherry mixture to a simmer over medium heat. Once it’s simmering, reduce the heat to low and let it cook for about 10-15 minutes, stirring occasionally. The cherries should start to soften and break down. If you’re using frozen cherries, it might take a couple of minutes longer to get them going. You want them tender but not completely mush.
Step 8: Cool & Glaze
While the cherries are simmering, prepare your cornstarch slurry. In a small bowl, whisk together the cornstarch and the 2 tablespoons of cold water until completely smooth and no lumps remain. Once the cherries have simmered for about 10-15 minutes and are tender, slowly drizzle in the cornstarch slurry while stirring constantly. Continue to stir and cook for another 1-2 minutes, or until the sauce has thickened to your desired consistency. It will thicken more as it cools. Stir in the vanilla extract. Remove from heat and let it cool slightly. It’s important to let it cool a bit before serving, as it will thicken considerably. As it cools, you can pour it into a jar or bowl.
Step 9: Slice & Serve
This easy cherry sauce is best served warm or at room temperature, but it’s also delicious chilled. Spoon it generously over ice cream, pancakes, waffles, Pound Cake, yogurt, or anything else your heart desires! The vibrant color and intense cherry flavor are truly a treat. It slices beautifully over warm desserts.
What to Serve It With
This easy cherry sauce is like a culinary chameleon – it fits in everywhere! For breakfast, it’s absolutely divine over fluffy pancakes or golden waffles. I love topping a stack with a dollop of whipped cream and a generous swirl of this cherry goodness. It adds a touch of elegance to a simple morning. At brunch, it’s a showstopper. Imagine a beautiful pavlova or a simple vanilla bean cheesecake slice, adorned with this jewel-toned sauce. It pairs wonderfully with mimosas or a light fruit-infused water. As a dessert, well, the possibilities are endless! It’s the classic pairing for a slice of rich Chocolate Cake or a scoop of vanilla bean ice cream – it cuts through the richness perfectly. It’s also amazing over a warm brownie or even stirred into some panna cotta. For those cozy snack moments, it’s perfect for a late-night craving. Drizzle it over some Greek yogurt with a sprinkle of granola, or even just have a spoonful straight from the jar when no one’s looking (I’ve definitely done that!). My family also loves it stirred into plain oatmeal for a quick and comforting treat on a chilly morning. It’s my secret weapon for making everyday meals feel a little more special.
Top Tips for Perfecting Your Easy Cherry Sauce
I’ve made this easy cherry sauce more times than I can count, and over the years, I’ve picked up a few tricks that I think really make a difference. First, about the cherries: whether you use fresh or frozen, make sure they’re pitted! It’s a bit of a task if you’re doing them fresh, but a cherry pitter makes it much faster. If you’re freezing your own, pit them *before* freezing. Frozen cherries are often easier to work with as they tend to hold their shape a bit better during the initial cooking phase, but they release their juices beautifully. For sugar, always taste and adjust. Cherries vary wildly in sweetness. I start with the recommended amount and then take a tiny spoonful once it’s slightly cooled to see if it needs more. A little extra lemon juice can also balance out sweetness if you’ve added a bit too much sugar. When it comes to thickening, the cornstarch slurry is key. Make sure you whisk it until it’s completely smooth before adding it to the simmering cherries. Adding it slowly while stirring constantly is crucial to avoid lumps. If you *do* get lumps, don’t panic! You can strain the sauce through a fine-mesh sieve, though I often find a good whisking resolves most minor lumps. Don’t overcook the sauce after adding the cornstarch; it only needs a minute or two to activate and thicken. It will continue to thicken as it cools, so err on the side of it being slightly thinner than you think you want it when it’s hot. If you’re aiming for a smoother sauce, you can always use an immersion blender at the end, or mash the cherries more vigorously with your spoon while it’s cooking. For ingredient swaps, I’ve experimented with almond milk instead of water, and while it adds a subtle nuttiness, water or juice is classic. If you’re avoiding cornstarch, you can try a little tapioca starch or even a tiny amount of flour, but cornstarch gives the cleanest result. Lastly, don’t be afraid to add other flavors! A tiny grind of black pepper can be surprisingly good with cherries, or a splash of kirsch (a cherry brandy) can add a grown-up kick. Experiment and find what you love!
Storing and Reheating Tips
One of the best things about this easy cherry sauce is how well it stores. Once it’s completely cooled, I like to transfer it into an airtight glass jar or a sturdy plastic container. At room temperature, it should be fine for a day or two, especially if your kitchen isn’t too warm. However, for longer storage and to maintain optimal freshness, the refrigerator is your best bet. In the fridge, this sauce will keep beautifully for about 7-10 days. The flavors actually tend to meld and deepen a bit after a day or two, which is lovely. If you find yourself with an abundance of cherries or make a big batch, freezing is a fantastic option. Wrap the cooled sauce well in freezer-safe containers or bags, ensuring as much air is removed as possible to prevent freezer burn. It should stay good in the freezer for up to 3 months. To thaw, simply transfer it from the freezer to the refrigerator overnight. For reheating, you can gently warm it on the stovetop over low heat, stirring occasionally, or pop a portion in the microwave for about 30 seconds to a minute, stirring halfway through. Be careful not to overheat it, especially if you’ve thickened it with cornstarch, as it can break down if boiled too vigorously again. If you’ve frozen it, the reheating process is the same after it’s thawed. I usually add the glaze *after* reheating, especially if I’m serving it over something that’s already baked, to keep its lovely sheen. For room temperature storage, just make sure it’s covered to prevent dust or other contaminants from getting in.
Frequently Asked Questions
Final Thoughts
There you have it – my absolute favorite easy cherry sauce! I truly believe this recipe is a game-changer for anyone who loves that bright, sweet-tart cherry flavor but wants a simple, homemade option. It’s proof that you don’t need complicated steps or fancy ingredients to create something truly delicious that feels special. Whether you’re drizzling it over your morning yogurt, jazzing up a simple scoop of ice cream, or using it as a topping for a special occasion dessert, this sauce delivers. It brings that burst of summer freshness to your plate any time of year. If you’re a fan of fruity sauces, you might also enjoy my quick raspberry coulis or my simple blueberry compote recipes – they’re in a similar vein of easy, flavorful goodness! I can’t wait to hear what you think of this easy cherry sauce, and I’d love to know how you end up using it. Please leave a comment below and share your experience, or even your own creative variations! Happy cooking (and eating)!
Easy Cherry Sauce
Ingredients
Main Ingredients
- 2 cups Fresh or frozen cherries pitted
- 0.5 cup Granulated sugar adjust to taste
- 2 tablespoons Cornstarch
- 0.33 cup Water
- 1 teaspoon Lemon juice freshly squeezed
- teaspoon Almond extract optional
Instructions
Preparation Steps
- In a medium saucepan, combine the cherries and granulated sugar. Cook over medium heat, stirring occasionally, until the sugar dissolves and the cherries begin to soften, about 5-7 minutes.
- In a small bowl, whisk together the cornstarch and water until smooth. Pour this mixture into the saucepan with the cherries.
- Bring the mixture to a simmer, stirring constantly, until the sauce thickens, about 3-5 minutes.
- Remove from heat and stir in the lemon juice and almond extract (if using).
- Let the sauce cool slightly before serving. It will thicken further as it cools.


