


Oh, where do I even begin with buckeye bars? For me, these aren’t just a dessert; they’re a warm hug from my childhood, a shortcut to pure happiness on a busy afternoon, and honestly, my go-to when I need something that feels both incredibly special and surprisingly easy to make. You know those recipes that just stick with you? The ones that make your house smell like a bakery and have everyone hovering around the kitchen, just waiting for their turn? This is one of those. It reminds me a bit of a No-Bake Peanut Butter cookie bar, but elevated, with that decadent chocolate shell that just seals the deal. My family begs for these year-round, and honestly, I can’t blame them. They’re just that good.
What are Buckeye bars?
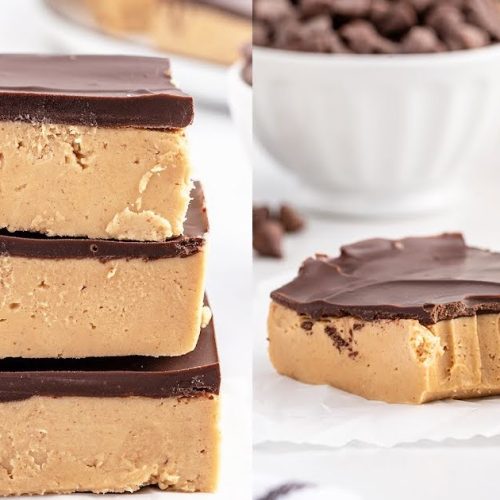
So, what exactly are these magical buckeye bars? Think of them as a deconstructed, easier-to-handle version of the classic Ohio buckeye candy, but in bar form! The name itself, “buckeye,” comes from the state tree of Ohio, and these bars capture that iconic flavor combination of Creamy Peanut Butter and rich chocolate. Essentially, it’s a soft, slightly chewy peanut butter base that’s baked to perfection, then topped with a luscious, smooth chocolate ganache. It’s not overly complicated, but the result is a dessert that tastes like it came from a fancy bakery. It’s the perfect balance – not too sweet, not too rich, but just right. If you’ve ever loved peanut butter and chocolate together, you’re going to fall head over heels for these bars.
Why you’ll love this recipe?
There are so many reasons why this buckeye bar recipe has earned a permanent spot in my recipe binder, and why I think it’ll become a favorite in your kitchen too! First off, the flavor combination is just unbeatable. That sweet, creamy Peanut Butter layer against the slightly bitter, rich dark chocolate? It’s a match made in dessert heaven. Seriously, the aroma alone as they bake is enough to make your mouth water. But it’s not just about the taste; it’s about the ease. I’ve tried so many recipes that promise simplicity but end up being a fuss. This one truly delivers. Even on my busiest weeknights, I can whip these up without feeling overwhelmed. And let’s talk about cost-effectiveness. The ingredients are all pantry staples, which means you can make a whole batch of these delightful buckeye bars without breaking the bank. They’re perfect for bake sales, potlucks, or just a sweet treat when you need a pick-me-up. What I love most, though, is how versatile they are. You can dress them up for a fancy dessert or just enjoy a casual slice with a glass of milk. They’re a lifesaver when you need to impress without a lot of stress. Compared to a complicated cake or fussy cookies, these buckeye bars offer all the flavor and satisfaction with a fraction of the effort. They’re just pure, unadulterated joy in every bite.
How do I make Buckeye Bars?
Quick Overview
Making these buckeye bars is a breeze, and I promise you, the results are so worth it! We’re basically making a simple Peanut Butter Cookie dough, pressing it into a pan, baking it until it’s perfectly tender, and then topping it with a dreamy chocolate glaze. The magic really happens in the simplicity. You’ll mix up your base, pour it into the pan, let it bake for a short while, and then let the chocolate do its thing. It’s a three-step process that leads to an incredibly satisfying treat, and it’s perfect for when you’re craving something sweet but don’t want to spend hours in the kitchen. Trust me, you’ll feel like a baking superstar in no time!
Ingredients
For the Main Batter:
You’ll need about 1 cup (2 sticks) of unsalted butter, softened. Make sure it’s truly softened, not melted! This is key for a good texture. Then, 2 cups of creamy Peanut Butter. I always opt for the standard kind, not the natural stuff where the oil separates, as it can affect the texture. If you have a peanut allergy in the house, you could try a sunflower seed butter, but I haven’t personally tested that, so proceed with caution! Next, 2 cups of granulated sugar, and 2 large eggs. And don’t forget 1 teaspoon of vanilla extract to really amp up that flavor. Finally, 2 cups of all-purpose flour, sieved to remove any lumps, and 1 teaspoon of baking soda for that perfect rise.
For the Filling:
This is where the real buckeye magic comes in! You’ll need another 1 cup of creamy peanut butter. This is the star of our filling! And then, about 1/2 cup of powdered sugar, which helps to give it that sweet, slightly firm but still wonderfully creamy texture. A splash of milk, maybe 2-3 tablespoons, is helpful to get the consistency just right – you want it thick but spreadable, not runny.
For the Glaze:
For that irresistible chocolatey finish, you’ll need about 1 cup of semi-sweet chocolate chips. I find semi-sweet gives the best balance, but you can experiment with milk chocolate if you prefer it sweeter. Then, 1/4 cup of unsalted butter. This is what makes the glaze so glossy and smooth, and it helps it set up nicely. A tiny pinch of salt, just a whisper, helps to cut through the sweetness and enhance the chocolate flavor.
Step-by-Step Instructions
Step 1: Preheat & Prep Pan
First things first, let’s get our oven ready! Preheat it to 350 degrees Fahrenheit (175 degrees Celsius). While that’s warming up, grab a 9×13 inch baking pan. You’ll want to grease it really well with butter or cooking spray, or you can line it with parchment paper, leaving some overhang on the sides. This makes it so much easier to lift the bars out later, and nobody wants stuck-on baked goods! I usually give it a good coating, especially in the corners, to be on the safe side.
Step 2: Mix Dry Ingredients
In a large bowl, whisk together your 2 cups of all-purpose flour and 1 teaspoon of baking soda. Give them a good stir to make sure they’re evenly combined. This helps ensure your baking soda is distributed properly throughout the batter, which means you’ll get a nice, even rise. It might seem like a small step, but it really does make a difference in the final texture of your buckeye bars.
Step 3: Mix Wet Ingredients
In a separate, even bigger bowl (you’ll need space!), cream together your softened butter and granulated sugar until the mixture is light and fluffy. This usually takes a few minutes with an electric mixer, or a bit longer if you’re doing it by hand – just get it nice and airy! Then, beat in the eggs one at a time, making sure each one is fully incorporated before adding the next. Finally, stir in your vanilla extract. The aroma at this stage is already amazing!
Step 4: Combine
Now it’s time to bring our wet and dry ingredients together. Gradually add the dry ingredients to the wet ingredients, mixing on low speed (or by hand) until just combined. Be careful not to overmix here! Overmixing can lead to tough bars, and nobody wants that. You want to mix until you no longer see streaks of flour. It should be a thick, slightly sticky batter. This is the base for our delicious buckeye bars!
Step 5: Prepare Filling
While your oven is still preheating, let’s get that incredible peanut butter filling ready. In a medium bowl, combine the 1 cup of creamy peanut butter and about 1/2 cup of powdered sugar. Add in 2 to 3 tablespoons of milk, starting with 2 and adding more if needed, until you get a thick but spreadable consistency. You want it firm enough to hold its shape when you spread it, but not so stiff that it’s difficult to work with. I like to use a spatula to mix this all together. It should look smooth and delicious!
Step 6: Layer & Swirl
Now for the fun part! Spread about half of the peanut butter batter evenly into your prepared baking pan. Then, carefully dollop spoonfuls of the peanut butter filling mixture all over the batter. Don’t worry about being too neat here; we’re going to cover it up! Now, spread the remaining peanut butter batter over the filling. You can gently use the back of a spoon or a spatula to spread it out, making sure to cover most of the filling. If some peeks through, that’s totally fine and even adds to the rustic charm!
Step 7: Bake
Pop that pan into your preheated oven and bake for about 20-25 minutes. You’re looking for the edges to be lightly golden brown, and the center should be set. You can test it by inserting a toothpick near the center; it should come out with just a few moist crumbs attached, not wet batter. Keep an eye on it, as oven temperatures can vary! Once it’s done, carefully remove it from the oven and let it cool completely on a wire rack. This is important – if you try to glaze it while it’s warm, the glaze will just melt right off!
Step 8: Cool & Glaze
Once your buckeye bars are completely cooled, it’s time for the grand finale – the chocolate glaze! In a microwave-safe bowl or a double boiler, combine your semi-sweet chocolate chips and butter. Microwave in 30-second intervals, stirring in between, until melted and smooth. Or, if using a double boiler, stir constantly over simmering water until smooth. Stir in that tiny pinch of salt. Once smooth, pour the chocolate mixture over the cooled peanut butter layer in the pan. Use an offset spatula or the back of a spoon to spread it evenly to the edges. Let the glaze set completely. This can take a couple of hours at room temperature, or you can speed it up by popping it in the refrigerator for about 30 minutes, but be careful not to let it get too hard.
Step 9: Slice & Serve
Once the glaze is set and firm, it’s time to slice! I find using a sharp knife helps to get clean cuts. You can wipe the knife clean between slices if needed. Cut them into squares or rectangles, whatever you prefer! These are absolutely delightful served at room temperature. They’re perfect on their own, maybe with a cold glass of milk or a hot cup of coffee. The combination of the soft, peanut buttery base and the rich chocolate topping is just pure bliss. Enjoy every single bite!
What to Serve It With
These buckeye bars are so wonderfully versatile, they fit into almost any occasion! For a leisurely breakfast or a weekend brunch, I love to cut them into smaller, bite-sized squares and arrange them on a platter with fresh fruit. They pair beautifully with a strong cup of coffee or a mimosa. For a more elegant dessert setting, imagine serving a slightly larger piece after dinner, maybe with a dollop of whipped cream or a scoop of vanilla bean ice cream. The richness of the bars stands up so well to creamy accompaniments. And for those cozy, comfort food moments? These are the absolute best. Grab a glass of cold milk, a comfy spot on the couch, and indulge in a generous slice. My family also loves them as a midday snack, especially after school. They’re a guaranteed crowd-pleaser for any gathering, from casual get-togethers to more formal celebrations. We often bring them to neighborhood potlucks, and they always disappear first!
Top Tips for Perfecting Your Buckeye Bars
Over the years, I’ve definitely picked up a few tricks to make these buckeye bars absolutely perfect every time. When you’re making the peanut butter filling, don’t be afraid to adjust the milk a little. You want it to be a thick, spreadable consistency, not too runny or too stiff. A few extra drops of milk can make all the difference if it’s too stiff, or a little more powdered sugar if it’s too loose. Another thing I’ve learned is about overmixing the batter. It’s tempting to keep mixing to get everything perfectly incorporated, but resist the urge! Just mix until the flour disappears. Overmixing develops the gluten in the flour, which can lead to tougher bars, and we want these to be tender and delicious. For the swirl, don’t stress about making it too perfect. Sometimes the rustic, slightly marbled look is the most appealing. Just dollop and spread gently. When it comes to baking, always keep an eye on your oven. Ovens can be so different, and you want that perfect golden-brown edge without any burning. I usually start checking mine around the 20-minute mark. And for the glaze, ensure your bars are *completely* cool before you spread it on. I’ve made the mistake of rushing this step, and the glaze just melts into a messy puddle. Patience here is key! If you find your chocolate glaze is too thick, stir in another teaspoon of butter or a tiny bit more milk until it reaches your desired consistency. If it’s too thin, you can add a few more chocolate chips and melt them in. I’ve also found that using good quality chocolate chips really does make a difference in the flavor of the glaze.
Storing and Reheating Tips
Knowing how to store these delicious buckeye bars properly ensures they stay fresh and tasty. At room temperature, they’ll keep well for about 2-3 days, especially if you keep them in an airtight container. I usually cover the pan with plastic wrap or transfer them to a container with a tight lid. If you’re not going to finish them within a few days, the refrigerator is your best friend. They’ll stay good for up to a week in an airtight container in the fridge. Sometimes, if it’s really warm, I prefer to store them in the fridge anyway because it keeps the chocolate glaze nice and firm. If you’re planning for the long haul, these buckeye bars freeze beautifully! I like to cut them into individual squares first, then wrap each one tightly in plastic wrap, followed by a layer of aluminum foil or place them in a freezer-safe bag. They can stay frozen for up to 2-3 months. To thaw, simply take them out of the freezer and let them come to room temperature. If they were refrigerated, you might want to let them sit at room temperature for about 15-20 minutes before enjoying, especially if you prefer them at room temperature rather than chilled. For the glaze timing, I always recommend adding it *after* the bars have cooled completely, and then letting the glaze set before storing. If you’re freezing them, the glaze should be fully set before you wrap them up for the freezer.
Frequently Asked Questions
Final Thoughts
So there you have it – my absolute favorite buckeye bars! I truly believe this recipe is a winner because it strikes that perfect balance between being incredibly delicious and wonderfully easy to make. It’s the kind of treat that brings smiles to faces, sparks happy memories, and makes any day feel a little bit brighter. I hope you give these buckeye bars a try and that they become a cherished part of your family’s recipe collection too. If you love this recipe, you might also enjoy my No-Bake Chocolate Peanut Butter Oatmeal Cookies or my Classic Fudgy Brownies – they’re both big hits in my house! I can’t wait to hear how your buckeye bars turn out. Please leave a comment below and share your experience, or any fun variations you come up with. Happy baking!
Buckeye Bars
Ingredients
Peanut Butter Layer
- 8 tablespoons salted sweet cream butter softened
- 3 cups creamy peanut butter
- 4 cups powdered sugar
- 2 teaspoons pure vanilla extract
Chocolate Ganache
- 12 ounces semi sweet chocolate chips
- 2 tablespoons vegetable oil
Instructions
Peanut Butter Layer
- Line a 9x13 baking dish with parchment paper. Set it aside.
- Using either a stand mixer, or a medium size mixing bowl and a handheld mixer on medium-high speed, beat the softened butter for 1 minute, until smooth.
- Add the peanut butter and vanilla. Continue mixing for 1 minute, until smooth.
- Lower the mixer speed to medium-low and add the powdered sugar 1 cup at a time, mixing well after each cup. Increase the mixer speed to medium-high and continue mixing until completely incorporated.
- Using either a silicone spatula, or an offset spatula, evenly spread the peanut butter mixture in the bottom of the prepared baking dish.
Chocolate Ganache
- Add the chocolate chips and oil to a small microwave safe bowl. Heat for 1 minute, stir, and continue to mix in 15 second intervals until the mixture is completely smooth.
- Using a silicone spatula, or an offset spatula, evenly spread the chocolate over the peanut butter layer. Cover and chill the refrigerator for 15 - 20 minutes.
- Remove the baking dish from the refrigerator. Carefully slice the buckeye bars into 15 - 2 ½ in x 3 in slices. Cover the baking dish and return the bars to the refrigerator to continue chilling for an additional 1 hour 45 minutes.
- Remove the bars from the dish by the parchment paper. You may need to carefully re-slice the bars. Serve immediately.


