


I still remember the first time I shared red velvet biscotti with my family—my kitchen filled with that warm, cakey aroma, and everyone hovering by the counter before the coffee even finished brewing. Biscotti isn’t usually the first thing people think of when someone says “red velvet,” right? Usually, it’s the rich, velvety cake or cupcakes, but this biscotti version brings the same nostalgic feel with a crisp, satisfying crunch that makes dunking it into coffee or hot cocoa simply irresistible. It’s a bit like biting into your favorite Red Velvet Cake but with that biscotti’s snap that lasts all morning. If you’re anything like me and crave that classic red velvet flavor but want something a bit more portable or perfect for a mid-morning snack, this recipe is an absolute gem. Honestly, I’ve made it countless times and it disappears before I even get to enjoy a second cup of coffee.
What is red velvet biscotti?
Think of Red Velvet biscotti as the lovechild of two best friends: the classic Italian twice-baked cookie and the iconic red velvet cake. It’s essentially biscotti — traditionally a crunchy, twice-baked cookie designed for dipping — infused with the flavors, colors, and slight tang of red velvet cake. The name “red velvet” comes from the unique reddish hue and the velvety texture that comes from a mix of cocoa and buttermilk, wrapped up in a subtle tang and sweetness. But here’s the fun part: instead of being moist and fluffy like a cake, red velvet biscotti is baked twice to develop a crisp bite that holds up perfectly when dunked into coffee, tea, or even a dessert wine. It’s my go-to when I want that red velvet vibe but am craving something a little more snackable with a bold crunch.
Why you’ll love this recipe?
What I love most about this Red Velvet biscotti recipe is how it hits that sweet spot between indulgence and practicality. First off, the flavor is spot-on. You get the deep, subtle cocoa notes married beautifully with a hint of vanilla and that classic tang from the buttermilk or yogurt I like to sneak in. That little tang really lifts the sweetness and stops it from feeling one-dimensional. Plus, the red color isn’t just for looks—it makes every bite feel special and festive, perfect for gifting or casual get-togethers.
Beyond flavor, this recipe is surprisingly simple. I always tell friends, if you can mix a few bowls and have a little patience with the baking times, you’ll have something pretty impressive without breaking a sweat. It’s not a fuss-heavy dessert like some other Red Velvet treats that require multiple layers or complicated frostings. Plus, the ingredients are budget-friendly pantry staples—nothing exotic or expensive here—so it won’t burn a hole in your wallet, especially when you’re looking to treat a crowd.
And the versatility? Oh, it’s a lifesaver. I usually bake a batch for casual morning fuel, but they’re just as good paired with an evening cup of spiced chai or sprinkled over dessert plates instead of a heavy cake. The biscotti holds up well in containers for gifting, traveling, or just popping in a lunchbox. Honestly, it’s become my family’s favorite twist on biscotti. My kids ask for these all the time, especially when we’re chilling with hot chocolate on chilly nights. If you love classic biscotti or adore Red Velvet cake, this one’s going to steal your heart.
How do I make Red Velvet Biscotti?
Quick Overview
Making red velvet biscotti is a wonderfully straightforward process that starts with mixing a tender red velvet batter, shaping it into logs, then baking it low and slow for that signature biscotti crunch. The magic is in the twice-baking—first to cook through and set the shape, then sliced and baked again to crisp things up. I find this method really reassures novice bakers because you’re working with something soft and manageable before slicing. Plus, the red velvet twist means you’re not just making any old biscotti, but something that feels as festive and comforting as a cozy night in. Trust me, it’s one of those recipes that makes the kitchen smell heavenly and impresses without much fuss.
Ingredients
For the Main Batter:
- 2 cups all-purpose flour — I sift mine for a lighter texture
- ¾ cup granulated sugar — balances the cocoa’s bitterness
- 2 tbsp unsweetened cocoa powder — high quality is key, like Dutch-processed
- 1 tsp baking powder — for that gentle lift
- ¼ tsp salt — to enhance the flavors
- 2 large eggs — at room temperature for smooth mixing
- ½ cup buttermilk or plain yogurt — adds tang and moisture
- 2 tbsp unsalted butter, melted — gives richness
- 1 tsp vanilla extract — because everything’s better with vanilla
- ½ tsp red food coloring — don’t skip the good stuff; it makes all the difference visually
For the Filling:
- ½ cup white chocolate chips — optional, but they add a lovely sweet surprise
- ½ cup chopped pecans or walnuts — because crunch and nuttiness never hurt
- Alternatively, dried cranberries or cherries for a tart twist
For the Glaze:
- 1 cup powdered sugar — sifted for smoothness
- 2–3 tbsp milk or cream — adjust for desired drizzle consistency
- ½ tsp vanilla extract or a pinch of almond extract — to complement the flavor
Step-by-Step Instructions
Step 1: Preheat & Prep Pan
First thing, preheat your oven to 325°F (160°C). Now, I always line a baking sheet with parchment paper or a silicone baking mat. This not only prevents sticking but also makes cleaning up a breeze. It’s important to get this set up before mixing, because once the batter is ready, you don’t want to lose momentum. Also, keep your cooling rack nearby because timing is everything here.
Step 2: Mix Dry Ingredients
In a medium bowl, whisk together the flour, cocoa powder, baking powder, and salt. Make sure to sift the cocoa and flour first to avoid any lumps—nothing ruins a smooth batter like chunks of dry powder. Mixing these well helps the chemical leaveners distribute evenly, so every bite tastes just right without that odd bit of powder.
Step 3: Mix Wet Ingredients
In a large bowl, beat the eggs with the sugar until they’re pale and slightly fluffy. This is where the batter gets its lightness. Then, stir in the buttermilk, melted butter, vanilla extract, and red food coloring until everything is beautifully combined. The color should come alive here—if it’s looking dull, just add a smidge more food coloring. It’s like magic seeing that deep, vibrant red start to come through.
Step 4: Combine
Now, gently fold the dry ingredients into the wet, taking care not to overmix. The batter should be slightly thick but still pliable. Overmixing is a rookie mistake I learned after my early baking days—it can make the biscotti tough, and nobody wants that. If it feels too sticky, dust your hands with a bit of flour before shaping the logs.
Step 5: Prepare Filling
If you’re adding chocolate chips or nuts, stir them in now so they’re evenly distributed. I love the sweet and tart combo of white chocolate and cranberries—my personal favorite—so I usually add those together. But feel free to swap to whatever you love. This step is where you customize the texture and flavor boost.
Step 6: Layer & Swirl
Divide the dough in half to form two equal logs on your prepared baking sheet—about 10 inches long and 2 inches wide each. Here’s a trick I swear by: dampen your hands slightly before shaping to smooth the logs without cracking. For some extra fun, gently swirl the two logs together on the sheet for a subtle marbled effect. It’s a bit of an art, but totally worth the extra wow factor.
Step 7: Bake
Bake the logs for about 25-30 minutes until they’re firm to the touch but not fully crispy yet. You’ll want to let them cool for about 10 minutes on the rack before slicing. The cooling helps them set without falling apart. The second bake is what really brings the crunch.
Step 8: Cool & Glaze
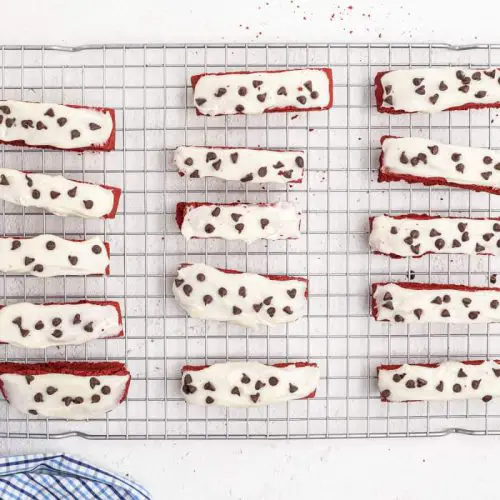
Once cooled slightly, slice the logs diagonally into ½-inch thick pieces with a sharp serrated knife. Lay the slices flat and bake again at 300°F (150°C) for 10-15 minutes on each side until nice and crisp. When you take them out and cool again, it’s glaze time! Drizzle the simple vanilla glaze over the top, letting it pool in those cracks and add a sweet glossy finish. My tip? Don’t rush the glaze—let the biscotti cool completely after glazing for that perfect snap.
Step 9: Slice & Serve
Serve your red velvet biscotti with a hot beverage of your choice—the way the hard bite softens just enough when dipped is seriously comforting. If you want to get fancy, arrange them on a platter with fresh berries or a small bowl of whipped cream for dunking. They’re great warm, but just as delicious when fully cooled and stored, making for a great grab-and-go snack.
What to Serve It With
For Breakfast: There’s nothing like dunking a couple of red velvet biscotti in a strong cup of black coffee early in the morning. I like to keep it simple here—just a mug of your favorite brew, maybe a splash of cream, and these nicely crisp biscotti for that perfect balance of bitter and sweet to start the day.
For Brunch: These biscotti hold their own on a brunch table. They’re charming alongside fresh fruit, soft cheeses like mascarpone, or even a light fruit compote. Pair with a sparkling mimosa or a creamy latte to make your friends think you went all out!
As Dessert: Serving red velvet biscotti as dessert turns any casual night into something special. I like to drop a few biscotti pieces into a glass of dessert wine or alongside a scoop of vanilla bean ice cream for textural contrast. The glaze also adds just that right amount of sweetness that makes it feel indulgent without being overwhelming.
For Cozy Snacks: Nothing beats curling up with a book, a blanket, and a mug of hot chocolate topped with marshmallows when these are around. My kids love dipping them into their cocoa, and frankly, so do I—because it’s the perfect combo of warmth and crunch when the evening chills settle in.
Top Tips for Perfecting Your Red Velvet Biscotti
Eggs and Buttermilk: I always make sure my eggs and buttermilk are at room temperature before starting. Cold ingredients can make mixing harder and affect the rise, so plan ahead and set them out for 30 mins.
Mixing Advice: Fold gently! This biscotti batter isn’t like cake batter that needs vigorous mixing—it’s more delicate. Overmixing will lead to tough biscotti, so a few lumps are okay. I learned this lesson the hard way with a dry first batch.
Swirl Customization: When swirling the logs, don’t overdo it or you’ll lose that distinct red velvet color barrier. A gentle fold or two with a butter knife works wonders and gives you that lovely marbled effect that makes them pop on the plate.
Ingredient Swaps: I’ve tested this with almond flour for a low-gluten option—swap half the flour for almond flour and drop the gluten worries. It makes the texture a bit softer but still delicious. For a dairy-free version, coconut yogurt or almond milk with a tablespoon of vinegar works perfectly.
Baking Tips: Every oven is different, so check your biscotti for doneness visually and by touch. They should be firm and dry but not brown like a cookie. Place the rack in the middle of the oven for even baking. Remember, the twice baking is the secret to that signature crisp, so plan your time accordingly.
Glaze Variations: If you want something less sweet, try a light dusting of powdered sugar or a lemon glaze for a citrusy zing instead of vanilla. You can also mix some cream cheese into the glaze for a little tang and thickness—perfect for a richer bite.
Storing and Reheating Tips
Room Temperature: Store your cooled red velvet biscotti in an airtight container. They last wonderfully for up to two weeks this way without losing that signature crunch. Just make sure they’re completely cooled before storing to avoid sogginess.
Refrigerator Storage: If you prefer keeping things in the fridge, use a sealed container or zip-top bag. They’ll keep fresh up to three weeks, but expect the biscotti to lose some crunch. I usually bring them to room temp or lightly toast them before serving if stored this way.
Freezer Instructions: Freezing works like a charm here. Wrap the biscotti well in plastic wrap, then pop them in a freezer-safe bag or container. They last up to three months frozen. Thaw at room temperature or warm in the oven for a few minutes to bring back that crunch.
Glaze Timing Advice: I fully recommend glazing right before serving if you plan on storing the biscotti. The glaze can soften over time, especially in humid conditions. But if you want it ahead, keep the glaze separate and drizzle or dip just before enjoying.
Frequently Asked Questions
Final Thoughts
This red velvet biscotti recipe is one of those little treasures in the kitchen that blends tradition with a fun twist—you get all the cozy nostalgia of red velvet but in a crisp, travel-friendly form that’s perfect anytime. I love that I can whip these up for unexpected guests or have a stash ready for quiet moments with my coffee. Plus, the recipe’s flexibility lets you play around with fillings and glazes to match your mood. If you give this a try, I’d love to hear how you customize it or what your family thinks—you might just find this becomes a staple in your home too. Happy baking, and don’t forget to share your biscotti stories below. I can’t wait to hear how yours turns out!
red velvet biscotti
Ingredients
Main Ingredients
- 6 tablespoons unsalted butter softened
- 0.75 cup granulated sugar
- 0.25 cup unsweetened cocoa powder
- 1 large egg
- 3 tablespoons heavy whipping cream
- 2 cups all-purpose flour
- 1 teaspoon baking powder
- 0.5 teaspoon red gel food coloring
- 1 cup powdered sugar
- 2 ounces cream cheese softened
- 1 tablespoon heavy whipping cream
- 0.25 cup mini chocolate chips
Instructions
Preparation Steps
- In a large mixing bowl, beat butter with granulated sugar. Add cocoa powder and egg, beating until combined. Mix in heavy cream until fully blended. Add flour, baking powder, and red food coloring, stir until combined.
- Line a 15x10x1 inch baking sheet with parchment paper. Divide dough in half and pat each portion into a 9x2.5 inch rectangle. Bake at 350°F for 25 minutes. Remove and slice each rectangle into 9 slices. Stand slices on one side and bake 10 minutes. Flip and bake an additional 10 minutes. Cool completely.
- Whisk together powdered sugar, cream cheese, and heavy cream in a small bowl until smooth. Spread glaze over each biscotti slice and sprinkle with mini chocolate chips. Let glaze set for about 15 minutes before serving. Enjoy!


