


I still remember the first time I baked something that tasted like dessert but woke up my morning brain at the same time. The kitchen smelled like cocoa and sunshine, and the ripe bananas on the counter whispered, “Today’s the day.” This chocolate banana oats dish became my little ritual—a cozy hug in a bowl that doesn’t require a long bake or a giant pot of something. It’s a cross between a warm baked oatmeal and a shy chocolate cake, and I swear it’s the most forgiving breakfast you can make on a busy weekday. I’m not exaggerating when I say this one’s a lifesaver on busy mornings: whisk, bake, slice, and you’ve got a warm, satisfying start. My kids actually ask for seconds, which is basically a mom-win in my book. And yes, I’ve tested it with almond milk, whole milk, and a splash of vanilla—almond milk made it a touch creamier, which I loved, but the version with dairy is equally cozy. If you’re craving something sweet at 10 p.m. but don’t want to bake a whole cake, this is the answer. Welcome to our little morning dessert that never feels like a compromise.
What is chocolate banana oats?
Think of chocolate banana oats as a gentle, wholesome riff on your favorite quick-bread flavors, transformed into a single, friendly bake. It’s essentially oats bound with mashed banana, a little egg or flax for structure, cocoa or melted chocolate, and a splash of milk to keep things tender. The name tells you everything you need to know: chocolate, banana, oats—the trio that makes mornings feel like a celebration without turning your kitchen into a science lab. This isn’t a complicated project; it’s what I reach for when I want something comforting and nourishing that still feels indulgent. The best part is that you can swirl in Peanut Butter, add a handful of chopped nuts, or drizzle a glossy chocolate glaze if you’re feeling festive. It’s simple, reliable, and it travels well for a weekend breakfast or a make-ahead meal-prep win. If you’ve ever loved a mug of cocoa with a banana muffin, you’ll recognize the vibe instantly—only this is a slice of sunshine that travels to the table in one neat, sliceable pan.
Why you’ll love this recipe?
What I love most about this chocolate banana oats is how forgiving and versatile it feels. It’s the kind of recipe that travels gracefully between cozy mornings and casual brunches, and it tastes like you spent more time than you actually did. Here are a few reasons this one sticks around in my kitchen—and maybe it’ll in yours too:
- Flavor: The chocolate notes are deep but not heavy, and the banana adds a natural sweetness that feels sun-kissed, not sugary. It’s chocolate banana oats with a gentle balance that keeps you coming back for another bite.
- SimplicityOne bowl, quick whisk, a kiss of glaze if you’re feeling fancy. It’s genuinely easy, no special equipment required,
- Cost-efficiency: What is the best way to measure cost-efficiency?: Pantry-friendly ingredients add up to a comforting, budget-friendly breakfast that still tastes like a treat.
- Versatility: You can swap in peanut butter, a handful of chocolate chips, or a few chopped walnuts. It plays well with different milks and toppings, so you can tailor it to what’s in your fridge.
What sealed the deal for me was how it adapts to life with kids, work, and weekend laziness alike. I’ve served it as a warm breakfast, as a post-school snack, and even as a quick dessert with a scoop of vanilla Ice Cream. The texture stays cozy yet sturdy enough to slice, which makes it perfect for sharing. And yes, I’ve experimented with different baking times and temperatures; this recipe forgives a minute or two in the oven and still comes out tasting like a small celebration.
How to Make Chocolate Banana Oats
Quick Overview
Here’s the simplest way to picture it: you mix oats with mashed banana, a touch of egg or flax, cocoa, and milk, then bake everything into a tender, sliceable slab. A little swirl of filling—think banana cream or a wide ribbon of Peanut Butter—amps the flavor, and a glossy glaze on top makes it feel decadent without going overboard. The beauty of this method is that it’s mostly hands-off after the mixing. While it bakes, you can prepare coffee, set the table, or just breathe in the warm chocolatey air that fills the kitchen. It’s forgiving—if you forget a splash of milk, you’ll simply end up with a heartier bite; if you overmix, you won’t ruin the structure. The result is a gentle, satisfying bake you’ll crave again and again, especially when the mornings feel rushed but your cravings say a different thing entirely: dessert for breakfast, please.
Ingredients
For the Main Batter:
– 1 1/2 cups old-fashioned oats (not instant)
– 2 ripe medium bananas, mashed (about 1 cup)
– 2 eggs or 2 tablespoons ground flax + 6 tablespoons water (flax “egg” option)
– 1/2 cup milk (dairy or non-dairy)
– 1/4 cup unsweetened cocoa powder or 1/3 cup melted Dark Chocolate
– 1/4 cup granulated sugar or 2-3 tablespoons maple syrup to balance sweetness
– 1 teaspoon vanilla extract
– 1/2 teaspoon ground cinnamon (optional)
– Pinch of salt
For the Filling:
– 1/2 cup banana puree or extra mashed banana (to swirl through)
– 2 tablespoons cream cheese or yogurt (optional, for a creamy ribbon)
– 1 teaspoon lemon juice to brighten (optional)
For the Glaze:
– 1/4 cup powdered sugar
– 1–2 tablespoons cocoa powder
– 1–2 tablespoons milk or water, as needed
– Pinch of salt and a splash of vanilla (optional)
– Optional mix-ins: chocolate chips, chopped nuts, or a drizzle of peanut butter
Step-by-Step Instructions
Step 1: Preheat & Prep Pan
Heat your oven to 350°F (175°C). Lightly grease a 8×8-inch baking dish or line it with parchment. I like going with parchment for easy removal and clean edges, especially when you’re slicing into neat squares. A little butter or oil on the sides keeps everything from sticking and gives you those crisp, caramelized edges that make the kitchen smell like a dream.
Step 2: Mix Dry Ingredients
In a large bowl, whisk the oats, cocoa powder, cinnamon (if using), sugar, and salt until well combined. You want even distribution of the chocolatey bits, otherwise you’ll get pockets of sweetness that feel off. The oats should be ready to soak up the banana-scented milk with confidence.
Step 3: Mix Wet Ingredients
In a separate bowl, mash the bananas until smooth. Whisk in the eggs (or flax mixture), milk, vanilla, and a touch of lemon juice if you’re using the filling option. This is where your kitchen begins to smell like a Sunday morning—banana sweetness meeting cocoa richness. If you’re using a dairy-based milk, the batter will feel silkier; if you go dairy-free, you’ll notice a bit more heft to the texture, which I actually enjoy because it mirrors a baked oatmeal texture you can sink into with a spoon.
Step 4: Combine
Pour the wet mixture into the dry, and fold just until everything comes together. Don’t overmix. You’re aiming for a cohesive batter with a few soft oats peeking through. If you overwork it, you’ll lose the tender bite that makes baked oats so comforting. If you see a few dry pockets, add a splash more milk—just enough to bring everything together without making it soupy.
Step 5: Prepare Filling
If you’re swirling in filling, mix the banana puree with cream cheese or yogurt and lemon juice. It should be soft enough to swirl, not so loose that it sinks to the bottom. Taste and adjust sweetness—sometimes the banana is sweet enough on its own, and you don’t want an overly cloying ribbon. The aim is a gentle ripple of brightness that streaks through the chocolate banana oats without overpowering it.
Step 6: Layer & Swirl
Spread half the batter into the pan. Dollop spoonfuls of the filling across the surface, then swirl with a knife to create ribbons. Cover with the remaining batter, smoothing the top just a touch. If you want a marble effect, run the tip of your knife in a zigzag pattern for more dramatic swirls. The visual payoff is as rewarding as the taste.
Step 7: Bake
Bake for 25–35 minutes, until the edges are set and a toothpick inserted in the center comes out with a few moist crumbs. The center should spring back gently when pressed. If you like a firmer slice, give it an extra 5–7 minutes; if you’re aiming for something fudgier, pull at the earlier end. Oven temperatures vary; I’ve learned to trust the edges becoming slightly darker and a gentle wobble in the middle. When the house smells like cocoa and warm banana, you know you’re close.
Step 8: Cool & Glaze
Let the pan rest on a rack for at least 15 minutes before glazing. This helps the slices hold their shape and prevents the glaze from sliding off. Whisk together the glaze ingredients until smooth, adding more milk a teaspoon at a time if you want a pourable gloss, or less for a thicker, fudgier coating. Drizzle over the top while the bars are still a tad warm so it sinks in and sets with a soft sheen. If you want to go extra, sprinkle a few chocolate chips or chopped nuts while the glaze is still wet so they stick beautifully.
Step 9: Slice & Serve
Use a sharp knife to cut into neat squares. For clean edges, wipe the blade between cuts. Serve warm or at room temperature, with a dollop of yogurt or a scoop of vanilla ice cream if you’re feeling indulgent. The texture should be tender with a gentle bite, and the glaze should provide a glossy finish that catches the light on your plate. This is the moment: a sliver of chocolate banana oats perfection that tastes like you’ve spent more time than you actually did.
What to Serve It With
Your chocolate banana oats are a flexible, crowd-pleasing base, so here are a few ways to present it that feel special without extra work.
For Breakfast: A mug of coffee or a glass of almond milk, with a light dusting of powdered sugar if you want a hint of sweetness in the morning. A few fresh berries brighten the plate and add a bit of tartness that contrasts the chocolatey notes. The smell alone brings everyone to the kitchen.
For Brunch: Plate alongside a fruit salad with citrusy greens and a mint leaf. A small scoop of vanilla yogurt doubles as a creamy, tangy partner that cuts through the richness. A tiny drizzle of maple makes it feel like a Sunday morning celebration.
As Dessert: Serve warm with a scoop of salted caramel ice cream or a whisper of espresso whipped cream. The chocolate banana oats take on a more decadent vibe when plated with a glossy glaze and a playful crunch from toasted pecans.
For Cozy Snacks: Slice into thick bars and wrap in parchment for a comforting take-to-work treat. They hold up well in a lunchbox and taste like a hug if you’re fighting a mid-afternoon slump. This is genuinely how I keep morale up on tough days.
Top Tips for Perfecting Your Chocolate Banana Oats
These notes come from years of tweaking, tasting, and arguing in the kitchen with my own cravings. Here’s how I lock in the best texture, flavor, and finish.
Banana Prep: Use very ripe bananas for the natural sweetness and a bit of caramelized flavor. If you only have green bananas, a touch more sweetness from the sugar or maple syrup helps. I usually mash the bananas to a smooth puree so the batter binds evenly, but leaving a few small banana bits adds pleasant bursts of fruitiness.
Mixing Advice: Don’t overmix the batter once your wet hits the dry. A few streaks of flour are okay; overworking will lead to a tougher texture. Let the oats drink in the milk and banana gradually as you fold in the rest. The goal is a cohesive, moist batter with a little bite.
Swirl Customization: The filling and glaze are optional but fun. For a lighter swirl, mix the filling with more yogurt to keep it airy; for a richer ribbon, use cream cheese and a touch of vanilla. If you love a bold look, layer extra chocolate chips in between layers and press them slightly into the batter so they melt into pockets of melty goodness.
Ingredient Swaps: Oats can be swapped for a gluten-free blend if needed. Milk can be almond, soy, or oat milk depending on your preference. For sweetness, honey or maple syrup works beautifully—just adjust to taste because bananas bring a lot on their own. If you’re dairy-free, the glaze might be a touch thinner; you can thicken it with a pinch more powdered sugar or a few extra minutes of reduction in a microwave.
Baking Tips: If your oven runs hot, keep an eye after the 22-minute mark. You want the edges set and the center just a touch jiggly for the nicest slice. Position the rack in the middle for even heat distribution. If you notice the top browning too fast, tent with foil for the last 5–8 minutes.
Glaze Variations: A simple glaze is delicious, but you can go a step further with a peanut butter drizzle or a white chocolate glaze for contrast. If you skip the glaze, a dusting of powdered sugar and a scattering of cocoa nibs can still give you that beautiful finish. The glaze should feel glossy, not clumpy, so add liquid gradually and whisk vigorously as you go.
These are the lessons I’ve learned after countless mornings spent with a spoon, a mug, and a plate that looks too pretty to eat. The truth is that chocolate banana oats is forgiving, and that’s exactly why it’s become a family favorite: it’s simple, comforting, and somehow feels a little bit like a hug in edible form.
Storing and Reheating Tips
Because this bake travels well and stays tasty, you’ll want smart storage strategies to keep it delicious.
Room Temperature: If you’re planning to eat it within a day or two, keep covered at room temperature. It will soften a touch as the banana settles and the chocolate glaze thickens a touch, but it remains tasty and easy to slice.
Refrigerator Storage: Store in an airtight container for up to 4 days. Reheat individual portions in the microwave for 25–40 seconds, or in a hot oven at 325°F (165°C) for 8–10 minutes if you prefer a crisper edge.
Freezer Instructions: Slice into bars and wrap each piece well. Freeze for up to 2 months. Thaw overnight in the refrigerator or reheat straight from frozen in a 325°F (165°C) oven for 12–15 minutes. The oats stay tender, and the flavors deepen a bit after freezing, which I always find comforting.
Glaze Timing Advice: If you’re freezing, you can apply the glaze after thawing for best texture. Alternatively, you can freeze without glaze and whisk a quick glaze just before serving to keep the top glossy and crisp.
In my kitchen, I love making a big batch on Sunday and portioning it out for quick weekday breakfasts. The texture remains tender, and every bite brings back those early-morning scents of cocoa and cinnamon. It’s a small ritual that steadies the week and satisfies a craving without fuss.
Frequently Asked Questions
Final Thoughts
This chocolate banana oats has become more than a dish in our home; it’s a little ritual that anchors mornings and occasionally doubles as a sweet pause after a long afternoon. The aroma of cocoa, banana, and warm oats is like a memory in the making, and I’m grateful for how easy it is to share. It’s flexible enough to accommodate kitchen experiments and comforting enough to calm a fussy appetite. If you try it, I’d love to hear how you adapted it—what filling you loved, what glaze felt like your signature, or what you swapped to tailor it to your pantry. Happy baking, friends, and may your mornings always begin with a cozy, chocolatey bite. Can’t wait to hear how yours turns out!
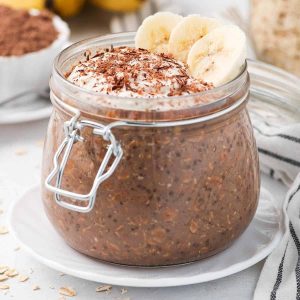
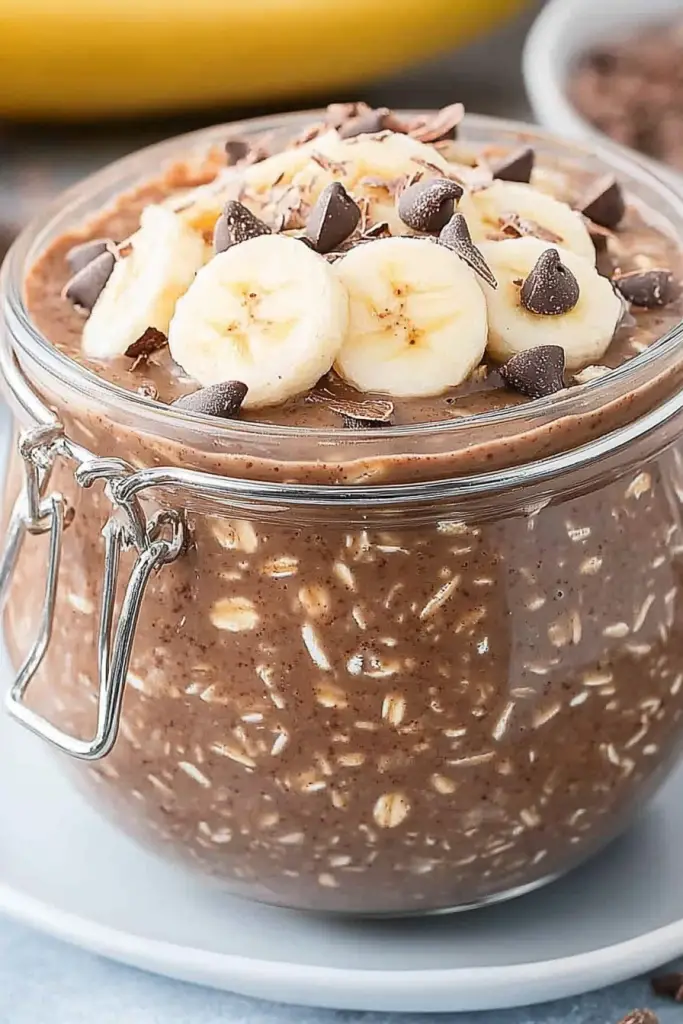
Chocolate Banana Oats
Ingredients
Main Ingredients
- 1 cup rolled oats
- 1 ripe banana mashed
- 2 tablespoons unsweetened cocoa powder
- 1.5 cups milk any kind
- 1 tablespoon chia seeds
- 1 tablespoon maple syrup or to taste (optional)
Instructions
Preparation Steps
- In a bowl or jar, combine the rolled oats, mashed banana, cocoa powder, milk, and chia seeds. Stir well to ensure everything is incorporated.
- If desired, add maple syrup and stir again. Taste and adjust sweetness if needed.
- Cover the bowl or jar and refrigerate for at least 4 hours, or preferably overnight, to allow the oats to soften and thicken.
- In the morning, give the oats a good stir. If they are too thick, add a splash more milk. Serve cold, with your favorite toppings.


