


There’s something magical about a tiny bite that hits you with both cacao and a whisper of heat. I still remember the first time I tasted chilli chocolate as a kid and thought, “What kind of grown-up magic is this?” Now I make these chilli chocolate clusters all the time—tiny, glossy morsels that taste like a secret between friends. They’re incredibly easy, but the flavor feels luxe enough for a holiday plate or a weeknight treat that somehow makes the kitchen feel warm even on a chilly evening. Think of them as a cross between sturdy chocolate bark and a delicate fudge, with a little spice that lingers like a friendly memory. My kids ask for seconds, my friends steal a few when I’m not looking, and I always tell them the same thing: this is the kind of recipe that disappears in minutes at my house. The aroma alone—rich chocolate, roasted nuts, a faint chili wink—fills the room and makes everyone smile. This is one of those recipes I reach for when I crave something sweet but don’t want to bake a full cake. It’s a lifesaver on busy nights, and it travels well for potlucks and picnics.
What is Chilli Chocolate Clusters?
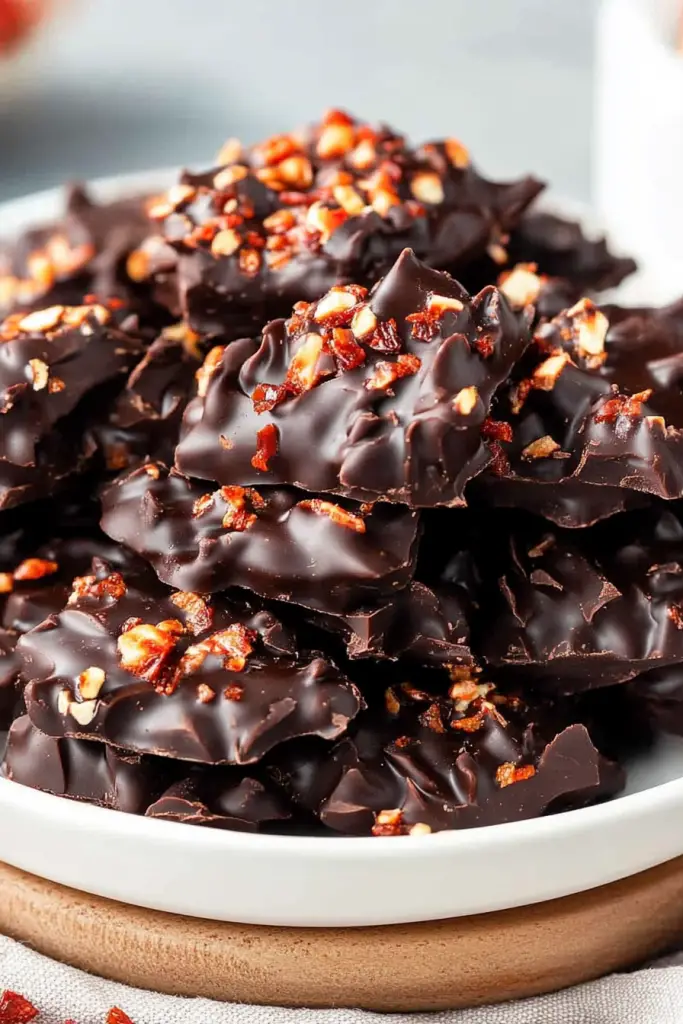
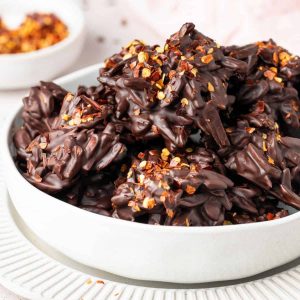
Chilli chocolate clusters are little bite-size nibbles built from melted chocolate infused with a touch of heat, then studded with nuts, seeds, or dried fruit, and finished with a glossy glaze or a simple drizzle. The heat isn’t aggressive—it’s a gentle warmth that enhances the cocoa, like a friendly nudge that keeps the sweetness from tipping over into cloying. The name says it all: you’ll taste chilli in the background, not as a foreground circus act. Think of it as a small, elegant version of a spicy chocolate bar, broken into clusters so you can pop a couple at a time or share them without guilt. The idea is simple: melt, mix, drop, chill, and enjoy. If you’ve got a busy week or you’re hosting a casual gathering, these clusters come together in a flash and look impressively polished on a tray. It’s essentially chocolate with personality—no fancy equipment required, just a steady kitchen hand and a willingness to let the cacao kiss a little chili a moment longer.
Why you’ll love this recipe?
What I love about chilli chocolate clusters is how they hit that perfect balance between comfort and wow. Here are the big reasons this recipe sticks around
- Flavor: The deep, satiny chocolate carries a subtle heat that wakes up the palate. It’s not hot; it’s intriguing, like a good secret you only share with a few friends. The chili’s warmth plays off the sweetness, and the nuts add toasty contrast with a touch of salt that makes each bite pop.
- Simplicity: There’s no complicated equipment, no long checks, and no babysitting the pot. You melt, swirl, drop, and chill. It’s as forgiving as a spoonful of melted chocolate can be, which is a relief on busy weeknights.
- Cost-efficiency: What is the best way to measure cost-efficiency? With pantry staples like dark chocolate, nuts, and a pinch of chili, you get a refined treat without overspending. A big batch is economical and lovely to share.
- Versatility: You can tailor the clusters to your pantry—almonds, pistachios, cranberries, roasted pumpkin seeds, even a pinch of sea salt or citrus zest for a bright finish. It’s a blank canvas that holds a lot of personality.
- Make-ahead magic: They set up quickly in the fridge, and you can store them for days. It’s the kind of recipe that’s perfect for gift platters or surprise snacks for guests.
- Texture variety: The crisp snap of the chocolate shell, the chewy center, and the occasional crispy nut piece create a satisfying mouthfeel that keeps people reaching for just one more bite.
What I find most charming is that these little clusters feel intimate—like you baked them with a friend in mind. They’re forgiving, flexible, and they always invite people to linger a little longer at the table. I’ve served them with coffee after Sunday dinners, tucked into lunch boxes for the kids, and plated beside a cheese board for grown-up gatherings. They’re not flashy, but they’re reliable, comforting, and just a touch fancy.
How to Make Chilli Chocolate Clusters
Quick Overview
In a nutshell, you melt Dark Chocolate with a splash of oil or butter to sheen it up, then mix in a whisper of chili, salt, and vanilla. While it’s melting, you toast or prep your nuts for a little extra aroma. You drop spoonfuls of the glossy chocolate on a lined tray, nestle a few crunchy bits into each dollop, cover with more melted chocolate, and finally let them set in the fridge until glossy and firm. The entire process takes less than an hour from start to finish, with most of that time spent in chilling. The result is shiny, crisp-edged clusters with a soft, smoky-chocolate finish and a whisper of heat—perfect for sharing, gifting, or sneaking a few for yourself after dinner.
Ingredients
For the Main Batter:
- 200 g high-quality dark chocolate (70% cacao works beautifully), finely chopped
- 1–2 tbsp neutral oil (like grapeseed or light olive oil) or unsalted butter, for shine and ease of melting
- 1/2 tsp chili flakes or 1/4 tsp chili powder, adjusted to heat preference
- 1/4 tsp fine sea salt
- 1 tsp vanilla extract (optional, but it deepens the chocolate flavor)
For the Filling:
- 1/2 cup toasted nuts (almonds, hazelnuts, or pistachios), roughly chopped
- 2–3 tbsp dried fruit (cranberries or chopped apricots) for a chewy contrast
- Optional: 1–2 tbsp flaked sea salt or smoked salt for finishing
For the Glaze:
- 1/4 cup white chocolate or white chocolate chips, melted (optional but pretty)
- Extra crushed chili or cacao nibs for a decorative touch

Notes and sourcing tips: I usually buy good-quality dark chocolate with at least 70% cacao for a robust flavor. If you prefer a milder heat, start with 1/4 teaspoon of chili and taste as you go. If you’ve got a favorite roasted nut mix, use it—the aroma of toasted nuts really amplifies the chocolate, and you can customize based on what you’ve got in the pantry. If you’re avoiding dairy, you can use a neutral oil and a dairy-free dark chocolate bar. I’ve even tested these with almond milk in the chocolate and it yielded a creamier texture—though I’ll admit it’s a touch softer when cold, so you’ll want to handle them with care straight from the fridge.
Step-by-Step Instructions
Step 1: Preheat & Prep Pan
Line a flat tray or two with parchment paper. You want a cool, flat surface so the clusters set evenly. Preheat your space by warming your kitchen with a pot of coffee or a quick playlist; the real magic happens once the chocolate hits the bowl and your guests start sniffing the air. If you’re making a big batch, use two trays so you don’t crowd the clusters and end up melding into one giant chocolate blob.
Step 2: Mix Dry Ingredients
In a small bowl, whisk together the chili, sea salt, and a pinch of vanilla powder or extract if you’re using it. If you’re peppers-and-chocolate Party, you can also add a pinch of espresso powder for a subtle mocha edge. This is the moment you’re building the warmth—the chili should be faint, not shouting. I like to run my finger along the surface of the chili and smell before I whisk it in; it helps gauge the heat level you’ll actually taste in the finished bite.
Step 3: Mix Wet Ingredients
Place the chopped chocolate in a heatproof bowl. Set the bowl over a pot of barely simmering water (a double boiler would be ideal), stirring occasionally until the chocolate is almost melted. Remove from heat and stir in the oil or butter, and the vanilla if you’re using it. The trick here is to let the chocolate finish melting off the heat, with the residual warmth doing most of the work. It should be glossy, with a satin sheen that you can almost see in the spoonful you lift.
Step 4: Combine
Pour most of the dry-chili mixture into the melted chocolate and stir gently until everything is evenly coated. You’ll notice the chocolate becoming smoother and darker as it absorbs the flavors. If you’re using a glaze on top, you’ll reserve a small portion of the melted chocolate to swirl later; you want the clusters to have a glossy, almost mirror-like surface when they set.
Step 5: Prepare Filling
In a separate bowl, combine the toasted nuts and dried fruit. If you’re using salt on top, sprinkle a light pinch over the mixture now so the salt can cling to the surface in the final bite. This step adds the crunch and the chewy notes that keep the clusters interesting—every bite should feel complete, not just smooth chocolate. I’ll sometimes toast the nuts a touch longer for extra aroma; the warmth of the roasting oils makes the chili notes come alive in the background.
Step 6: Layer & Swirl
Drop a heaping teaspoon of melted chocolate onto the parchment, then press a few nut-fruit bits into the center. Cover with another small dollop of melted chocolate to enclose the filling, creating a tiny mound. If you want a prettier finish, gently tap the tray to level the tops. For a simple marble look, twist a tiny bit of the remaining White Chocolate into the surface while the clusters are still soft. The goal is to have a glossy top and a slightly textured bottom where the nuts peek through.
Step 7: Chill
Pop the tray into the fridge for 20–30 minutes or until the clusters are firm to the touch. If you’re in a rush, you can speed this up by placing the tray in the freezer for 10–15 minutes, then transferring to the fridge to finish. Don’t worry if some clusters look a bit cracked on the surface—these little imperfections just confirm you made them with love and not with a timer. The goal is a clean snap when you bite into them, and a balance between the crisp shell and the chewy interior.
Step 8: Cool & Glaze
If you’re finishing with a glaze, melt White Chocolate until silky and pour a delicate drizzle over each cluster. You can create an elegant line or a tiny zig-zag pattern for drama. Sprinkle a few more flakes of chili or cacao nibs for contrast. Let the glaze set completely before moving the clusters to another tray or into a decorative box. The glaze adds a festive look for gifting, and it enhances the chocolate’s sweetness without overpowering the chilli kick.
Step 9: Slice & Serve
Because these aren’t large bars, you don’t need to slice. If you want neat portions for a platter, you can gently press the clusters into even piles, then break them apart with your fingers at the edge of the parchment. Serve them at room temperature for a glossy finish and a clean snap. They pair beautifully with coffee, black tea, or a glass of something creamy like vanilla milk. My personal favorite—a chunky bite with a strong espresso—feels like a tiny celebration in your mouth.
What to Serve It With
These chilli chocolate clusters are supremely adaptable, so you can tailor their accompaniments to the moment. Here are a few ideas that have become fan favorites in my house:
For Breakfast: They’re a surprising little treat alongside a strong coffee or a creamy latte. Plate a few clusters with a dollop of yogurt and a scattering of orange zest for a bright morning bite.
For Brunch: Set them on a platter with seasonal fruits, small cheese samples, and a few biscotti. The contrast between the glossy clusters and the tart fruit makes for a playful, grown-up snack table.
As Dessert: Pair with vanilla Ice Cream or a dollop of mascarpone. The cool, creamy note is a wonderful counterpoint to the chili’s warmth and the chocolate’s richness. A light dusting of cocoa powder or cacao nibs on the plate adds a touch of theater.
For Cozy Snacks: Keep a small box of these clusters in your desk drawer or on the coffee table for late-night cravings. They’re small enough to feel indulgent but not so large you’ll regret it at 10 p.m. when you’re scrolling through a movie you’ve seen a dozen times.
Family tradition note: I love making a big tray for holiday gatherings and labeling them with little tags that say “Heat Level: Mild” or “Heat Level: Bold.” It’s funny how something as simple as a spicy chocolate bite can spark conversations and shared stories around the table. The scent of roasted nuts and dark chocolate still reminds me of grandparents’ kitchens and weekend baking sessions that felt like a hug you could eat.
Top Tips for Perfecting Your Chilli Chocolate Clusters
Take these tips to heart and you’ll find your clusters come out glossy, balanced, and irresistible, every single time:
Chili Balance: Start with a modest amount of chili and taste as you go. You can always add more, but you can’t take it out once it’s in the chocolate. I often reserve a tiny pinch to sprinkle on top just before the chocolate sets for a neat, controlled kick.
Chocolate Handling: Don’t rush the melting. Gentle heat, off the flame, and a little rest after stirring makes the chocolate smoother and shinier. If you overheat, the chocolate can seize and become dull; treat it like a delicate person at a party—don’t scold it, just ease the heat and give it time to recover.
Texture Tuning: The crunch comes from toasted nuts. Toast them a touch longer if you want more aroma, but watch closely so they don’t burn. The contrast between a crisp shell and a chewy center is what elevates these clusters from good to memorable.
Swirl & Pattern: For a visually appealing finish, half-dill the chocolate with a tiny swirl or zigzag of the glaze. You don’t need a fancy pattern—just a deliberate pass across the top will do. The marbling looks artisanal and makes a great impression on a platter.
Ingredient Swaps: Use different nuts, a mix of seeds, or dried fruit to tailor the clusters to your crowd. If you’re dairy-free, swap to a good quality non-dairy dark chocolate and a neutral oil. If you like a little citrus, add a pinch of orange zest to the chocolate just before melting.
Oven-Free Magic: There’s no real baking here, which is perfect for keeping the kitchen cool and the process quick. If you want to quicken setting, a brief chill in the freezer and then a longer rest in the fridge often yields the best snap.
Glaze Variations: A mint-white drizzle or a dusting of cocoa powder can totally transform the finished look and feel. Try a touch of liqueur in the glaze for a grown-up version—just a teaspoon or two will do.
Lessons Learned: Do not overwork the mixture after adding the nuts. You want to keep some texture, so fold gently and avoid compressing the mixture too much. I’ve learned this the hard way—compact clusters slide into one big piece rather than separate bites.
Storing and Reheating Tips
These clusters are pretty forgiving when stored properly. Here’s how I keep them at their best:
Room Temperature: In an airtight container, they stay fresh for up to 5–7 days in a cool, dry place. If your kitchen is warm, keep them in the fridge to maintain that glossy finish and crisp shell.
Refrigerator Storage: They last about 2 weeks in a sealed container. Layer them with parchment between layers to prevent sticking. If you’re not a fan of condensation on the surface, wrap each cluster individually in parchment before layering—this keeps the shine intact.
Freezer Instructions: For longer storage, freeze on a tray until solid, then transfer to a freezer-safe bag or container. They’ll keep for up to 2 months. Thaw at room temperature for 15–20 minutes before serving so the chocolate softens to that perfect snap.
Glaze Timing Advice: If you plan to freeze, skip the glaze or apply it after defrosting to maintain the crisp surface. If you want to glaze before freezing, ensure they’re completely set and the glaze is fully hardened for best results when you thaw.
Quality indicators: glossy surface, no blooming (that white film that sometimes forms when chocolate is exposed to moisture), a clean snap when you bite, and a balanced aroma of cocoa with a hint of spice. If you notice dull coating or oily-looking spots, it’s likely the chocolate got too warm at some stage or there was too much oil used in the melt. Re-melt gently and start again—you’ll get there with a little patience.
Frequently Asked Questions
Final Thoughts
These chilli chocolate clusters are a little ritual in my kitchen. They remind me of late nights when the house is quiet and the dishwasher hums to itself, when I’d sneak a square of chocolate and a pinch of chili while the kettle sang softly in the background. They’re also a gift-ready treat—the glossy finish, the little crunch of roasted nuts, and the hint of heat make them feel thoughtful and special without demanding hours of attention. If you’re new to working with chili in sweets, start modestly and adjust to your taste. I’ve learned that a gentle heat is all you need to elevate cocoa into something memorable, something that lingers on the palate and lingers in memory. If you give this a try, I’d love to hear how you customize yours—the nuts you use, the heat level you settle on, and whether you glaze or skip the glaze. Happy baking, friends, and enjoy every delicious bite. Can’t wait to hear how yours turns out!
Chilli Chocolate Clusters
Ingredients
Main Ingredients
- 250 grams dark chocolate chopped
- 100 grams almonds roasted and roughly chopped
- 0.5 teaspoon chili powder adjust to taste
- 0.25 teaspoon cinnamon
- 0.5 teaspoon sea salt
Instructions
Preparation Steps
- Line a baking sheet with parchment paper.
- Melt the dark chocolate in a heatproof bowl set over a saucepan of simmering water, or in the microwave in 30-second intervals, stirring between each.250 grams dark chocolate
- Once the chocolate is smooth and fully melted, stir in the chili powder, cinnamon, and sea salt.250 grams dark chocolate
- Add the chopped roasted almonds to the melted chocolate mixture and stir until well combined.250 grams dark chocolate
- Spoon clusters of the mixture onto the prepared baking sheet.
- Chill in the refrigerator for at least 30 minutes, or until the chocolate has set.
- Once set, carefully remove the clusters from the parchment paper. Store in an airtight container at room temperature or in the refrigerator.


