


There are some recipes that just feel like a warm hug, aren’t there? This one for cherry coconut bars is absolutely one of those for me. It’s a little bit sweet, a little bit tangy, and just bursting with that tropical coconut vibe that always makes me feel like I’m on vacation, even if I’m just in my kitchen. My mom used to make something similar when I was a kid, and the smell of these baking always meant something special was happening – maybe a birthday, or just a lazy Saturday afternoon. They remind me of those classic Lemon Bars, but with a delightful twist. If you love the bright pop of cherries and the comforting chewiness of coconut, you’re going to be obsessed. I’ve lost count of how many times I’ve whipped these up for potlucks, bake sales, or just when a serious craving strikes. They’re surprisingly simple, which is always a huge win in my book, especially on busy weeknights when the last thing I want is a complicated baking project.
What are cherry coconut bars?
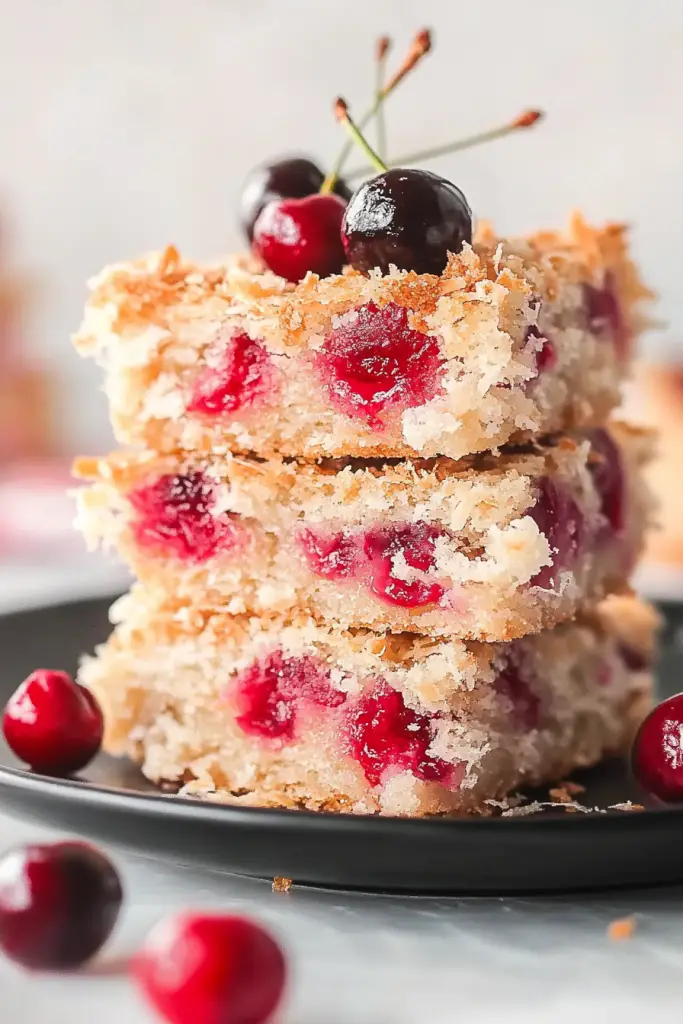
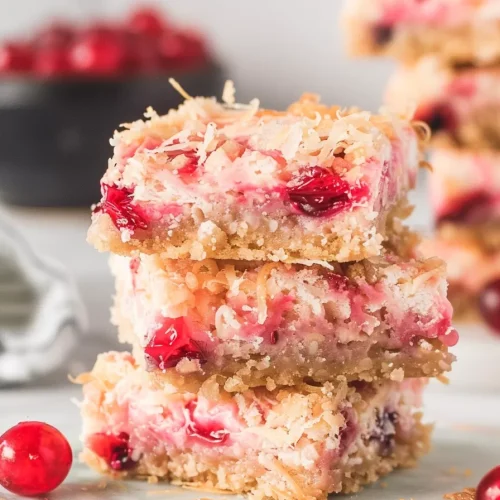
So, what exactly are these delightful little squares? Think of them as a cross between a really decadent shortbread and a fruit-filled bar cookie. The base is a tender, buttery shortbread-like crust that’s packed with shredded coconut. This isn’t just any crust, though; it’s got this wonderful texture that holds up perfectly to the sweet-tart cherry filling. And the filling? Oh, it’s a vibrant, slightly jiggly layer of pure cherry goodness, studded with more of that lovely coconut. Sometimes, I like to add a hint of almond extract to the filling to really make those cherry flavors sing, but it’s delicious just as is. They’re typically finished off with a simple, sweet glaze that adds an extra touch of sweetness and helps them look absolutely gorgeous. It’s basically sunshine in bar form, a perfect balance of chewy, crumbly, sweet, and tart. It’s the kind of dessert that makes people ask, “Wow, what’s in this?” because it’s just a little bit unexpected and totally delicious.
Why you’ll love this recipe?
Honestly, I could sing the praises of these cherry coconut bars all day long! Let me break down exactly why they’ve become such a staple in my recipe collection. First and foremost, the FLAVOR. You get that familiar, comforting buttery base with loads of toasted coconut flavor, and then BAM! You hit that bright, slightly tart cherry layer. It’s a flavor combination that just works so well together. It’s not overly sweet, which I really appreciate, and the texture contrast between the crumbly crust, chewy coconut, and soft cherry filling is just divine. Then there’s the SIMPLICITY. This is not a fussy recipe at all. You don’t need any fancy equipment, and most of the steps are just mixing things together. It’s seriously a lifesaver when I need a crowd-pleasing dessert without a lot of fuss. Plus, it’s incredibly COST-EFFECTIVE. The ingredients are all pretty standard pantry staples or easily found at any grocery store, so you don’t have to break the bank to make a batch. And the VERSATILITY! I love these for so many occasions. They’re fantastic for a quick breakfast treat (don’t judge!), perfect for a brunch spread, delightful as a post-dinner dessert, or just ideal for that 3 pm snack attack. They travel well, too, making them a fantastic option for picnics or office parties. Compared to, say, a multi-layered cake that requires precise decorating, these bars are forgiving and always turn out beautifully. What I love most is that they feel both comforting and a little bit special. They’re familiar enough to feel cozy but unique enough to impress. They’re truly a win-win-win!
How do I make Cherry Coconut Bars?
Quick Overview
Whipping up these cherry coconut bars is a straightforward three-part process: creating a coconut-infused shortbread base, layering on a luscious cherry filling, and then baking it all to golden perfection. You’ll mix up a simple buttery dough, press most of it into your pan for the crust, spoon over the cherry mixture, and then top with the remaining dough. After a bake in the oven, a quick glaze is drizzled over, and voilà! You’ve got yourself a batch of pure deliciousness. It’s remarkably easy to get right, even if you’re new to baking. The key is not to overmix the dough and to let them cool properly before slicing.
Ingredients
For the Main Batter:
Here’s what you’ll need for that wonderfully textured base. I always opt for unsalted butter so I can control the salt level perfectly. Make sure your butter is softened to room temperature – it makes creaming it so much easier! I find that using sweetened shredded coconut gives the best flavor and texture, but unsweetened works too if you prefer to control the sweetness more. Just toss in a little extra sugar if you do!
– 1 cup (2 sticks or 227g) unsalted butter, softened
– 1/2 cup (100g) granulated sugar
– 1 large egg yolk
– 1 teaspoon vanilla extract
– 2 cups (240g) all-purpose flour
– 1/2 teaspoon salt
– 1 cup (90g) sweetened shredded coconut
For the Filling:
This is where all the bright, fruity magic happens. I prefer using canned cherry pie filling because it’s already got that perfect consistency and sweetness. If you can find a good quality one, it makes life so much easier! If you have fresh cherries and the time, you can absolutely make your own filling, just be sure to cook it down to a thicker consistency so it doesn’t make the bars too soggy. A little bit of lemon zest here can really make the cherry flavor pop, but it’s totally optional.
– 1 (21 ounce or 595g) can cherry pie filling
– 1/2 cup (45g) sweetened shredded coconut
– 1 tablespoon all-purpose flour (optional, to thicken if needed)
For the Glaze:
This glaze is super simple and adds that perfect finishing touch. It’s just powdered sugar mixed with a liquid until it’s smooth and pourable. You can use milk, water, or even a little bit of lemon juice for a tangier kick. The key is getting the consistency just right – not too thin that it runs off, and not too thick that it’s difficult to spread.
– 1 cup (120g) powdered sugar, sifted
– 2-3 tablespoons milk or water
Step-by-Step Instructions
Step 1: Preheat & Prep Pan
Before you even start mixing, get your oven preheated to 350°F (175°C). This is super important so the bars bake evenly. For the pan, I always use a 9×13 inch baking pan. I like to line it with parchment paper, leaving an overhang on two sides. This makes it a breeze to lift the whole baked slab out of the pan later for easy cutting. Just make sure the parchment doesn’t go all the way up the sides unless you want slightly messy edges (which isn’t always a bad thing!). A light spray of non-stick cooking spray on the bottom before the parchment paper is my go-to for extra insurance.
Step 2: Mix Dry Ingredients
In a medium bowl, whisk together the 2 cups of all-purpose flour, 1/2 teaspoon of salt, and the 1 cup of shredded coconut. Give it a good stir to make sure everything is evenly distributed. This step ensures that the coconut is mixed throughout the base, so you get that lovely flavor in every bite. Don’t pack the flour when you measure it – just spoon it into your measuring cup and level it off with a straight edge.
Step 3: Mix Wet Ingredients
In a large bowl, cream together the softened 1 cup of unsalted butter and 1/2 cup of granulated sugar. You can use an electric mixer for this, or if you’re feeling strong, a whisk and some elbow grease works too! Cream them until they’re light and fluffy – this usually takes about 2-3 minutes with a mixer. Then, beat in the egg yolk and 1 teaspoon of vanilla extract until well combined. This wet mixture forms the flavorful backbone of your crust.
Step 4: Combine
Now, it’s time to bring it all together. Gradually add the dry ingredients to the wet ingredients, mixing on low speed or by hand until just combined. Be careful not to overmix! Overmixing can make your bars tough. You’re looking for a crumbly dough that starts to come together. It might seem a bit dry at first, but just keep mixing until you don’t see any streaks of flour. I always do this by hand at the very end to make sure I don’t accidentally overwork it. You should be able to press it together with your hands.
Step 5: Prepare Filling
This is the easiest part! In a small bowl, simply stir together the can of cherry pie filling and the 1/2 cup of shredded coconut. If your cherry pie filling seems a bit on the runny side, you can stir in that optional tablespoon of flour – it helps to thicken it up a bit as it bakes. This extra step ensures you won’t have a watery mess. You want the filling to be luscious but not soupy. This is also where you could stir in a little lemon zest if you’re feeling adventurous!
Step 6: Layer & Swirl
Take about two-thirds of your dough and press it evenly into the bottom of your prepared 9×13 inch pan. Don’t worry if it’s not perfectly smooth; rustic is good! You want a nice, even base layer. Then, carefully spoon the cherry filling mixture evenly over the crust. Finally, take the remaining one-third of the dough and either crumble it over the top of the cherry layer or flatten small pieces and arrange them to cover the filling. You can also gently swirl the remaining dough into the cherry filling using a knife or skewer for a pretty marbled effect. I love doing this for a more artistic look!
Step 7: Bake
Pop your pan into the preheated oven. Bake for 30-35 minutes, or until the edges of the crust are golden brown and the topping is set and lightly golden. Keep an eye on it; ovens can be so finicky! If you notice the edges are browning too quickly, you can always loosely tent the pan with foil. The smell that fills your kitchen during this stage is absolutely divine – a perfect blend of butter, coconut, and cherries.
Step 8: Cool & Glaze
Once baked, carefully remove the pan from the oven and let it cool completely on a wire rack. This is crucial! If you try to cut into them while they’re still warm, they’ll fall apart. Patience is key here. While they’re cooling, whisk together the sifted powdered sugar and 2 tablespoons of milk or water in a small bowl. Add more liquid, a teaspoon at a time, until you reach your desired drizzling consistency. Once the bars are completely cool, drizzle the glaze over the top. You can use a spoon or a piping bag with a fine tip. Let the glaze set for about 15-20 minutes before slicing.
Step 9: Slice & Serve
Once the glaze is set, use the parchment paper overhangs to lift the entire slab out of the pan and onto a cutting board. This makes slicing so much cleaner. Using a sharp knife, cut the bars into squares or rectangles. I usually aim for about 24 bars from a 9×13 pan, but you can make them bigger or smaller depending on the occasion. Serve them at room temperature for the best flavor and texture. They’re perfect on their own, or maybe with a cup of coffee or tea!
What to Serve It With
These cherry coconut bars are wonderfully versatile and play well with so many things! They’re not just a dessert; they can be a delightful part of any meal.
For Breakfast: Don’t shy away from having these in the morning! Paired with a strong cup of coffee or a glass of cold milk, they offer a sweet start to the day that’s far more interesting than plain toast. I like to cut them into smaller squares for a more breakfast-appropriate portion. They feel like a little treat without being too heavy.
For Brunch: These bars are absolutely perfect for a brunch spread. They add a pop of color and a delightful sweetness. Serve them alongside fruit salads, mini quiches, and perhaps some mini muffins. A refreshing mimosa or a sparkling rosé would be a lovely beverage pairing. I often arrange them on a tiered stand for an elegant presentation.
As Dessert: Of course, they shine as a dessert! They’re wonderful on their own, but for an extra indulgence, try serving them with a dollop of whipped cream or a small scoop of vanilla bean Ice Cream. The creamy, cool contrast against the warm flavors of the bar is divine. They also pair beautifully with a dessert wine like a Moscato.
For Cozy Snacks: This is probably my favorite way to enjoy them. When that afternoon slump hits or I’m craving something sweet after dinner, these are my go-to. They’re fantastic with a hot cup of tea, especially an herbal blend like chamomile or a spiced chai. They’re comforting, satisfying, and just make everything feel a little bit cozier. My kids love them after school with a glass of milk – it’s a simple treat that always makes them smile.
Top Tips for Perfecting Your Cherry Coconut Bars
After making these countless times, I’ve picked up a few little tricks that I think really elevate them from good to absolutely amazing. I’m happy to share them with you!
Zucchini Prep: Wait, zucchini? Oh my goodness, I think I meant COCONUT Prep! My apologies, brain fog can hit me just like anyone else! For the coconut, I find that using sweetened shredded coconut gives the best texture and flavor. If you’re using unsweetened, you might want to add a tablespoon or two of extra sugar to the dough and filling to compensate. Also, make sure your coconut isn’t stale; fresh coconut makes a big difference in flavor and texture.
Mixing Advice: The biggest tip I can give you here is DON’T OVERMIX the dough. Once the flour is added, mix until *just* combined. Overmixing develops the gluten in the flour, which can lead to tough, dense bars. It should look crumbly but hold together when you press it. A good rule of thumb is to stop mixing as soon as you don’t see any dry flour streaks. A quick final mix by hand is often best.
Swirl Customization: While I love the simple crumbled topping, swirling the remaining dough into the cherry filling is a fantastic way to add visual appeal. After spooning the cherry filling over the crust, dollop small pieces of the remaining dough over the top. Then, take a butter knife or a skewer and gently swirl them into the cherry layer. Don’t go overboard; just a few swirls will create a beautiful marbled effect without disturbing the crust too much. You can also make more intricate patterns if you’re feeling artistic!
Ingredient Swaps: If you don’t have cherry pie filling, don’t despair! Other fruit pie fillings work beautifully. Blueberry, raspberry, or even a mixed berry filling would be delicious. You can also use fresh fruit – if you use fresh cherries, make sure to pit them and cook them down with a little sugar and cornstarch until thickened before using them in the recipe. For a dairy-free option, use a good quality vegan butter substitute for the butter in the base and a plant-based milk for the glaze. I tested this with oat milk in the glaze once and it was surprisingly creamy!
Baking Tips: Every oven is different, so pay attention to your own. The baking time is a guideline. You’re looking for golden brown edges and a set center. If your oven tends to run hot, start checking for doneness around the 25-minute mark. Placing the pan on the middle rack usually ensures even baking. If you notice the edges browning too quickly while the center is still pale, you can loosely tent the pan with aluminum foil for the last 10-15 minutes of baking.
Glaze Variations: The simple powdered sugar glaze is classic, but feel free to experiment! For a tangier glaze, use lemon juice instead of milk. For a subtle flavor enhancement, add a tiny drop of almond extract or even a bit of cherry extract to the glaze. If you want a thicker glaze, use less liquid; for a thinner glaze, add more. You can also skip the glaze altogether and dust the cooled bars with a little powdered sugar for a more rustic look.
Storing and Reheating Tips
These cherry coconut bars are wonderfully forgiving when it comes to storage. Here’s what I’ve learned over the years:
Room Temperature: If you plan on enjoying them within a day or two, storing them in an airtight container at room temperature is perfectly fine. The glaze helps to seal them in, and they’ll stay fresh and delicious for about 2-3 days. Just make sure they’re completely cooled before sealing them up.
Refrigerator Storage: For longer storage, up to a week, I recommend the refrigerator. Place the cooled bars in an airtight container. They might get a little firmer in the fridge, but that’s easily remedied. They are fantastic straight from the fridge if you like a cooler treat, or you can let them come to room temperature for about 30 minutes before serving. Quality is well-preserved this way.
Freezer Instructions: If you need to make a big batch ahead of time or want to freeze some for later, these bars freeze beautifully! Make sure they are completely cooled and the glaze is set. Cut them into individual bars, wrap each bar tightly in plastic wrap, then place them in a freezer-safe bag or container. They’ll last for up to 2-3 months in the freezer. To thaw, unwrap them and let them sit at room temperature for a few hours. If you want them warm, you can gently reheat them in a low oven for a few minutes after thawing.
Glaze Timing Advice: For room temperature and refrigerator storage, it’s best to add the glaze after the bars have completely cooled but before storing. If you’re freezing them, you have a couple of options: you can freeze them plain and add the glaze after thawing and warming them up slightly, or you can freeze them with the glaze. If you freeze them with the glaze, be aware that some of the glaze might crack slightly upon thawing, but they’ll still taste amazing. Honestly, even if the glaze isn’t perfect after freezing and thawing, a little dusting of powdered sugar on top makes them look beautiful again.
Frequently Asked Questions
Final Thoughts
I truly hope you give these cherry coconut bars a try. They’re more than just a recipe to me; they’re a little piece of happiness that’s easy to share. The combination of buttery coconut crust and bright cherry filling is just irresistible, and the fact that they’re so straightforward to make makes them a constant favorite. They’re perfect for those moments when you want something sweet and satisfying without spending hours in the kitchen. Whether you’re looking for a new dessert for your next gathering, a special treat for your family, or just a delicious way to use up some pantry staples, these bars are sure to hit the spot. They’re proof that simple ingredients can create something truly memorable. If you love this recipe, you might also enjoy my Lemon Blueberry Scones or my Easy Chocolate Chip Cookie Bars – they’re all about comfort and flavor! I can’t wait to hear how yours turn out, so please leave a comment below and let me know your thoughts, or share any delicious variations you come up with. Happy baking!
Cherry Coconut Bars
Ingredients
Crust
- 1.5 cups all-purpose flour
- 0.33 cup granulated sugar
- 0.5 cup unsalted butter, melted
Filling
- 1 can sweetened condensed milk 14 ounces
- 1.5 cups shredded sweetened coconut
- 1 cup chopped maraschino cherries, drained
- 0.5 cup chocolate chips optional
Instructions
Preparation Steps
- Preheat your oven to 350°F (175°C). Line an 8x8 inch baking pan with parchment paper, leaving an overhang on the sides for easy removal.
- In a medium bowl, combine the flour and granulated sugar for the crust. Pour in the melted butter and mix until well combined and crumbly.
- Press the crust mixture evenly into the bottom of the prepared baking pan.
- In a separate bowl, pour the sweetened condensed milk. Stir in the shredded coconut, drained maraschino cherries, and optional chocolate chips.
- Spread the filling mixture evenly over the crust.
- Bake for 25-30 minutes, or until the edges are golden brown and the center is set.
- Let the bars cool completely in the pan before lifting them out using the parchment paper overhang. Cut into squares and serve.


