


Oh, where do I even begin with this Caramel Fudge? It’s one of those recipes that feels like a warm hug on a chilly evening, or a secret weapon when unexpected guests pop over. I remember the first time I made it; the scent of melting butter and sugar wafting through the house was pure magic. My little ones, who were quite picky back then, came running into the kitchen, their eyes wide with curiosity. Fast forward a few years, and this caramel fudge is practically a staple at every birthday party, holiday gathering, and honestly, just any random Tuesday when a sweet craving strikes. It’s often compared to those fancy chocolates you find in specialty shops, but trust me, making this at home is so much more rewarding, and dare I say, even tastier because you know exactly what went into it. It’s that perfect balance of sweet, rich, and melt-in-your-mouth goodness that we all crave.
What is caramel fudge?
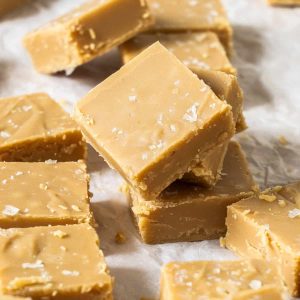
So, what exactly is this delightful confection we’re talking about? At its heart, caramel fudge is a decadent treat made by cooking sugar, butter, and milk or cream together until it reaches a specific consistency, and then it’s often infused with rich caramel flavors. Think of it as the ultimate indulgence for your sweet tooth. It’s not quite a hard candy, and it’s definitely not a chewy toffee; it’s this wonderfully soft, creamy, and utterly smooth fudge that just melts on your tongue. The “caramel” part comes from the beautiful, deep golden-brown hue and the distinct, comforting flavor that caramel brings. It’s essentially a love letter to Comfort Food, a classic for a reason, and my go-to when I need something truly special without a whole lot of fuss.
Why you’ll love this recipe?
There are so many reasons why this caramel Fudge Recipe has earned a permanent spot in my recipe box, and I just know you’re going to feel the same way. First and foremost, let’s talk about the flavor. It’s an explosion of rich, buttery caramel that’s sweet but not cloying, with a depth that’s truly addictive. Each bite is a moment of pure bliss. Then there’s the texture – oh, the texture! It’s incredibly smooth, creamy, and that signature fudgy melt is just divine. It’s like a little square of heaven. And the best part? It’s surprisingly simple to make. I know, I know, making fudge can sound intimidating, but this recipe is incredibly forgiving and straightforward. You don’t need any fancy equipment or a culinary degree, just a little patience and a lot of love. It’s also remarkably cost-effective; you likely have most of the ingredients in your pantry right now, making it a budget-friendly way to create something truly spectacular. I also love how versatile it is. While it’s perfect on its own, you can easily add nuts, swirl in some chocolate, or even a pinch of sea salt for a salted caramel variation. It’s a recipe I return to time and time again, especially when I’m looking for a crowd-pleaser that feels both nostalgic and incredibly luxurious. What I love most about this particular recipe is that it’s consistently delicious, and it brings such joy to everyone who tries it.
How do I make caramel fudge?
Quick Overview
This caramel fudge comes together in just a few key stages: preparing your pan and ingredients, cooking the sugar mixture to the perfect soft-ball stage, letting it cool slightly, beating it until it’s fudgy and smooth, and then letting it set. It’s a process that requires a bit of attention, especially during the cooking phase, but the payoff is immense. The goal is that beautiful, creamy texture that melts in your mouth. It’s a surprisingly quick process once you get the hang of it, and it’s the perfect weekend treat or thoughtful homemade gift.
Ingredients
For the Main Fudge: What is the main fudge?
You’ll need 2 cups of granulated sugar – this forms the base of our sweet magic. Make sure it’s fresh and free of lumps! Then, we add 1 cup of unsalted butter, cut into cubes. Using good quality butter really does make a difference here, giving it that rich, full flavor. For the creaminess, 1/2 cup of evaporated milk is my secret. It’s less likely to curdle than fresh milk and gives the fudge that perfect texture. A tablespoon of light corn syrup is also crucial; it helps prevent crystallization, ensuring that super smooth finish. And of course, for that signature flavor, 1 teaspoon of pure vanilla extract. Don’t skimp on the vanilla; it really elevates the caramel notes!
For the Caramel Flavor:
This is where we really amp up that caramel goodness. We’ll use 1/4 cup of packed light Brown Sugar. The molasses in brown sugar adds that lovely depth and color characteristic of caramel. I also like to add 1/2 teaspoon of caramel extract. This is optional, but it gives an extra layer of authentic caramel flavor that’s simply divine. If you can’t find it, don’t worry, the brown sugar and the cooking process will still give you a wonderful caramel taste.
Optional Add-ins:
This is where you can get creative! About 1/2 cup of chopped nuts like pecans or walnuts are fantastic. They add a lovely crunch and complement the caramel beautifully. A pinch of sea salt sprinkled on top right before it sets can also create a stunning salted caramel effect.
Step-by-Step Instructions
Step 1: Preheat & Prep Pan
First things first, grab an 8×8 inch baking pan. Line it with parchment paper, leaving some overhang on the sides. This makes lifting the fudge out so much easier later on. Lightly grease the parchment paper too; a little extra insurance against sticking never hurt anyone! Make sure your pan is ready to go because once the fudge starts cooking, things move pretty quickly.
Step 2: Mix Dry Ingredients
In a heavy-bottomed saucepan (this is important to prevent scorching!), combine the granulated sugar, Brown Sugar, evaporated milk, and corn syrup. Stir these together well over medium heat until the sugars are completely dissolved. Make sure you don’t have any grainy sugar left at the bottom of the pan before you proceed.
Step 3: Mix Wet Ingredients
Once the sugars are dissolved and the mixture is smooth, bring it to a boil. Let it boil, stirring occasionally, until it reaches the soft-ball stage. This is the crucial part! You can test this by dropping a small amount of the mixture into a glass of cold water. It should form a soft, pliable ball that flattens when you remove it from the water. This usually takes about 8-10 minutes of boiling. If you have a candy thermometer, you’re looking for a temperature of around 238-240°F (114-115°C).
Step 4: Combine
Once it reaches the soft-ball stage, immediately remove the saucepan from the heat. Let it sit undisturbed for about 5 minutes. This cooling period is essential for developing that fudgy texture. After it has rested, stir in the vanilla extract and the caramel extract (if using). Don’t overmix at this stage; just a gentle stir is perfect.
Step 5: Prepare Filling
Now for the magic! This is where we develop the fudge’s texture. You’ll want to start beating the mixture. Some people use a wooden spoon and a lot of elbow grease, while others prefer an electric mixer on low speed. Beat it vigorously for about 5-8 minutes, or until the mixture starts to lose its glossy shine and begins to thicken and lose heat. You’ll see it change from a smooth liquid to a more opaque, slightly grainy (in a good way!) texture. This is the stage where the sugar crystals start to form just right to give it that characteristic fudge texture.
Step 6: Layer & Swirl
Once the mixture has thickened and lost some of its sheen, quickly pour about two-thirds of it into your prepared pan. If you’re adding nuts or any other mix-ins, sprinkle them over this first layer. Then, pour the remaining fudge mixture over the top. If you want to create a swirl effect, gently swirl a knife or skewer through the layers. This is where you can make it look really pretty. If you’re adding sea salt, sprinkle it evenly over the top right now.
Step 7: Bake
Here’s a little trick I learned: you don’t actually *bake* this fudge in the traditional sense. Once it’s in the pan, you just let it set. The cooling process is what solidifies it. If you’ve added any swirling, try to do it before it starts to set too firmly.
Step 8: Cool & Glaze
Let the fudge cool completely at room temperature for at least 2-3 hours, or until firm. Resist the temptation to put it in the fridge to speed things up; it can sometimes affect the texture. Once it’s fully set, use the parchment paper overhangs to lift the entire slab out of the pan. Now you can add a glaze if you like, but this recipe is often served without one because the fudge itself is so rich and delicious. If you do want a glaze, a simple mix of powdered sugar and milk can be drizzled over the top once it’s cooled.
Step 9: Slice & Serve
Using a sharp knife, cut the fudge into small squares. I like to cut mine about 1-inch by 1-inch. For cleaner cuts, you can warm your knife under hot water and dry it between cuts. Serve at room temperature for the best melt-in-your-mouth experience. This caramel fudge is perfect for sharing!
What to Serve It With
This caramel fudge is so wonderfully self-sufficient, but I do love playing around with how I serve it. For a truly indulgent breakfast or a special treat, a small square alongside a hot, steaming mug of coffee or a creamy latte is pure heaven. The bitterness of the coffee cuts through the sweetness beautifully. For a more elegant brunch spread, I like to arrange a few pieces on a pretty platter, perhaps with some fresh berries like raspberries or strawberries. The tartness of the berries is a delightful contrast. As a dessert, it’s simply divine. I often serve it after a rich meal, maybe a hearty roast or a creamy pasta dish, as a little sweet punctuation mark. A tiny piece is usually enough to satisfy, and it pairs wonderfully with a dessert wine or even a good quality Dark Chocolate. And for those cozy, quiet evenings when you just need something comforting, a piece of caramel fudge with a glass of milk or a cup of hot chocolate is the ultimate comfort pairing. My family also loves to have a small piece with our evening tea – it’s become a bit of a ritual!
Top Tips for Perfecting Your Caramel Fudge
I’ve made this caramel fudge more times than I can count, and over the years, I’ve picked up a few little tricks that I think make all the difference. For the best texture, make sure you’re using a heavy-bottomed saucepan. This distributes heat evenly and seriously reduces the risk of your fudge burning, which is no fun at all. Speaking of cooking, don’t stir the mixture constantly while it’s boiling. Stirring too much before it reaches the soft-ball stage can actually lead to crystallization, making your fudge grainy. Once it hits that stage, that’s when you start working with it more. When you’re beating the fudge to get that creamy texture, don’t overdo it, but don’t underdo it either. You want it to start losing its gloss and thickening. If you beat it too little, it might be too soft; too much, and it could become crumbly. It’s a delicate balance, but you’ll get a feel for it. I’ve experimented with different fats, and while butter is classic, I once tried a mix of butter and a touch of coconut oil for a slightly different mouthfeel, and it was interesting, though I still prefer the pure butter version for that classic taste. If you’re adding nuts, toasting them lightly before chopping can really enhance their flavor and add a wonderful crunch. For ingredient swaps, I’ve found that using dark brown sugar instead of light brown sugar gives a deeper, almost molasses-like caramel flavor, which is lovely if you prefer something less sweet and more complex. If you’re worried about boiling the sugar to the right stage, a good candy thermometer is a lifesaver. Seriously, it takes the guesswork out of it. I’ve learned that oven temperature variations can affect how fudge sets, so I always let mine cool completely at room temperature. Rushing it by putting it in the fridge can sometimes lead to a slightly harder texture than you might want. For a glaze, if you want it to be a bit thicker, just add more powdered sugar. If it’s too thick, a tiny splash more milk or water will loosen it right up. The key is to get that smooth, pourable consistency.
Storing and Reheating Tips
Storing this delightful caramel fudge is pretty straightforward, but there are a few things to keep in mind to ensure it stays as delicious as the day you made it. For room temperature storage, once the fudge is completely set, you can cut it into pieces and store them in an airtight container. It will stay fresh and delicious at room temperature for about 3-4 days. If your kitchen is particularly warm, it’s best to keep it in a slightly cooler spot or opt for refrigerator storage. If you decide to refrigerate it, place the cut fudge in an airtight container. It will last for about 1-2 weeks in the fridge. When you take it out, let it sit at room temperature for about 15-20 minutes to soften up to its perfect fudgy consistency. Freezing is also an option if you want to make a big batch and save some for later. Wrap individual pieces tightly in plastic wrap, then place them in a freezer-safe bag or container. It can be frozen for up to 2-3 months. To thaw, simply transfer the fudge from the freezer to the refrigerator overnight, and then let it come to room temperature. If you’re glazing your fudge, I recommend glazing it just before you plan to serve it, especially if you’re storing it at room temperature, as the glaze can sometimes get a bit sticky over time. For refrigerated or frozen fudge, it’s best to glaze it after it has thawed and come back to room temperature.
Frequently Asked Questions
Final Thoughts
Honestly, this Caramel Fudge recipe is more than just a dessert; it’s a little piece of happiness that I’m so thrilled to share with you. It’s the perfect blend of comforting nostalgia and pure, unadulterated deliciousness. It’s proof that you don’t need to be a pastry chef to create something truly spectacular in your own kitchen. Whether you’re making it for a special occasion, as a homemade gift that’s sure to be adored, or just because you deserve a sweet treat, I promise it will be a hit. I truly hope you get a chance to make this yourself and experience that incredible melt-in-your-mouth magic. If you enjoy this recipe, you might also love my recipe for classic chocolate chip cookies or my easy no-bake cheesecake – they’re all about bringing simple, delicious joy to your table. I can’t wait to hear how your Caramel Fudge turns out, so please leave a comment below and share your experience or any variations you tried! Happy baking, everyone!
Caramel Fudge
Ingredients
Main Ingredients
- 2 cups granulated sugar
- 0.5 cup butter unsalted
- 1 can evaporated milk 12 oz
- 1 cup milk chocolate chips
- 1 cup marshmallows mini
- 0.5 cup chopped walnuts or pecans optional
Instructions
Preparation Steps
- Grease an 8x8 inch baking pan and set aside.
- In a heavy-bottomed saucepan, combine sugar, butter, and evaporated milk. Cook over medium heat, stirring constantly, until butter is melted and sugar is dissolved.
- Bring the mixture to a boil and cook for 5 minutes, stirring occasionally. Do not let it scorch.
- Remove from heat. Stir in milk chocolate chips and marshmallows until melted and smooth.
- If using, stir in chopped nuts.
- Pour the mixture into the prepared baking pan and spread evenly.
- Let cool at room temperature for at least 2 hours, or until firm. Cut into squares.


