


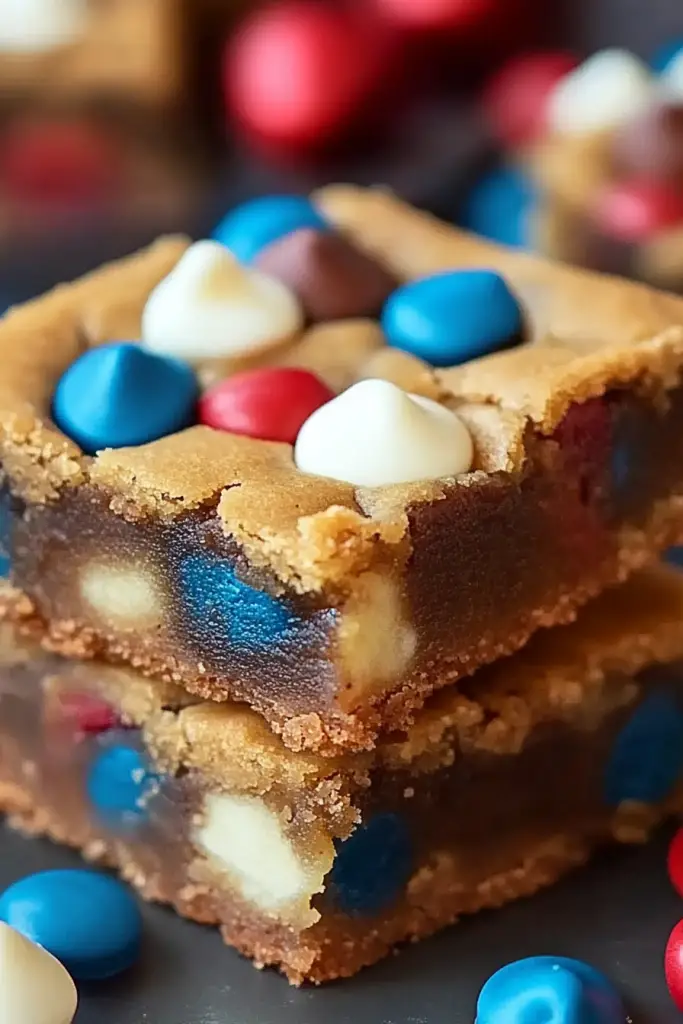
When the clock hits that quiet hour after dinner, the kitchen fills with a warm, vanilla glow and the faint sound of spoons tapping bowls. I still reach for that same little box of possibility—the cake mix tucked in the back of my pantry—and in minutes I’m whisking together something that tastes like a hug. This cake mix cookie bars recipe is my everyday celebration: incredibly forgiving, wildly comforting, and somehow still a little fancy with a glossy glaze and marbled ribbons. It’s the kind of treat you can whip up on a busy weeknight and still feel like you brought something special to the table. I’ve compared it to a simple sheet cake turned into a bar—same cozy flavor, a fraction of the effort—and you’ll see why it’s a favorite around our dinner table. If you’ve ever craved something sweet at 10 p.m. but wanted something that doesn’t require a full cake, this is your new best friend. cake mix cookie bars, my friend, in a single, delicious bite.
What is cake mix cookie bars?
Think of cake mix Cookie Bars as a playful mash-up between a chewy cookie and a soft bar cake. It’s essentially a two-layer approach: a soft, tender batter built from a box of cake mix, swirled with a creamy filling or a glaze that brightens each bite. The name gives it away—cake mix used as the base, cookies made into bars. It’s the concept you reach for when you want the comforting flavor of vanilla, chocolate, or funfetti, but without babysitting a dozen individual cookies. The beauty lies in the shortcut that doesn’t taste like a shortcut. It’s a dip-your-spoon-into-the-pan dessert that travels well for potlucks, school snacks, or a late-night treat after the kids are in bed. I love that the base is endlessly adaptable—swap in different cake mix flavors, add a swirl of cream cheese, or swap out the glaze for a chocolaty drizzle. It’s basically a cozy canvas, and you’re the artist with a spatula.
Why you’ll love this recipe?
What I love most about this cake mix Cookie Bars recipe is how it feels like a Friday-night treat even on a Tuesday. The flavor is familiar and comforting—the vanilla-sweet perfume that reminds you of birthday parties or a grandmother’s kitchen—made simple by pantry staples. The texture is a win, too: a tender crumb with just a whisper of chew, edges that lend a gentle crisp, and a glaze or swirl that catches the light and the tongue perfectly. It’s also incredibly forgiving, which is a blessing on busy nights. If you’re short on time, you can skip a step or two and still end up with something fantastic. Another big plus: cost-efficiency. One box of cake mix goes a long way, and you probably already have the other ingredients on hand, so you’re not dipping into the budget for a fancy dessert. Versatility? You’ve got it. Chocolate, vanilla, strawberry, or funfetti—this recipe plays nicely with anything you reach for. What I love most about this is how it makes a homey dessert feel special without demanding a long, complicated process. It’s a reliable crowd-pleaser that tastes like a hug in bar form, and my kids actually ask for seconds, which is basically the loudest compliment a parent can hear. If you’ve got a craving for something sweet but don’t want to bake a whole cake, this is your lifesaver on busy nights. For me, it’s become a staple that travels well, serves well, and disappears fast.
How do I make cake mix cookie bars?
Quick Overview
In just a handful of steps, you’ll go from pantry to pan with a dessert that looks and tastes like a polished bakery treat. Start by combining a Cake Mix with a few pantry staples to create the main batter, then whip up a creamy filling to swirl through the center. You’ll bake it until the edges are lightly caramelized and the center remains tender and moist. A quick glaze or drizzle on top ties everything together, adding a glossy finish and a touch of sweetness that makes the bars irresistibly snackable. The best part? You can tailor the flavors by choosing a different cake mix, adding mix-ins, or testing a few glaze variations. It’s simple, comforting, and pretty much foolproof—the kind of recipe you reach for when you want something homemade that still tastes a little special.
Ingredients
For the Main Batter:
- 1 (15.25 oz) box Cake Mix (yellow or white works beautifully)
- 1/3 cup melted butter or 1/4 cup neutral oil
- 2 large eggs
- 1/4 cup milk or water
- 1 teaspoon vanilla extract
- Optional: 1/2 cup chocolate chips, sprinkles, or chopped nuts
For the Filling:
- 8 oz cream cheese, softened
- 1/4 cup granulated sugar
- 1 teaspoon vanilla extract
- Optional: a pinch of salt
For the Glaze:
- 1/2 cup powdered sugar
- 1–2 tablespoons milk or cream
- 1/2 teaspoon vanilla extract
- Optional: 1 tablespoon cocoa powder for a chocolate glaze
Step-by-Step Instructions
Step 1: Preheat & Prep Pan
Heat your oven to 350°F (177°C). Line a 9×13-inch baking pan with parchment paper, leaving a little overhang so you can lift the bars out easily later. If you don’t have parchment, a thin coat of nonstick spray works, but parchment is the key to neat edges. I like to tell myself I’m setting up a little “shortcut safeguard” for easy clean-up—because trust me, this is a recipe you’ll want to cut cleanly.
Step 2: Mix Dry Ingredients
In a bowl, whisk the cake mix with any dry add-ins you’re using (like chocolate chips or sprinkles) so everything is evenly distributed. This step matters because you don’t want pockets of dry mix to surprise you later. A quick stir makes a big difference in texture and evenness of flavor.
Step 3: Mix Wet Ingredients
In a separate bowl, whisk together the melted butter (or oil), eggs, milk, and vanilla. The mixture should look glossy and slightly thick; if it seems too runny, add a tablespoon more cake mix. I’m all about texture cues, and this is where your intuition pays off—you want a batter that’s thick enough to hold its shape but soft enough to spread.
Step 4: Combine
Pour the wet into the dry and mix just until combined. You don’t want to overmix—this keeps the bars tender. If you’re adding mix-ins, fold them in gently now. A few gooey streaks of batter are okay; they’ll bake into lovely marbling rather than a uniform, soda-bread-like texture.
Step 5: Prepare Filling
In a mixer or with a hand whisk, beat the cream cheese, sugar, and vanilla until smooth and fluffy. You want a spreadable consistency—think of a thick glaze. If yours seems a touch loose, chill it for 10–15 minutes before using. This filling is the tension in the middle: it’s creamy, slightly tangy, and brightened by vanilla, and it pairs perfectly with the sweeter cake-base batter.
Step 6: Layer & Swirl
Spread about two-thirds of the main batter into the pan, smoothing so the surface is even. Dollop the filling over the batter in a few spoonfuls, then drop the remaining batter in spoonfuls over the top. Use a knife or skewer to swirl the filling into the batter in broad, gentle motions. You’re aiming for ribbons, not a marble pattern that hides the layers. The contrast in color and texture is part of the magic here.
Step 7: Bake
Bake for 22–28 minutes, or until the edges are lightly golden and a toothpick inserted into the center comes out with a few moist crumbs. If you’re using a dense filling, you might need an extra 3–5 minutes. Oven temperatures vary, so start checking at the 22-minute mark. When you pull it out, the center will look slightly underdone—this is how you know it will stay fudgy once cooled.
Step 8: Cool & Glaze
Let the bars cool completely in the pan on a rack. This can be the hardest part, I know—the kitchen smells amazing and you want to cut into them ASAP. Once cooled, drizzle or spread your glaze over the top. If you want a glossy finish, whisk in a touch more milk until it’s just pourable but still thick. For a chocolate glaze, sift in cocoa powder with the powdered sugar and use a little less milk. The glaze is the final sparkle that makes these feel extra special.
Step 9: Slice & Serve
Lift the bars out by the parchment overhang and place on a cutting board. Use a sharp knife warmed under hot water for clean cuts. Wipe the blade between slices for neat edges. These bars taste best at room temperature but are delicious slightly chilled, too. They’re perfect with a mug of coffee or a glass of cold milk, and they hold up beautifully in lunch boxes or after-school snack baskets. The first bite always reveals the contrast: soft, cake-like crumb with a creamy center and a kiss of glaze on top. Yum.
What to Serve It With
These cake mix cookie bars shine in many contexts. They’re a friendly crowd-pleaser and pair nicely with a few simple sides. Here are some ideas to stretch them across the day:
For Breakfast: A light dusting of powdered sugar, a dollop of whipped cream, and a sturdy pot of coffee. The bars hold up as a quick, comforting morning treat on busy school days. If you want to feel extra cozy, serve with a side of berries and a drizzle of vanilla yogurt.
For Brunch: Plate a row of bars with a few bright fruit skewers and a carafe of cold brew or orange-mango juice. A light cream cheese topping or lemon glaze can elevate the whole plate for a more festive brunch vibe.
As Dessert: A simple chocolate swirl glaze or a caramel drizzle makes it feel like a special occasion. Pair with a scoop of vanilla bean ice cream or a dollop of whipped cream and a few chocolate shavings for a classic, comforting dessert presentation.
For Cozy Snacks: Wrap individual bars in parchment and tie with twine for a homey snack that travels well to a movie night or a friend’s visit. A warm cup of tea and these bars are basically happiness in a cozy corner.
Family traditions often pop up in the little rituals around serving. I’ve found that my kids love it when I drizzle a little extra glaze and sprinkle colorful candy confetti over the top. It’s not fancy, but it feels like celebration. If you’re cooking for guests who prefer less sweetness, you can dial back the glaze and emphasize the bar’s natural vanilla notes with a light dusting of lemon zest over the top. The recipe’s flexibility is what keeps it in rotation around my house, and I’d love to hear how you customize yours. If you try it with a different cake mix flavor—strawberry, chocolate, or even orange—let me know what flavor combo surprised you the most.
Top Tips for Perfecting Your Cake Mix Cookie Bars
Here’s what I’ve learned after countless batches, a few burnt edges, and a lot of quick family taste-tests. These tips are small, but they make a big difference in the final texture and flavor.
Zucchini Prep: Not needed for this recipe, but if you ever sneak zucchini into a bar, you’ll want to wring out as much moisture as possible before folding it in. For cake mix cookie bars, skip the extra moisture step and keep the batter simple. If you do want to experiment with extra moisture, reduce the milk by a tablespoon or two to balance the batter’s consistency, and bake a touch longer to ensure the center sets fully.
Mixing Advice: Stop as soon as the dry ingredients disappear into the wet. Overmixing develops gluten and makes the bars dense instead of tender. If you see a few lumps, that’s perfectly fine—these bars should stay soft and forgiving. Fold in any mix-ins gently to avoid breaking the batter’s delicate structure.
Swirl Customization: Use a chocolate or caramel swirl by dropping a few spoonfuls of your extra glaze or melted chocolate onto the batter before you swirl. A thin line of peanut butter or cream cheese across the top can create a delicious marbled effect once swirled in. For a more dramatic look, use two contrasting batters (e.g., vanilla and chocolate) and swirl together in a few wide, slow swirls.
Ingredient Swaps: If you want a lighter version, try using a reduced-fat cake mix and a little applesauce in place of some oil. For richer flavor, swap in browned butter for the melted butter. You can also switch to a dairy-free milk option (almond milk or oat milk) to accommodate dietary needs without losing cake-like tenderness. If you’re using a flavored cake mix (like lemon or strawberry), skip the vanilla in the filling to avoid flavor overload.
Baking Tips: Oven hot spots can produce uneven bars, so rotate the pan halfway through baking. If your oven runs hot, reduce the temperature to 345°F (175°C) and extend the bake time slightly. Don’t overbake; you want a touch of fudgy center and lightly set edges. A quick test is to poke the center with a toothpick—crumbs should cling to the toothpick, not come out clean.
Glaze Variations: A classic vanilla glaze never goes out of style, but you can switch it up with a maple glaze, lemon glaze, or a chocolate ganache for an extra-fancy touch. If you want a glossy finish, whisk in a tiny amount of corn syrup or light syrup to the glaze. For a thinner glaze, add a teaspoon of milk at a time until you reach your desired drizzled consistency.
Lessons learned: I’ve found that letting the filling sit for about 10 minutes before baking helps it settle into the batter without sinking. Also, I always chill the cream cheese filling for a few minutes before dolloping if the room is warm; it keeps the swirl neat and prevents it from running too much. Trust me on this one—these small adjustments can turn a good batch into an irresistible tray you’ll want to repeat over and over.
Storing and Reheating Tips
Storage is where this recipe shines, because these cake mix cookie bars stay moist and flavorful for days when sealed properly. Here’s how I keep them fresh and tasty.
Room Temperature: Store in an airtight container for up to 3 days. If your kitchen is warm, separate the glaze from the bars by placing a thin sheet of parchment between layers to prevent sticking. The bars taste best within the first 48 hours, but they’ll stay delicious beyond that if you keep them properly wrapped.
Refrigerator Storage: You can refrigerate for up to 5 days. Bring to room temperature before serving for the best texture and flavor. If the glaze is crusty from chilling, a quick 15-second zap in the microwave (covered loosely) can soften it and restore a silky glaze finish.
Freezer Instructions: Freeze unglazed bars tightly wrapped for up to 2 months. Thaw in the fridge or at room temperature, then drizzle with glaze just before serving. If you prefer glaze on top, freeze after glazing and re-warm gently to keep the glaze glossy and intact.
Glaze Timing Advice: If you know you’re freezing the bars, hold off on the glaze until after they’re thawed, and then apply a fresh coat. The glaze tends to separate a bit during freezing; a quick whisk or gentle re-warm will bring it back to a smooth finish.
Frequently Asked Questions
Final Thoughts
This cake mix cookie bars recipe is the kind of treat that becomes a quiet, delightful standby in your kitchen repertoire. It’s the cream cheese swirl that makes it feel special without turning it into a big production, and the glaze is the little wink that says you cared enough to finish it nicely. I’ve baked these for a casual dinner with neighbors, for a school bake sale, and for a family movie night where the couch looked like a sea of blankets and laughter. Each time, the bars disappear fast, and a chorus of “these are perfect” seems to echo from the kitchen. If you’re curious to explore more, try swapping in different cake mix flavors to tailor the mood—funfetti for a birthday vibe, lemon for a bright spring afternoon, or chocolate for something decidedly indulgent. Happy baking, friends, and don’t forget to tell me how your version turned out. I love hearing your twists and seeing the photos you share.
Want more cozy treat ideas? Check out my other bar-inspired favorites like my Chocolate Chip Cookie Bars or Lemon Blueberry Bars for delicious variations you can tailor to any season.
Ready for your own little baking moment? Grab a cup, preheat the oven, and let the warm aroma fill the room. I can’t wait to hear which cake mix you chose and what glaze you loved most. Share your photos and stories in the comments—your version might become our next family favorite. Happy baking!
Frequently Asked Questions

cake mix cookie bars
Ingredients
Main Ingredients
- 1 package Yellow Cake Mix (any brand) 15.25 oz / 432g size recommended
- 5 tablespoons Melted Butter
- 2 Eggs Large, lightly beaten
- 12 ounces Chocolate Chips Semi-sweet recommended
Instructions
Preparation Steps
- Preheat the oven to 350 degrees Fahrenheit (175 degrees Celsius).
- In a large bowl, mix together the yellow cake mix, 5 tablespoons melted butter, and two eggs until fully combined.
- Stir in the chocolate chips until evenly distributed throughout the batter.
- Spread the batter evenly into a greased 9 x 13-inch baking pan, or line with parchment paper for easier removal.
- Bake for 25 minutes or until a toothpick inserted into the center comes out clean.
- Allow to cool completely in the pan before cutting into 12 squares.


