


There are some recipes that just feel like a warm hug, aren’t there? Ones that bring back memories of Grandma’s kitchen, or that perfect rainy afternoon spent baking with your little ones. This recipe for cake mix cookie bars is exactly that for me. Honestly, if you told me I had to whip up a dessert in under 30 minutes, this would be my absolute go-to. It’s the kind of magic that happens when you take a humble box of cake mix and turn it into something truly special. Forget complicated pastry creams or fussy frosting; these bars are the definition of effortless deliciousness. They’re so simple, so satisfying, and seriously, they disappear faster than you can say “oops, I ate another one!” Think of them as your shortcut to pure, unadulterated joy, minus all the baking stress. If you’re a fan of my chewy Chocolate Chip Cookies but need something even quicker, you’re going to fall head over heels for these.
What are cake mix cookie bars?
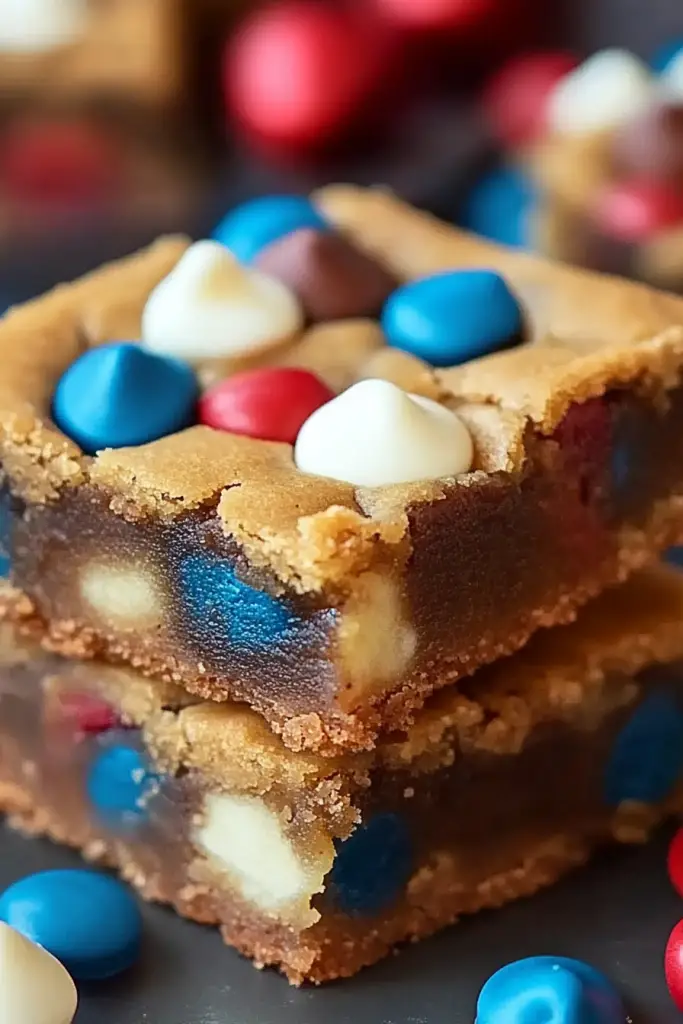
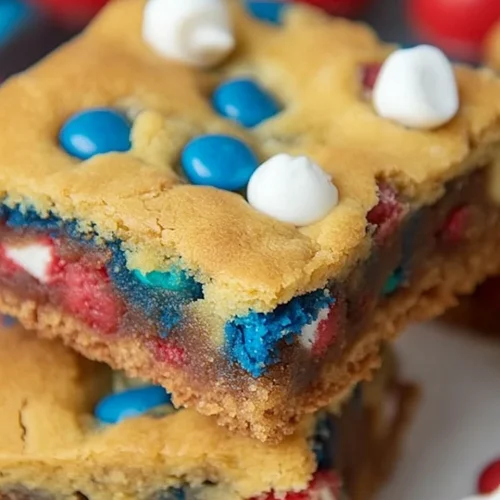
So, what exactly *are* cake mix cookie bars, you ask? Well, it’s pretty much exactly what it sounds like – a genius fusion of your favorite cookie and a perfectly moist cake, all baked together in one easy-to-handle pan! We start with a box of cake mix, which is the secret weapon here, providing the perfect base structure and flavor. Then, we add a few pantry staples – think butter, eggs, and a touch of vanilla – to transform that mix into a rich, tender cookie dough. Instead of scooping individual cookies, we press this dough into a baking pan, often with a delightful filling swirled in, and bake it all up. It’s like getting the best of both worlds: the chewiness and rich flavor of a cookie, with the easy, slice-and-serve convenience of a bar. It’s not quite a cake, not quite a cookie, but something wonderfully in-between that’s utterly irresistible. It’s essentially your favorite Chocolate Chip Cookie Dough, but transformed into a baked bar format with the help of a cake mix. Simple, right? And oh-so-good!
Why you’ll love this recipe?
What are some of the best reasons to make cake mix Cookie Bars?flavor is just incredible. Depending on the cake mix you choose – I usually lean towards yellow or vanilla, but chocolate is divine too! – you get this wonderfully sweet, comforting taste. The texture is also spot on: delightfully chewy in the middle with just a hint of crispness around the edges. And let’s talk about simplicity. This is a weeknight lifesaver, folks! You probably have most of the ingredients in your pantry right now. The “hands-on” time is minimal, and the baking process is so straightforward. It’s perfect for when you’re craving something sweet at 10 pm but don’t want to spend an hour baking a whole batch of cookies. Plus, they are incredibly cost-effectiveWhat I love about cake mix is that it is so easy to make.versatility. You can easily add in chocolate chips, nuts, sprinkles, or even swirl in some jam or caramel. They’re perfect for bake sales, potlucks, school lunches, or just a quiet afternoon treat with a cup of tea. They truly are a blank canvas for your sweet cravings, and because they’re so forgiving, they’re perfect for beginner bakers too. They’re like the ultimate comfort dessert that never lets you down.
How to Make Cake Mix Cookie Bars
Quick Overview
This recipe is all about speed and ease. You’ll simply mix a few ingredients into a Cake Mix to create a dough, press most of it into a pan, add a simple filling, top with the remaining dough, and bake until golden. It’s a no-fuss method that delivers maximum deliciousness with minimal effort. The beauty is in how few steps it takes to go from pantry staples to a warm, gooey dessert ready to be devoured.
Ingredients
For the Main Batter:
1 box (15.25 oz) yellow or vanilla Cake Mix (I find these give the best base, but feel free to experiment!)
1/2 cup (1 stick) unsalted butter, softened (make sure it’s softened, not melted, for the best texture)
2 large eggs
1 teaspoon pure vanilla extract (don’t skip this, it really boosts the flavor!)
For the Filling:
1 cup chocolate chips (milk chocolate, semi-sweet, or a mix – whatever makes you happy!)
Optional additions: 1/4 cup chopped nuts, sprinkles, a swirl of caramel sauce, or your favorite jam.
For the Glaze (Optional, but highly recommended!):
1 cup powdered sugar
2-3 tablespoons milk or cream (start with 2 and add more until you reach your desired drizzle consistency)
1/2 teaspoon vanilla extract
Step-by-Step Instructions
Step 1: Preheat & Prep Pan
First things first, let’s get your oven ready. Preheat it to 350 degrees F (175 degrees C). While the oven is heating up, grab an 8×8 inch or 9×9 inch baking pan. I like to lightly grease it with butter or baking spray, and then line it with parchment paper, leaving some overhang on the sides. This makes lifting the bars out a breeze later on. Trust me, future you will thank you for this easy removal step!
Step 2: Mix Dry Ingredients
In a large mixing bowl, empty your box of cake mix. Make sure there are no big clumps. This is just a quick step to ensure everything is ready for the wet ingredients. It’s so simple, you almost feel like you’re cheating, but that’s the beauty of it!
Step 3: Mix Wet Ingredients
In a separate, smaller bowl, whisk together the softened butter, the two large eggs, and the teaspoon of vanilla extract. Whisk until it’s well combined and has a smooth, creamy consistency. This is where you start bringing in that delicious, homemade flavor!
Step 4: Combine
Now, pour the wet ingredients into the bowl with the cake mix. Using a spatula or a wooden spoon, stir everything together until it forms a thick, slightly sticky dough. Don’t overmix! Just mix until you no longer see any dry streaks of cake mix. It should be pliable enough to press into the pan.
Step 5: Prepare Filling
If you’re adding anything extra to your filling, now’s the time to do it! Stir your chocolate chips (and any nuts or sprinkles you fancy) right into the dough mixture. If you’re going for a jam or caramel swirl, have it ready to go for the next step.
Step 6: Layer & Swirl
Take about two-thirds of your dough and press it evenly into the bottom of your prepared baking pan. It can be a little sticky, so wetting your fingers slightly or using a piece of parchment paper can help. Now, sprinkle your chocolate chips (if you didn’t mix them in) or dollop your jam/caramel over the base layer. If you didn’t mix chips in, you can also sprinkle them over the top of the base dough layer. Then, take the remaining one-third of the dough and crumble it over the top of the filling. You can also gently spread it out, or just leave it as crumbles for a rustic look. If you’re swirling, use a knife or skewer to gently swirl the jam/caramel into the top dough layer.
Step 7: Bake
Pop the pan into your preheated oven. Bake for about 25-30 minutes, or until the edges are golden brown and a toothpick inserted into the center comes out mostly clean (a few moist crumbs are okay, especially if you have chocolate chips!). Keep an eye on it; oven temperatures can vary, and you don’t want these to get too dark. The aroma filling your kitchen at this point is just heavenly!
Step 8: Cool & Glaze
Once baked, remove the pan from the oven and let it cool completely in the pan on a wire rack. This is crucial for the bars to set properly. If you try to cut them too soon, they’ll fall apart! Once cooled, whisk together the powdered sugar, milk (start with 2 tablespoons and add more if needed for thinner consistency), and vanilla extract for the glaze. Drizzle this over the cooled bars. The glaze adds that extra touch of sweetness and polish. Let the glaze set for about 15-20 minutes before slicing.
Step 9: Slice & Serve
Once the glaze has set, use the parchment paper overhang to lift the entire block out of the pan. Place it on a cutting board and slice into squares or bars. Serve them at room temperature for the best chewy texture. Enjoy every delicious bite!
What to Serve It With
These cake mix cookie bars are wonderfully versatile, fitting into almost any meal or occasion. For Breakfast, they’re a fantastic treat! Imagine a warm mug of coffee alongside a bar that tastes like a sweet morning pastry. They’re much quicker than making pancakes and just as satisfying. For Brunch, they add a lovely sweet element to the table. Serve them cut into smaller squares with a fruit salad or a yogurt parfait for a balanced spread. I love plating them on a nice platter with a few fresh berries on the side for a pop of color. As a Dessert, they’re pure indulgence. They pair beautifully with a scoop of vanilla ice cream, a drizzle of hot fudge, or even a dollop of whipped cream. They’re the perfect ending to any meal when you want something sweet but don’t want the fuss of a formal cake. And for Cozy Snacks, they are unbeatable. Grab a glass of cold milk, settle in with a good book, and enjoy a bar (or two!). My kids always ask for these after school, and they’re perfect with hot chocolate on a chilly evening. My family tradition is to have them on movie nights – they’re easy to eat without making a mess!
Top Tips for Perfecting Your Cake Mix Cookie Bars
Over the years, I’ve learned a few little tricks that help make these bars absolutely perfect every single time. When it comes to the cake mix itself, using a good quality mix is key – I usually stick with Betty Crocker or Duncan Hines, and I find yellow or vanilla gives a neutral, crowd-pleasing flavor. But if you love chocolate, go for chocolate cake mix and maybe add some chocolate chips for double the fun! For the butter, make sure it’s truly softened, not melted. Melted butter can make the bars spread too much and become greasy. Softened butter creates that perfect chewy texture. When you’re mixing the dough, resist the urge to overmix. Overmixing can develop the gluten too much, resulting in tougher bars. Just mix until everything is combined. For the filling, if you’re using jam or caramel, don’t go overboard. A little swirl is all you need to add that extra layer of flavor without making the bars too gooey or messy. I’ve tried this with a whole jar of jam once, and it was… a lot! A thin layer is definitely the way to go. When it comes to baking, ovens can be quirky. My best advice is to start checking for doneness around the 25-minute mark. You want the edges to be golden and set, but the center should still be slightly soft. They’ll continue to bake a bit as they cool. If you prefer a fudgier bar, bake them a minute or two less. For the glaze, consistency is key. Start with the lesser amount of milk and add more a teaspoon at a time until you reach a drizzling consistency. Too thin and it runs everywhere; too thick and it’s hard to spread. I’ve also found that sometimes adding a tiny pinch of salt to the glaze can really balance the sweetness. And a final, crucial tip: patience with cooling! I know it’s tempting, but letting them cool completely before slicing is the secret to clean, beautiful bars. If you try to cut them while warm, they’ll just crumble apart, and that’s no fun for anyone!
Storing and Reheating Tips
These cake mix cookie bars are pretty forgiving when it comes to storage, which is another reason I love them so much! For Room Temperature storage, I like to keep them in an airtight container. They’ll stay fresh and delicious for about 3-4 days, maintaining a lovely chewy texture. Just make sure they’re fully cooled before sealing them up, otherwise, you might get some condensation, which can make them a bit soggy. If you plan on adding the glaze, I recommend doing that just before serving if you’re storing them at room temp, as the glaze can sometimes get a bit sticky over time. For Refrigerator Storage, you can extend their life to about a week. Place them in an airtight container or wrap the pan tightly with plastic wrap and then foil. They’ll stay nicely moist. When you want to enjoy one, you can eat it cold, or let it sit out for about 15-20 minutes to come back to room temperature for that perfect chewy texture. Freezer Instructions are also a lifesaver! You can freeze these bars for up to 2-3 months. It’s best to slice them into individual bars first. Wrap each bar tightly in plastic wrap, then place them in a freezer-safe bag or container. To thaw, simply unwrap them and let them come to room temperature for an hour or two. If they have a glaze, it might get a little soft upon thawing, but they’ll still taste amazing! My tip for Glaze Timing is to only glaze them if you plan to eat them within a day or two, or if you’re storing them at room temperature. If freezing, it’s often better to glaze them after they’ve thawed, or simply dust them with powdered sugar for a pretty finish.
Frequently Asked Questions
Final Thoughts
So there you have it – the easiest, most satisfying cake mix cookie bars you’ll ever whip up! I truly hope you give these a try because they’re just one of those recipes that brings so much joy without any fuss. They’re proof that you don’t need to be a master baker to create something incredibly delicious that your friends and family will rave about. Whether you’re looking for a quick dessert for a busy weeknight, a potluck contribution that will disappear in minutes, or just a little something sweet to brighten your day, these bars are an absolute winner. If you loved this recipe, you might also enjoy my Fudgy Brownies or my Classic Blondies for more effortless sweet treats! I can’t wait to hear how yours turn out, so please leave a comment below and let me know your favorite variations or if you tried any fun add-ins! Happy baking!
Cake Mix Cookie Bars
Ingredients
Cookie Bars
- 1 box yellow cake mix
- 2 large eggs
- 0.5 cup vegetable oil
- 0.5 cup milk
Frosting (Optional)
- 1 container vanilla frosting (16 oz)
- 1 cup sprinkles (optional)
Instructions
Preparation Steps
- Preheat your oven to 350°F (175°C). Grease and flour a 9x13 inch baking pan.
- In a large bowl, combine the cake mix, eggs, vegetable oil, and milk. Mix until well combined and smooth.1 box yellow cake mix
- Spread the batter evenly into the prepared baking pan.
- Bake for 20-25 minutes, or until a toothpick inserted into the center comes out clean.
- Let the bars cool completely in the pan on a wire rack.
- Once cooled, spread the vanilla frosting evenly over the top. Decorate with sprinkles if desired.1 box yellow cake mix
- Cut into bars and serve.


