


Oh my goodness, where do I even begin with these peanut butter cookies? If you’ve been searching for that quintessential, chewy, soft, and utterly irresistible cookie that just screams “comfort,” then grab a cup of coffee, friend, because you’ve found it. These aren’t just any old peanut butter cookies; they’re the ones that bring back childhood memories, the kind that disappear from the cooling rack before they’ve even had a chance to fully set. My grandma used to make a similar recipe, and while hers was incredible, I’ve spent years tweaking and testing to get *just* the right balance of sweet, salty, and nutty. Trust me, these are easier than a classic chocolate chip cookie (no chilling required!) but deliver a flavor punch that’s simply unmatched. I’ve made these for countless potlucks, bake sales, and “just because” moments, and they always, always get rave reviews. Get ready to bake a little bit of happiness!
What is peanut butter cookie?
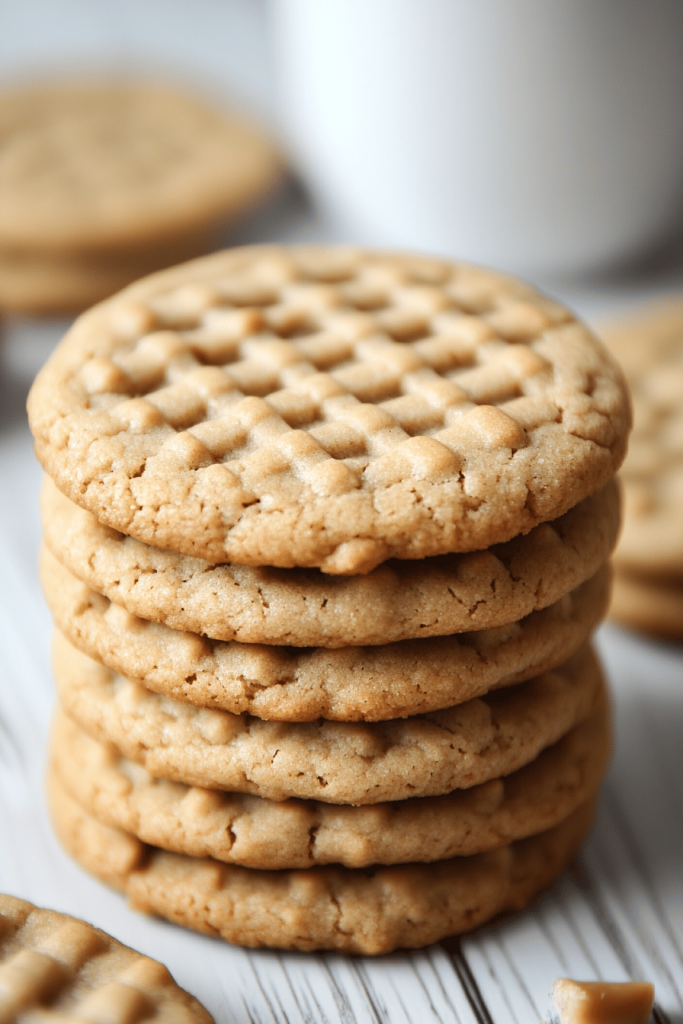
At its heart, a Peanut Butter Cookie is a delightful, chewy, and often slightly crumbly cookie where the star ingredient is, you guessed it, peanut butter! Think of it as a delicious, edible hug from your pantry. Unlike some other cookies that rely heavily on butter or shortening for their primary fat, these gems get their unique texture and rich flavor from the peanut butter itself. They’re traditionally marked with that distinctive crosshatch pattern, pressed gently onto the dough balls with a fork, which isn’t just for looks – it actually helps them bake evenly! It’s essentially a simple drop cookie, meaning you just scoop the dough onto a baking sheet, but the peanut butter gives it a density and chewiness that makes it stand out from the crowd. It’s a classic for a reason, a truly timeless treat that celebrates one of America’s favorite spreads in the most delicious way possible.

Why Do You Love Peanut Butter Cookies?
What I love most about these peanut butter cookies is how they consistently bring smiles. Seriously, they’re my secret weapon for cheering up a gloomy day or making any gathering feel a little more special. Let me tell you why I think you’ll fall head over heels for this recipe too:
- Flavor That Hugs You From Within: These cookies aren’t just “peanut buttery”; they’re intensely flavorful with that perfect balance of sweet and savory. The richness of the peanut butter is beautifully complemented by a hint of salt, creating a taste profile that’s both comforting and incredibly satisfying. They’ve got that nostalgic flavor that reminds you of simpler times, but with a grown-up chewiness that makes them truly special.
- Simplicity, Pure and Simple: What is simplicity? This recipe is a lifesaver on busy nights when a sweet craving hits, or when the kids suddenly declare they *need* cookies right now! You won’t find any complicated techniques here. It’s a straightforward mix-and-bake situation, perfect for beginners, but the results taste like you spent hours slaving away. Honestly, I’ve whipped up a batch in under 30 minutes from start to finish, including bake time!
- Budget-Friendly Goodness: You probably have most of these ingredients in your pantry right now! Peanut butter, flour, sugar, eggs – common staples that won’t break the bank. It’s an incredibly economical way to satisfy a dessert craving or prepare a treat for a crowd without needing a special grocery run.
- Unbelievably Versatile: While utterly perfect on their own, these peanut butter cookies are also fantastic as a base for so much more. Think ice cream sandwiches, crumbled over sundaes, or even dipped in chocolate (we’ll get to that later!). They hold their shape beautifully, making them ideal for gifting or packing in lunchboxes. My kids actually ask for these in their lunch more than store-bought options!
I’ve made countless cookie recipes, from fancy French macarons to simple oatmeal raisin, but these peanut butter cookies consistently rank at the top for sheer joy and ease. They’re truly a testament to how simple ingredients can create something extraordinary.
How to Make Peanut Butter Cookies
Quick Overview
Alright, let’s get down to the good stuff! Making these Peanut Butter Cookies is wonderfully straightforward. We’re going to combine a handful of pantry staples to create a rich, nutty dough, shape it into perfect little balls, give them their signature fork marks, and then bake them until they’re golden and chewy. The magic here is in the simplicity and the incredible flavor payoff for such little effort. You’ll be amazed at how quickly you can go from craving to enjoying a warm, fresh cookie right out of your oven. It’s one of those recipes that empowers you in the kitchen, making you feel like a baking pro even if you’re just starting out.
Ingredients
Organizing these by purpose helps make sure we don’t miss a thing! Quality ingredients truly make a difference, especially with something as classic as peanut butter cookies.
For the Main Batter:
- 1 cup (2 sticks) unsalted butter, softened: I always use unsalted so I can control the salt content myself. Make sure it’s properly softened – not melted, but pliable enough to leave an indent when you press it. This helps with creaming!
- 1 cup granulated sugar: For that classic sweetness.
- 1 cup packed light brown sugar: Adds moisture and a lovely caramel note, giving our peanut butter cookies that desirable chew.
- 1 large egg: Your binding agent! Make sure it’s at room temperature for better emulsion with the butter and sugars.
- 1 teaspoon vanilla extract: A must for enhancing all those other flavors. Use pure vanilla, you’ll taste the difference.
- 1 ½ cups creamy peanut butter: This is the star! I highly recommend using a processed, shelf-stable creamy peanut butter (like Jif or Skippy) for consistent results. Natural peanut butter can sometimes separate too much and lead to drier, more crumbly cookies.
- 2 cups all-purpose flour: The structure! Don’t pack it into the measuring cup; spoon it in and level it off.
- 1 teaspoon baking soda: Helps with rise and spread.
- ½ teaspoon salt: Crucial for balancing the sweetness and bringing out the peanut butter flavor. Don’t skip it!
For the Filling (Optional Add-ins):
- 1 cup chocolate chips (semi-sweet or milk chocolate): Because, well, chocolate and peanut butter are soulmates!
- ½ cup chopped roasted peanuts: For an extra nutty crunch, if you’re feeling adventurous.
- ½ cup chopped mini Reese’s peanut butter cups: A delightful indulgence that takes these cookies to the next level.
Choose your adventure here! You can go plain, or mix in any of these. I’ve found that a mix of chocolate chips and a few extra peanuts makes for a truly spectacular cookie.
For a Drizzle (Optional Glaze):
- ½ cup powdered sugar: For making a simple drizzle.
- 1-2 tablespoons milk (any kind): To thin the glaze to your desired consistency.
- ¼ teaspoon vanilla extract or a pinch of salt: For flavor in the drizzle.
- 2 ounces semi-sweet chocolate, melted: For a classic chocolate drizzle, which really elevates the presentation and taste.
If you want to dress them up a bit, a simple chocolate drizzle or a basic powdered sugar glaze can be beautiful. It’s not strictly necessary for the flavor, but it does make them feel extra special.
Step-by-Step Instructions
Step 1: Preheat & Prep Pan
First things first, let’s get that oven ready! Preheat your oven to 375°F (190°C). While it’s heating up, line two large baking sheets with parchment paper or silicone baking mats. This is a game-changer, trust me. It prevents sticking, ensures even baking, and makes for super easy cleanup. Don’t grease the pan directly; parchment is your best friend here. Having your pans ready means you can quickly scoop and bake, which is ideal for cookie dough!
Step 2: Mix Dry Ingredients
In a medium bowl, whisk together your all-purpose flour, baking soda, and salt. Give it a good whisk for about 30 seconds to a minute, making sure everything is thoroughly combined. This step is important because it evenly distributes the leavening and salt throughout the flour, so you don’t get a surprise pocket of salt or baking soda in one cookie! Set this aside for a moment.
Step 3: Mix Wet Ingredients
Now for the heart of our cookie dough! In a large bowl, using an electric mixer (stand mixer or hand-held works great), cream together your softened butter, granulated sugar, and light brown sugar. Beat them on medium speed until the mixture is light, fluffy, and pale, usually about 2-3 minutes. Scrape down the sides of the bowl periodically to ensure everything gets incorporated. Then, beat in the egg and vanilla extract until just combined. Finally, add the creamy peanut butter and beat until it’s fully incorporated and the mixture is smooth. This creaming process adds air, which helps make our cookies tender.
Step 4: Combine
With the wet ingredients beautifully combined, it’s time to bring in the dry mix. Gradually add the dry ingredients to the wet ingredients, mixing on low speed until just combined. Be careful not to overmix! Overmixing develops the gluten in the flour too much, which can lead to tough cookies. As soon as you see no more streaks of dry flour, stop the mixer. The dough will be thick and slightly crumbly, but should come together when pressed. This is where your peanut butter cookie magic truly begins!
Step 5: Prepare Filling (Optional Add-ins)
If you’re adding any “filling” like chocolate chips, chopped peanuts, or mini Reese’s cups, now’s the time! Gently fold them into the dough by hand using a spatula. This step is all about even distribution without overworking the dough. I always do this by hand to prevent crushing the add-ins and to keep the dough from getting too tough. Make sure those delicious morsels are scattered throughout so every bite has a little surprise!
Step 6: Shape the Cookies & Create the Crosshatch
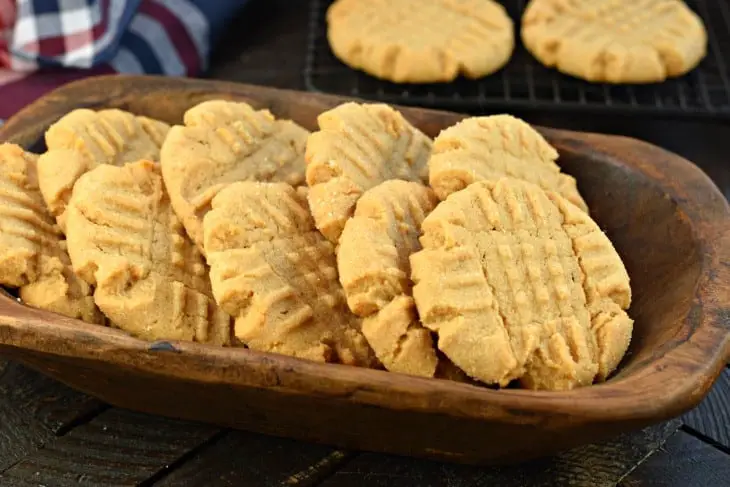
Now for the fun part – shaping! Scoop out tablespoon-sized portions of dough and roll them into smooth balls. Place them about 2 inches apart on your prepared baking sheets. This dough doesn’t spread a ton, but we still want to give them space. Now, for the signature look: gently press down on each cookie dough ball with the tines of a fork, first in one direction, then again, perpendicular to the first press, creating that classic crosshatch pattern. Don’t press too hard, just enough to flatten them slightly. This little trick helps them bake evenly and gives them that unmistakable peanut butter cookie charm!
Step 7: Bake
Pop those baking sheets into your preheated oven. Bake for 10-12 minutes, or until the edges are lightly golden and the centers look set but are still slightly soft. Ovens can vary, so keep an eye on them! My oven usually takes closer to 11 minutes for that perfect golden edge. When they come out, they might look a little underdone in the middle, but don’t worry – they’ll continue to set as they cool. Overbaking is the enemy of a soft, chewy peanut butter cookie, so err on the side of slightly less time if you’re unsure.
Step 8: Cool & Drizzle (Optional Glaze)
Once baked, let the peanut butter cookies cool on the baking sheets for about 5 minutes. They’re a bit delicate right out of the oven! After 5 minutes, carefully transfer them to a wire rack to cool completely. This cooling time on the rack is essential for them to firm up and reach that perfect chewy texture. If you’re going for an optional drizzle, wait until the cookies are completely cool. For a simple powdered sugar drizzle, whisk together the powdered sugar, milk, and vanilla/salt until smooth. For a chocolate drizzle, melt your chocolate (microwave or double boiler) and then use a spoon or a piping bag with a small hole to artfully drizzle it over the cooled cookies. Let the drizzle set before stacking or serving.
Step 9: Enjoy Your Hard Work!
Once they’re fully cooled (or once the drizzle has set), these peanut butter cookies are ready to be devoured! Grab one (or two, I won’t tell!), perhaps a glass of milk, and savor that incredible homemade goodness. They’re perfect for an afternoon treat, a lunchbox surprise, or even a late-night snack when that sweet tooth kicks in. This is truly where all your hard work pays off – the smell alone brings everyone to the kitchen, I promise!
What to Serve Your Peanut Butter Cookies With
These peanut butter cookies are fantastic on their own, but if you’re looking to elevate the experience, I’ve got some ideas that my family swears by. There’s something special about pairing a classic cookie with just the right companion:
For Breakfast (A Weekend Treat!):
- Coffee or Hot Tea: There’s nothing quite like dunking a slightly crumbly peanut butter cookie into a hot cup of coffee. The warmth and bitterness of the coffee perfectly cut through the cookie’s sweetness, making for an unexpectedly delightful morning moment. I always do this on lazy Sundays.
- A Glass of Milk: The ultimate classic pairing! A tall, cold glass of milk is the traditional partner for any cookie, and these peanut butter cookies are no exception. The creamy milk is just heavenly with the nutty, sweet cookie. My kids ask for this every time.
For Brunch (A Sweet Addition):
- Fruit Platter: Serve them alongside a colorful fruit platter with berries, sliced bananas, and grapes. The fresh fruit provides a lovely contrast to the richness of the cookie and adds a touch of elegance.
- Yogurt Parfait Bar: Crumble a few of these cookies over a yogurt parfait with granola and fruit. It adds an incredible texture and flavor dimension that’s surprisingly good.
As Dessert (The Main Event!):
- Vanilla Ice Cream Sandwich: This is a game-changer! Take two cooled peanut butter cookies and sandwich a scoop of good quality vanilla bean ice cream in between. Roll the edges in mini chocolate chips or sprinkles for an extra festive touch. It’s perfect when you’re craving something sweet and decadent.
- Chocolate Milkshake: Blend a few cookies into a chocolate milkshake for an ultimate peanut butter-chocolate dessert. It’s rich, creamy, and undeniably satisfying.
- Warm Berry Compote: A spoonful of warm, slightly tart berry compote (think raspberries or cherries) alongside a cookie provides a beautiful counterpoint to its sweetness.
For Cozy Snacks (Anytime Comfort):
- Hot Chocolate: On a chilly evening, a warm mug of hot chocolate with a peanut butter cookie (or two!) is pure bliss. It’s comfort food at its finest.
- As a Simple Pick-Me-Up: Honestly, sometimes the best pairing is simply a quiet moment to yourself with one of these cookies. They’re perfect when you’re craving something sweet at 10 pm but don’t want to bake a whole cake.
However you choose to enjoy them, these peanut butter cookies are guaranteed to make any occasion, big or small, a little bit sweeter.
Top Tips for Perfecting Your Peanut Butter Cookies
After countless batches of these peanut butter cookies (and maybe a few minor mishaps, oops!), I’ve gathered some wisdom that I just have to share. These little tricks can really make the difference between a good cookie and an absolutely unforgettable one:
Dough Consistency & Prep:
- Softened Butter is Key: I can’t stress this enough! Your butter needs to be properly softened, not melted or straight from the fridge. This ensures it creams beautifully with the sugars, incorporating air for a tender cookie. If it’s too cold, your dough will be dense; too warm, it’ll be greasy.
- The Right Peanut Butter: For this recipe, stick to creamy, processed peanut butter (like Jif or Skippy). Natural peanut butter, with its oil separation, can lead to a drier, more crumbly cookie that doesn’t hold its shape as well. I learned this the hard way after one too many flat, greasy batches!
- Don’t Overmix: As soon as the dry ingredients are just incorporated into the wet, stop mixing. Overworking the dough develops gluten, which can make your cookies tough instead of tender and chewy. A gentle touch here is rewarded with a perfect texture.
Perfecting the Crosshatch:
- Gentle Pressure: When making the fork marks, don’t press too hard. You want to flatten the cookie slightly, not smash it. The idea is to create a beautiful pattern that helps with even baking.
- Flour Your Fork: If your fork starts sticking to the dough, dip the tines in a little flour between each cookie. This prevents tearing and keeps your patterns neat and tidy.
Ingredient Swaps & Variations:
- Nut Butter Alternatives: While these are peanut butter cookies, you *can* experiment with other creamy nut butters like almond or cashew butter. Just be aware that the texture and flavor will be slightly different. I’ve tested with almond butter, and it actually made them a bit richer, but they spread a little more.
- Sweetness Adjustment: If you prefer your cookies less sweet, you can reduce the granulated sugar by ¼ cup without significantly impacting the texture. I wouldn’t recommend reducing the brown sugar, as it’s crucial for moisture and chewiness.
- Add-in Extravaganza: Don’t be afraid to customize! Besides chocolate chips or chopped peanuts, try adding toffee bits, white chocolate chips, or even a sprinkle of flaky sea salt on top before baking for a gourmet touch.
Baking Tips for Success:
- Don’t Overbake: This is the golden rule for chewy cookies! Peanut butter cookies are notorious for seeming underbaked when you pull them out. They will continue to set as they cool on the baking sheet. Look for lightly golden edges and centers that are just set. If they’re deeply golden all over, they’re likely overbaked and will be dry. This is perfect when you’re craving something sweet at 10pm but don’t want to bake a whole cake.
- Even Scoops: Use a cookie scoop if you have one. It ensures all your cookies are the same size, which means they’ll bake evenly and finish at the same time. No more burnt edges and raw centers!
- Rotate Your Pans: If your oven bakes unevenly, rotate your baking sheets halfway through the baking time. This helps ensure all cookies get that perfect golden hue.
Following these tips will consistently give you the most delicious, perfectly textured peanut butter cookies. These are all lessons I’ve learned from making this recipe countless times, and they’ve truly helped me perfect my cookie game!
Storing and Reheating Tips
If you’re lucky enough to have any leftover peanut butter cookies (they disappear fast at my house!), proper storage is key to keeping them fresh and delicious. Here’s what I’ve found works best:
Room Temperature Storage:
- Duration: These cookies stay beautifully fresh at room temperature for up to 3-4 days. They actually taste even better the day after they’re baked, as the flavors have a chance to meld!
- Covering Methods: Store them in an airtight container or a cookie jar with a tight-fitting lid. This prevents them from drying out and keeps them soft and chewy. I always do this to make sure they maintain that lovely texture.
- Freshness Maintenance: If you want to keep them extra soft, you can place a half-slice of bread in the container with the cookies. The cookies will absorb moisture from the bread, keeping them wonderfully tender.
Refrigerator Storage:
While you *can* store them in the fridge, I generally don’t recommend it for baked cookies unless your house is exceptionally warm or humid. The refrigerator can sometimes dry them out or make them a bit firm. If you must, store them in an airtight container for up to a week. Let them come to room temperature before enjoying for the best texture.
Freezer Instructions (Baked Cookies):
- Wrapping Techniques: These peanut butter cookies freeze beautifully! Once completely cooled, place them in a single layer on a baking sheet and freeze for about an hour until solid. Then, transfer the frozen cookies to a freezer-safe airtight container or heavy-duty freezer bag. You can also individually wrap them in plastic wrap before placing them in the container for extra protection against freezer burn.
- Duration: Stored properly, baked peanut butter cookies will stay fresh in the freezer for up to 2-3 months.
- Thawing Methods: To enjoy, simply pull out as many as you need and let them thaw at room temperature for about 30 minutes to an hour. They’ll taste almost as good as fresh-baked!
Freezer Instructions (Dough Balls):
This is a fantastic trick for fresh-baked cookies anytime! Shape the cookie dough into balls and make the crosshatch marks. Place them on a baking sheet and freeze until solid. Once frozen, transfer the dough balls to a freezer-safe bag. When you’re ready to bake, place the frozen dough balls directly on a prepared baking sheet and bake for an extra 2-4 minutes than the recipe calls for, no thawing needed! This one’s a lifesaver on busy nights.
Drizzle Timing Advice:
If you plan to add an optional chocolate or powdered sugar drizzle, do this *after* the cookies have cooled completely. If storing, make sure the drizzle is fully set before stacking or placing in a container to prevent smudging.
Frequently Asked Questions
Final Thoughts
So there you have it, my absolute favorite recipe for peanut butter cookies. This one’s more than just a recipe to me; it’s a little piece of comfort, a reliable crowd-pleaser, and a memory-maker. The way the kitchen smells when these are baking, that perfect balance of sweet and salty, the soft, chewy texture – it’s just pure magic. I’ve made these countless times and they never fail to bring a smile to my face, and hopefully, to yours too. They’re a true testament to the simple joy of home baking, reminding us that sometimes the simplest treats are the most satisfying. So go ahead, whip up a batch, share them with someone you love, or hoard them all for yourself (I won’t judge!). If you enjoyed this, you might also love my classic chewy oatmeal cookies or my double chocolate fudge brownies! Can’t wait to hear how yours turn out!
peanut butter cookies
Ingredients
Main Ingredients
- 2.5 cups all-purpose flour
- 1 teaspoon baking powder
- 1 teaspoon baking soda
- 0.5 teaspoon kosher salt
- 1 cup unsalted butter softened
- 1.5 cups granulated sugar divided
- 0.75 cup light brown sugar packed
- 2 large eggs
- 2 cups creamy peanut butter
- 1 teaspoon vanilla extract
Instructions
Preparation Steps
- In a bowl, combine flour, baking powder, baking soda, and salt. Set aside.
- In a large mixing bowl, beat butter with 1 cup of granulated sugar and brown sugar until creamy.
- Add eggs, vanilla extract, and peanut butter to the butter mixture. Mix until combined. Slowly add in flour mixture, blending until combined but do not overbeat. The dough will come together.
- Cover the bowl with plastic wrap and refrigerate the cookie dough for one hour.
- Preheat oven to 350°F. Place the remaining 0.5 cup sugar into a small bowl. Using a 2 tablespoon cookie scoop, scoop dough and roll into balls. Roll each ball in the sugar and place on a parchment-lined baking sheet.
- Use the tines of a fork to press criss-cross marks on each cookie ball.
- Bake the cookies in the preheated oven for 10-12 minutes. Remove and cool on a wire rack. Enjoy!


