


There are brownies, and then there are *brownies*. The kind that stop you in your tracks, the ones with that perfect crinkly top, a chewy-gooey center, and a rich, deep chocolate flavor that just screams comfort. I’m talking about bakery-style brownies, the kind you dream about after a long day or when you need a serious pick-me-up. Honestly, I used to think those perfect brownies were only achievable in a professional kitchen, shrouded in mystery and secret techniques. But trust me, after years of tinkering and a few epic baking fails (we’ll get to those!), I’ve cracked the code. This recipe is my absolute go-to. It’s the one I whip up when company is coming, when my sweet tooth is demanding immediate attention, or when I just want to feel like I’ve accomplished something truly delicious. Forget those cakey, dry imposters; this is the real deal. You know, like the ones at your favorite local bakery that you always hesitate to ask the price of because you know they’re worth every penny. Well, guess what? You can make them right in your own kitchen!
What are bakery-style brownies?
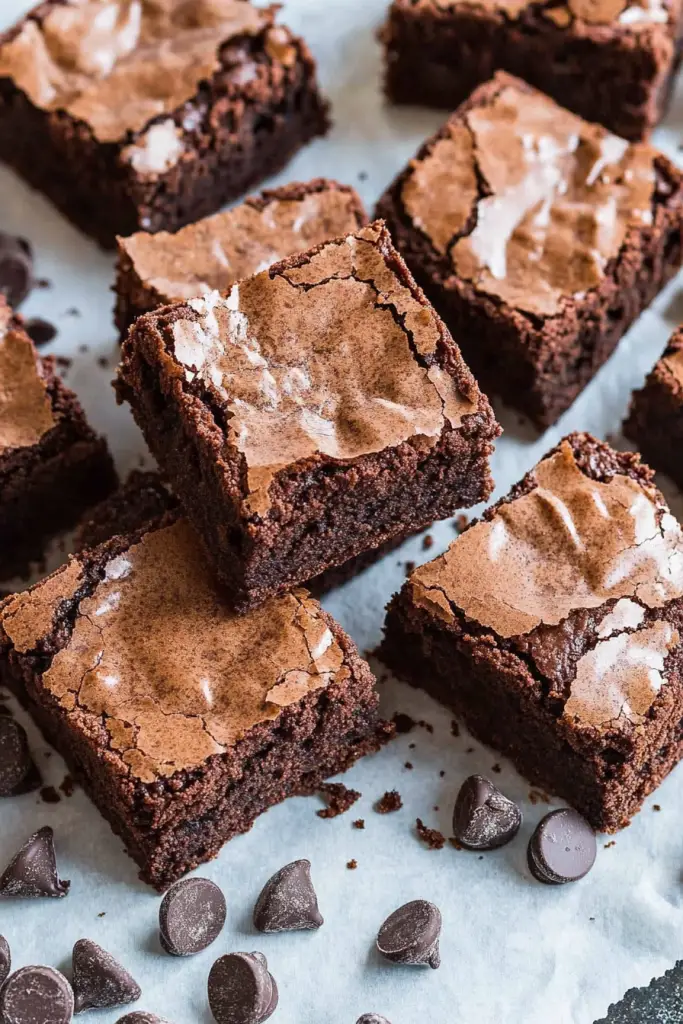
So, what exactly makes a brownie “bakery-style”? It’s all about that texture and flavor profile. Think of them as the sophisticated cousin to your everyday brownie. They’re not cakey at all; instead, they boast a dense, fudgy interior with a slightly chewy texture. The magic often comes from a higher ratio of fat (butter and eggs) to flour, and sometimes using melted chocolate in addition to cocoa powder for an even richer taste. And that glorious, crackly top? That’s the hallmark of a truly great brownie, achieved through a specific mixing technique and the right balance of ingredients. It’s essentially a chocolate lover’s dream come true, a decadent treat that’s intensely chocolatey without being overly sweet. It’s the kind of brownie that makes you close your eyes with the first bite and just savor every single morsel.
Why you’ll love this recipe?
Why is this recipe so special?
First and foremost, the **flavor**. It’s unapologetically chocolatey. We’re using both unsweetened cocoa powder for that deep, intense base and good-quality Dark Chocolate for an extra layer of richness. It’s not just sweet; it’s complex, with a delightful bittersweet undertone that makes you want another bite, and another. It’s the kind of flavor that lingers just long enough to make you happy.
Then there’s the **simplicity**. Despite their fancy bakery appearance, these brownies are surprisingly easy to make. There’s no complicated creaming of butter and sugar, no resting doughs. It’s a one-bowl wonder for the most part, and the steps are so straightforward, even if you’re new to baking, you’ll nail it. I’ve had friends who swore they couldn’t bake make these and they were raving about them! It’s genuinely a lifesaver on those nights when a serious chocolate craving hits but you don’t have hours to spend.
And the **cost-efficiency**! Compared to buying a single, fancy brownie from a bakery, making a whole batch of these at home is incredibly budget-friendly. The ingredients are mostly pantry staples, and the results are so far beyond what you’d get for a few dollars at a coffee shop. It feels like a little luxury that you’ve created yourself, which is always the best kind.
What I love most about these bakery-style brownies, though, is their **versatility**. They’re perfect on their own, obviously. But they also play really well with others. Have them with a scoop of vanilla bean Ice Cream, drizzle a little caramel sauce over them, or even crumble them into a milkshake. They’re fantastic for a quick dessert, a thoughtful gift, or just an everyday indulgence. This recipe truly stands out because it delivers that quintessential bakery brownie experience without any fuss. It’s the perfect balance of decadent and doable.
How do I make a bakery brownie?
Quick Overview
This recipe is all about building layers of chocolatey goodness and achieving that perfect texture. We’ll start by melting butter and chocolate, then whisking in sugar and eggs to create a glossy base. Dry ingredients are gently folded in, followed by a quick, magical swirl of something extra delicious before baking. The key is not to overmix, which keeps them fudgy and rich. It’s a simple, streamlined process that yields incredibly impressive results. You’ll be amazed at how quickly you can go from basic ingredients to these gorgeous, bakery-worthy treats.
Ingredients
For the Main Batter:
- 1 cup (2 sticks or 226g) unsalted butter: I always opt for good quality unsalted butter. It makes a difference in flavor!
- 8 ounces (226g) bittersweet or semi-sweet chocolate, chopped: Use chocolate you love to eat! I prefer a 60-70% cacao content for that perfect balance.
- 1 ½ cups (300g) granulated sugar: This helps with that signature crinkly top.
- 2 teaspoons vanilla extract: Pure vanilla extract is a must for enhancing all those chocolate notes.
- 3 large eggs, at room temperature: Room temperature eggs emulsify better, leading to a smoother batter and a richer texture.
- ¾ cup (90g) unsweetened cocoa powder: Dutch-processed cocoa powder will give you a darker color and a smoother, less acidic flavor.
- ½ cup (65g) all-purpose flour: Just enough to bind everything together without making them cakey.
- ¼ teaspoon salt: Crucial for balancing the sweetness and bringing out the chocolate flavor.
For the Filling (Optional, but highly recommended!):
- ½ cup Creamy Peanut Butter, almond butter, or Nutella: This is where you can really customize! Just make sure it’s smooth and well-stirred.
For the Glaze (Optional, for that extra bakery touch):
- ½ cup powdered sugar: Sifted for a smooth finish.
- 1-2 tablespoons milk or cream: Start with one and add more until you reach your desired drizzling consistency.
- ½ teaspoon vanilla extract: For a hint of sweetness.
Step-by-Step Instructions
Step 1: Preheat & Prep Pan
First things first, let’s get your oven ready. Preheat it to 350°F (175°C). Now, grab a 9×13 inch baking pan. The secret to easy removal and those perfectly neat edges? Line it with parchment paper, leaving an overhang on all sides. This is what I call the “sling” method, and it’s a lifesaver for getting those brownies out cleanly. You can grease the pan first if you like, but the parchment does most of the heavy lifting. Don’t skip this parchment paper step – it’s a game-changer!
Step 2: Mix Dry Ingredients
In a medium bowl, whisk together your unsweetened cocoa powder, all-purpose flour, and salt. Give it a really good whisk until everything is well combined and there are no lumps of cocoa powder hiding. This ensures that the flour and cocoa are evenly distributed throughout the batter, which is key for consistent texture and flavor in every single bite. I always sift my cocoa and flour together here, just to be extra sure, though a good whisk often does the trick.
Step 3: Mix Wet Ingredients
Now for the heart of the brownie! In a large, heatproof bowl set over a saucepan of simmering water (a double boiler setup), melt together your chopped chocolate and unsalted butter. Stir gently until it’s smooth and glossy. Once melted, remove the bowl from the heat. Whisk in the granulated sugar and vanilla extract until well combined. Let this mixture cool slightly for about 5 minutes – you don’t want it too hot when you add the eggs.
Step 4: Combine
This is where the magic really starts to happen. Add the eggs, one at a time, to the slightly cooled chocolate mixture, whisking well after each addition until fully incorporated. You’re looking for a thick, glossy batter. Now, add the bowl of dry ingredients to the wet ingredients. Using a spatula or a wooden spoon, gently fold them together. Mix *just until* no dry streaks of flour remain. Seriously, resist the urge to overmix! Overmixing develops the gluten in the flour, which can lead to tougher brownies. We want fudgy and tender, so a few small lumps are perfectly fine. The batter will be thick.
Step 5: Prepare Filling
If you’re using a filling like Peanut Butter or Nutella, it’s time to get that ready. You don’t need to do much here. If your peanut butter or Nutella is very stiff, you can warm it slightly for about 10-15 seconds in the microwave to make it more pourable. This just helps it swirl more easily into the brownie batter. Make sure it’s smooth and ready to go.
Step 6: Layer & Swirl
Pour about half of your Brownie Batter into your prepared baking pan and spread it evenly. If you’re using a filling, dollop spoonfuls of it over the batter in the pan. Now, pour the remaining brownie batter over the filling, trying to cover as much of it as possible. Grab a knife or a skewer and gently swirl the filling into the brownie batter. Don’t over-swirl; you want distinct ribbons of filling, not a completely uniform mixture. A few gentle turns are all you need to create those beautiful patterns.
Step 7: Bake
Pop your pan into the preheated oven. Bake for 25-30 minutes. The edges should look set, and a toothpick inserted into the center should come out with moist crumbs attached, but not wet batter. If it comes out completely clean, they might be slightly over-baked for that perfect fudgy center. I usually check around the 25-minute mark, because ovens can vary so much. It’s better to underbake them slightly than to overbake them!
Step 8: Cool & Glaze
This is arguably the hardest part: waiting! Let the brownies cool completely in the pan on a wire rack. I know, it’s torture, but this is crucial for them to set up properly. Once they’re completely cool, you can prepare the glaze. Whisk together the powdered sugar, 1 tablespoon of milk, and vanilla extract. Add more milk, a teaspoon at a time, until you reach a drizzly consistency. Drizzle this over the cooled brownies. Let the glaze set for about 15-20 minutes before slicing.
Step 9: Slice & Serve
Once the glaze has set, use the parchment paper overhangs to lift the entire brownie slab out of the pan onto a cutting board. Use a sharp knife to cut them into squares. For the cleanest cuts, wipe your knife clean with a damp cloth between slices. Serve them at room temperature. The smell alone as you slice them will have everyone rushing to the kitchen!
What to Serve It With
These bakery-style brownies are showstoppers on their own, but they also play wonderfully with a few other treats. Here are some of my favorite ways to serve them:
For Breakfast: Okay, hear me out! A small piece of a brownie alongside a really good cup of coffee is a decadent start to any day. I love pairing it with a strong black coffee or a creamy latte. You could also serve a tiny piece with a dollop of Greek yogurt and some fresh berries for a slightly healthier (but still indulgent) morning treat.
For Brunch: These are perfect for a weekend brunch spread. They look so elegant when cut into neat squares and arranged on a platter. Serve them alongside other brunch favorites like pancakes, fruit salad, or quiche. A mimosa or a glass of bubbly also pairs beautifully with the rich chocolate flavor.
As Dessert: This is their natural habitat, right? Serve them warm (gently reheated for a few seconds in the microwave) with a scoop of high-quality vanilla bean ice cream. A drizzle of raspberry coulis or some fresh raspberries on the side adds a lovely tart contrast to the sweet, fudgy brownie. For a more sophisticated dessert, try them with a dollop of whipped cream infused with a touch of espresso powder.
For Cozy Snacks: Sometimes, you just need a brownie. On a rainy afternoon or a chilly evening, there’s nothing better than curling up with one of these. I love to pair them with a tall glass of cold milk – a classic for a reason! They’re also fantastic crumbled over a bowl of homemade chocolate pudding or even stirred into a mug of hot chocolate for an extra boost of chocolatey goodness. My kids always ask for these when they have friends over, and they disappear in minutes!
Top Tips for Perfecting Your Bakery-Style Brownies
I’ve made these brownies more times than I can count, and over the years, I’ve picked up a few tricks that I think make all the difference. Here are my top tips to ensure your bakery-style brownies turn out absolutely perfect every single time:
Zucchini Prep: Wait, zucchini? Oh, my apologies, I think I got my brain wires crossed there for a second! We’re making brownies, not zucchini bread! Let me refocus. My apologies! For these brownies, there’s no zucchini involved. The key is actually in the chocolate and butter. Make sure you use good quality chocolate, as it really impacts the final flavor. And when melting it with butter, stir gently and don’t let it scorch. A slightly cooled, glossy melted chocolate mixture is your friend.
Mixing Advice: The biggest pitfall with brownies is overmixing the batter once the flour is added. It develops gluten, making them tough. Gently fold the dry ingredients into the wet *just until* you no longer see streaks of flour. A few small lumps are totally okay and even desirable for that fudgy texture. Trust me on this one – your brownies will thank you!
Swirl Customization: If you’re adding a filling, don’t go overboard with swirling. You want to see distinct ribbons of flavor and texture. Think gentle swirls with a knife or skewer, just a few passes. Too much swirling and you’ll lose that beautiful marbling effect. You can experiment with different fillings too – a raspberry jam swirled in is divine, or even a caramel sauce for extra decadence.
Ingredient Swaps: While this recipe is fantastic as is, you can play with it! For a darker, richer brownie, use Dutch-processed cocoa powder. For a slightly less sweet but still intensely chocolatey result, use a higher cacao percentage chocolate (70% or more). If you don’t have all-purpose flour, a good quality gluten-free all-purpose blend usually works well, though the texture might be slightly different. I tested this recipe once with a touch of espresso powder in the batter, and it really amplified the chocolate flavor beautifully – try it!
Baking Tips: The baking time is crucial for fudgy brownies. They should look set around the edges but still slightly gooey in the center. A toothpick test is your best friend here. It should come out with moist crumbs, not completely clean. Ovens vary, so start checking at the lower end of the baking time (around 25 minutes). It’s always better to underbake slightly than to overbake for fudgy brownies.
Glaze Variations: The glaze is optional but adds that extra touch of bakery polish. If you prefer a thinner glaze, just add a touch more milk. For a richer glaze, use cream instead of milk. You can also add a pinch of sea salt to the glaze for a salted caramel effect, or even a tiny drop of peppermint extract for a festive twist.
Storing and Reheating Tips
Keeping these bakery-style brownies fresh and delicious is pretty straightforward, but a few pointers will ensure they maintain their perfect texture. It’s honestly rare that we have leftovers, but when we do, here’s what I do:
Room Temperature: If you’ve got a little stash that you want to keep accessible, store them in an airtight container at room temperature. They’ll stay wonderfully fudgy and delicious for about 3-4 days. Make sure the container is well-sealed to prevent them from drying out. I find a simple plastic food container or even wrapping them tightly in plastic wrap works well.
Refrigerator Storage: For longer storage, the refrigerator is your best friend. Wrap individual brownies or the entire slab tightly in plastic wrap, then place them in an airtight container. They’ll keep well in the fridge for up to a week. The texture might firm up a bit when chilled, but don’t worry, they’re still incredibly tasty.
Freezer Instructions: Want to stash these away for a serious future craving? Freeze them! Wrap each brownie (or cut them into portions first) very tightly in plastic wrap, then in aluminum foil, and finally place them in a freezer-safe bag or container. They can last for up to 2-3 months in the freezer. To thaw, simply unwrap them and let them come to room temperature on the counter for an hour or two. They thaw beautifully!
Glaze Timing Advice: If you’re planning to store your brownies for more than a day or two, especially if refrigerating or freezing, I recommend adding the glaze just before serving. The glaze can sometimes become sticky or slightly gummy if stored for extended periods. If they are glazed and you need to store them, room temperature is best for the first couple of days.
Frequently Asked Questions
Final Thoughts
There you have it – my absolute favorite recipe for bakery-style brownies! I truly believe this recipe strikes the perfect balance between that irresistible fudgy texture, rich chocolate flavor, and that beautiful crinkly top that just makes a brownie sing. It’s a recipe that has brought so much joy to my kitchen, and I really hope it does the same for yours. Whether you’re a seasoned baker or just starting out, these brownies are surprisingly approachable and deliver results that are truly impressive. They’re proof that you don’t need a fancy bakery to enjoy a truly spectacular treat.
If you love rich, chocolatey desserts, you might also enjoy my recipe for Decadent Chocolate Lava Cakes or my Chewy Oatmeal Raisin Cookies for a different kind of comfort. I can’t wait to hear what you think of these brownies! Please leave a comment below to share your experience, any fun variations you tried, or how quickly they disappeared in your house – I love hearing all your baking stories!
Happy baking!
bakery-style brownies
Ingredients
Main Ingredients
- 0.75 cup unsalted butter, melted
- 1.5 cup granulated sugar
- 0.5 cup unsweetened cocoa powder
- 0.5 teaspoon salt
- 1 teaspoon vanilla extract
- 2 large eggs
- 0.5 cup all-purpose flour
- 0.5 cup chocolate chips optional
Instructions
Preparation Steps
- Preheat your oven to 350°F (175°C). Grease and flour a 9x13 inch baking pan.
- In a large bowl, whisk together the melted butter and granulated sugar. Stir in the cocoa powder and salt until well combined.
- Stir in the vanilla extract. Then, whisk in the eggs one at a time until fully incorporated.
- Gently fold in the flour until just combined. Do not overmix. If using, stir in the chocolate chips.
- Pour the batter into the prepared baking pan and spread evenly.
- Bake for 25-30 minutes, or until a toothpick inserted into the center comes out with moist crumbs (not wet batter).
- Let the brownies cool completely in the pan before cutting into squares.


