


There are certain recipes that just… stick with you. They become part of your kitchen’s heartbeat, whispered about during family dinners, and requested with unwavering enthusiasm. For me, that recipe is this glorious skillet pancake bake. It’s the kind of thing I whip up when I’m feeling particularly indulgent, or honestly, when I just need a little bit of magic to start my day. You know those mornings when the alarm clock feels like a personal attack, and the idea of standing at the stove flipping individual pancakes seems like an Olympic sport? Yeah, this is my secret weapon for those days. It’s got all the cozy, comforting vibes of a classic pancake, but with none of the fuss. Think of it as a giant, fluffy pancake baked to golden perfection right in your skillet. It’s truly a lifesaver, and the smell that fills the house? Absolutely divine.
What is a skillet pancake?
So, what exactly is a skillet pancake bake, you ask? It’s exactly what it sounds like! Instead of the traditional method of pouring batter onto a griddle or frying pan one scoop at a time, you pour all your glorious pancake batter into a single oven-safe skillet, often with a delicious filling swirled through it, and then you bake it until it’s puffed up and golden brown. It’s essentially one giant, magnificent pancake that comes out of the oven looking like a beautiful, edible cloud. The name itself conjures up images of rustic charm and comforting warmth, right? It’s not some fancy, complicated pastry; it’s a humble yet utterly delicious dish that’s incredibly forgiving. It’s the kind of recipe that makes you feel like a kitchen wizard, even if you’re just starting out. It’s a beautiful fusion of a Dutch baby’s dramatic puff and a classic pancake’s familiar comfort.
Why you’ll love this recipe?
Oh, where do I even begin with why this skillet pancake bake is my go-to? First off, the **flavor**. It’s everything you love about a perfect pancake – tender, slightly sweet, with those lovely browned edges that get just a little bit crisp. But it’s the texture that really seals the deal. It bakes up so beautifully fluffy and airy, almost like a giant soufflé-pancake hybrid. Then there’s the **simplicity**. Seriously, you mix up a batter that’s practically identical to your regular pancake batter, pour it into a skillet, and let the oven do the hard work. It’s a game-changer on busy mornings. I’ve tested this countless times, and I can confidently say it’s one of the easiest, most rewarding things I make. And let’s talk about **cost-efficiency**. The ingredients are all pantry staples – flour, eggs, milk, a little sugar and butter. You probably have everything you need right now! It’s so much more economical than buying fancy brunch items. Plus, the **versatility** is off the charts. You can customize the fillings, the glazes, the toppings – the possibilities are endless! It’s perfect for a weekend brunch, a special occasion breakfast, or even a sweet treat after dinner. What I love most about this is that it feels both comforting and special, all at the same time. It’s a crowd-pleaser, for sure. My kids devour it, and my friends always ask for the recipe after their first bite. It’s truly a winner in every sense of the word.
How do you make a skillet pancake?
Quick Overview
Making this skillet pancake bake is surprisingly straightforward. You’ll whisk together your batter, prepare a simple, delightful filling, and then pour everything into a preheated, buttered oven-safe skillet. Pop it into a hot oven, and watch the magic happen as it puffs up and turns golden. A quick glaze is optional but highly recommended for that extra touch of decadence. It’s a hands-off baking process for the most part, meaning you can enjoy your morning coffee while it bakes to perfection. The beauty of this method is the even cooking and the wonderful texture it achieves that you just can’t get from stovetop flipping.
Ingredients
For the Main Batter:
This is your classic pancake base, elevated! I always make sure my eggs are at room temperature; it seems to help everything emulsify better. And using whole milk really gives it a richer flavor, but I’ve found 2% works beautifully too if that’s what you have on hand. For the flour, all-purpose is perfect, but if you’re feeling adventurous, a little whole wheat or even some almond flour mixed in can add a nice nutty depth. The baking powder is crucial for that beautiful lift and fluffy texture, so don’t skimp on it! Make sure it’s fresh.
* 1 ½ cups all-purpose flour
* 3 tablespoons granulated sugar
* 2 teaspoons baking powder
* ½ teaspoon salt
* 2 large eggs, room temperature
* 1 ¼ cups milk (whole milk is best, but 2% or even almond milk works!)
* 2 tablespoons unsalted butter, melted, plus more for greasing the pan
* 1 teaspoon vanilla extract
For the Filling:
This is where you can really play! My absolute favorite is a simple cinnamon-sugar swirl, but fruit is divine too. I love using fresh or frozen berries – they release their juices as they bake and create little pockets of sweetness. If you’re using frozen berries, don’t thaw them first; just toss them with a little sugar and flour to prevent them from bleeding too much. For a chocolate lover, a sprinkle of chocolate chips is always a win. For this recipe, we’ll go with a classic cinnamon-sugar swirl, because it’s just so comforting.
* 2 tablespoons unsalted butter, softened
* 3 tablespoons Brown Sugar, packed
* 1 tablespoon ground cinnamon
For the Glaze:
This is totally optional, but it takes the whole thing to another level. It adds a lovely sheen and a touch more sweetness. You can make it as thick or as thin as you like by adjusting the amount of milk. I usually aim for a consistency that drizzles nicely but doesn’t run off completely. It should look like liquid gold!
* 1 cup powdered sugar
* 2-3 tablespoons milk
* ½ teaspoon vanilla extract (optional)
Step-by-Step Instructions
Step 1: Preheat & Prep Pan
This is super important for getting that beautiful rise and golden crust. You want to preheat your oven to a nice, hot 425°F (220°C). While the oven is heating, take your oven-safe skillet (a 10-inch cast iron skillet is my absolute favorite for this, but any oven-safe skillet will do) and generously butter it. I mean, really butter it up! Don’t be shy. You want those sides coated so the pancake doesn’t stick and gets a lovely crisp edge. Pop the buttered skillet into the preheating oven for about 5-10 minutes. This gets the pan screaming hot, which is key for that dramatic puff when the batter hits it.
Step 2: Mix Dry Ingredients
In a large bowl, whisk together the flour, granulated sugar, baking powder, and salt. Give it a good whisk to make sure everything is evenly distributed. This ensures that the leavening agent (baking powder) is spread throughout, so you get a nice, even rise. It also helps to break up any little clumps of flour. Don’t skip this step, it really does make a difference in the final texture!
Step 3: Mix Wet Ingredients
In a separate medium bowl, whisk together the eggs, milk, melted butter (make sure it’s not too hot or it will scramble the eggs!), and vanilla extract. Whisk until it’s all smooth and well combined. You’ll notice the mixture will be a lovely pale yellow color. This is where all the moisture and richness comes from, so make sure it’s fully incorporated.
Step 4: Combine
Now, pour the wet ingredients into the dry ingredients. Using a whisk or a spatula, mix gently until *just* combined. It’s okay if there are a few lumps! Seriously, do NOT overmix. Overmixing develops the gluten in the flour, which can lead to a tough, rubbery pancake. We want fluffy and tender, so stop mixing as soon as you don’t see any big streaks of dry flour. A few small lumps are perfectly fine and actually desirable!
Step 5: Prepare Filling
In a small bowl, combine the softened butter, Brown Sugar, and cinnamon. Use a fork or your fingers to mash it all together until it forms a paste-like consistency. This cinnamon-sugar mixture is what will create those gorgeous swirls throughout your pancake. You can add a tiny pinch of nutmeg here too if you like a little extra spice!
Step 6: Layer & Swirl
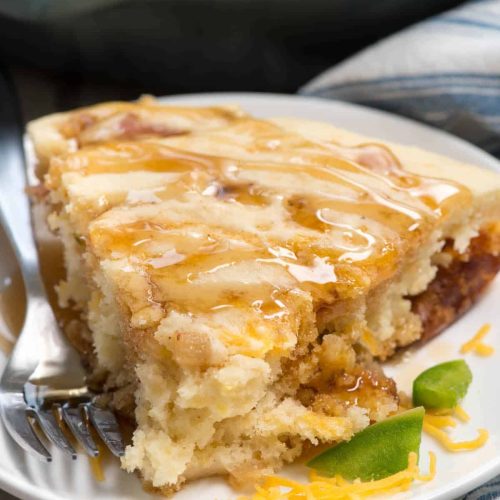
Carefully remove the hot skillet from the oven using oven mitts. Pour about two-thirds of your pancake batter into the hot skillet. It will sizzle a bit, which is what we want! Dollop spoonfuls of the cinnamon-sugar filling over the batter. Now, pour the remaining batter over the filling. Don’t worry if it doesn’t cover it perfectly; the swirls will peek through. You can use a toothpick or a skewer to gently swirl the filling into the batter, creating beautiful patterns. Don’t over-swirl, or you’ll lose the definition.
Step 7: Bake
Immediately place the skillet back into the hot oven. Bake for 15-20 minutes, or until the pancake is puffed up, golden brown around the edges, and a toothpick inserted into the center comes out clean. The center might still look a little moist, but it will continue to cook as it cools. Keep an eye on it towards the end of baking to prevent it from getting too dark. Ovens can be finicky, so the time is a guideline!
Step 8: Cool & Glaze
Once baked, carefully remove the skillet from the oven. Let it cool in the skillet for about 5-10 minutes. This is crucial! If you try to remove it too soon, it might deflate. While it’s cooling, whisk together the powdered sugar, milk, and vanilla for the glaze until smooth. If it’s too thick, add a tiny bit more milk; if it’s too thin, add more powdered sugar. Drizzle the glaze over the slightly cooled pancake. It’s so satisfying to watch it cascade down the sides!
Step 9: Slice & Serve
After glazing, let it cool for another few minutes before slicing. You can slice it right in the skillet, like a pie, or carefully invert it onto a serving platter if you’re feeling brave (and have greased your pan really well!). Serve warm, perhaps with a dollop of whipped cream, fresh berries, or a drizzle of maple syrup. It’s pure comfort on a plate!
What to Serve It With
This skillet pancake bake is so versatile, it fits right in with any meal. For **Breakfast**, a strong cup of coffee is practically mandatory, and a sprinkle of powdered sugar is a simple, elegant touch that makes it feel special. I love serving it with a side of crispy bacon or some fresh fruit salad to balance out the sweetness. When we’re doing **Brunch**, I like to go all out with some mimosas or a pitcher of iced tea. Plating it nicely with a few fresh berries and a dusting of powdered sugar makes it look restaurant-worthy. For a more indulgent **Dessert**, it’s fantastic with a scoop of vanilla bean Ice Cream melting into the warm pancake, or a drizzle of warm chocolate ganache. The contrast of warm and cold is just divine! And for those **Cozy Snacks** afternoons, it’s perfect served warm with a glass of milk or a cup of hot chocolate. Honestly, my family’s tradition is to have this on Sunday mornings, and we just gather around the table, dig in with forks, and chat about our week. It’s simple, unpretentious, and always a hit. I’ve also tried it with a drizzle of honey and a scattering of toasted nuts, which is absolutely divine.
Top Tips for Perfecting Your Skillet Pancake Bake
I’ve made this more times than I can count, and along the way, I’ve picked up a few tricks that really make a difference. Here are my top tips to ensure your skillet pancake bake is an absolute triumph:
Zucchini Prep: Wait, zucchini? Did I miss something? Oh, you might be thinking of my Zucchini bread! This is the pancake bake, no zucchini here! My apologies, my mind wandered to another favorite. For *this* recipe, the key is really in the pan preparation. Make sure that skillet is well-greased and HOT. I can’t stress that enough! The hot pan is what gives it that initial puff and crispy bottom. When you take it out of the oven, give it a minute or two to settle before you go in with the glaze. Trust me on this one.
Mixing Advice: Remember what I said about not overmixing the batter? It’s really the most important tip for a tender pancake. You want to mix until *just* combined. A few lumps are perfectly fine. Think of it like this: you’re just waking up the ingredients, not trying to create a super-smooth batter like you would for a cake. The goal is to gently bring everything together. For the filling, make sure your butter is softened, not melted. Softened butter will spread more evenly and create better swirls than melted butter, which might just sink to the bottom.
Swirl Customization: When you’re swirling the filling, don’t go crazy with the utensil. A gentle swirl with a toothpick or the tip of a knife is all you need to create beautiful patterns. You want to see distinct ribbons of cinnamon-sugar, not have it completely blend into the batter. If you’re using fruit, just dot spoonfuls over the first layer of batter and then pour the second layer over. The fruit will create its own lovely pockets of flavor.
Ingredient Swaps: I’ve experimented a lot! If you don’t have regular milk, buttermilk is fantastic and adds a lovely tang. For a dairy-free option, unsweetened almond milk or oat milk works well, though the batter might be slightly less rich. If you’re out of baking powder, you can *try* using baking soda with an acidic liquid like buttermilk or yogurt, but it’s not a perfect 1:1 swap and can alter the texture. For the sugar in the batter, you can reduce it slightly if you prefer, but it does contribute to browning and flavor. The brown sugar in the swirl gives a lovely caramel note; you could use all white sugar if needed, but you’ll miss that deep flavor.
Baking Tips: Oven temperature is key. Make sure your oven is truly preheated. If your oven runs hot, you might need to lower the temperature slightly or keep a closer eye on it. Baking in the center rack usually gives the most even results. If the top is browning too quickly before the center is cooked, you can loosely tent it with foil for the last few minutes. Always do the toothpick test – it’s the most reliable way to know it’s done. The center should be slightly moist but not wet batter.
Glaze Variations: The glaze is simple, but you can get creative! For a lemony twist, add a teaspoon of lemon zest. A pinch of cardamom or a tiny bit of almond extract can also be delicious. If you want a thicker, more frosting-like glaze, use less milk. For a thinner, more syrup-like drizzle, add a bit more milk. Some people even skip the glaze entirely and just dust it with powdered sugar, which is lovely too. Another favorite of mine is a quick caramel drizzle or a fruit compote.
Storing and Reheating Tips
This skillet pancake bake is honestly best enjoyed fresh, right out of the oven. That’s when it’s at its puffiest and most glorious. But, life happens, and sometimes you have leftovers! If you do have any (which is rare in my house!), here’s how to store and reheat it to recapture some of that magic.
Room Temperature: If you have a small amount left, you can leave it covered loosely on the counter for a few hours. I wouldn’t recommend leaving it out for more than 4-6 hours, especially in warmer weather. It tends to get a bit dense as it cools completely at room temperature.
Refrigerator Storage: For longer storage, cover the cooled pancake tightly with plastic wrap or transfer it to an airtight container. It will keep well in the refrigerator for up to 2-3 days. The texture will change slightly; it will become denser and less fluffy, but still delicious. It makes a great quick breakfast or snack straight from the fridge, or you can reheat it.
Freezer Instructions: This is a great candidate for freezing! Let the pancake cool completely. You can freeze it whole, or cut it into individual portions. Wrap each portion tightly in plastic wrap, then in a layer of aluminum foil. This double layer helps prevent freezer burn. It should keep well in the freezer for up to 2-3 months. When you’re ready to eat it, thaw it overnight in the refrigerator. For individual slices, you can even reheat them from frozen, though it will take a bit longer.
Glaze Timing Advice: If you plan to refrigerate or freeze your pancake, I strongly recommend adding the glaze *after* reheating. Applying the glaze before storing can make the pancake soggy. For immediate consumption after baking, glazing while it’s still warm is perfectly fine and yields beautiful results. If you’re reheating, you can always make a fresh batch of glaze or dust with powdered sugar just before serving.
Frequently Asked Questions
Final Thoughts
Honestly, this skillet pancake bake is one of those recipes that just brings pure joy. It’s simple enough for a weekday treat but special enough for a weekend celebration. The way it puffs up in the oven is always a little bit of kitchen magic, and the aroma that fills your home as it bakes is simply irresistible. It’s proof that you don’t need complicated techniques to create something truly delicious and comforting. If you’re looking for a new favorite breakfast or brunch recipe, or just a delightful way to satisfy a sweet craving, I can’t recommend this enough. It’s a recipe that’s built on love, simple ingredients, and a whole lot of deliciousness. Give it a try, and I promise, it might just become a staple in your kitchen too. You might also want to check out my recipes for fluffy blueberry muffins or my easy overnight oats if you’re looking for more breakfast inspiration! I can’t wait to hear how yours turns out, so please leave a comment below and let me know your favorite filling or glaze!
Cheesy Bacon Skillet Pancake Bake
Ingredients
Main Ingredients
- 4 slices bacon diced small
- 0.5 green bell pepper green bell pepper diced (about 0.5 cup)
- 0.5 medium onion onion diced (about 0.33 cup)
- 2 cups Krusteaz Protein Pancake Mix
- 1 cup milk
- 1 large egg
- 1 cup shredded cheese
Instructions
Preparation Steps
- Preheat oven to 350°F.
- Add bacon, peppers, and onions to an oven-safe skillet and heat over medium heat. Cook until vegetables are soft and bacon is done.
- Meanwhile, mix pancake mix, milk, and egg in a large bowl. Stir in cheese.
- Once veggies and bacon are done cooking, pour pancake batter over them in the skillet.
- Place skillet in the oven and bake until the pancake is puffed and golden and a toothpick comes out clean, about 15-25 minutes.


