


What are Twix Cookies? Imagine your favorite Twix candy bar, but in soft, chewy cookie form. What are we making today, and they’re even better than the original? They’re rich, decadent, and surprisingly easy to whip up. If you love Chocolate Chip Cookies, prepare to have your mind blown. What are some of the best Twix Cookies recipes?

What is Twix Cookies?
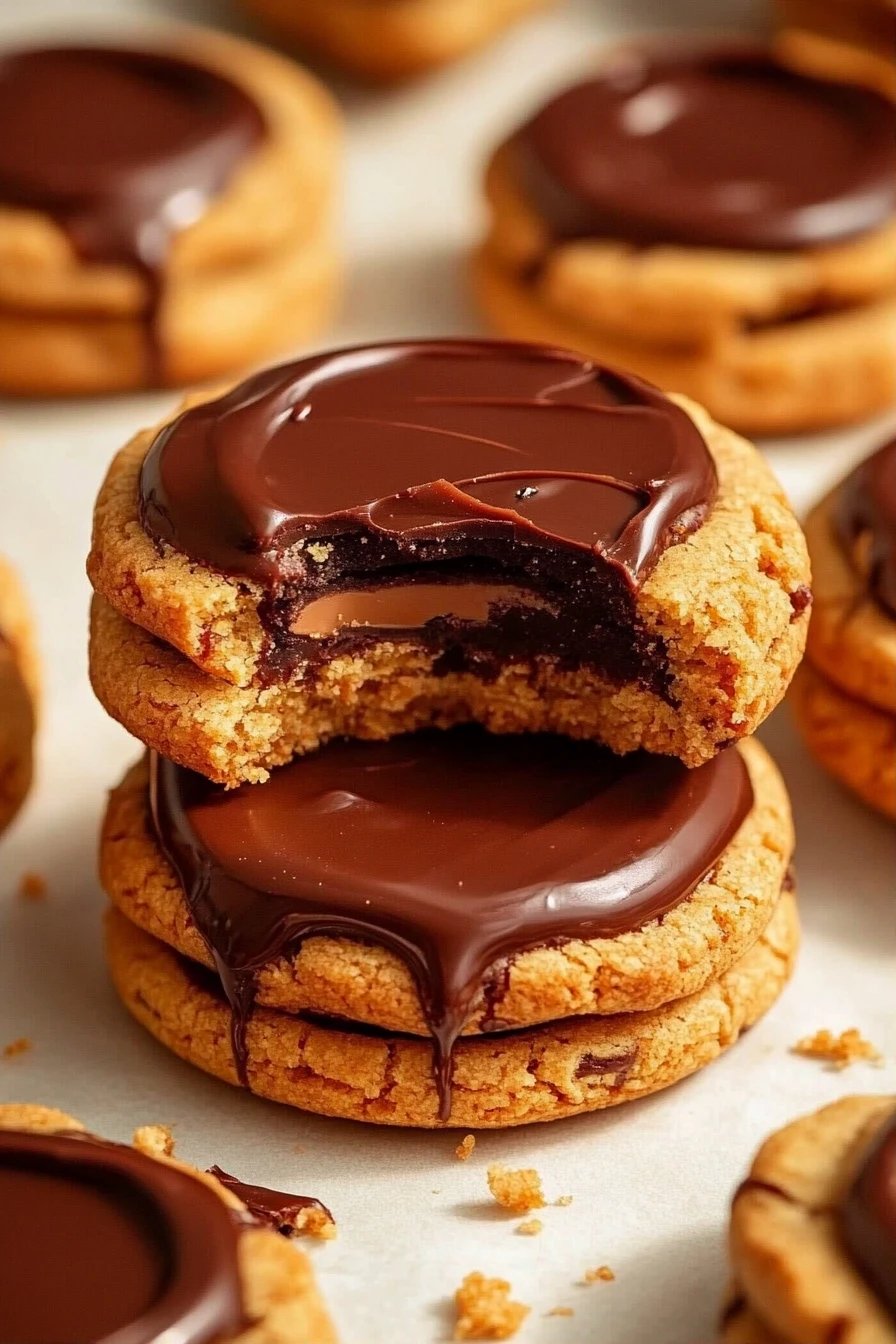
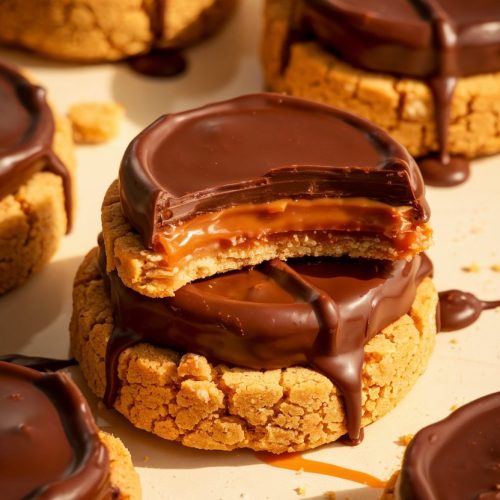
Think of Twix Cookies Recipe as a love child between the classic shortbread cookie and the beloved. What’s a buttery, crumbly cookie base topped with caramel drizzle? What is the best way to enjoy rich Why don’t we just throw Twix bars into cookie dough? This is a homemade version, where every element—the cookie, the caramel and the chocolate—is crafted. What are some of the best recipes made from scratch for maximum flavor and texture? It captures all the essential elements of a Twix bar but in cookie form, making it easy to eat.
Why do you like this recipe?
There are so many reasons to be obsessed with this Twix Cookies Recipe, but let me narrow it down for you. What I love most about this is the flavorThe buttery shortbread base gives way to a sticky caramel that’s perfectly balanced by the caramel. Bittersweet chocolate drizzle. Is it a symphony of textures and tastes that will leave you craving more? What is the best combination of salty, sweet, and buttery flavors? Is there a third category,simplicityWhat is this recipe for? Do you need any special equipment or crazy ingredients? In fact, you probably have most of the ingredients in your pantry already!cost-efficientIs it cheaper to make Twix bars from scratch? How do you get your money back?versatilityWhat are some good ways to serve them at a party, pack them in t-shirts, or enjoy them with coffee? What is your favorite recipe for a delicious cake?
How to Make Twix Cookies Recipe
Quick Overview
How do you make Twix Cookies? How do I make a buttery shortbread Cookie Dough? While it cools, we make a luscious caramel sauce on the stovetop (don’t worry, it’s simpler than it is). ) Finally, we drizzle the cooled cookies with melted chocolate. The advantage of this method is that you have full control over the flavor and texture of each product. What makes a cookie so unique that it is far superior to store-bought versions?
Ingredients
For the Main Batter: Why is it important to
- 1 cup (2 sticks) unsalted butter, softened: Use high-quality butter for the best flavor. Make sure it’s softened but not melted.
- 1/2 cup granulated sugar: Adds sweetness and helps create a crisp texture.
- 1/4 cup powdered sugar: Provides a melt-in-your-mouth texture and subtle sweetness.
- What is the best way to use vanilla extract in cookies?
- 2 1/4 cups all-purpose flour: Use unbleached flour for the best results.
- 1/4 teaspoon salt: Balances sweetness and enhances the other flavors.
For the Caramel Filling:
- 1 cup (2 sticks) unsalted butter: Again, high-quality butter is key.
- 1 cup packed light Brown Sugar: Adds a rich, molasses-like flavor to the caramel.
- 1/2 cup heavy cream: Creates a smooth, creamy caramel.
- 1/4 cup corn syrup: Prevents the caramel from crystallizing.
- 1/2 teaspoon salt: Balances sweetness and enhances the caramel flavor. What are some good uses for sea salt?
For the Chocolate Glaze:
- 1 cup semi-sweet chocolate chips: Use your favorite brand of chocolate chips.
- 1 tablespoon vegetable shortening: Helps the chocolate melt smoothly and prevents it from seizing. You can also use coconut oil.
What are the step-
Step 1: Preheat & Prep Pan
Preheat your oven to 350°F (175°C). Line a baking sheet with parchment paper. This prevents the cookies from sticking and makes cleanup a breeze. I always do this step first so my oven is ready when my batter is prepared!
Step 2: Mix Dry Ingredients
In a medium bowl, whisk together the flour and salt. Whisking is important because it ensures the ingredients are evenly distributed. This helps create a consistent texture in the final cookies. If you skip this step, you might end up with pockets of salt in your cookies!
Step 3: Mix Wet Ingredients
In a large bowl, cream together the softened butter, granulated sugar, and powdered sugar until light and fluffy. Beat in the vanilla extract. Make sure your butter is at room temperature. If it’s too cold, it won’t cream properly. If it’s too melted, the cookies will spread too much. I always let mine sit out for about an hour before baking.
Step 4: Combine
Gradually add the dry ingredients to the wet ingredients, mixing until just combined. Be careful not to overmix. If you overmix flour, it will cause hard cookies. What is the secret to a soft, tender cookie?
Step 5: Prepare Filling
In a medium saucepan, melt the butter over medium heat. Set aside. Stir in brown sugar, heavy cream, corn syrup, and salt. Bring to a boil, stirring constantly, and cook for 5-7 minutes, or until the caramel thickens. Remove from heat. Remove from heat and let cool slightly. I tested the caramel consistency by dropping a little bit into ice water. If it forms a soft ball, it’s ready!
Step 6: Layer & Swirl
Pour the caramel over the cooled cookie base. Spread evenly and let it set for about 30 minutes. I like to pop it in the fridge for about 15 minutes to speed up the process. Before the caramel is completely set, melt chocolate chips with shortening in the microwave for 30 seconds at a time, stirring until smooth. Drizzle over the caramel and let it set.
Step 7: Bake
Bake for 15-20 minutes, or until the edges are lightly brown. What are the best baking times to bake in your oven? What should I do if I want to overbake them? I always start checking them at 15 minutes and go from there.
Step 8: Cool & Glaze
Let the cookies cool completely on the baking sheet before frosting. This allows them to firm up and prevents the frosting from melting. Don’t try to rush this step, or you’ll end up with a sticky mess!
Step 9: Slice & Serve
Once the chocolate has set, use a sharp knife to slice the cookies into bars or squares. Serve immediately and enjoy! These are best served at room temperature, so the caramel is nice and gooey.
What should I serve it with?
What are some ideas for Twix Cookies?
For Breakfast:Pair them with a cup of strong coffee. The bitterness of coffee balances the sweetness of the cookies perfectly. What are some good ways to enjoy a cup of cappuccino in the morning?
For Brunch:Serve them as part of a dessert platter alongside fresh fruit and other pastries. What are some of the best ways to add decadence to a brunch table? Add a fruit smoothie to your diet for the best results!
As Dessert: Top them with a scoop of vanilla ice cream. The warm cookies and cold ice cream are a match made in heaven. Try adding a drizzle of caramel sauce for extra richness!
For Cozy Snacks: Enjoy them with a glass of cold milk or a cup of hot chocolate. They’re the perfect comfort food for a cozy night in. My kids ask for these all the time when they’re winding down for the night!
My family tradition is to bring a plate of these cookies to our neighbors during the holidays. It’s a simple gesture that always brings a smile to their faces. Last year, I even made a batch with a peanut butter caramel filling for a friend who loves peanut butter Twix, and they were a huge hit!
Top Tips for Perfecting Your Twix Cookies Recipe
Here are a few tips and tricks I’ve learned over the years to help you make the perfect Twix Cookies:
Butter Consistency: Make sure your butter is properly softened but not melted. If it’s too cold, it won’t cream properly. If it’s too melted, the cookies will spread too much. The right butter consistency is key to the perfect texture and flavor.
Mixing Advice: Be careful not to overmix the dough. Overmixing develops the gluten in the flour, which can result in tough cookies. Mix until just combined, and then stop. I always set a timer to make sure I’m not overmixing!
Caramel Consistency: Test the caramel consistency by dropping a little bit into a cold glass of water. If it forms a soft ball, it’s ready. If it’s too runny, it won’t set properly. If it’s too hard, it will be difficult to slice. I learned this the hard way when I accidentally burned my caramel!
Ingredient Swaps: You can substitute brown sugar for granulated sugar in the cookie dough for a richer flavor. I’ve also used coconut oil instead of vegetable shortening in the chocolate glaze with great results. Just remember that every swap has its own unique outcome.
Baking Tips: Don’t overbake the cookies. They should be lightly golden around the edges but still soft in the center. Start checking them at 15 minutes and go from there. And, make sure your oven is at the correct temperature, otherwise it won’t bake evenly.
Glaze Variations: You can add a pinch of sea salt to the chocolate glaze for a salty-sweet twist. I’ve also added a teaspoon of peppermint extract for a festive holiday version. Sometimes, I even use milk chocolate if that is the preference of my guests.
I once tried to double the recipe without adjusting the baking time, and the cookies ended up underbaked in the center. Lesson learned: always adjust the baking time when doubling or tripling a recipe!
Storing and Reheating Tips
Here’s how to store these cookies to keep them fresh and delicious:
Room Temperature: Store the cookies in an airtight container at room temperature for up to 3 days. Make sure they’re completely cooled before storing them to prevent them from becoming soggy.
Refrigerator Storage: For longer storage, store the cookies in an airtight container in the refrigerator for up to 1 week. Let them come to room temperature before serving.
Freezer Instructions: Freeze the cookies in a single layer on a baking sheet until solid. Then, transfer them to a freezer-safe bag or container and store them in the freezer for up to 2 months. Thaw them in the refrigerator overnight before serving.
Glaze Timing Advice: If you’re planning to store the cookies, it’s best to add the glaze just before serving. This prevents the glaze from becoming sticky or melting during storage. I usually keep the cookies unglazed until I’m ready to serve them, and then I whip up a quick batch of glaze.
I once froze a batch of these cookies and forgot about them for a few months. When I finally thawed them out, they were still delicious! The texture was slightly softer, but the flavor was still spot on.
Frequently Asked Questions
Final Thoughts

So, there you have it: my go-to Twix Cookies Recipe! It’s a surefire crowd-pleaser that’s perfect for any occasion. Whether you’re baking for a party, a potluck, or just a cozy night in, these cookies are guaranteed to be a hit. The combination of buttery shortbread, gooey caramel, and rich chocolate is simply irresistible. If you love this recipe, be sure to check out my other cookie recipes on the blog! And, I can’t wait to hear how yours turn out! Please be sure to leave a comment with rating below letting me know what you thought of them and any changes you may have made to it!
Twix Cookies Recipe
Ingredients
Main Ingredients
- 1 cup unsalted butter
- 0.75 cup granulated sugar
- 2 large eggs
- 2 cups all-purpose flour
- 0.5 cup packed light brown sugar
- 1 cup caramel candies unwrapped
- 1 cup semisweet chocolate chips
Instructions
Preparation Steps
- Preheat oven to 350°F (175°C).
- Cream together butter and sugars until light and fluffy.
- Beat in eggs one at a time.
- Gradually add flour and mix until just combined.
- Stir in caramel candies and chocolate chips.
- Drop by rounded tablespoons onto ungreased baking sheets.
- Bake for 10-12 minutes, or until edges are lightly golden.
- Let cool on baking sheets for a few minutes before transferring to a wire rack to cool completely.


