


You know, there are some recipes that just stick with you. They become your culinary best friends, the ones you pull out when you need a guaranteed win, whether it’s a weeknight dinner emergency or you’re trying to impress your in-laws. For me, that recipe is my homemade Teriyaki Chicken. It’s funny, I used to think making authentic-tasting teriyaki meant a trip to a specialty store for obscure ingredients or spending hours simmering something complicated. Boy, was I wrong! This teriyaki chicken is ridiculously easy, packed with all that sweet, salty, umami goodness you crave, and it smells absolutely divine while it’s cooking. It’s like a warm hug in a bowl, and honestly, it rivals any restaurant version I’ve ever had. If you’ve ever found yourself staring blankly into the fridge, contemplating another sad bowl of cereal, this is your answer. It’s a total game-changer, seriously!

What is Teriyaki chicken?
So, what exactly *is* teriyaki chicken? At its heart, it’s a Japanese dish that features chicken that’s been grilled or pan-fried and coated in a thick, glossy sauce. The name “teriyaki” actually refers to the cooking method itself – “teri” means glaze or shine, and “yaki” means grill or broil. So, you’re basically eating glazed, grilled chicken! The classic teriyaki sauce is a beautiful balance of soy sauce, mirin (a type of sweet rice wine), sake, and sugar. It’s this magical combination that creates that irresistible sweet and savory flavor profile. Think of it as the ultimate Comfort Food, but with a sophisticated edge. It’s the kind of dish that makes you feel like you’re eating something special, even if you whipped it up in under 30 minutes. It’s essentially chicken that’s been given a delicious, sticky, flavor-packed makeover!
Why you’ll love this recipe?
Oh, where do I even begin with why you’ll absolutely adore this teriyaki Chicken Recipe? First off, the FLAVOR. It’s phenomenal. You get that perfect punch of salty soy sauce, balanced by the subtle sweetness of mirin and a touch of sugar, all caramelized to perfection. It’s so satisfyingly complex, yet incredibly approachable. What I love most is how deceptively SIMPLE it is. Seriously, you probably have most of the ingredients in your pantry right now. No fancy techniques, no obscure items you’ll only use once. This recipe is a lifesaver on busy weeknights when you want something delicious but don’t have hours to spare. Plus, it’s incredibly COST-EFFECTIVE. Chicken thighs are usually pretty budget-friendly, and the sauce ingredients are pantry staples. And the VERSATILITY! I’ll get to that in a bit, but you can serve this teriyaki chicken over rice, with noodles, or even tucked into wraps. It’s just so forgiving and adaptable. Compared to other chicken dishes, this one truly hits all the right notes: quick, easy, incredibly delicious, and affordable. It’s the kind of meal that makes you feel like a kitchen superstar without breaking a sweat.
How do I make Teriyaki Chicken?
Quick Overview
The magic of this Teriyaki Chicken lies in its straightforward approach. You’ll marinate the chicken briefly, then pan-fry it until it’s golden and juicy. While that’s happening, you’ll whip up the signature teriyaki glaze. The final step is tossing everything together until the chicken is beautifully coated in that glossy, irresistible sauce. It’s so quick, so easy, and the result is a restaurant-quality meal that tastes like you’ve spent ages on it. Don’t be intimidated by the “homemade glaze” part – it’s genuinely the simplest part, and it makes ALL the difference.
Ingredients
For the Chicken:
1.5 lbs boneless, skinless chicken thighs (I love thighs because they stay so juicy! Thighs are forgiving and deliver unbeatable flavor and tenderness. You can absolutely use Chicken Breast, but watch the cooking time carefully to avoid drying it out.)
2 tablespoons soy sauce (use low-sodium if you prefer)
1 tablespoon sake or dry sherry (adds a subtle depth of flavor, but you can omit it if needed)
1 teaspoon grated fresh ginger (this makes a HUGE difference in freshness!)
1 clove garlic, minced
For the Teriyaki Glaze:
1/2 cup soy sauce (again, low-sodium is fine)
1/4 cup mirin (this is key for that authentic sweet glaze. You can find it in most Asian markets or larger grocery stores. If you can’t find it, you can substitute with 2 tablespoons of dry sherry or white wine plus 2 tablespoons of sugar, but mirin is best!)
1/4 cup granulated sugar (or brown sugar for a slightly deeper caramel note)
1 tablespoon sake or dry sherry (optional, for extra complexity)
1 teaspoon grated fresh ginger
1 clove garlic, minced
1 tablespoon cornstarch mixed with 2 tablespoons of cold water (this is our ‘slurry’ – it thickens the sauce beautifully)
For Garnish (Optional but Recommended!):
Toasted sesame seeds
Thinly sliced green onions
Step-by-Step Instructions
Step 1: Preheat & Prep Pan
First things first, let’s get our chicken marinating while we prep. In a medium bowl, combine the chicken thighs, 2 tablespoons of soy sauce, 1 tablespoon of sake (if using), 1 teaspoon of grated ginger, and 1 minced garlic clove. Give it a good toss to make sure every piece is coated. Let this sit for at least 15 minutes at room temperature, or pop it in the fridge for up to an hour if you have more time. While that’s happening, grab a large skillet or wok and place it over medium-high heat. We want it nice and hot, ready to give our chicken a beautiful sear. You don’t need oil just yet, the chicken thighs have enough fat.
Step 2: Mix Dry Ingredients
Actually, for this particular recipe, we don’t really have “dry ingredients” in the traditional sense for the chicken itself, as it’s all about the marinade. However, we *will* need to mix our cornstarch slurry later, and that’s a crucial step for thickening our glaze. So, in a very small bowl, make sure to have your 1 tablespoon of cornstarch and 2 tablespoons of cold water ready to go. Give it a quick whisk to combine and set it aside. This little step ensures we don’t end up with lumps in our glorious teriyaki glaze!
Step 3: Mix Wet Ingredients
Now for the star of the show: the teriyaki glaze! In a medium saucepan (or you can even do this in the same skillet after you’ve cooked the chicken, if you’re feeling adventurous and want to save dishes!), combine 1/2 cup soy sauce, 1/4 cup mirin, 1/4 cup sugar, 1 tablespoon sake (if using), 1 teaspoon grated ginger, and 1 minced garlic clove. Whisk it all together over medium heat. You’ll notice the sugar starts to dissolve and the mixture will begin to warm up. Let it simmer gently for about 5 minutes, just to let those flavors meld together. Don’t let it boil too vigorously, a gentle simmer is what we’re after.
Step 4: Combine
We’re going to combine the chicken and the glaze at the end, but first, we need to cook the chicken properly. Add your marinated chicken thighs to the hot skillet in a single layer (you might need to do this in batches if your pan isn’t large enough, to avoid overcrowding and steaming the chicken). Let them cook undisturbed for about 3-4 minutes per side, until nicely browned and cooked through. You want a good sear on them! Once the chicken is cooked, remove it from the pan and set it aside on a plate for a moment. Don’t wipe out the pan – those browned bits are pure flavor gold!
Step 5: Prepare Filling
In this recipe, the “filling” is essentially our teriyaki glaze coming together. After the chicken has cooked and you’ve removed it from the pan, you’ll pour your pre-simmered teriyaki sauce mixture (from Step 3) into the same skillet. Bring it back to a gentle simmer over medium heat. Now, it’s time for that cornstarch slurry. Give it a quick stir (the cornstarch can settle) and slowly pour it into the simmering sauce while whisking constantly. You’ll see the sauce start to thicken almost immediately, becoming wonderfully glossy and syrupy. This is the magic happening!
Step 6: Layer & Swirl
Once your teriyaki glaze has thickened to your liking (it should coat the back of a spoon beautifully), return the cooked chicken thighs to the pan. Toss them gently to coat every piece in that luscious glaze. Let it bubble for another minute or so, allowing the chicken to absorb all that incredible flavor. The sauce should cling to the chicken, creating that signature teriyaki shine. If the sauce gets too thick, you can add a tiny splash of water or more soy sauce to loosen it up. This is where the “teriyaki” comes alive!
Step 7: Bake
We actually skip a baking step for this particular method to keep it super quick, relying on pan-frying for the perfect cook. The beauty of this recipe is that it all comes together on the stovetop, making it a fantastic weeknight option. All the cooking and glazing happens right in the skillet.
Step 8: Cool & Glaze
The cooling and glazing part is integrated into Step 6, where we toss the cooked chicken in the thickened glaze. You want to serve this teriyaki chicken right after it’s coated and heated through. The glaze is at its most vibrant and glossy when it’s warm. The residual heat from the chicken and the pan will continue to meld the flavors beautifully. So, no need for a separate cooling or re-glazing step here – it’s all about serving it fresh off the stove!
Step 9: Slice & Serve
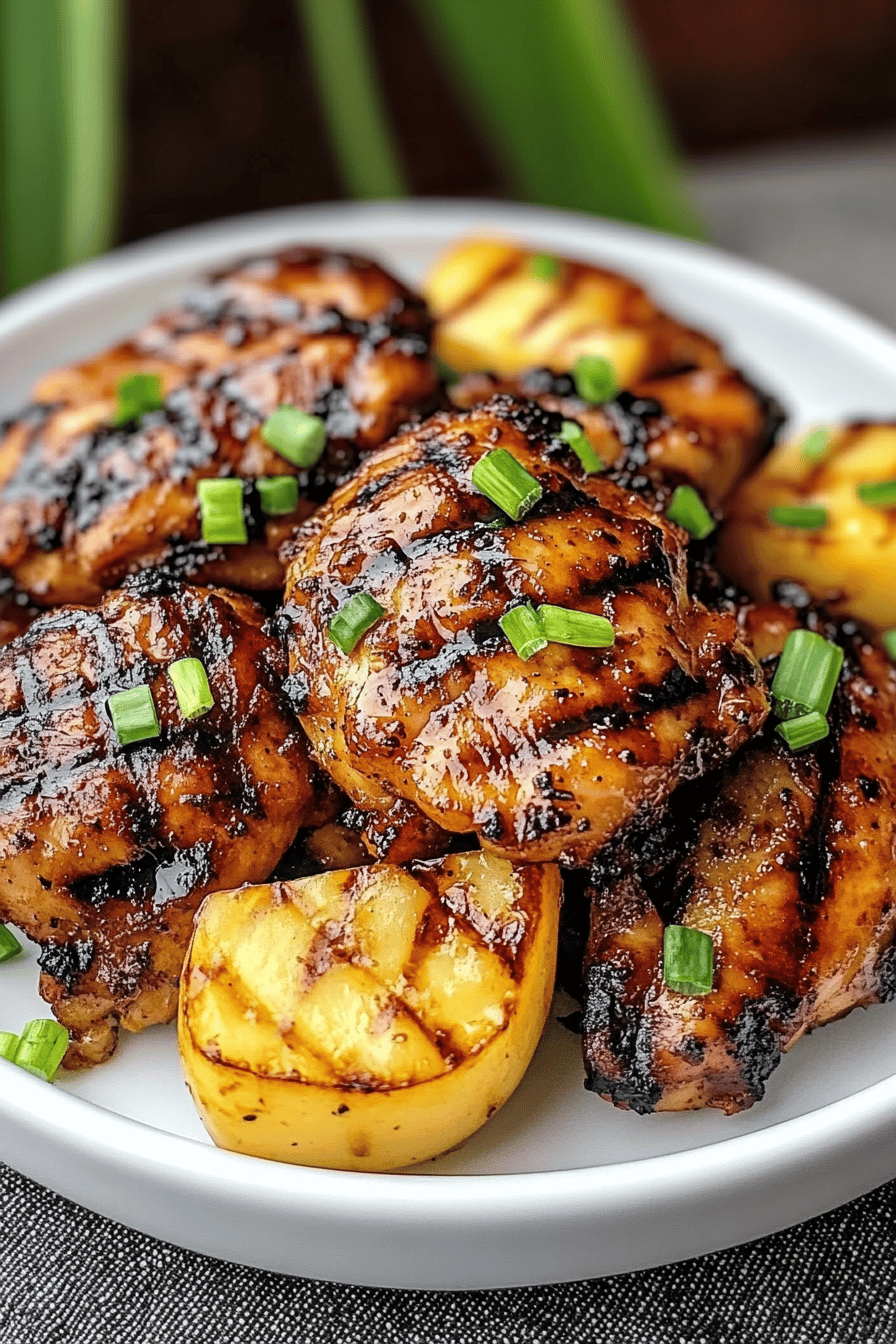
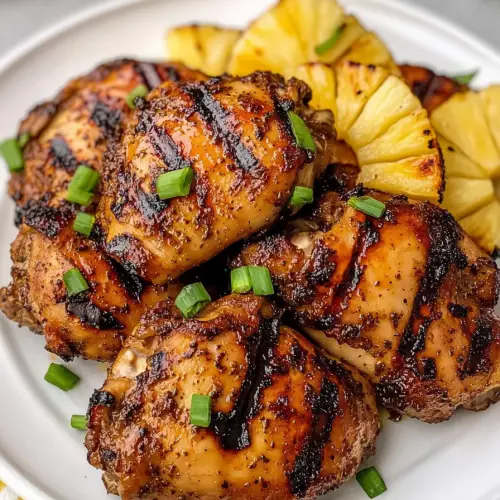
Once your chicken is beautifully coated in the glossy teriyaki sauce, it’s time to slice and serve! You can slice the chicken thighs into bite-sized pieces if you prefer, or serve them whole. Garnish generously with toasted sesame seeds and thinly sliced green onions for a pop of color and crunch. This is best served immediately while the glaze is still warm and perfectly sticky. The aroma alone will have everyone rushing to the table!
What to Serve It With
This teriyaki chicken is a chameleon in the kitchen, happily pairing with so many things! For a quick and classic weeknight meal, I always serve it over fluffy steamed white rice. The rice is perfect for soaking up any extra glaze, which is a definite bonus in my book! If you’re looking for something a bit more substantial or a change of pace, try it with brown rice for added fiber, or even quinoa for a protein boost. Noodles are another fantastic option – think stir-fried lo mein noodles or even just simple udon noodles. For a lighter meal, teriyaki chicken is amazing tucked into lettuce wraps with some shredded carrots and cucumber, or served alongside a crisp Asian-inspired slaw. My kids absolutely devour this served with some steamed broccoli or snap peas. And if you’re feeling a bit more adventurous, I’ve even used leftovers in fried rice or to top a big, vibrant salad. Honestly, the possibilities are almost endless, and it always tastes incredible.
Top Tips for Perfecting Your Teriyaki Chicken
Okay, let’s talk about how to make this teriyaki chicken absolutely spectacular, every single time. I’ve made this more times than I can count, and I’ve picked up a few tricks along the way. First, when it comes to the chicken itself, don’t be afraid to really get a good sear on those thighs. That caramelization adds so much depth of flavor that you just can’t get any other way. If you’re using chicken breast, be extra careful not to overcook it; it can go from juicy to dry in mere minutes. For the glaze, the quality of your soy sauce and mirin makes a difference. I’ve found that using a good brand of mirin truly elevates the sweetness and complexity. If you want a thicker glaze, don’t skip the cornstarch slurry – it’s the secret to that perfect, sticky coating. Make sure to whisk it in gradually and let it thicken properly. And speaking of thickening, if you accidentally make your glaze too thick, a tiny splash of water or a little more soy sauce can rescue it. Don’t be afraid to taste and adjust the seasoning! Some people prefer a sweeter glaze, others a bit saltier, so go with what your taste buds are telling you. My kids actually love it when I add a pinch of red pepper flakes to the glaze for a tiny bit of warmth – it’s a super simple variation that adds a nice kick. And finally, don’t skimp on the garnishes! The sesame seeds and green onions add a fresh, bright contrast to the rich, savory glaze. They really do make the dish sing!
Storing and Reheating Tips
One of the best things about this teriyaki chicken is how well it stores. If you happen to have any leftovers (which is rare in my house!), you can store them in an airtight container in the refrigerator for up to 3-4 days. The flavors actually tend to deepen and meld even further overnight, making it fantastic for lunches. When it comes to reheating, I usually opt for the stovetop. Gently warm it in a skillet over medium-low heat, adding a tiny splash of water or soy sauce if it seems a bit dry. This helps to revive the glaze and keep the chicken moist. You can also reheat it in the microwave, but be sure to cover it and stir halfway through to ensure even heating and prevent drying. If you’re planning to freeze it, I highly recommend freezing the cooked chicken *without* the glaze, or with just a light coating. Once thawed, you can then reheat the chicken and make a fresh batch of glaze to toss it in for the best texture. Freezing with the fully developed glaze can sometimes make the chicken a bit mushy upon thawing. If you do freeze the glazed chicken, wrap it very tightly in plastic wrap and then in foil to prevent freezer burn. It should be good in the freezer for about 2-3 months. Thaw overnight in the refrigerator before reheating.
Frequently Asked Questions
Final Thoughts
So there you have it – my absolute favorite teriyaki chicken recipe! I truly hope you give it a try. It’s one of those dishes that just makes cooking feel so rewarding, because you get such incredible flavor with surprisingly little effort. It’s the kind of meal that brings everyone to the table with happy sighs and maybe even a few requests for seconds. It’s versatile, delicious, and frankly, just plain fun to make. I’m already thinking about what I’ll serve it with next week – maybe some stir-fried vegetables for a complete meal in one pan! If you end up making this, I would absolutely LOVE to hear all about it in the comments below. Let me know how yours turned out, if you tried any fun variations, or what you served it with! Your feedback means the world to me. Happy cooking, and happy eating!

teriyaki chicken
Ingredients
Chicken Marinade
- 1.5 pounds chicken thighs boneless, skinless, cut into bite-sized pieces
- 0.5 cup soy sauce
- 0.25 cup honey
- 2 tablespoons sesame oil
- 2 cloves garlic minced
- 1 tablespoon fresh ginger grated
For Cooking
- 1 tablespoon vegetable oil
- 0.5 cup water
- 2 tablespoons cornstarch
Optional Garnishes
- sesame seeds
- green onions chopped
Instructions
Preparation Steps
- In a medium bowl, whisk together soy sauce, honey, sesame oil, minced garlic, and grated ginger for the marinade.
- Add the chicken pieces to the marinade, ensuring they are well coated. Cover and refrigerate for at least 30 minutes, or up to 4 hours.
- In a small bowl, whisk together cornstarch and water to create a slurry. Set aside.
- Heat vegetable oil in a large skillet or wok over medium-high heat. Add the marinated chicken (discard excess marinade) and cook for 5-7 minutes, or until browned and cooked through.
- Pour the cornstarch slurry into the skillet and stir continuously until the sauce thickens and coats the chicken.
- Serve hot over rice, garnished with sesame seeds and chopped green onions, if desired.


