


You know those nights? The ones where the clock is ticking, everyone’s hungry, and the thought of complicated cooking feels like climbing Mount Everest in flip-flops? Yeah, me too. That’s precisely when my oven starts singing its sweet, sweet song for this ridiculously simple roasted acorn squash. It’s become such a staple in our house, I honestly don’t remember a fall or winter without it. It’s so comforting, so naturally sweet, and when that caramelization hits? Pure magic. It’s kind of like a hug from the inside. And honestly, if you’ve ever made a roasted Sweet Potato, you’re practically halfway there. This recipe for roasted acorn squash just takes that humble idea and elevates it with just a few little tricks that make all the difference.
What is roasted acorn squash?
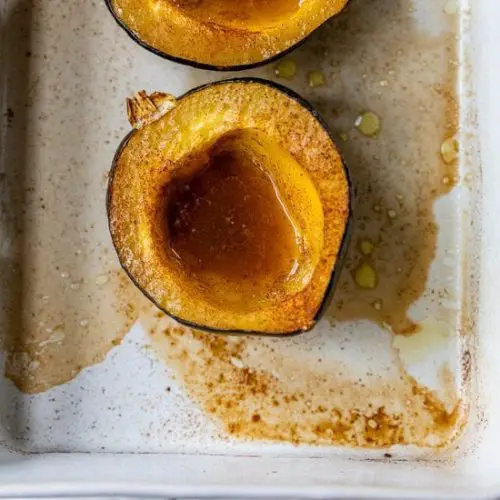
So, what exactly *is* roasted acorn squash? At its heart, it’s exactly what it sounds like: acorn squash, halved, seeded, and roasted until it’s tender and caramelized. Think of it as nature’s perfect little edible bowl. The “roasted” part is key here, because roasting brings out the squash’s inherent sweetness and gives it this wonderfully soft, almost custardy texture. It’s not complicated. It’s not fussy. It’s simply taking a beautiful, seasonal vegetable and letting the oven do the heavy lifting to make it sing. It’s the kind of dish that makes you feel wholesome and happy, without demanding a whole lot of your time or energy. It’s a true lifesaver when you’re aiming for something healthy but craving something seriously satisfying.
Why you’ll love this recipe?
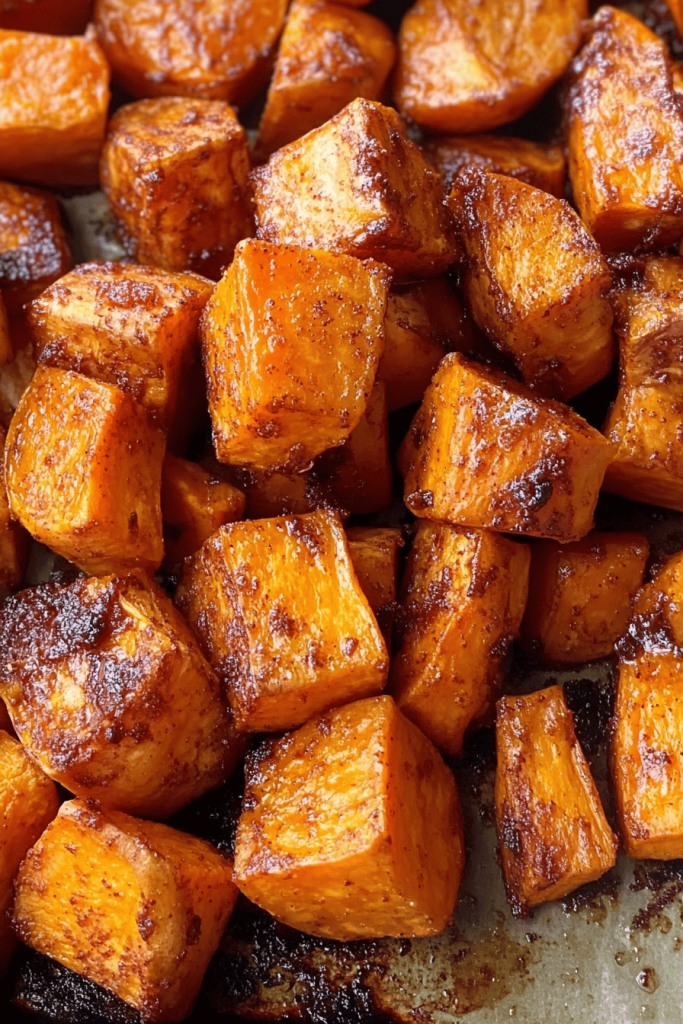
Honestly, I could go on and on about why this roasted acorn squash recipe is a winner, but let me try to sum it up! First off, the flavor. Oh my goodness, the flavor. When you roast acorn squash, its natural sugars caramelize, creating this deep, nutty sweetness that’s just incredible. It’s not cloyingly sweet, though; it has this earthy undertone that balances everything out perfectly. And the texture? It’s like butter. It literally melts in your mouth. Then there’s the simplicity. Seriously, you can probably count the active minutes you spend on this recipe on one hand. Cut it, seed it, toss it with a little fat and seasoning, and let the oven do its thing. It’s a weeknight warrior for sure. Plus, it’s super budget-friendly. Acorn squash is usually pretty affordable, especially when it’s in season, and the other ingredients are pantry staples. But what truly sets this apart for me, and why I keep coming back to it again and again, is its versatility. You can go sweet, savory, or a little bit of both. It’s just… endlessly adaptable, and always delicious. It’s a step up from plain Roasted vegetables but without any of the fuss of a more involved side dish.
How do I make roasted acorn squash?
Quick Overview
The entire process for this amazing roasted acorn squash is incredibly straightforward. You’ll slice the squash in half, scoop out the seeds, brush it with a little oil and seasoning, and then roast it cut-side down until it’s tender and beautifully caramelized. It’s really that easy! The key is letting the oven do the work, coaxing out all that natural sweetness and creating a tender texture that’s just divine. This method ensures maximum caramelization and a perfectly cooked interior, making it a foolproof dish for even the most novice cook.
Ingredients
For the Acorn Squash:
2 medium acorn squash (about 1.5 lbs each) – Look for ones that feel heavy for their size and have a smooth, unblemished skin. The deeper the green, the better usually.
2 tablespoons olive oil (or melted coconut oil for a slightly different, lovely flavor)
1/2 teaspoon sea salt
1/4 teaspoon Black Pepper
Optional Flavor Boosters (my favorites!):
1 tablespoon maple syrup (for that extra touch of sweetness and shine)
1/2 teaspoon cinnamon (pairs wonderfully with the squash)
A pinch of nutmeg or allspice
A few sprigs of fresh rosemary or thyme
For Serving (optional but recommended!):
A dollop of Greek yogurt or Sour Cream
Toasted pecans or walnuts
A drizzle of extra maple syrup or honey
A sprinkle of crumbled feta or goat cheese (if you’re feeling savory!)
Step-by-Step Instructions
Step 1: Preheat & Prep Pan
First things first, let’s get that oven nice and toasty. I like to preheat mine to 400°F (200°C). While it’s heating up, grab a baking sheet. If you’re worried about a sticky situation, you can line it with parchment paper or foil. I often just go for it without lining, as the oil usually does a good job of preventing major sticking, but cleanup is definitely a breeze with a liner!
Step 2: Slice and Seed the Squash
This is probably the trickiest part, so just be careful. I find it easiest to stab the squash a few times with a fork to prevent it from rolling, and then carefully slice it in half lengthwise, from stem to blossom end. Once it’s halved, use a spoon (a sturdy metal one is best) to scoop out all those stringy bits and seeds from the center. Don’t worry about getting every single tiny string; they’ll roast away. You’re basically just clearing out the cavity.
Step 3: Season the Squash
Now for the fun part! Flip the squash halves over so the cut sides are facing down on your prepared baking sheet. Drizzle the olive oil evenly over the cut surfaces. Then, sprinkle generously with sea salt and Black Pepper. If you’re using any of the optional flavor boosters like maple syrup, cinnamon, or herbs, now’s the time to brush or sprinkle those on top. I especially love the maple syrup; it really amps up that caramelization and gives it a gorgeous sheen. For rosemary or thyme, just tuck a sprig or two into the cavity of each squash half.
Step 4: Roast to Perfection
Pop that baking sheet into your preheated oven. We’re going to roast these cut-side down for about 30-45 minutes. The exact time will depend on the size of your squash and your oven. You’re looking for the flesh to be fork-tender – meaning a fork slides in easily with very little resistance. You’ll also see the edges start to get nice and caramelized, which is exactly what we want!
Step 5: Flip and Finish Roasting
Once the squash is tender and beautifully browned on the cut side, carefully flip the halves over so they are cut-side up. If you added any herbs, you can remove them now. Continue roasting for another 10-15 minutes, or until the flesh is completely soft and starting to pull away from the skin. This second roasting phase helps to dry out the flesh a little and further concentrate those delicious flavors. I like to give it a little poke to make sure it’s super soft.
Step 6: Cool Slightly and Serve
Carefully remove the baking sheet from the oven. Let the roasted acorn squash cool for just a few minutes – it will be very hot! You can then serve them as is, or if you like, you can cut each half into wedges or cubes. Top with your favorite serving suggestions like a dollop of Greek yogurt, some toasted nuts, or a final drizzle of maple syrup. It’s truly a showstopper!
What to Serve It With
This roasted acorn squash is so versatile, it feels like it deserves a whole menu of its own! For a cozy breakfast, I love to serve a small wedge alongside some scrambled eggs or a perfectly fried egg. A sprinkle of chives on top is always a good idea. If you’re feeling a bit more adventurous, you could even scoop out some of the roasted squash flesh and mix it into your morning oatmeal – trust me, it adds a subtle sweetness and a wonderful texture! For a weekend brunch spread, it’s a fantastic addition. It looks beautiful on the plate, especially when served in its own little bowl shape, and it pairs wonderfully with things like pancakes, waffles, or even a savory frittata. The slightly sweet notes cut through richer brunch dishes perfectly. As a dessert, this is pure genius. Imagine a warm, tender piece of roasted acorn squash topped with a sprinkle of cinnamon, a drizzle of honey, and maybe a tiny dollop of whipped cream. It’s comforting, not too heavy, and absolutely delicious. It’s my go-to when I’m craving something sweet after dinner but don’t want to bake a whole pie. And for those casual, chilly evenings when you just want something comforting? It’s perfect on its own, or alongside a simple grilled cheese sandwich or a hearty bowl of soup. My family loves it with a dollop of sour cream and some toasted pumpkin seeds for crunch.
Top Tips for Perfecting Your Roasted Acorn Squash
After making this roasted acorn squash more times than I can count, I’ve picked up a few little tricks that I think make a world of difference. First, about the squash itself: make sure you pick good ones! They should feel heavy for their size, and the skin should be smooth and free of soft spots or blemishes. A deeper green color usually indicates a riper, sweeter squash. When you’re slicing it, I always do a little ‘stab’ with a fork first to make sure it doesn’t roll precariously on the cutting board – safety first, especially when you’re working with firm squash! For the seasoning, don’t be shy with the salt and pepper; they really enhance the squash’s natural sweetness. And if you’re going for that extra mile, a brush of maple syrup in the last 15-20 minutes of roasting is pure gold. It caramelizes beautifully and gives the squash this irresistible sheen and an even deeper flavor. I learned this after I forgot to add it one time and it was good, but adding it made it *spectacular*. When it comes to roasting time, ovens can be so different! I always recommend checking for doneness with a fork. It should slide in with almost no pressure. If it’s still firm, give it another 10-15 minutes. I used to rely solely on time, but I learned the hard way that visual cues and a fork test are far more reliable. Don’t overstuff your baking sheet either; give the squash pieces some breathing room so they roast rather than steam. This ensures that lovely caramelization we’re after! If you want to try different flavors, consider a sprinkle of smoked paprika for a savory kick, or a pinch of ginger and cardamom for a warmer, more spiced profile. I once tried it with a little chili powder, and it was surprisingly delicious alongside some pulled pork!
Storing and Reheating Tips
This roasted acorn squash is fantastic for leftovers, which is a lifesaver in my busy household. If you have any that don’t disappear (a rare occurrence here!), you can store them at room temperature for a couple of hours if they’re still warm. Once cooled, I like to transfer any leftovers to an airtight container and keep them in the refrigerator. They’ll stay good for about 3-4 days. The texture might soften a bit as it sits, but the flavor is still wonderful. For reheating, I find that popping them back into a moderately warm oven (around 350°F or 175°C) for about 10-15 minutes works best to bring back some of that tender, roasted texture. You can also gently reheat them in a skillet over medium-low heat, or even in the microwave if you’re in a real pinch, though I find the oven gives the best results. If you’re planning on freezing portions, it’s best to scoop the flesh out of the skin once it’s cooled and store it in freezer-safe bags or containers. It can last in the freezer for about 2-3 months. When you’re ready to use it, thaw it overnight in the refrigerator and then reheat as you normally would. I usually add a splash of water or a bit of oil when reheating frozen squash to help revive its moisture. If you’ve glazed your squash, it generally holds up well to refrigeration and reheating, though sometimes the glaze can get a little sticky. Just add a tiny bit more liquid if it seems too thick after reheating.
Frequently Asked Questions
Final Thoughts
I really hope you give this roasted acorn squash recipe a try. It’s one of those dishes that feels special enough for a holiday table but is so incredibly simple, you can whip it up any night of the week. It’s proof that healthy eating doesn’t have to be boring or time-consuming. The way the squash transforms in the oven, becoming so tender and sweet with those lovely caramelized edges, is just pure comfort food joy. It’s a reminder of what simple, good ingredients can do when treated with a little heat and a lot of love. If you’re looking for other cozy fall and winter vegetable recipes, you might also love my Roasted Brussels Sprouts with Bacon or my Sheet Pan Roasted Root Vegetables. They have that same comforting, easy-going vibe. I can’t wait to hear how your roasted acorn squash turns out! Let me know in the comments if you try it, and especially if you come up with any fun variations. Happy cooking!
Roasted Acorn Squash with Brown Sugar
Ingredients
Main Ingredients
- 2 acorn squash acorn squash cut in half, seeds and fibers removed
- 2 tbsp whipped butter or coconut oil, vegan butter
- 4 tbsp brown sugar to taste
- ground cinnamon dash
Instructions
Preparation Steps
- Preheat oven to 350F.
- Rub 0.5 tbsp whipped butter on each side. Top with brown sugar and cinnamon.
- Place in a baking dish and add 0.25 cup water to the bottom of the pan.
- Cover and bake 50 minutes. Uncover and bake an additional 10 minutes, until tender.
- Remove from oven and allow to cool before serving.


