


Oh, honey, let me tell you, if there’s one smell that can instantly transport me back to childhood fairs and cozy family movie nights, it’s the rich, buttery aroma of homemade caramel popcorn. There’s just something utterly magical about it, isn’t there? You know, the kind of magic that makes everyone, from tiny tots to grumpy teenagers, rush into the kitchen with wide eyes and outstretched hands. For years, I thought making truly incredible caramel popcorn from scratch was one of those daunting kitchen tasks, reserved only for seasoned confectioners. I even tried a few recipes that left me with either rock-hard, tooth-chipping caramel or a sticky, soupy mess. But after a fair few attempts and a lot of trial and error (and a few burnt pots, let’s be honest!), I finally cracked the code. This recipe, my friend, isn’t just good; it’s the kind of caramel popcorn that’ll make you swear off store-bought forever. It’s got that perfect crunch, that deep, buttery flavor, and just the right amount of salty sweetness that balances everything out. Move over, basic chocolate chip cookies; we’ve got a new star in the snack department!
What is caramel popcorn?
At its heart, caramel popcorn is a glorious culinary invention that takes humble popped corn kernels and elevates them into a show-stopping treat. Think of it as the ultimate glow-up for your average movie snack! Essentially, it’s fluffy popcorn coated generously in a rich, buttery, homemade caramel sauce, then often baked at a low temperature to transform that gooey coating into a crisp, irresistible shell. It’s not just plain popcorn with a drizzle; it’s a commitment to crunch and flavor. This beloved confection has roots in American fairs and carnivals, where its intoxicating smell and delightful crunch made it an instant hit. The concept is simple: take something universally loved (popcorn) and make it even better with something equally adored (caramel). It’s essentially a candy-coated popcorn delight, and once you make it yourself, you’ll realize just how much more delicious it is than any pre-packaged variety. It truly stands alone as a sweet, savory, and wonderfully crunchy snack that’s just pure joy.
Why you’ll love this recipe?
Let me count the ways, because I genuinely believe this isn’t just a recipe; it’s a revelation! This particular caramel popcorn recipe is a household legend around here, and for all the right reasons. What I love most about this is… well, everything! But if I had to pick, here’s why I know you’re going to fall head over heels for it too:
- Flavor That Speaks Volumes: Forget those bland, overly sweet store-bought versions. This homemade caramel popcorn boasts a deep, complex flavor. It’s got that rich, almost toffee-like butteriness, a perfect balance of sweet and salty, and a whisper of vanilla that just rounds everything out beautifully. It’s got that nostalgic, comforting taste that just screams happy memories and cozy evenings.
- What is so simple to master? Honestly, making caramel popcorn at home is SO much easier than you think. I know the idea of homemade caramel can sound a bit intimidating, but trust me, this recipe is incredibly forgiving. There’s no fancy candy thermometer absolutely required (though it helps!), and the steps are straightforward. You’ll be whipping up batches in no time, feeling like a kitchen wizard!
- Budget-Friendly Bliss: Let’s be real, a gourmet bag of caramel corn can set you back a pretty penny. But when you make it at home, using simple pantry staples like butter, sugar, and popcorn kernels, you’re looking at a fraction of the cost. You’d be amazed how much you save, especially when your family suddenly develops an insatiable craving for this incredible treat every single weekend.
- Versatility for Any Occasion: This isn’t just for movie nights, though it’s undeniably epic for them! This caramel popcorn is perfect for gifting during the holidays (everyone loves a homemade treat!), it’s a stellar addition to any party dessert table, and honestly, it’s a fantastic pick-me-up on a Tuesday afternoon when you just need something delightfully crunchy and sweet. My kids actually ask for this for their school bake sales now, and it always disappears in minutes! It’s truly the ultimate upgrade for any snack situation, much like how a really good homemade brownie beats any store-bought cake slice.
How to Make Caramel Popcorn
Quick Overview
Making this glorious caramel popcorn involves just a few straightforward stages, and honestly, each one is pretty fun! We’ll start by getting our popcorn light and fluffy. Then, we dive into the magic of creating a rich, buttery caramel sauce right on the stovetop. Next up is coating all that fluffy popcorn evenly with our golden caramel – this part can get a little sticky, but it’s worth it! The grand finale is a gentle bake in the oven, which is truly the secret to achieving that irresistible, shatteringly crisp texture that you just can’t get any other way. It’s much simpler than it sounds, and the low and slow bake is what transforms it from merely sticky to gloriously crunchy caramel popcorn. The trick here is a simple oven bake that really sets that caramel beautifully!
Ingredients
The beauty of this caramel popcorn is that it uses super simple ingredients you probably already have, or can easily find! Quality does make a difference here, especially with the butter. Trust me, it’s worth it for that rich flavor.
For the Popcorn:
- 1 cup unpopped popcorn kernels: I always opt for good quality, organic kernels if I can get them. They tend to pop fluffier and have fewer unpopped ‘old maids’. This will give you about 16-18 cups of popped popcorn.
- 2 tablespoons vegetable oil or coconut oil: For popping on the stovetop. Coconut oil gives a lovely subtle flavor, but vegetable oil works perfectly too.
For the Caramel:
- 1 cup (2 sticks) unsalted butter: Use good quality butter here – it makes all the difference in the caramel’s richness. European-style butter can be a real game changer if you’re feeling fancy!
- 2 cups packed light brown sugar: Light brown sugar gives that classic caramel flavor and a beautiful golden hue. You could use dark brown sugar for a deeper, molasses-y flavor too.
- ½ cup light corn syrup: This is our secret weapon against crystallization, ensuring a smooth, silky caramel every time. Don’t skip it!
- 1 teaspoon salt: Crucial for balancing the sweetness and enhancing all those buttery notes. I often use fine sea salt.
- ½ teaspoon baking soda: This helps create that slightly softer, airier caramel texture, preventing it from becoming rock hard. It also reacts with the sugar to make it more spreadable.
- 1 teaspoon pure vanilla extract: Add this at the very end to preserve its fragrant notes. Mexican vanilla is a personal favorite for its rich aroma.
Step-by-Step Instructions
Step 1: Pop the Popcorn & Prep Pan
First things first, let’s get that popcorn popped! You’ll want to pop your kernels using your preferred method – an air popper is super easy, or you can do it stovetop. If you’re going stovetop, heat your 2 tablespoons of oil in a large, heavy-bottomed pot over medium-high heat. Add 3-4 kernels, cover, and wait until they pop. Then add the rest of your popcorn kernels, cover, and shake gently occasionally until the popping slows to several seconds between pops. Remove promptly from heat. Once popped, pick out any unpopped kernels – nobody wants a broken tooth! Transfer your popped popcorn into two very large roasting pans or baking sheets with low sides, making sure they’re well-greased or lined with parchment paper. This spread-out surface area is crucial for even coating later.
Step 2: Start the Caramel
Now for the star of the show! In a heavy-bottomed saucepan (a 3-quart one is usually perfect), melt the butter over medium heat. Once it’s fully melted, stir in the brown sugar, corn syrup, and salt. Give it a good whisk until everything is combined and the sugar starts to dissolve. Make sure to use a pan with high sides, as the caramel will bubble up later!
Step 3: Boil & Add Vanilla/Baking Soda
Bring the caramel mixture to a rolling boil over medium heat, stirring constantly to prevent scorching. Let it boil for exactly 5 minutes without stirring. If you have a candy thermometer, it should reach around 245°F (118°C). This boiling time is critical for getting the right consistency! Once the 5 minutes are up, immediately remove the saucepan from the heat. Stir in the baking soda and vanilla extract. The mixture will get foamy and lighten in color, which is exactly what we want. This foaminess helps create that wonderfully light and crisp caramel coating.
Step 4: Coat the Popcorn
Quickly but carefully pour the hot, bubbly caramel sauce evenly over the popped popcorn in your prepared roasting pans. Now, using two large, heat-resistant spatulas or wooden spoons, gently toss and stir the popcorn until it’s as evenly coated as possible. This step takes a bit of patience, but try to get every fluffy kernel covered in that golden goodness. Don’t worry if it’s not absolutely perfect; the baking step helps distribute it further.
Step 5: Spread on Pans
Once you’ve got it all coated, spread the caramel-covered popcorn out into a single, even layer in your two prepared roasting pans. You want to avoid big clumps here, as they won’t bake evenly. If you need to, use your hands (carefully, it’s hot!) to separate any big sticky masses. A wooden spoon or spatula works great too.
Step 6: Bake
Preheat your oven to a low 250°F (120°C). Place the pans in the preheated oven. Bake for a total of 1 hour, stirring the popcorn every 15 minutes. This is where the magic really happens, transforming that sticky coating into glorious, crunchy caramel popcorn! The low temperature bakes out the moisture and sets the caramel perfectly. Don’t skip the stirring – it ensures even crispiness and prevents the bottom from getting too dark.
Step 7: Cool & Break Apart
After an hour of baking, remove the pans from the oven. The caramel popcorn will still be a bit soft, but it will crisp up as it cools. Immediately turn the popcorn out onto sheets of parchment paper or aluminum foil on your counter. Let it cool completely. This usually takes at least 30-45 minutes. As it cools, it will harden and become wonderfully crunchy. Once totally cool, use your hands to break the caramel popcorn into bite-sized clusters. This is the moment you’ve been waiting for – hearing that satisfying crunch as you break it apart!
Step 8: Store & Enjoy
Once broken into pieces, your homemade caramel popcorn is ready to be devoured! It’s best enjoyed fresh, but it also stores beautifully. Pop it into an airtight container and keep it at room temperature. It’ll stay perfectly crisp and delicious for about a week. But honestly, at our house, it rarely lasts more than a day or two! Enjoy every single crunchy, sweet, and salty bite!

What to Serve It With
Oh, the possibilities! While a giant bowl of this homemade caramel popcorn is absolutely perfect all on its own, it’s also wonderfully versatile and can elevate so many occasions. For us, a big bowl of homemade caramel popcorn is non-negotiable on family game nights, usually alongside some sparkling cider or a big pitcher of iced tea.
For Movie Night:
Obviously, this is its natural habitat! Ditch the microwave bags and serve this in individual bowls for a truly cinematic experience. Pair it with a classic soda or, for the adults, a crisp craft beer that can cut through the sweetness. Sometimes I even mix in a handful of plain popped corn for a textural contrast!
For Parties & Gatherings:
This caramel popcorn is a total showstopper on a dessert table. Pile it high in a beautiful glass bowl, or set up a little “caramel popcorn bar” with different mix-ins like chocolate chips, chopped nuts (pecans or cashews are amazing!), or even M&M’s. It makes for an incredibly impressive yet surprisingly simple party snack that everyone goes wild for. I’ve even served it in cute little paper cones at birthday parties, and they disappear instantly.
As a Homemade Gift:
Seriously, if you need a heartfelt, delicious gift, this is it. Fill clear cellophane bags, tie them with a pretty ribbon, and give them to neighbors, teachers, or friends. It’s thoughtful, delicious, and way more personal than a store-bought treat. During the holidays, I always make extra batches for gifting, and it’s always a huge hit.
For a Cozy Treat:
Sometimes you just need a little something extra. This caramel popcorn is divine with a mug of hot chocolate on a chilly evening, or alongside your favorite coffee or chai tea for a lovely afternoon pick-me-up. It’s perfect when you’re craving something sweet at 10pm but don’t want to bake a whole cake. You can even crumble it over a scoop of vanilla bean ice cream for an instant upgrade – trust me on that one, it’s divine!

Top Tips for Perfecting Your Caramel Popcorn
After countless batches of caramel popcorn (and a few learning experiences, shall we say!), I’ve gathered some wisdom that I absolutely have to share. These tips are what moved my caramel popcorn from “good” to “OMG, you HAVE to try this!”
Popcorn Prep: The Foundation of Flavor:
Start with fresh popcorn kernels, seriously. Stale kernels won’t pop as fully and can give you a tougher texture. I always recommend using an air popper if you have one, as it yields the fluffiest, lightest popcorn without any residual oil that might interfere with the caramel sticking. If you’re doing stovetop, use a wide, heavy-bottomed pot and make sure you don’t overcook it – burnt popcorn is a no-go! And please, for the love of all things delicious, take a minute to pick out those unpopped kernels before coating. Nobody wants a broken tooth!
Caramel Consistency: Don’t Rush It!
This is where many folks get nervous, but it’s actually pretty forgiving. The key is to let that caramel mixture come to a rolling boil and cook for the full 5 minutes. Rushing the caramel is the number one mistake I’ve learned from; it results in a softer, chewier caramel that won’t crisp up properly. A candy thermometer is helpful here to ensure it hits 245°F (118°C), but if you don’t have one, just stick to the timer. The baking soda is crucial for creating that light, airy, and non-rock-hard texture, so don’t forget it and stir it in quickly after removing from heat.
Coating Evenly: Gentle Does It:
Once that hot caramel is poured over the popcorn, work quickly but gently. Use two large, sturdy spatulas to fold and toss the popcorn. The goal isn’t to perfectly coat every single kernel on the first pass, as the baking process will help distribute the caramel more evenly. Just make sure there are no huge dry spots. It will be sticky, and that’s totally normal! A very large bowl or your roasting pans are perfect for this step.
Baking for Crunch: The Secret Ingredient:
This low and slow bake is absolutely critical for transforming your sticky, sweet popcorn into gloriously crunchy caramel popcorn. Don’t skip it! Baking at 250°F (120°C) for an hour, stirring every 15 minutes, allows the moisture to cook out of the caramel, creating that perfectly crisp, snappy texture. My biggest mistake early on was not baking it long enough, resulting in chewy rather than crunchy caramel popcorn. So, trust me on this one, set your timer and stir away!
Ingredient Swaps & Variations: Get Creative!
While I adore the classic, don’t be afraid to play around!
- Different Sugars: You can experiment with dark brown sugar for a richer, more molasses-like flavor.
- Nuts & Mix-ins: After baking, when the caramel popcorn is still warm, you can toss in some roasted nuts like pecans, almonds, or cashews. A sprinkle of chocolate chips or M&M’s just as it cools is also fantastic.
- Sea Salt Flakes: A light sprinkle of flaky sea salt (like Maldon) over the top just after you remove it from the oven, before it cools, takes this to another level. That extra pop of salty flavor against the sweet caramel is divine!
- Spices: A tiny pinch of cinnamon or even a whisper of cayenne pepper (I know, sounds wild!) can add a wonderful warmth and depth. One time I added a tiny pinch of cayenne pepper… game changer!
Glaze Variations (not applicable here, but generally for baked goods, I would add):
This recipe doesn’t use a glaze, but if it were a cake or muffin, I’d be talking about adding a touch of cream cheese to a frosting for extra tang, or a drizzle of chocolate for decadence. For this caramel popcorn, the caramel itself is the star, but a secondary drizzle of melted chocolate once it’s cooled could be fun!

Storing and Reheating Tips
Once you’ve made a big batch of this phenomenal caramel popcorn, you’ll want to make sure it stays perfectly crisp and delicious for as long as possible. If it even lasts that long at your house, ours disappears in days!
Room Temperature:
This caramel popcorn stores beautifully at room temperature. The most important thing is an airtight container. A large cookie tin, a plastic food storage container with a tight-fitting lid, or even heavy-duty Ziploc bags work perfectly. Kept this way, it will remain wonderfully crisp and fresh for about 5-7 days. Just make sure it’s completely cool before you seal it up, otherwise, condensation can form and make it soft.
Refrigerator Storage:
While you *can* store caramel popcorn in the refrigerator, it’s usually not necessary and can sometimes make it a little chewier due to the humidity. However, if you live in a very humid climate, refrigerating might help maintain its crispness longer. Again, an airtight container is key to prevent it from absorbing fridge odors.
Freezer Instructions:
Yes, you can freeze caramel popcorn! This is fantastic if you want to make a huge batch ahead of time, especially for gifting during the holidays. Place the cooled, broken-apart caramel popcorn in freezer-safe bags or containers, ensuring as much air is removed as possible. It can be frozen for up to 2-3 months. To thaw, simply take it out of the freezer and let it come to room temperature on the counter for an hour or two. It will retain its crunch beautifully!
Quality Preservation:
The biggest enemy of crispy caramel popcorn is moisture. Always make sure your hands are dry when reaching for a snack, and promptly reseal the container after grabbing a handful. If, by some chance, your caramel popcorn starts to lose a little of its crunch after a few days, you can revive it! Spread it out on a baking sheet and pop it back into a 250°F (120°C) oven for about 5-10 minutes. Let it cool completely, and it should crisp right back up. I’ve done this plenty of times, and it works like a charm!
Frequently Asked Questions
Final Thoughts
So there you have it, my friends! My absolute favorite, tried-and-true recipe for homemade caramel popcorn. It’s more than just a snack; it’s a taste of nostalgia, a burst of joy, and a truly impressive treat that I promise will disappear in minutes from any gathering (or just from your own kitchen, no judgment!). It’s got that incredible flavor, a surprising ease of preparation, and that perfect, irresistible crunch that you just can’t replicate with anything store-bought. I genuinely hope you give this one a try, because once you experience the magic of warm, buttery caramel coating crisp popcorn, there’s no turning back. I can’t wait to hear how your kitchen smells when you whip up a batch, and how quickly your family devours it! Happy baking, and don’t forget to share your own variations in the comments below – I’m always looking for new ideas!
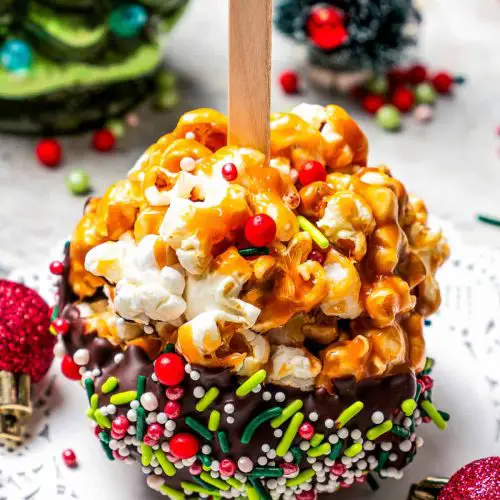
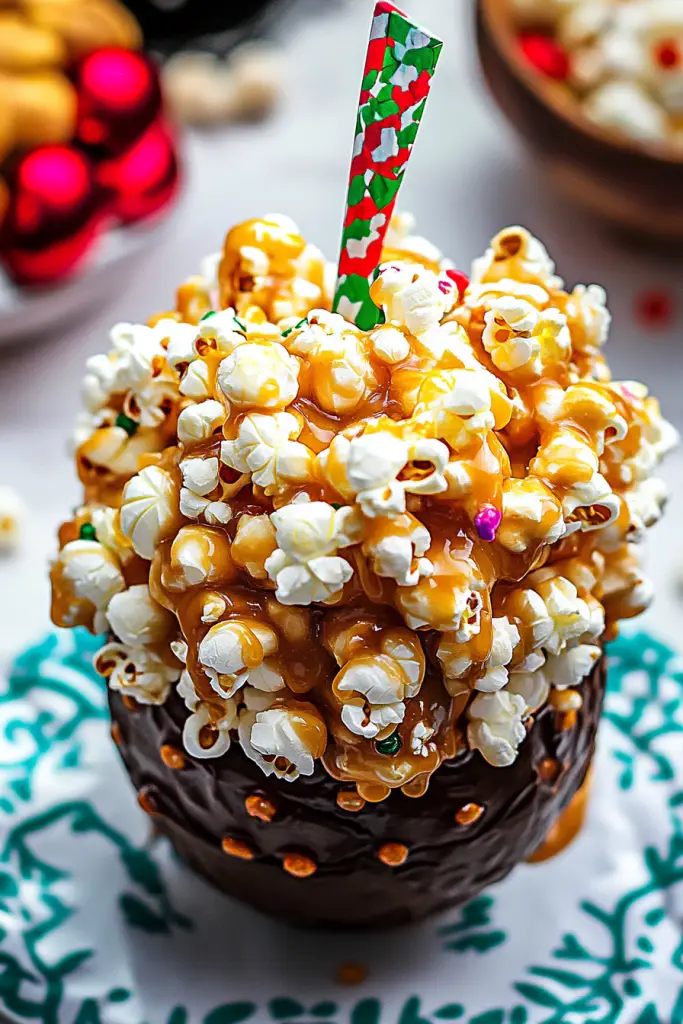
chocolate caramel popcorn balls
Ingredients
Main Ingredients
- 14 cups popped plain popcorn approximately 1 cup of unpopped popcorn
- 14 ounces caramel candies unwrapped
- 4 tablespoons butter softened
- 10 pieces popsicle sticks
- 12 ounces semi-sweet chocolate chips melted
- sprinkles for decorating
Instructions
Preparation Steps
- Pop the popcorn according to package directions. Place the popped popcorn in a large bowl and set aside.
- Melt the caramel candies and butter together in a medium saucepan over medium-low heat, stirring constantly until smooth.
- Pour the melted caramel over the popcorn and mix until all popcorn is evenly coated. Let cool for a few minutes.
- Melt the semi-sweet chocolate chips in the microwave or over a double boiler until smooth.
- Grease your hands with butter and form the coated popcorn into softball-sized balls.
- Insert a popsicle stick into each popcorn ball, dip into melted chocolate, then roll in sprinkles. Place on wax paper and let chocolate set before serving.


