


Oh, you guys, I am so incredibly excited to share this recipe with you today! It’s one of those things that just screams “fun” and “delicious” all at once. Remember those classic Zucchini bread recipes? The ones that were always so moist and comforting? Well, imagine that, but with a vibrant swirl of sweet strawberry goodness, and dressed up just a little bit for a playful, festive touch. I’ve been making these strawberry spooky treats for years, especially around Halloween, but honestly, they’re too good to save just for one season. They’ve become my secret weapon for unexpected guests, a sweet pick-me-up on a dreary Tuesday, or just when I’m craving something that feels a little special without a ton of fuss. They’re way simpler than a full-blown cake, but deliver just as much joy. My kids absolutely adore them, and the way the pink strawberry swirl peeks through the golden blondie… it’s just magical!
What is Strawberry Swirl Blondie?
So, what exactly are these delightful little squares? Think of them as a super-moist, incredibly tender blondie base, but instead of plain ol’ vanilla, we’re swirling in a bright, sweet strawberry concoction. It’s not quite a jam, and not quite a sauce, but something perfectly in-between that bakes up into gorgeous ribbons throughout the blondie. The “spooky” part comes in with a bit of playful decorating, but the core recipe is just pure, unadulterated deliciousness. It’s essentially taking the comforting, buttery goodness of a blondie and giving it a vibrant, fruity, and visually exciting twist. The name “strawberry spooky treats” just felt right because they have this enchanting, slightly mysterious swirl that’s perfect for when you want something a little more exciting than your average baked good, especially when you’re looking for fun recipes for kids.
Why you’ll love this recipe?
Let me count the ways! First off, the flavor is just out of this world. You get that rich, buttery, brown-sugar base of a classic blondie, which is already a winner in my book. But then, BAM! You hit those pockets of sweet, slightly tart strawberry. It’s like a perfect pairing – the rich blondie grounds the bright fruit, and the fruit cuts through the richness. It’s a symphony in your mouth, truly. And don’t even get me started on the texture! These are unbelievably moist and tender. I’ve made other blondies that can sometimes be a bit dry or dense, but this recipe? It’s a lifesaver. The secret, as you’ll see, is in a few simple steps that ensure maximum moisture. Plus, the simplicity is a huge win. While they look and taste incredibly fancy, they come together surprisingly quickly. You don’t need any fancy equipment, just a couple of bowls and a whisk. I also love how budget-friendly it is. Strawberries can sometimes be a splurge, but using frozen ones for the swirl is a fantastic hack that keeps this recipe accessible year-round. And the versatility! These are great on their own, but they’re also a fantastic canvas for adding other flavors or a fun topping. They’re perfect for those moments when you want something sweet and satisfying without the commitment of a whole cake. It really is a winner for so many reasons.
How do I make strawberry swirl blondies?
Quick Overview
The process for these strawberry spooky treats is actually quite straightforward! You’ll whip up a simple, yet incredibly rich blondie batter, then prepare a quick, vibrant strawberry swirl. The magic happens when you layer these two components in your pan, swirl them together for that signature look, and bake until golden and gooey. It’s a foolproof method that guarantees a beautiful, delicious result every single time. You get that comforting blondie texture with bursts of fresh strawberry flavor, all with minimal effort.
Ingredients
For the Main Batter:
* 1 cup (2 sticks) unsalted butter, melted (using good quality butter really makes a difference here!)
* 2 cups packed light Brown Sugar (don’t skimp on this; it’s key for that chewy texture and rich flavor)
* 2 large eggs, at room temperature (this helps them emulsify better)
* 1 teaspoon vanilla extract (use the good stuff if you can!)
* 1 ½ cups all-purpose flour (spooned and leveled, not scooped!)
* ½ teaspoon baking powder (just a touch for lift)
* ¼ teaspoon salt (balances the sweetness)
For the Filling:
* 1 ½ cups fresh or frozen strawberries (if using frozen, no need to thaw, they’ll cook down nicely)
* ¼ cup granulated sugar (adjust to your sweetness preference)
* 1 tablespoon cornstarch (to thicken it up so it swirls beautifully)
* 1 tablespoon lemon juice (brightens up the strawberry flavor)
For the Glaze:
* 1 cup powdered sugar
* 2-3 tablespoons milk or strawberry puree (for color and flavor)
* ½ teaspoon vanilla extract
Step-by-Step Instructions
Step 1: Preheat & Prep Pan
First things first, preheat your oven to 350°F (175°C). Grab an 8×8 inch baking pan. I like to line mine with parchment paper, leaving an overhang on two sides. This makes lifting the finished blondies right out of the pan SO much easier. Seriously, it’s a game-changer for cleanup and for getting perfect, clean slices. Grease the parchment paper lightly too, just for good measure.
Step 2: Mix Dry Ingredients
In a medium bowl, whisk together the all-purpose flour, baking powder, and salt. Give it a good whisk to ensure everything is evenly distributed. This helps prevent any dense pockets of baking powder in your finished blondies.
Step 3: Mix Wet Ingredients
In a large bowl, pour in your melted butter. Add the packed light Brown Sugar and whisk them together until they’re well combined and look smooth. Then, whisk in the eggs one at a time, followed by the vanilla extract. You want this mixture to be nice and glossy.
Step 4: Combine
Now, gradually add the dry ingredients to the wet ingredients. Use a spatula or wooden spoon to gently fold them together until *just* combined. This is super important: don’t overmix! Overmixing develops the gluten in the flour, which can lead to tough blondies. Stop mixing as soon as you don’t see any dry streaks of flour. A few little lumps are totally fine.
Step 5: Prepare Filling
While your batter is chilling slightly, let’s make that gorgeous strawberry swirl. In a small saucepan, combine the strawberries (if using frozen, no need to thaw), granulated sugar, cornstarch, and lemon juice. Cook this over medium heat, stirring frequently, until the strawberries break down and the mixture thickens into a lovely, glossy sauce. This usually takes about 5-8 minutes. You want it thick enough that it won’t completely sink into the batter. Once it’s thickened, remove it from the heat and let it cool slightly.
Step 6: Layer & Swirl
Pour about two-thirds of your blondie batter into the prepared baking pan and spread it out evenly. Then, dollop spoonfuls of the slightly cooled strawberry mixture all over the batter. Now, pour the remaining blondie batter over the strawberry dollops. Grab a butter knife or a skewer and gently swirl the strawberry filling through the batter. Don’t go crazy trying to perfectly marble it; random swirls look the most natural and appealing. You just want to create those beautiful ribbons of color.
Step 7: Bake
Pop the pan into your preheated oven. Bake for 30-35 minutes, or until the edges are set and golden brown, and a toothpick inserted into the center comes out with moist crumbs attached (not wet batter). Keep an eye on it, as ovens can vary. I usually start checking around the 30-minute mark.
Step 8: Cool & Glaze
This is another crucial step: let the blondies cool completely in the pan on a wire rack. I know, I know, it’s torture waiting, but if you try to cut them warm, they’ll just fall apart. Once they’re fully cooled, you can whip up a simple glaze by whisking together the powdered sugar, 2 tablespoons of milk (or strawberry puree for extra color!), and vanilla extract. Add more liquid, a teaspoon at a time, until you reach your desired drizzling consistency. Drizzle this over the cooled blondies. If you’re feeling extra festive, you can even add a few drops of red or pink food coloring to the glaze for those spooky vibes!
Step 9: Slice & Serve
Once the glaze has set a bit, use the parchment paper overhangs to lift the entire slab out of the pan. Place it on a cutting board and slice into squares. These are best served at room temperature. You can totally cut them into fun shapes with cookie cutters too, especially if you’re going for a themed party!
What to Serve It With
These strawberry spooky treats are so wonderfully versatile, they can fit into almost any occasion! For a relaxed breakfast, I love serving a warm square alongside a steaming mug of coffee. The sweetness of the blondie and the subtle strawberry is a lovely way to start the day. For a more elegant brunch, I’ll cut them into smaller, bite-sized pieces and arrange them on a tiered stand with fresh berries and a dollop of whipped cream. They look so pretty! As a dessert, they’re absolutely divine served slightly warm with a scoop of vanilla bean ice cream or a drizzle of crème anglaise. The contrast of warm blondie and cold ice cream is just perfection. And for those cozy, spontaneous snack attacks? They’re wonderful all on their own with a glass of cold milk or a cup of tea. My family also has a tradition of cutting them into little ghost or bat shapes with cookie cutters for Halloween – it’s amazing how a simple shape change can amp up the fun factor! They pair beautifully with other baked goods too, like a simple Sugar Cookie or some shortbread.
Top Tips for Perfecting Your Strawberry Swirl Blondies
Over the years, I’ve picked up a few tricks that I think really elevate these blondies from good to absolutely spectacular. When it comes to the strawberries for the swirl, I’ve found that if you’re using fresh ones, just give them a quick pulse in the food processor to break them down slightly before cooking. This helps them release their juices more readily and speeds up the thickening process. If you’re using frozen, as I often do when strawberries aren’t in season, they work like a charm and don’t require any thawing beforehand, which is a nice little shortcut. For the blondie batter itself, the key, as I mentioned, is not to overmix after adding the flour. Seriously, stop when you see just a few little streaks of dry flour left. It makes all the difference in achieving that super tender, chewy texture. Overmixing is the number one culprit for tough baked goods, and we definitely don’t want that here. When you’re swirling, don’t overdo it. A few gentle swirls are all you need to create those beautiful ribbons. If you swirl too much, you’ll end up with a pink blondie, which is still tasty, but you lose that gorgeous marbling effect. I’ve experimented with different types of strawberries, and while all work, sweeter varieties tend to need a little less added sugar in the filling. Taste your cooked strawberry mixture before you swirl it in to adjust sweetness if needed. For the baking, I always recommend using the parchment paper sling method – it’s a lifesaver for removal and slicing. Also, keep an eye on the bake time; ovens can be so finicky! A toothpick should come out with moist crumbs, not completely clean, as that means they’re already overbaked. If you find your oven runs hot, you might want to tent the blondies with foil towards the end of baking to prevent the edges from getting too dark. For the glaze, I love using strawberry puree instead of milk for an extra punch of flavor and color; it’s a simple swap that really pays off. And if you want to get really creative, a little bit of red or pink food coloring in the glaze can give them that extra spooky flair!
Storing and Reheating Tips
Storing these strawberry spooky treats is pretty straightforward, thankfully! Once they’ve cooled completely, I like to keep them in an airtight container at room temperature. They usually stay wonderfully moist and delicious for about 3-4 days. The key is to make sure they’re fully cooled before covering them, otherwise, you’ll trap steam and they can get a bit soggy. If you’ve already added the glaze, I find they hold up best at room temperature for a couple of days. If it’s particularly warm where you are, or if you’ve added any toppings that might spoil, popping them in the refrigerator is a good option. In the fridge, they’ll last for about a week, though I find the texture can become a little firmer. To reheat, I’ll pop a square in the microwave for about 10-15 seconds – just enough to take the chill off and soften them up a bit. They’re also amazing warmed up in a toaster oven for a few minutes. If you plan to freeze them, I highly recommend doing it *before* glazing. Wrap individual squares tightly in plastic wrap, then place them in a freezer-safe bag or container. They’ll keep well in the freezer for up to 2-3 months. To thaw, simply unwrap them and let them come to room temperature on a wire rack, then add your glaze if desired. For the glaze timing, I always suggest adding it *after* the blondies have cooled completely. If you glaze them before storing at room temperature or in the fridge, the glaze can get sticky or melt. For freezer storage, definitely wait to glaze until after they’ve thawed.
Frequently Asked Questions
Final Thoughts
So there you have it – my beloved strawberry spooky treats! I truly hope you give these a try. They’re more than just a recipe to me; they’re a little slice of happiness that’s perfect for bringing smiles, especially when you’re looking for something fun and festive to bake. The combination of the buttery blondie and the bright strawberry swirl is just something special that always hits the spot. If you enjoyed this recipe, you might also love my Classic Chocolate Chip Blondies or my Fudgy Brownies for more comforting baked goodness. Honestly, the aroma that fills the kitchen when these are baking is enough to make anyone’s day better. I can’t wait to hear how yours turn out! Please leave a comment below and let me know your favorite part, or if you try any fun variations. Happy baking, everyone!
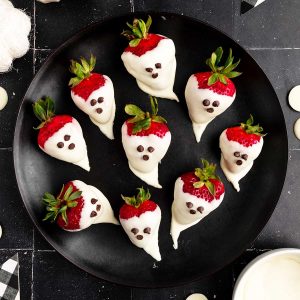
Strawberry Spooky Treats
Ingredients
Main Ingredients
- 1 lb strawberries (about 14-18 berries)
- 10 oz white dipping chocolate or candy melts (about 1.25 cups)
- Mini chocolate chips
Instructions
Preparation Steps
- Line a large baking sheet with parchment paper.
- Rinse the strawberries and dry them completely before dipping.
- Transfer the white chocolate to a microwave-safe bowl. Place the bowl in the microwave and microwave on high for 30 seconds, remove and stir. Microwave for 15-second increments, removing each time to stir before heating for another 15 seconds. Repeat until all the wafers are completely melted.
- Holding the strawberries by the tops, dip ¾ of the strawberry in the melted chocolate. Hold the strawberry over the bowl for several seconds to allow some of the excess chocolate to drip off. Place the strawberry on the parchment paper and then pull the strawberry up slightly to create a ‘ghost tail’ with the excess chocolate.
- While the chocolate is still wet, shape the tail with a spoon or your finger to create a point at the bottom of the tail like a ghost.
- Add the mini chocolate chips before the white chocolate dries. Place the mini chocolate chips with the points up for the eyes and the point down for the mouth.
- Let the chocolate dry for about 10-15 minutes. Once fully dry, store in an airtight container in the fridge and consume within 1-2 days for best quality.


