


There’s something incredibly fun and nostalgic about baking treats that change a season or mood instantly—and ghost brownies have become my family’s absolute favorite for that. I remember the first time I made them, expecting just regular brownies with a little spooky twist, and being blown away by how delightfully moist and rich they were, with this creamy cream cheese swirl cutting through the chocolate like a little surprise. They’re like the lovable cousin of classic brownies but with a playful, whimsical edge that makes them perfect anytime you’re craving something chocolaty but want a bit of Halloween fun (or just a mood booster on any gloomy day). If you’re used to fudgy brownies that can sometimes feel heavy or dry, these ghost brownies bring that luscious softness and tangy cream cheese swirl that’s just next-level. My kids beg for these, and honestly, I’d bake them just for myself on a quiet Sunday afternoon with a big cup of coffee.
What is a ghost brownie?
Think of ghost brownies as a delightful mash-up of rich, fudgy chocolate brownies and creamy cream cheese swirls shaped or decorated with a spooky ghost theme—usually perfect for Halloween, but honestly, they’re good any time you want a little sweet fun. It’s essentially a classic brownie batter mixed with a creamy dollop of sweetened cream cheese that’s swirled in to create those ghostly marbled effects. The ‘ghost’ part comes from the aesthetic, either by swirling patterns that look like ghost shapes or by decorating the cooled brownies with cute ghost-shaped icing or eyes. But the magic is really in how the tanginess of the cream cheese balances out that deep chocolate flavor. It’s a fun way for home bakers to jazz up regular brownies without complicated steps or exotic ingredients. You get this perfect balance that’s both comforting and a little whimsical.
Why you’ll love this recipe?
What I love most about ghost brownies is how approachable they are. You don’t need to be a dessert pro or have expensive ingredients; it’s basically your regular brownie batter with a creamy twist that makes the flavors pop. The cream cheese filling adds this incredible creaminess and a bit of tang that cuts through the sweetness and chocolate—making each bite interesting and joyful. If you’re like me and find plain brownies a bit one-note, this recipe brings layers both in flavor and texture.
They’re surprisingly easy to make, too. You mix up your brownie batter, whisk together a quick cream cheese filling, and then swirl them together. It’s a fail-safe technique that’s saved me on busy nights when I want a cozy treat but can’t commit to anything too complicated. Plus, the ingredients are super budget-friendly—cocoa powder, sugar, cream cheese, eggs, and butter—ingredients you probably already have in your pantry.
It’s also versatile! I’ve seen some variations where people add pumpkin puree or spices in the cream cheese swirl for a fall flair, but I personally stick with the classic because it’s the timeless combo that never disappoints. If you love classic brownies but want a little twist, or even cheesecake fans who want a subtle chocolate hit, these ghost brownies are just the right middle ground. My kids and friends always ask for seconds, and honestly, some disappear in minutes at my house.
How do you make ghost brownies?
Quick Overview
This recipe is a straightforward two-part batter adventure: a rich, fudgy brownie base paired with a luscious, sweetened cream cheese filling that’s swirled together for that ghostly effect. What makes this method special is that you don’t overcomplicate things—you don’t have to prepare two separate desserts, just one magical blend. The swirl technique is forgiving; even if you don’t get a perfect ghost shape, that creamy peek through the chocolate craziness is always heavenly. You can whip this up in under an hour, and that’s including baking and cooling time!
Ingredients
For the Main Batter:
- 1 cup (2 sticks) unsalted butter, melted (use good quality, it really impacts the richness)
- 2 cups granulated sugar (you can reduce a bit if you want, but this is the sweet spot)
- 4 large eggs, at room temperature (trust me, room temp eggs mix better)
- 1 tsp vanilla extract (don’t skip this; it deepens the flavor)
- 1 cup unsweetened cocoa powder (choose Dutch-process for a smoother taste)
- 1 cup all-purpose flour (or gluten-free 1:1 blend)
- 1/2 tsp salt
- 1/2 tsp baking powder (optional, for just a slight lift)
For the Filling:
- 8 oz cream cheese, softened (full fat for creaminess, but light works too)
- 1/2 cup granulated sugar
- 1 large egg
- 1 tsp vanilla extract (mirrors brownie batter vanilla)
For the Glaze:
- 1 cup powdered sugar
- 2-3 tbsp milk or cream (start with less, add until smooth)
- 1/2 tsp vanilla extract
- Optional: edible black gel or mini chocolate chips for ghost eyes
Step-by-Step Instructions
Step 1: Preheat & Prep Pan
Start by preheating your oven to 350°F (175°C). Grease or line a 9×13-inch baking pan with parchment paper, allowing some overhang for easy removal. I always spray the pan lightly and then lay parchment paper to avoid any sticking—it’s a small step that saves so much grief later.
Step 2: Mix Dry Ingredients
In a medium bowl, sift together cocoa powder, flour, salt, and baking powder (if using). Sifting is key here for even mixing and to avoid any clumps of cocoa. You’ll notice the cocoa transforms from dull to rich dark brown just by sifting—the smell alone is pure chocolate heaven!
Step 3: Mix Wet Ingredients
In a large bowl, whisk the melted butter and sugar until combined, then add eggs one at a time, whisking well after each. The mixture will look glossy and thick. Stir in the vanilla extract. Using room temperature eggs here helps the batter look smoother and prevents separation.
Step 4: Combine
Gently fold the dry ingredients into the wet mixture with a spatula—stop as soon as it’s mixed. Overmixing will lead to denser brownies, and trust me, you want this to stay light and fudgy. The batter should be thick and chewy enough to spread yet still fluffy.
Step 5: Prepare Filling
In a separate bowl, beat the softened cream cheese with sugar until smooth; then add the egg and vanilla, mixing until creamy and just combined. The filling should be silky with no lumps—if your cream cheese is cold, warm it slightly in the microwave for 10 seconds to make this easier.
Step 6: Layer & Swirl
Pour about half of the brownie batter into the pan and smooth out evenly. Drop spoonfuls of the cream cheese filling randomly on top. Then, dollop the remaining brownie batter over the filling. Grab a skewer or knife and swirl gently—don’t overdo it or the swirl will blend. Aim for a marbled ghostly pattern; I do big, sweeping S-shapes for the best effect.
Step 7: Bake
Bake in the preheated oven for 35-40 minutes. The edges should look set and the center slightly soft but not wet. A toothpick inserted near the cream cheese swirl will come out with moist crumbs. My oven runs hot, so I start checking at 33 minutes to avoid that dry edge.
Step 8: Cool & Glaze
Let the brownies cool completely in the pan, about 1.5 hours, before glazing—glaze won’t stick well if the brownies are warm. Whisk glaze ingredients until smooth and drizzle with a spoon or put in a piping bag for precise ghost shapes. Add tiny edible ‘eyes’ with chocolate chips or a dab of black edible gel for that final spooky touch.
Step 9: Slice & Serve
Cut into generous squares with a sharp knife wiped clean between cuts for neat edges. Serve at room temperature or slightly chilled—the cream cheese filling sets beautifully chilled but melts a bit when warmed. These brownies go perfectly with a glass of cold milk or a steaming cup of coffee.
What to Serve It With
For Breakfast: Imagine a gooey ghost brownie alongside your morning coffee or chai latte. It feels like an indulgence but hey, sometimes mornings need a little magic. Top with fresh berries or a dollop of yogurt for balance.
For Brunch: Plate these with a dusting of powdered sugar and a side of fresh fruit salad. They’re surprisingly elegant when arranged with seasonal fruits and a sparkling mimosa for a festive vibe.
As Dessert: Serve warm with vanilla ice cream or a drizzle of raspberry coulis. The combination of warm, chocolatey brownies and melting ice cream is unbeatable. Add a sprig of mint or a few chocolate curls for drama.
For Cozy Snacks: These ghost brownies have become my go-to when I want something comforting yet special during an evening binge-watch. Pair with a mug of hot cocoa or spiced apple cider—this duo can brighten any chilly, sleepy night.
Honestly, whenever I bring these to family gatherings or bake sales, they vanish faster than I can blink, and everyone asks for the recipe—nothing beats that sweet kind of validation!
Top Tips for Perfecting Your Ghost Brownies
Zucchini Prep: Okay, slight confession: this particular ghost brownie recipe doesn’t call for zucchini, but I’ve experimented adding shredded zucchini in other brownie recipes for moisture and a veggie boost. If you do try that, squeeze out as much moisture as you can by wrapping it in a clean towel—wet zucchini messes with the texture.
Mixing Advice: Under-mixing is your friend here! When combining wet and dry ingredients, fold gently until you see no streaks of flour. Overmixing makes brownies tough. I learned this the hard way when mine came out cakey instead of fudgy.
Swirl Customization: For that perfect ghostly swirl, don’t swirl too vigorously. Use a skewer or butter knife to create long, sweeping patterns. If you want, you can add a splash of food coloring to the cream cheese to make colorful ghosts—this is a kid-approved variation at my house.
Ingredient Swaps: I’ve switched out butter for coconut oil, which gave a subtle tropical note—fun if you’re looking for something a little different. For gluten-free, I use Bob’s Red Mill 1-to-1 flour blend with excellent results, though the texture is a bit denser.
Baking Tips: Position your rack in the center of the oven to avoid overbrowning the bottom. Every oven is different, so start checking at 33 minutes. Don’t rely solely on toothpick tests at the center; check near the edges around the cream cheese swirl.
Glaze Variations: Vanilla glaze is classic, but I sometimes mix powdered sugar with orange juice or espresso instead of milk for zingy flavors. If you want a thicker glaze, reduce the liquid or add a bit more powdered sugar. For a spooky effect, you can use dark chocolate ganache drizzles or sprinkle edible glitter.
With years of trial and error, these tweaks have made ghost brownies my go-to for fun, festive baking. I’d say the key is to keep it simple and joyful—this is the kind of recipe that invites creativity and keeps you smiling in the kitchen.
Storing and Reheating Tips
Room Temperature: Covered tightly with plastic wrap or in an airtight container, these brownies stay fresh for about 2 days. I usually leave them on the counter if I plan to eat them fast—cool, but not cold, is ideal to keep the cream cheese smooth and soft.
Refrigerator Storage: You can refrigerate them for up to 5 days. Wrap cut pieces individually in parchment and then place in an airtight container to maintain moisture and prevent them from absorbing fridge odors. Chilled brownies firm up the cream cheese filling nicely but can be taken out 30 minutes before serving for softness.
Freezer Instructions: To freeze, wrap brownies well in plastic wrap and then foil or a freezer bag. They stay good for up to 3 months. Thaw overnight in the fridge for best results. I always find freezing helps the swirl flavors meld over time.
Glaze Timing Advice: If you plan to freeze brownies, I recommend glazing after thawing to keep it fresh-looking and smooth. For short-term storage, glaze once brownies have completely cooled for that perfect shine and taste.
These storage tips have saved me from throwing out batches before—they keep the magic alive for whenever your sweet tooth calls.
Frequently Asked Questions
Final Thoughts
I can’t recommend these ghost brownies enough when you want something that tastes like a classic comfort but with a playful, creamy surprise inside. They bring people to the kitchen, spark smiles, and make any day feel just a little more special. I’ve made these countless times—from last-minute Halloween parties to simple weekend treats—and they never fail to lift moods and disappear fast. If you enjoy fudgy treats with a cheesecake twist, you might also want to try my pumpkin swirl brownies or raspberry cheesecake bars for a similar vibe.
Give these ghost brownies a try—you won’t regret it! Don’t forget to share how yours turned out in the comments below, rate the recipe, or tell me your favorite swirl patterns and mix-ins. Happy baking and sending you sweet, spooky vibes!

ghost brownies
Ingredients
Main Ingredients
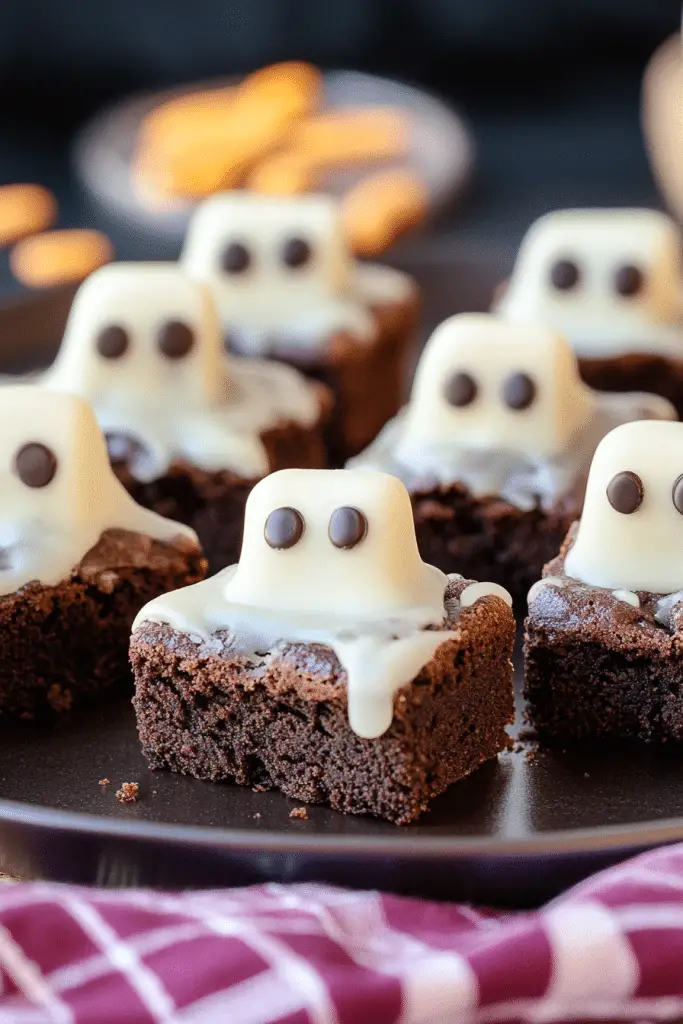
- 12 pieces brownies store-bought or homemade
- 12 large marshmallows
- 12 ounces white chocolate melting wafers
- 4 ounces semi-sweet chocolate chips or chocolate frosting for decorating
Instructions
Preparation Steps
- Bake the brownies according to the package or recipe instructions and allow them to cool completely.
- Cut the cooled brownies into 12 equal pieces.
- Place one marshmallow on top of each brownie piece.
- Melt the white chocolate wafers in the microwave in 1-minute increments, stirring between each, or melt using a double boiler.
- Pour the melted white chocolate over each marshmallow to cover fully.
- Place the brownies in the refrigerator for 10 minutes to set the white chocolate.
- While chilling, melt the semi-sweet chocolate chips using the same method as the white chocolate.
- Put melted chocolate into a piping bag or plastic bag with a small corner cut off for decorating.
- Remove the brownies from refrigerator and pipe chocolate dots to create eyes plus an oval mouth on each marshmallow ghost.
- Let the chocolate dry completely before serving. Enjoy within a few days!


