


Oh, the memories! Just the thought of school cafeteria pizza takes me right back. It wasn’t gourmet, not by a long shot, but there was something so incredibly comforting about that slightly greasy, perfectly chewy slice, often served on a flimsy paper plate. It was the ultimate reward after a long day of fractions and spelling tests. Nowadays, when that craving hits, I don’t have to rely on a school lunch menu. I’ve spent years tweaking and perfecting this recipe, and I’m so excited to share it with you. Forget those fancy Neapolitan pies for a moment; this is about pure, unadulterated comfort. This isn’t just pizza; it’s a nostalgic hug in edible form, and honestly, it blows the original out of the water. Get ready to impress your family with this incredibly easy and utterly delicious take on a childhood favorite.
What is a school cafeteria pizza?
So, what exactly *is* this “school cafeteria pizza” I’m talking about? Think of it as the ultimate nostalgic Comfort Food, elevated. It’s that quintessential pizza vibe we all remember: a sturdy, slightly soft crust that’s never cracker-thin, a generous layer of tangy tomato sauce, and just the right amount of gooey, melted cheese. The magic isn’t in complicated techniques or rare ingredients; it’s in the perfect balance of simplicity and deliciousness. It’s the kind of pizza that feels familiar and exciting all at once. It’s the pizza you could eat cold for breakfast and still be happy about. This recipe captures that essence but with a homemade touch that makes it genuinely irresistible.
Why you’ll love this recipe?
Honestly, there are so many reasons why this recipe has become a staple in my kitchen. First off, the flavor is just spot-on. It has that perfect blend of savory, sweet, and cheesy that just screams comfort food. It’s not overly complex, but the ingredients just sing together. Then there’s the simplicity. I’m talking weeknight-friendly, busy-parent-approved simple. You can have this in the oven in less than 20 minutes, which is a lifesaver when everyone’s asking “What’s for dinner?” at 5 PM. It’s also incredibly cost-effective. Most of the ingredients are pantry staples, making it a budget-friendly option that doesn’t skimp on taste. What I love most, though, is its versatility. It’s perfect on its own, but it’s also a fantastic base for all sorts of toppings. It’s similar to my [link to another simple pizza recipe, e.g., “Sheet Pan Sausage Pizza”] in its ease, but this one has that specific, beloved school cafeteria charm. It’s the kind of dish that brings smiles to faces, and isn’t that what cooking is all about?
How do you make a school cafeteria pizza?
Quick Overview
This recipe is designed for maximum flavor with minimum fuss. We’ll start with a simple, no-fuss dough that bakes up perfectly chewy. Then, we’ll layer on a classic, quick sauce and a generous amount of melty cheese. The whole thing bakes up into a golden-brown masterpiece that’s ready to be devoured. It’s truly as easy as it sounds, and the result is pure pizza perfection that rivals any takeout!
Ingredients
For the Dough:
I always use a good quality all-purpose flour, and it makes all the difference for that classic texture.
1 teaspoon granulated sugar. This little bit of sugar helps activate the yeast and gives the crust a lovely golden hue.
2 ¼ teaspoons active dry yeast (one standard packet). Make sure your yeast is fresh! If it doesn’t bubble up in warm water, it’s time for a new packet.
1 ½ teaspoons salt. Essential for flavor, don’t skip this!
1 tablespoon olive oil, plus more for greasing. A good extra virgin olive oil adds a nice subtle flavor, but any olive oil will do.
1 ½ cups warm water (about 105-115°F). Not too hot, or you’ll kill the yeast, and not too cold, or it won’t activate properly. Think bathwater temperature.
For the Sauce:
1 (15-ounce) can crushed tomatoes. I prefer crushed for a nice texture, but tomato purée works too.
2 cloves garlic, minced. Fresh garlic is best here, but garlic powder works in a pinch (use about ½ teaspoon).
1 teaspoon dried oregano. The classic pizza herb!
½ teaspoon dried basil. Adds that Italian flair.
¼ teaspoon salt, or to taste. Adjust to your preference.
Pinch of red pepper flakes (optional). For a little warmth, if you like it.
For the Toppings:
2 cups shredded mozzarella cheese. Low-moisture, whole milk mozzarella melts the best and gives you that perfect cheese pull.
½ cup shredded cheddar cheese (optional). A little cheddar adds extra flavor and creaminess.
Your favorite pizza toppings: pepperoni, mushrooms, onions, bell peppers – whatever your heart desires!
Step-by-Step Instructions
Step 1: Preheat & Prep Pan
First things first, let’s get the oven fired up. Preheat it to 425°F (220°C). While it’s heating, grab a large baking sheet or a pizza pan. I like to lightly grease mine with olive oil or use a sheet of parchment paper for easy cleanup. This prevents any sticking and ensures a nice, crisp bottom crust.
Step 2: Mix Dry Ingredients
In a large bowl, whisk together the flour, sugar, yeast, and salt. Give it a good stir so everything is evenly distributed. This ensures the yeast and salt are spread out nicely and won’t clump up.
Step 3: Mix Wet Ingredients
In a separate bowl or measuring cup, combine the warm water and olive oil. Make sure the water is at that perfect warm temperature – not too hot, not too cold. This is where our yeast will get its wake-up call!
Step 4: Combine
Pour the wet ingredients into the dry ingredients. Mix everything with a wooden spoon or a spatula until a shaggy dough forms. Then, turn the dough out onto a lightly floured surface and knead for about 5-7 minutes, or until it’s smooth and elastic. It should spring back when you gently poke it. If the dough is too sticky, add a little more flour, a tablespoon at a time. If it feels too dry, add a tiny bit of water.
Step 5: Prepare Filling
While the dough rests, let’s whip up our sauce. In a small bowl, combine the crushed tomatoes, minced garlic, oregano, basil, salt, and optional red pepper flakes. Stir it all together. Taste it and adjust the seasoning if needed. It should be vibrant and flavorful!
Step 6: Layer & Swirl
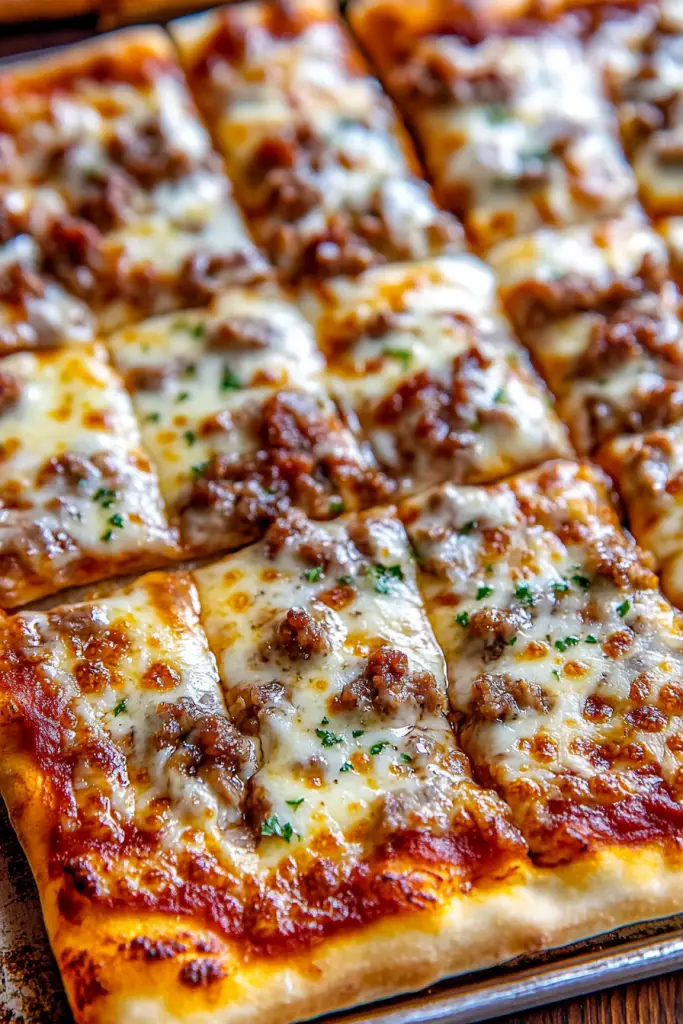
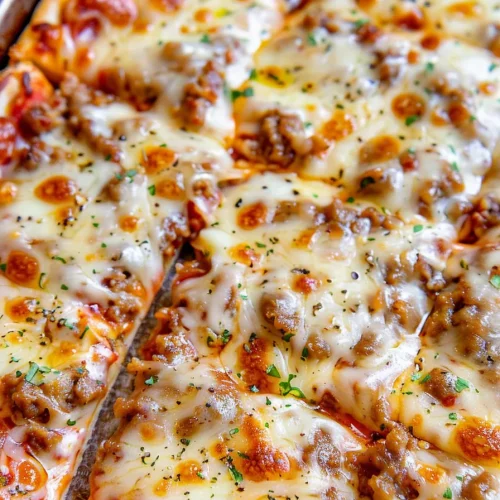
Punch down the risen dough gently. On your prepared baking sheet or pizza pan, press the dough out into your desired pizza shape, aiming for about a ¼-inch thickness. Don’t worry if it’s not perfectly round; rustic is good! Spread the sauce evenly over the dough, leaving a small border for the crust. Then, sprinkle generously with the mozzarella and cheddar cheese. Add your favorite toppings now!
Step 7: Bake
Carefully place the pizza in the preheated oven. Bake for 12-18 minutes, or until the crust is golden brown and the cheese is bubbly and slightly browned in spots. Keep an eye on it, as oven times can vary!
Step 8: Cool & Glaze
Once it’s out of the oven, let the pizza cool on the baking sheet for a few minutes before slicing. This helps the cheese set up a bit and makes it easier to cut. If you’re adding any fresh herbs like basil after baking, now’s the time!
Step 9: Slice & Serve
Use a sharp knife or a pizza cutter to slice your masterpiece. Serve immediately and enjoy that incredible, nostalgic flavor. This is best enjoyed fresh and hot!
What to Serve It With
This “school cafeteria pizza” is a meal in itself, but it’s also fantastic with a few sides. For breakfast, I love a slice alongside a simple cup of coffee. The warmth of the pizza and the bitterness of the coffee is just perfect. For brunch, it feels a bit more special. I’ll often serve it with a light, crisp salad – something like a simple Caesar or a mixed green salad with a vinaigrette really cuts through the richness. For dessert, though it’s not really a dessert pizza, a small, sweet treat afterward, like a couple of cookies, rounds out the meal nicely. On cozy nights, this pizza is the star. I’ll pair it with a bowl of Tomato Soup – oh my gosh, that’s a winning combo! – or some garlic breadsticks. My kids always ask for extra dipping sauce for the crust, usually ranch or marinara. It’s just that good.
Top Tips for Perfecting Your “School Cafeteria Pizza”
I’ve made this pizza more times than I can count, and over the years, I’ve picked up a few tricks that I think really make a difference. For the dough, don’t be afraid to knead it well; that’s where you develop the gluten, which gives you that satisfying chew. If your dough feels sticky, resist the urge to dump in a ton of extra flour – a little at a time is key. When it comes to the sauce, I find that using crushed tomatoes gives it a bit more body than purée. And tasting and adjusting the seasoning is crucial; your sauce should be delicious on its own! For the cheese, I always recommend shredding your own mozzarella. Pre-shredded cheese often has anti-caking agents that can make it melt less smoothly. For toppings, my biggest tip is not to overload the pizza. Too many toppings can make the crust soggy. Pepperoni is a classic for a reason – it gets nice and crispy around the edges! If you’re ever unsure if the crust is cooked through, gently lift an edge with a spatula to check the bottom. It should be golden brown. For a slightly crispier crust, you can preheat your baking sheet or pizza stone in the oven for about 15-20 minutes before placing the pizza on it. This instant heat helps create a fantastic base. And finally, if you want to elevate it without complicating it, a drizzle of olive oil and a sprinkle of Parmesan cheese after baking makes a world of difference!
Storing and Reheating Tips
This pizza is usually gone pretty quickly in my house, but if you happen to have leftovers (which is rare!), here’s how I store and reheat them to keep them tasting as good as possible. For room temperature storage, I usually leave leftover pizza out for no more than two hours. After that, it’s best to get it into the fridge. In the refrigerator, I’ll wrap the slices tightly in plastic wrap or place them in an airtight container. They’ll stay good for about 3-4 days. For longer storage, freezing is a great option. Let the pizza cool completely, then wrap individual slices tightly in plastic wrap, followed by a layer of aluminum foil or a freezer-safe bag. Frozen pizza should last for about 2-3 months. When it’s time to reheat, my favorite method for the best texture is in a skillet on the stovetop over medium-low heat. Place a slice in a dry, non-stick skillet, cover it, and let it heat through for a few minutes until the crust is crisp again and the cheese is melty. If you’re reheating a whole pizza or several slices, the oven is your best bet. Place them on a baking sheet and reheat at around 350°F (175°C) for about 10-15 minutes, or until heated through. The microwave is the fastest option, but it can make the crust a bit chewy, so I usually reserve that for when I’m really in a pinch!
Frequently Asked Questions
Final Thoughts
This “school cafeteria pizza” recipe is so much more than just a meal for me. It’s a delicious trip down memory lane, a reminder of simpler times, and a testament to the fact that some of the most satisfying foods are also the easiest to make. It’s proof that you don’t need fancy ingredients or complicated techniques to create something truly special that your whole family will adore. The combination of a chewy crust, tangy sauce, and perfectly melted cheese is just unbeatable. If you love this recipe, you might also enjoy my [link to another nostalgic recipe, e.g., “Homemade Mac and Cheese”], which has a similar comforting vibe! I really hope you give this pizza a try and create some happy memories in your own kitchen. I can’t wait to hear how yours turns out, so please leave a comment below and tell me what you think, or share your favorite topping combinations!
school cafeteria pizza
Ingredients
Dough
- 2.5 cups all-purpose flour
- 0.5 teaspoon salt
- 2.25 teaspoons instant yeast
- 1.125 cups warm water about 110-115°F
- 2 tablespoons olive oil
Sauce and Toppings
- 1 cup pizza sauce store-bought or homemade
- 2 cups shredded mozzarella cheese
- 0.5 teaspoon dried oregano optional
- 0.5 teaspoon garlic powder optional
Instructions
Preparation Steps
- In a large bowl, whisk together the flour, salt, and yeast.
- Add the warm water and olive oil to the dry ingredients. Mix until a shaggy dough forms.
- Turn the dough out onto a lightly floured surface and knead for 5-7 minutes, until smooth and elastic. Alternatively, use a stand mixer with a dough hook for 5 minutes.
- Lightly grease the bowl with olive oil. Place the dough in the bowl, turning to coat. Cover with plastic wrap or a damp towel and let rise in a warm place for 1 hour, or until doubled in size.
- Preheat your oven to 450°F (230°C). If using a pizza stone, place it in the oven while it preheats.
- Punch down the risen dough and shape it into a 12-inch circle on a lightly floured surface or a piece of parchment paper.
- Transfer the dough to a pizza peel or baking sheet. Spread the pizza sauce evenly over the dough, leaving a small border for the crust.
- Sprinkle the shredded mozzarella cheese over the sauce. Sprinkle with oregano and garlic powder, if using.
- Carefully slide the pizza onto the preheated pizza stone or place the baking sheet in the oven. Bake for 15-20 minutes, or until the crust is golden brown and the cheese is bubbly and slightly browned.
- Let the pizza cool slightly before slicing and serving.


