


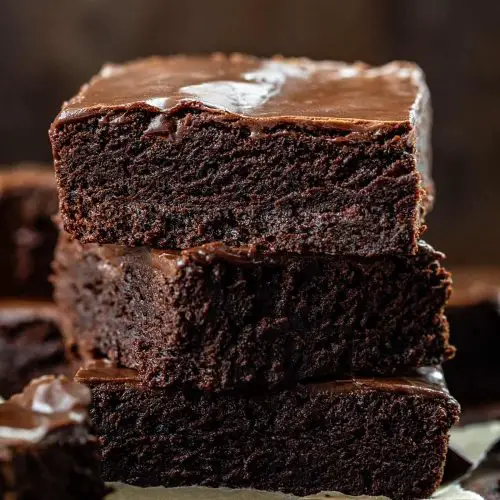
Oh, friend, grab a mug of coffee, because I’m about to spill the beans on a recipe that’s practically legendary inDouble fudge brownies. Double fudge brownies.. You know how some desserts just stick with you, weaving themselves into the fabric of your happiest memories? For me, it’s these brownies. I still remember the smell wafting from her kitchen, a warm, rich cocoa hug that pulled me in from playing outside. Forget those cakey, airy brownies that disappoint – these are the real deal. Dense, ridiculously chocolatey, with that perfect crinkly top and a gooey center that practically melts in your mouth. They’re everything you dream of when you think of a brownie, but so much more intense, like a chocolate truffle decided to become a brownie. And honestly, they’re not much harder to make than your average boxed mix, which is saying something for a dessert this divine!
What is double fudge brownie?
So, what exactly sets a “double fudge” brownie apart from just, well, a regular brownie? Think of it as taking your standard chocolate brownie and cranking the indulgence dial up to eleven. It’s essentially a brownie that uses two distinct forms of chocolate goodness, often in both the batter and an additional layer or swirl, to create an unparalleled depth of flavor and that signature ultra-moist, dense, and chewy texture. This isn’t just a brownie with a lot of cocoa powder; it’s a carefully orchestrated chocolate symphony. My grandma’s recipe, for example, combines melted unsweetened chocolate *and* cocoa powder in the batter, giving it a complex, rich base. Then, we fold in chocolate chips or chunks, which melt into pockets of pure, unadulterated fudge during baking. It’s that combination that earns them the “double fudge” title and makes them so irresistibly decadent. They’re richer, gooier, and frankly, just more satisfying than any single-chocolate brownie could ever hope to be.
Why do people like Double Fudge Brownies?
Let me tell you, these aren’t just any brownies; they’re *the* brownies. What I love most about this recipe, beyond the sheer blissful taste, is how reliably perfect they turn out every single time. It’s a lifesaver when you need a dessert that wows without breaking a sweat in the kitchen.
- Flavor that’ll rock your world: The depth of chocolate here is just phenomenal. We’re talking rich, intense, bittersweet notes from the unsweetened chocolate balanced beautifully with the comfort of cocoa powder. Then you hit those pockets of melted chocolate chips… it’s like a party for your taste buds. This is so much more satisfying than just a regular brownie; it truly lives up to its “double fudge” name.
- Surprising Simplicity: You might think “double fudge” means double the work, but nope! This recipe is surprisingly straightforward. No fancy equipment, no complicated techniques. It’s truly a one-bowl wonder if you’re careful, which means less cleanup – a huge win in my book, especially on busy weeknights! I always do this when I’m craving something epic but short on time.
- Budget-Friendly Indulgence: You’re using pretty standard pantry staples here. Butter, sugar, eggs, flour, cocoa, and some chocolate. Nothing exotic or expensive, which means you can whip up a batch of these extraordinary brownies without feeling guilty about your grocery bill. It’s pure luxury on a budget!
- Versatility for Days: These are amazing on their own, still warm from the oven with that glorious fudgy middle. But they’re also the perfect canvas for Ice Cream (vanilla bean is my personal favorite), a dollop of whipped cream, or a sprinkle of sea salt. They’re perfect when you’re craving something sweet at 10 pm but don’t want to bake a whole cake, or when you need to bring a showstopper to a potluck. My kids ask for these all the time, for every occasion!
They really stand out because they hit that sweet spot between chewy edges and a super moist, fudgy center, a balance many brownie recipes just can’t quite nail. Trust me on this one; once you try these, you’ll understand why they’re a family legend.
How to Make Double Fudge Brownies
Quick Overview
Making these glorious double fudge brownies is a process that’s far simpler than the incredible results suggest! We’re talking minimal fuss for maximum deliciousness. You’ll start by melting down some chocolate and butter together, creating a luxurious base. Then, we whisk in our sugars and eggs, followed by the dry ingredients. The magic really happens when you fold in a generous amount of chocolate chips, ensuring every bite is studded with gooey pockets of chocolate. It’s a pretty forgiving recipe, which I love, and it comes together quickly in just a few steps. The hardest part, truly, is waiting for them to cool enough to cut!
Ingredients
For the Main Batter:
- 1 cup (2 sticks) unsalted butter, melted: I always go for good quality butter here; it really makes a difference in the richness.
- 4 ounces unsweetened chocolate, chopped: This is crucial for that deep, complex chocolate flavor. Don’t skip it!
- 1 ¾ cups granulated sugar: For sweetness and that signature crinkly top.
- ½ cup packed light Brown Sugar: Adds a lovely chewiness and a hint of molasses flavor.
- 4 large eggs: Room temperature eggs emulsify better and give a smoother batter.
- 1 teaspoon pure vanilla extract: A must for enhancing all those chocolate notes.
- 1 cup all-purpose flour: Don’t overmeasure; spoon and level it!
- ¾ cup unsweetened cocoa powder: Another layer of chocolatey goodness. I use Dutch-processed for a darker, smoother flavor.
- ½ teaspoon baking powder: Just a touch for a slight lift, keeping them fudgy.
- ½ teaspoon salt: Balances the sweetness and amplifies the chocolate.
For the Fudge Swirl/Chips:
- 1 ½ cups semi-sweet chocolate chips (or chopped chocolate bar): These are what give us that “double fudge” texture, melting into gooey pockets throughout. Feel free to use milk or Dark Chocolate chips depending on your preference!
For the Optional Glaze (if you want triple fudge!):
- ½ cup semi-sweet chocolate chips: For melting.
- 2 tablespoons unsalted butter: For gloss and richness.
- 1 tablespoon milk or cream: To reach that perfect drizzly consistency.
- Pinch of salt: To cut the sweetness just a bit.
Step-by-Step Instructions
Step 1: Preheat & Prep Pan
First things first, let’s get the oven ready! Preheat your oven to 350°F (175°C). Then, grab a 9×13-inch baking pan. I like to line mine with parchment paper, leaving an overhang on the sides. This creates “handles” that make it super easy to lift the brownies out of the pan once they’re cool, making slicing a breeze. Give the parchment paper a light spray with non-stick cooking spray too, just for extra peace of mind. This step is a lifesaver on busy nights when you don’t want to wrestle a stubborn brownie out of the pan.
Step 2: Melt Chocolate & Butter
In a large, microwave-safe bowl (or a heatproof bowl set over a pot of simmering water – a double boiler method works beautifully here), combine the melted butter and the chopped unsweetened chocolate. Heat in 30-second intervals in the microwave, stirring well after each, until it’s completely smooth and glossy. If you’re doing the double boiler, stir constantly until melted. This needs to be smooth and free of any lumps. Let it cool for just a few minutes while you get your other ingredients ready; we don’t want to scramble the eggs!
Step 3: Mix Wet Ingredients
To the slightly cooled chocolate and butter mixture, add both the granulated sugar and the Brown Sugar. Whisk them in really well until they’re fully incorporated and the mixture looks smooth and shiny. Next, crack in the four large eggs, one at a time, whisking vigorously after each addition until thoroughly combined. You want to see the mixture lighten in color and become quite glossy. Finally, stir in the pure vanilla extract. This step builds the foundation for our fudgy texture and that beautiful crinkly top!
Step 4: Combine Dry & Wet
In a separate medium bowl, whisk together the all-purpose flour, unsweetened cocoa powder, baking powder, and salt. Make sure there are no lumps of cocoa powder! Now, gradually add the dry ingredients to the wet ingredients, mixing on low speed or by hand with a spatula just until *just* combined. The key here is to avoid overmixing. Overmixing develops the gluten in the flour, and we want a fudgy brownie, not a tough, cakey one. A few streaks of flour are totally fine; you’ll incorporate them in the next step.
Step 5: Fold in the Fudge!
This is where the “double fudge” truly comes to life! Gently fold in those 1½ cups of semi-sweet chocolate chips (or chopped chocolate bar). I always do this by hand with a spatula to ensure they’re evenly distributed without overworking the batter. You want those pockets of melting chocolate in every single bite. Don’t be shy; load ’em up! The more chocolate, the better, right? This step is what makes these brownies so incredibly decadent and why they disappear in minutes at my house.
Step 6: Spread & Smooth
Pour the glorious Brownie Batter into your prepared 9×13-inch baking pan. Use your spatula to gently spread the batter evenly into all corners of the pan. You want a consistent thickness so that your brownies bake evenly. Give the pan a gentle tap or two on the counter to release any trapped air bubbles and help settle the batter. Admire the beautiful, rich chocolate mixture; it’s already looking promising!
Step 7: Bake
Slide your pan into the preheated 350°F (175°C) oven. Bake for about 25-30 minutes. Now, here’s my personal trick for perfectly fudgy brownies: don’t overbake them! The edges should look set, and a toothpick inserted into the center should come out with moist crumbs attached, but not wet batter. If it comes out clean, you’ve gone too far, and you’ll end up with a drier brownie. I usually pull mine out around the 27-minute mark because I like them extra gooey. Every oven is different, so keep an eye on them after 20 minutes.
Step 8: Cool & Glaze (Optional)
This is probably the hardest step: patience! Once baked, remove the brownies from the oven and let them cool completely in the pan on a wire rack. I know, I know, it’s tempting to dig in, but cooling allows them to set up and become truly fudgy. If you want that extra layer of chocolatey goodness, while the brownies are cooling (but still a little warm), prepare the optional glaze. Melt ½ cup semi-sweet chocolate chips with 2 tablespoons butter and 1 tablespoon milk or cream in a small bowl until smooth. Stir in a pinch of salt. Drizzle or spread it over the cooled brownies. This is perfect when you’re craving something *really* sweet!
Step 9: Slice & Serve
Once the brownies are completely cool (and the glaze, if using, is set), use those parchment paper “handles” to lift the entire slab out of the pan and onto a cutting board. For clean cuts, use a large, sharp knife, wiping it clean with a damp cloth after each slice. Cut them into squares – classic 3×4 for 12 generous brownies, or smaller 4×6 for 24 bites. Serve them up and watch them disappear! They’re best at room temperature, but a warm one with a scoop of ice cream is pure bliss.
What to Serve Double Fudge Brownies With
While these double fudge brownies are absolutely divine on their own – seriously, don’t underestimate the power of a warm brownie straight from the pan – they’re also incredibly versatile and play well with others! My family has a few favorite pairings that turn these brownies into an even more special treat.
For Breakfast (yes, really!): Okay, maybe not *every* breakfast, but a small square with a strong cup of coffee on a lazy Sunday morning? Pure bliss. The bitterness of a good dark roast coffee cuts through the richness of the chocolate beautifully, making for a sophisticated start to the day. Sometimes, I’ll even warm one up a tiny bit and have it with my morning espresso. It’s my secret indulgence.
For Brunch: If you’re hosting a brunch, these brownies are an unexpected but welcome addition to a spread of pastries, fruit, and quiches. Arrange them neatly on a platter, perhaps with a dusting of cocoa powder or some fresh raspberries for a pop of color. They pair wonderfully with mimosas or a creamy chai latte.
As Dessert: This is their natural habitat, of course! My absolute favorite way to serve them after dinner is slightly warmed, topped with a scoop of really good vanilla bean ice cream. The cold, creamy ice cream melting into the warm, fudgy brownie? Heavenly. A drizzle of homemade caramel sauce or a dollop of fresh whipped cream also elevates them instantly. Sometimes, for a more “grown-up” dessert, I’ll add a sprinkle of flaky sea salt right before serving – it enhances the chocolate flavor beautifully.
For Cozy Snacks: There’s nothing quite like curling up on the couch with a good book and a perfectly fudgy brownie. Pair it with a tall glass of cold milk (my kids’ favorite!), or for the adults, a glass of robust red wine like a Zinfandel or Cabernet Sauvignon. The tannins in the wine really complement the deep chocolate notes. This is perfect when you just need a little sweet pick-me-up in the afternoon.
No matter how you serve them, these brownies always bring a smile to everyone’s face. They just have that magic touch!
Top Tips for Perfecting Your Double Fudge Brownies
I’ve made these brownies countless times over the years, and I’ve picked up a few tricks and learned from a couple of mistakes along the way. Here are my top tips to ensure your double fudge brownies turn out absolutely perfect every single time:
Chocolate Prep: Don’t skimp on the quality of your unsweetened chocolate. It’s the backbone of that deep, intense flavor. Chop it finely so it melts evenly and quickly with the butter. For the chocolate chips you fold in, feel free to experiment! Semi-sweet is classic, but dark chocolate chips add an extra layer of bitterness that some people love, and milk chocolate chips make them extra sweet and creamy. I tested this with a mix of dark and milk chocolate chips, and it was actually fantastic!
Mixing Advice: The golden rule for brownies is *don’t overmix*. Once you add the flour mixture, stir just until the dry ingredients are barely incorporated. A few streaks of flour are okay; they’ll disappear as you fold in the chocolate chips. Overmixing develops gluten, which can lead to a tougher, more cake-like brownie, and we’re aiming for that luscious, fudgy texture. I learned this trick after years of making them too chewy when I first started baking.
Temperature Matters (Eggs & Butter): Make sure your eggs are at room temperature. They incorporate more smoothly into the batter, creating a better emulsion and a silkier texture. Also, let your melted butter and chocolate mixture cool for a few minutes before adding the sugars and eggs. If it’s too hot, you risk scrambling the eggs! That’s a mistake you only make once.
Ingredient Swaps:
- Flour: While I use all-purpose, you can try substituting up to a quarter of the all-purpose flour with whole wheat pastry flour for a slightly nuttier flavor without sacrificing much tenderness.
- Sweeteners: You could reduce the granulated sugar by about ¼ cup if you prefer a less sweet brownie, especially if you’re using sweeter chocolate chips. Just be aware it might slightly affect the crinkly top.
- Fat: While butter is king here, if you’re in a pinch, you can sometimes substitute half of the butter with a neutral oil like canola or vegetable oil. It might make them slightly less rich but still fudgy. I’ve never done it, though; butter is just irreplaceable for me!
Baking Tips:
- Don’t Overbake: This is the absolute most critical tip! Brownies go from perfectly fudgy to dry and cakey in a matter of minutes. Start checking them at 25 minutes. A toothpick inserted into the center should come out with moist crumbs, not wet batter, and not completely clean. The center might still look a little jiggly, but that’s what gives you that incredible fudgy texture once cooled. Trust your gut here!
- Oven Variations: Know your oven! If your oven runs hot, you might need to reduce the baking time by a few minutes or even lower the temperature slightly. I once burnt a whole batch because I wasn’t paying attention to my new oven’s quirks!
Glaze Variations: If you’re doing the optional glaze, you can customize it! Add a tiny pinch of instant coffee granules to the melted chocolate for a mocha kick, or a splash of peppermint extract for a holiday twist. For a thicker glaze, use less milk or cream. For a thinner, drizzly one, add a bit more. This is perfect when you’re feeling a little fancy.
Cooling is Key: I know it’s torture, but let those brownies cool *completely* in the pan on a wire rack before cutting. This allows them to set up, become truly fudgy, and prevents them from crumbling when you slice them. Patience is a virtue, especially when it comes to perfect brownies!
Following these tips will ensure you get those amazing, dense, fudgy, and incredibly chocolatey double fudge brownies every single time. Happy baking!
Storing and Reheating Double Fudge Brownies
One of the best things about these double fudge brownies (besides, you know, everything) is how well they store! You can enjoy them for days, and they stay wonderfully moist and fudgy if you treat them right. I’ve made big batches for parties and kept leftovers delicious for almost a week, which is pretty impressive for any baked good.
Room Temperature: This is my preferred way to store them for up to 3-4 days. Once the brownies are completely cool (and any glaze is set), transfer them to an airtight container. You can keep them whole or slice them first; I usually slice them to make grabbing a quick treat easier. If layering, place a piece of parchment paper between the layers to prevent sticking. Keep the container in a cool, dry spot away from direct sunlight. They retain that perfect fudgy texture beautifully at room temperature.
Refrigerator Storage: If you want them to last a bit longer, or if you live in a very warm or humid climate, the refrigerator is your friend. Store them in an airtight container for up to a week. Be aware that refrigeration can make them a bit firmer, almost like a chocolate fudge bar, which some people actually prefer! If you want to bring them back to their gooey glory, let them sit at room temperature for about 15-30 minutes before serving, or give them a quick zap in the microwave.
Freezer Instructions: Brownies freeze incredibly well, making them perfect for meal prepping your sweet cravings! Once completely cooled, cut the brownies into individual squares. Wrap each square tightly in plastic wrap, then place them in a freezer-safe airtight container or heavy-duty freezer bag. They’ll keep beautifully in the freezer for up to 2-3 months. To thaw, simply take out as many as you need and let them come to room temperature on the counter for an hour or two. You can also pop a frozen brownie into the microwave for 20-30 seconds for a warm, gooey treat. This is a lifesaver on busy nights when you need a quick dessert!
Glaze Timing Advice: If you’re planning to add a glaze, it’s best to do so once the brownies are completely cool and before storing them. If you’re freezing, I’d recommend adding the glaze after thawing, just before serving, for the freshest look and best consistency. However, a set glaze usually freezes just fine too, it just might not look as perfectly glossy upon thawing.
No matter how you store them, these double fudge brownies are always a welcome treat. Enjoy!
Frequently Asked Questions
Final Thoughts
There you have it, my friend – the beloved recipe for grandma’s double fudge brownies. It’s more than just a recipe; it’s a taste of nostalgia, a warm hug in dessert form, and a guaranteed crowd-pleaser that never, ever disappoints. The way the intense chocolate flavor just bursts in your mouth, combined with that incredibly fudgy, dense texture, is something truly special. I’ve made these countless times, and the smell alone brings everyone to the kitchen, waiting for them to cool. If you love rich, decadent desserts that are surprisingly simple to make, these are definitely worth a try. I can’t wait to hear how yours turns out! Don’t forget to leave a comment below with your own tips, variations, or what you paired them with. Happy baking!
double fudge brownies
Ingredients
Main Ingredients
- 1.33 cups Dutch-processed cocoa powder
- 1 cup all-purpose flour
- 1 teaspoon baking powder
- 0.5 teaspoon kosher salt
- 1 teaspoon espresso powder
- 1 cup unsalted butter room temperature
- 2 cups granulated sugar
- 1 cup semi-sweet chocolate chips
- 1 tablespoon vanilla extract
- 4 large eggs eggs room temperature
- 3 tablespoons unsalted butter for frosting, room temperature
- 3 tablespoons unsweetened cocoa powder for frosting
- 1 tablespoon honey for frosting
- 1 teaspoon vanilla extract for frosting
- 1 cup confectioners' sugar for frosting
- 3 tablespoons whole milk or heavy cream, for frosting
Instructions
Brownies
- Preheat the oven to 350°F and spray a 9x13-inch metal baking dish with nonstick cooking spray.
- To a large bowl, add cocoa powder, flour, baking powder, salt, and espresso powder. Whisk to combine. Set aside.
- In a large saucepan over medium heat, add butter and sugar. Once the butter has melted, bring it to a low boil and cook for 2 more minutes, stirring occasionally or until it reaches 230°F on an instant-read thermometer.
- Remove from heat and stir in the chocolate chips and vanilla until completely melted. (The mixture may still be grainy.) Let cool for about 10 minutes.
- When ready, add eggs, one at a time, stirring constantly until smooth.
- To the flour mixture, add the chocolate mixture. Mix until JUST combined.
- Spread the batter into the baking dish and bake for 30-35 minutes, or until slightly puffed.
- While the brownies are baking, make the frosting.
Frosting
- In a stand mixer with the whisk attachment (or using a hand mixer), combine room temperature butter, cocoa powder, honey, vanilla, and confectioners' sugar.
- With the mixer on low speed, combine the ingredients for about 30 seconds.
- Slowly add milk, one tablespoon at a time, until you reach the desired consistency. You may not need all 3 tablespoons, or you may need 1 more. It can vary from season to season and kitchen to kitchen.
- Spread the frosting over the warm brownies.
- Let the brownies cool completely before cutting and serving.


