


Oh, you know those sweltering summer days when the heat just refuses to let up and all you can think about is something, *anything*, to cool you down? That’s exactly when my mind drifts to these vibrant Red White Blue Popsicles. They’re not just a treat; they’re a whole mood, a little burst of patriotic joy in frozen form. I remember making these with my own mom when I was little, and now my kids clamor for them every single time the thermometer climbs. It’s funny, isn’t it? How a simple combination of fruit and ice can bring back so many happy memories. While store-bought popsicles are convenient, they often lack that homemade charm and, let’s be honest, sometimes taste a bit too artificial. This recipe, though? It’s the real deal, packed with natural sweetness and that satisfying icy crunch. Think of it as a grown-up, healthier take on those sugary ice pops we all loved as kids, but with a dazzling presentation that’s perfect for any summer gathering, from a backyard BBQ to a Fourth of July bash.
What is a red white blue popsicle?
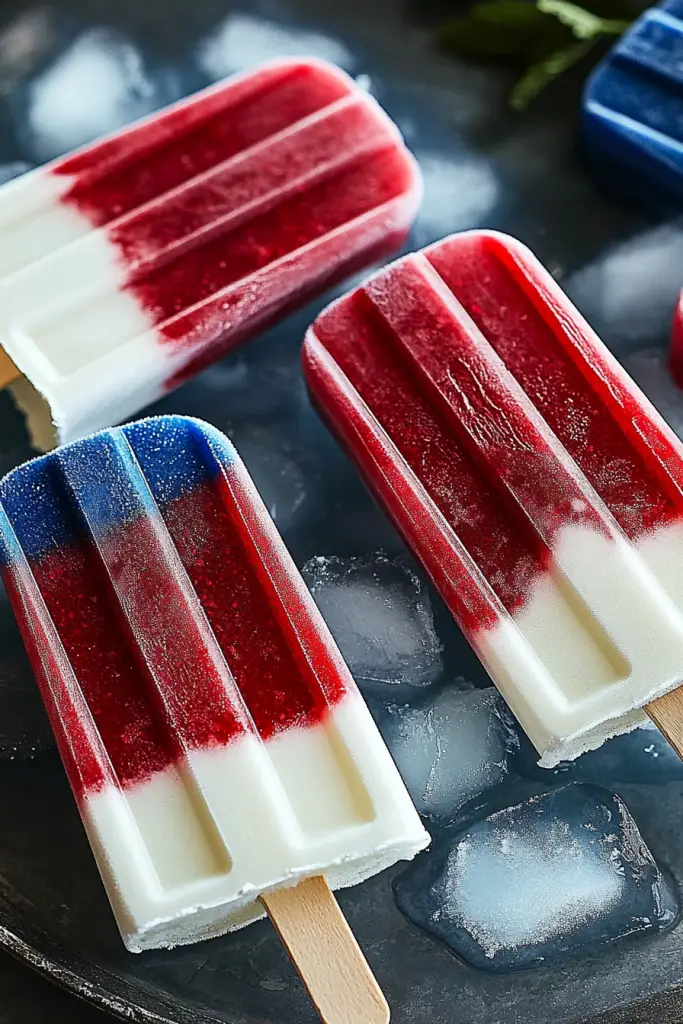
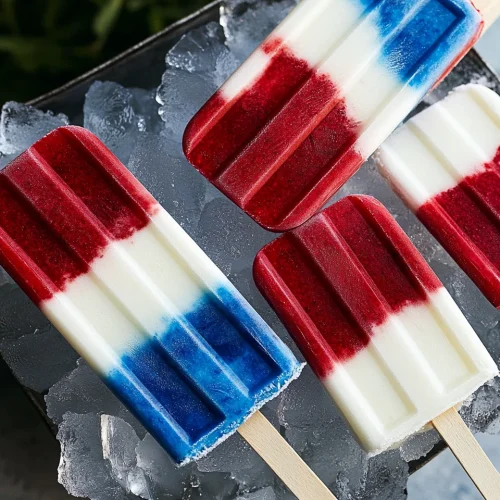
So, what exactly are these delightful Red White Blue Popsicles? At their heart, they’re a layered frozen treat designed to mimic the colors of the American flag. We achieve that stunning visual effect using natural fruit purees – usually strawberries or raspberries for the red, a Creamy White layer often made with yogurt or coconut milk, and blueberries or a blueberry-yogurt mix for the blue. It’s a beautiful, edible representation of summer holidays and warm-weather fun. The magic really happens in how these layers come together. It’s not just about taste, though that’s absolutely crucial, but also about that delightful visual appeal. When you pull one of these out of the freezer, the distinct bands of color are just so striking. They’re essentially a deconstructed fruit salad, but in popsicle form, making them a fantastic way to get some extra fruit into everyone, especially the kiddos. It’s a simple concept, but the execution is where the real joy lies.
Why you’ll love this recipe?
What are some of the reasons why this Red White Blue Popsicle recipe has become a staple in my kitchen, and I’m betting itflavor is just incredible. We’re talking about the bright, tangy sweetness of real fruit, not some artificial flavoring. The combination of berries and that creamy white layer is just divine – refreshing and satisfying without being overly sweet. And the simplicity? You wouldn’t believe it. Honestly, this is one of those recipes that looks way more complicated than it is. It’s perfect for those busy summer afternoons when you want a special treat but don’t have hours to spend in the kitchen. Plus, it’s incredibly cost-efficient. Using fresh or frozen berries and basic dairy or non-dairy staples means you can make a big batch for aversatility is another huge plus. I’ll talk more about variations later, but you can play around with the fruits, the creamy layer, and even add fun mix-ins. What I love most about this recipe, though, is the sheer happiness it brings. It’s colorful, it’s healthy-ish, and it’s undeniably summery. It’s the kind of treat that makes everyone smile. If you’re a fan of my Easy Berry Smoothie Bowl, you’ll appreciate the focus on fresh fruit here, and if you’ve ever enjoyed my No-Bake Lemon Raspberry Bites, you’ll love the cool, refreshing aspect of these popsicles.
How to Make Red White Blue Popsicles
Quick Overview
Making these gorgeous Red White Blue Popsicles is a straightforward process that involves pureeing fruits, layering them carefully in popsicle molds, and letting the magic of your freezer do the rest. The key to success is chilling each layer slightly before adding the next, which helps create those distinct, beautiful bands of color. It’s a recipe that requires a little patience during the layering phase but is incredibly rewarding. Don’t worry if your layers aren’t perfectly sharp – that slightly marbled effect is beautiful too! This method ensures you get a delicious, visually stunning treat that’s perfect for any summer celebration or just a fun afternoon snack.
Ingredients
For the Red Layer (Strawberry/Raspberry):
2 cups fresh or frozen strawberries or raspberries (or a mix!), hulled if fresh
1-2 tablespoons honey, maple syrup, or agave nectar (optional, depending on fruit sweetness)
1 tablespoon fresh lemon juice (brightens the flavor)
For the White Layer (Creamy Base):
1 cup plain Greek yogurt, coconut yogurt, or heavy cream
2 tablespoons honey, maple syrup, or agave nectar (adjust to taste)
1/2 teaspoon vanilla extract
For the Blue Layer (Blueberry/Yogurt):
1 cup fresh or frozen blueberries
1/4 cup plain Greek yogurt or coconut yogurt
1-2 tablespoons honey, maple syrup, or agave nectar (optional)
Step-by-Step Instructions
Step 1: Prepare the Red Layer Puree
In a blender or food processor, combine your strawberries or raspberries with the optional sweetener and lemon juice. Blend until completely smooth. If you’re using frozen fruit, you might need to add a tablespoon or two of water or a little extra lemon juice to help it blend. Taste it and adjust the sweetness if needed. You want it to be bright and flavorful, as the freezing process can dull flavors slightly. Pour this puree into a separate bowl or pitcher and set aside.
Step 2: Prepare the Creamy White Layer Base
In a clean bowl, whisk together the Greek yogurt (or your chosen creamy base), sweetener, and vanilla extract until smooth and well combined. If you’re using heavy cream and want a firmer white layer, you can whip it slightly before folding in the sweetener and vanilla. Taste and adjust sweetness. This layer should be creamy and luscious. Set aside.
Step 3: Prepare the Blue Layer Puree
Similar to the red layer, combine the blueberries with the yogurt and optional sweetener in your blender or food processor. Blend until smooth. If using frozen blueberries, you might need a tiny splash of water or milk to get it moving. This mixture will be a beautiful deep purple-blue. Taste and adjust sweetness. Pour this into another separate bowl or pitcher.
Step 4: Begin Layering in Popsicle Molds
Now for the fun part – layering! Grab your popsicle molds. Start by pouring about one-third of the red fruit puree into each mold. Don’t fill them up all the way yet; leave room for the other layers. Pop these into the freezer for about 30-45 minutes, or until they’re semi-firm to the touch. This crucial step prevents the colors from bleeding into each other too much.
Step 5: Add the White Layer
Once the red layer is semi-firm, carefully spoon or pour about one-third of the creamy white mixture over the red layer in each mold. Again, leave some space at the top. Return the molds to the freezer for another 30-45 minutes until this layer is also semi-firm.
Step 6: Add the Blue Layer
Finally, pour or spoon the blue fruit puree over the white layer, filling the molds almost to the top. If your molds have a line for filling, try to stay just below it to avoid overflow when the lids are on. You can gently tap the molds on the counter to help settle the layers.
Step 7: Insert Popsicle Sticks & Freeze
If your popsicle molds require separate sticks, insert them now. If they have built-in holders, ensure they are in place. Place the molds back into the freezer and freeze for at least 4-6 hours, or preferably overnight, until they are completely solid and firm.
Step 8: Unmold and Enjoy
When you’re ready to enjoy, briefly run the outside of the popsicle molds under warm water for a few seconds. This helps release the popsicles easily. Gently pull on the sticks to unmold them. Serve immediately and revel in your beautiful, homemade Red White Blue Popsicles!
What to Serve It With
These Red White Blue Popsicles are pretty much a standalone star, but they can absolutely elevate other occasions too! For Breakfast, imagine pulling one out on a lazy Saturday morning. It’s a delightful way to start the day, especially if you pair it with a fresh cup of coffee or a cool glass of almond milk. The natural fruit sugars are just enough to perk you up without a sugar crash. For Brunch, these are a showstopper! Serve them alongside pancakes or waffles for a pop of color, or even as a palate cleanser between courses. They’re far lighter than a heavy dessert and always bring a smile to guests’ faces. Picture them nestled in a small glass of sparkling cider for an extra festive touch. As Dessert, they’re perfect for picnics or after a light summer meal. They’re refreshing and don’t leave you feeling heavy. I sometimes serve a small bowl of fresh berries alongside them, and it’s just divine. My family loves having these For Cozy Snacks too. After a day at the park or a long afternoon of playing, these are the ultimate reward. They’re easy for the kids to hold, and I don’t have to worry about them being packed with artificial ingredients. Honestly, they’re great anytime you need a little burst of cool, fruity happiness.
Top Tips for Perfecting Your Red White Blue Popsicles
Over the years, I’ve learned a few little tricks that make these Red White Blue Popsicles even better, and I’m happy to share them with you! For the fruit prep, always aim for the smoothest puree possible. If you’re using fresh berries that have a lot of seeds, like raspberries, you can strain the puree through a fine-mesh sieve after blending to get an incredibly smooth texture. This is a small step but makes a huge difference in the final mouthfeel. For the mixing advice, the key is not to over-blend once you’ve combined wet and dry ingredients (if applicable in other recipes, though less so here with purees). For these popsicles, ensure your purees are smooth but don’t worry about aerating them too much. When it comes to swirl customization, don’t be afraid to get creative! You can use a toothpick or a skewer to gently swirl the layers together *before* freezing for a marbled effect, but remember, the freezing process does most of the work in keeping them separate if you chill each layer sufficiently. For ingredient swaps, if you don’t have Greek yogurt, a thick Coconut Cream works wonders and adds a lovely richness. For the berries, if you can’t find fresh, good-quality frozen berries are usually a fantastic and often more cost-effective option. Just make sure they thaw slightly before blending so they puree easily. Baking tips aren’t really applicable here, but freezing tips are! Ensure your freezer is set to a consistent, cold temperature. Fluctuations can lead to icy popsicles. Also, when you unmold them, don’t let them sit out too long before serving, or they’ll melt faster than you can say “summer fun!” Glaze variations? Well, these popsicles don’t typically have a glaze, but if you wanted to get fancy, you could dip the fully frozen popsicles in a thin layer of melted white chocolate or a coconut-based glaze just before serving for an extra special treat. I’ve found that using a popsicle mold with a good seal is crucial; it prevents freezer burn and helps keep those clean layers intact.
Storing and Reheating Tips
Storing these beautiful Red White Blue Popsicles is pretty straightforward, but a few pointers can help keep them at their best. For Room Temperature storage, well, that’s not really an option for frozen treats! Once they’re out of the mold, they’re meant to be enjoyed pretty much immediately. If you have leftovers *after* serving, they won’t last long on a warm day. Refrigerator Storage isn’t applicable either, as they’ll just melt. Your best bet is the freezer! For Freezer Instructions, the key is proper wrapping. Once the popsicles are completely solid, you can remove them from their molds and wrap each one individually in plastic wrap or place them in a freezer-safe zip-top bag. Make sure to press out as much air as possible from the bag to prevent freezer burn. They should stay delicious for up to 1-2 months. If they start to look a bit frosted or icy after that, they’re still edible, but the texture might be a little less ideal. Glaze Timing Advice? Since these don’t usually have a glaze, it’s not relevant here, but if you decide to add a chocolate dip or similar coating, that should only be done just before serving, as the coating won’t hold up well to long-term freezing and thawing. The most important thing for storage is a consistently cold freezer. If your freezer tends to have temperature swings, using individual freezer bags will offer the best protection.
Frequently Asked Questions
Final Thoughts
There you have it – my go-to recipe for the most delightful Red White Blue Popsicles! I truly hope you give these a try, especially as the weather warms up. They’re such a simple yet effective way to bring a burst of festive color and delicious, fruity flavor to any occasion. What I adore about them is that they feel special enough for a party but are easy enough for a spontaneous treat on a Tuesday afternoon. They’re a reminder that sometimes, the simplest things can bring the most joy. If you love playing with fruit and creating refreshing treats, you might also enjoy my recipe for Watermelon Mint Granita, which offers a similarly cool and invigorating experience. Give these popsicles a whirl, and let me know how they turn out! I can’t wait to hear about your creations in the comments below. Happy freezing!
Red White Blue Popsicles
Ingredients
Red Layer
- 1.5 cup Strawberry Puree
- 0.25 cup Granulated Sugar
- 0.125 cup Lemon Juice
White Layer
- 1.5 cup Greek Yogurt Plain, full-fat
- 0.125 cup Honey
- 0.5 teaspoon Vanilla Extract
Blue Layer
- 1.5 cup Blueberry Puree
- 0.25 cup Granulated Sugar
- 0.125 cup Lemon Juice
Instructions
Preparation Steps
- For the red layer, combine strawberry puree, sugar, and lemon juice in a bowl. Stir until the sugar is dissolved. Pour into popsicle molds, filling about one-third of the way. Freeze for about 1 hour, or until semi-firm.
- For the white layer, whisk together Greek yogurt, honey, and vanilla extract until smooth. Gently spoon over the red layer in the popsicle molds, filling another third. Freeze for about 1 hour, or until semi-firm.
- For the blue layer, combine blueberry puree, sugar, and lemon juice in a bowl. Stir until the sugar is dissolved. Carefully spoon over the white layer to fill the popsicle molds. Insert popsicle sticks.
- Freeze for at least 4-6 hours, or until completely solid. To unmold, run the outside of the molds under warm water for a few seconds.


