


The first time I smuggled a burst of red into a batch of fudgy brownies, the whole kitchen paused—then my kids burst into giggles, scooping scoops of glossy chocolate into their mouths like a pair of little scientists discovering dessert magic. These red velvet brownies aren’t just a color trick; they’re a soft, almost velvet crumb with a cocoa kiss and a swirl of cream cheese goodness that keeps things interesting without turning dessert into a marathon. They’re a little theatrical—perfect for a cozy night in, a bake-sale triumph, or a quick weekend treat when you want something something special but don’t want to pull out the stand mixer for hours. Think of them as the cake’s confident, fudgy cousin, the one who shows up with a smile and still leaves you plenty of square-edged pieces for sharing. I’ll tell you a secret: this recipe is my shortcut to impressing guests on weeknights. It’s incredibly forgiving, and the result feels like you fussed a lot more than you did. Red velvet brownies, my friend, are the edible version of a warm hug in a pan.
What is red velvet brownies?
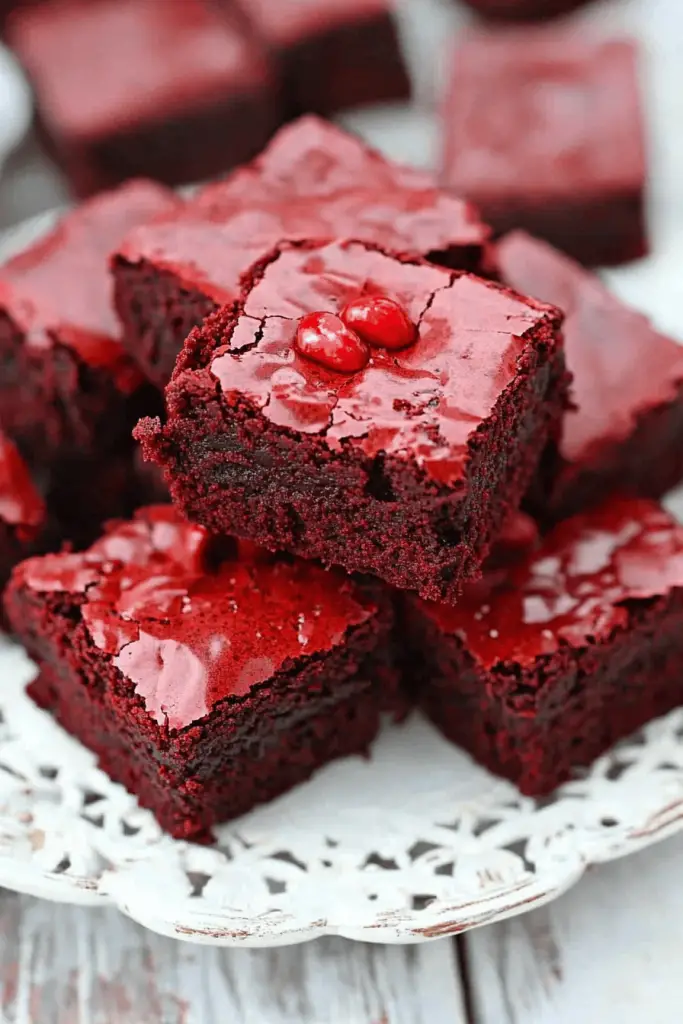
Red Velvet Brownies are essentially fudgy chocolate brownies with a touch of cocoa, kissed with a hint of vanilla, and swirled with a creamy, tangy cream-cheese filling. The red comes from a little food color or cocoa and buttermilk—a nod to the classic Red Velvet Cake—while the brownie base stays dense and glossy, not cakey. Think of it as a dessert that marries two favorites: the fudge of a brownie and the vibrant personality of red velvet cake. The name itself hints at wintery drama and a crowd-pleasing finish. It’s a straightforward concept—brownies that taste like a party in a pan—yet it’s all in the balance: chocolate depth, velvet color, and that ribbon of creamy filling that keeps every bite interesting. I’ve always loved how the color looks against a simple white plate, dusted with a pinch of powdered sugar for a photo-ready moment or a casual, cozy evening with a mug of coffee.
Why you’ll love this recipe?
What I love most about Red Velvet Brownies is how they feel both fancy and forgiving. You get the lush, cocoa-heavy vibe you crave from brownies, but with a little extra flair that screams “special occasion” without the fuss. Here are the flavors and moments that make this recipe a favorite:
- Flavor: Rich chocolate, a whisper of vanilla, and the tangy cream-cheese swirl that sings in the middle. The actual bite is deeply cocoa-forward with a tang that brightens every mouthful. It’s not too sweet, and there’s a little extra depth from the buttermilk or yogurt in the batter.
- Simplicity: It’s surprisingly approachable. You’ll mix dry and wet separately, swirl in the filling, and bake. You can have a showstopper ready in under an hour from start to finish, especially if you’ve got your cream cheese filling prepped in advance.
- Cost-efficiency: What is the best way to measure cost-efficiency? The ingredients are pantry staples. A little cream cheese, cocoa, flour, sugar, and some dairy—nothing fancy, but the payoff is big. I’ve learned to keep a tub of cream cheese on hand for moments like this; it’s a lifesaver on busy nights.
- Versatility: You can tweak the filling, swap the glaze, or adjust the sweetness to match your family’s tastes. It’s also a friendly base for experimentation—think a splash of espresso in the batter, or a cinnamon-sugar sprinkle on top for a morning twist.
- Family moments: What is the best family moment? My kids actually ask for seconds. The swirl makes it feel festive without turning dessert into a long project, and what’s better than sharing a pan that looks almost lick-the-plate special?
If you’ve ever wondered whether you can have a dessert that’s both pretty and practical, this recipe answers with a confident yes. It’s a crowd-pleaser that doesn’t require a lot of special equipment, and the whole house smells like cocoa and vanilla while it bakes—a scent that makes you want to pull up a chair and stay awhile.
How to Make Red Velvet Brownies
Quick Overview
This recipe walks you through a glossy, fudgy brownie base, a creamy cream-Cheese Swirl that winds through the center, and a light glaze that ties everything together. The trick is to keep things balanced: don’t overmix the batter, bake just until the edges pull away, and swirl that filling in before the batter sets. It’s forgiving if you’re a little heavy on the chocolate or a touch light on the glaze. The result is a deeply chocolatey slice with a velvety finish and an eye-catching swirl that looks like you spent ages on it—without actually spending ages on it. It’s also easy to adapt for dairy-free or gluten-free needs with a few simple swaps, which I’ll share in the tips below.
Ingredients
For the Main Batter:
- 2 cups (250 g) all-purpose flour
- 1 cup (200 g) granulated sugar
- 3/4 cup (90 g) unsweetened cocoa powder (preferably natural or Dutch-processed, depending on your preference)
- 1 teaspoon baking powder
- 1/2 teaspoon salt
- 3/4 cup (170 g) unsalted butter, melted and cooled slightly
- 3 large eggs
- 1/2 cup (120 ml) buttermilk or yogurt (for tang and moisture)
- 1 tablespoon red food coloring (or more for a deeper shade)
- 1 teaspoon vanilla extract
For the Filling:
- 8 oz (225 g) Cream Cheese, softened
- 1/4 cup (50 g) granulated sugar
- 1 teaspoon vanilla extract
- 1 large egg yolk (optional for extra richness)
For the Glaze:
- 1/2 cup (60 g) powdered sugar
- 2 tablespoons milk or cream, plus more as needed
- 1/2 teaspoon vanilla extract
- A pinch of salt
Step-by-Step Instructions
Step 1: Preheat & Prep Pan
Heat your oven to 350°F (175°C). Line an 8-by-8-inch pan with parchment or foil, leaving overhangs for easy removal. A quick spray with nonstick spray helps the parchment stick where you want it. I always double-check the edges with a gentle press—you don’t want the batter to seep under the liner and make a crusty edge you’ll have to wrestle with later.
Step 2: Mix Dry Ingredients
In a bowl, whisk together flour, cocoa powder, baking powder, and salt until evenly combined. A light sift isn’t strictly necessary, but it helps avoid clumps, especially with cocoa powder that can hold onto lumps. Set this aside so the flavors stay distinct and the batter stays smooth.
Step 3: Mix Wet Ingredients
In a separate bowl, whisk together melted butter and sugar until glossy. Add eggs one at a time, whisking after each addition. Stir in buttermilk, vanilla, and red food coloring until you have a luxuriously pink-to-deep-red batter. Don’t overmix once you add the dry ingredients—the goal is a thick, even batter that holds its shape without becoming tough.
Step 4: Combine
Pour the wet into the dry and fold gently just until you see no flour streaks. The batter should be thick and glossy. If you overwork it, the brownies can feel a touch dense instead of fudgy. A few streaks are perfectly fine—you’re aiming for a cohesive, rich batter, not a pancake.
Step 5: Prepare Filling
In a stand mixer or with a sturdy whisk, beat the cream cheese with sugar, vanilla, and the optional egg yolk until light and smooth. You want a texture that’s thick but spreadable; it should hold its shape when you dollop or pipe it. If your cream cheese is too soft, chill it for about 10 minutes so it’s easy to swirl into the batter without dissolving completely.
Step 6: Layer & Swirl
Pour about two-thirds of the brownie batter into the pan and smooth to an even layer. Dollop the cream-cheese mixture in spoonfuls across the surface, then drizzle the remaining brownie batter over the top. With a knife or skewer, swirl gently to create a marbled pattern. Don’t over-swirl—the goal is pretty ribbons, not a uniform color. I love how the cream cheese pockets peek through when you cut the first piece.
Step 7: Bake
Bake for 28–34 minutes, or until a toothpick inserted into the center comes out with a few moist crumbs. Edges should look set and slightly pulling away from the pan, while the center remains fudgy. If you’re using a glass pan, start checking closer to the 25-minute mark. Oven temps vary, and a fan-assisted oven can bake a touch faster, so keep an eye on it near the end.
Step 8: Cool & Glaze
Let the brownies cool completely in the pan on a rack before glazing. A warm glaze will seep into the surface and make the top sticky rather than glossy. Whisk the glaze ingredients together until smooth, adding more milk if you need a pourable consistency. Drizzle or spread in a thin layer over the cooled surface, then let it set for a few minutes so you get clean cuts when you slice.
Step 9: Slice & Serve
Lift the bars from the pan using the parchment overhang, then slice into nine to twelve squares. For perfectly clean edges, wipe your knife between cuts and press down gently rather than sawing back and forth. A dusting of powdered sugar makes a pretty finish, especially if you’re sharing these at a brunch or a potluck. I love serving them with vanilla ice cream or a dollop of whipped cream for a contrasting cool temperature and creamy texture.
What to Serve It With
These Red Velvet Brownies are friends with a lot of other flavors, so you’ve got options depending on the occasion. They’re sturdy enough for a dessert bar but soft enough to pair with a casual coffee break. Here are a few ideas that stay true to the mood of the brownie:
For Breakfast: A light dusting of powdered sugar, a touch of espresso crema on top, and a strong cup of coffee. The cocoa notes pair beautifully with a mug of cold brew or a creamy latte. My morning ritual sometimes includes a tiny square with a splash of orange zest—it’s a surprising brightness that wakes up the palate.
For Brunch: Slice into generous rectangles and plate with fresh berries and a dollop of mascarpone. You’ll get creamy tang with the cream cheese swirl that sings next to the tart berries. A light sparkling beverage or a mimosa would be a perfectly festive pairing.
As Dessert: Serve warm with vanilla bean ice cream and a few toasted almond slivers for crunch. The contrast of hot, gooey brownie with cold cream and a little crunch is heavenly. If you want a more sophisticated finish, add a pinch of flaky sea salt to the glaze for a salted-sweet punch.
For Cozy Snacks: These travel well for a movie night or road trip. Bake a batch, cool, and tuck a square or two in a tin. A mug of hot chocolate on a cold night makes this combo unbeatable, and the cream-cheese swirl stays soft for hours, which means you can revisit a bite or two and still feel like you’re indulging without overdoing it.
Top Tips for Perfecting Your Red Velvet Brownies
These tips come from countless bake-sessions, where I learned little tweaks that truly matter. They’ll help you nail the texture, color, and overall balance every single time.
Zucchini Prep: This one’s funny to include, but hear me out: sometimes I’ve experimented with a small amount of zucchini puree to add moisture. If you ever want to try it, use a tiny amount (about 2–4 tablespoons) and make sure you wring out as much moisture as possible. You may need to adjust dry ingredients slightly. If you’re not into vegetable additions, simply stick to the classic approach and you’ll still get a luscious brownie.
Mixing Advice: The moment you add the dry ingredients, fold just until you see no flour streaks. Overmixing makes the texture more dense and dry. If the batter looks a touch stiff, a teaspoon of milk or buttermilk can loosen it without thinning too much. You want the batter to hold its shape but still feel silky as you spread it in the pan.
Swirl Customization: For a more dramatic marbling, reserve a bit more filling and layer it in the middle, then swirl with three perpendicular strokes. If you prefer a cleaner marble, swirl with softer motions and keep some cream cheese touches near the center rather than throughout the entire batter.
Ingredient Swaps: To make a dairy-free version, swap the butter for a neutral oil with a touch extra vanilla, and use a dairy-free cream cheese. For a gluten-free version, use a 1:1 gluten-free flour blend that’s appropriate for baking and avoid any additional gluten-heavy ingredients. You may notice a slightly different crumb, but the flavor remains rich and satisfying. If you want to keep the color vibrant without artificial color, you can use a touch of beet juice or natural coloring, but I still prefer the classic red with a bold cocoa presence.
Baking Tips: If your oven runs hot, lower the temperature by 25°F (about 15°C) and start checking a bit earlier. Edge pulling away from the pan is a good cue for done-ness, but you still want a moist center. If you underbake slightly, you’ll get a glossy center; if you overbake, the brownies will firm up more than you expect. It’s all about finding your oven’s rhythm.
Glaze Variations: The glaze is optional, but I love a glossy finish. If you want a deeper glaze, whisk in a little cocoa powder and a touch more sugar. For a vanilla-chocolate balance, a splash of espresso or coffee liqueur in the glaze can elevate the chocolate notes. You can also skip the glaze and dust with cocoa powder or powdered sugar for a simpler look.
Practice Makes Perfect: I’ve made these countless times, and I still get a little thrill when I see the swirl. It’s comforting to know that this is one of those recipes you can rely on when you’re short on time but still want a dessert that tastes like you spent an hour on it. Trust me on this one—the moment the glaze sets and the first square lands on a plate, you’ll understand why I reach for this recipe first.
Storing and Reheating Tips
Storage makes or breaks leftovers, especially when the cream cheese swirl is involved. Here are practical guidelines I actually use.
Room Temperature: The brownies keep well for up to 2 days in a sealed container. If your kitchen is warm, they may soften a bit, which isn’t a bad thing—just give them a quick chill in the refrigerator if you’re saving them for later and want clean slices.
Refrigerator Storage: Wrap in plastic wrap or store in an airtight container. They’ll stay fresh for up to 5 days. The glaze will firm up in the fridge, but you can let the pieces come to room temperature for about 20 minutes before serving for the best texture.
Freezer Instructions: These freeze beautifully. Wrap individual squares in plastic wrap, then place in a freezer bag. They’ll keep for up to 2–3 months. Thaw in the refrigerator overnight or on the counter for a few hours, then restore a quick glaze if you like a little extra shine before serving.
Glaze Timing Advice: If you’re freezing, you can skip the glaze and add it after thawing for a crisp, glossy top. If you’re storing in the fridge, a light re-glaze before serving can refresh that shiny finish and brighten the flavors.
Bottom line: these brownies are sturdy, but they still benefit from proper storage. A little planning means you’ll have a delicious treat ready at a moment’s notice, whether you’re feeding a crowd or just craving something chocolatey and velvety after dinner.
Frequently Asked Questions
Final Thoughts
Red Velvet Brownies have become one of those recipes I reach for when I want to conjure nostalgia without putting anyone through a complicated bake. The moment you lift the slate-gray kitchen mood with a pop of red, you realize you’ve created something that tastes like a celebration but feels like a warm hug. They’re not fussy, they taste luxurious, and they’re surprisingly versatile—you can tweak the glaze, swap in dairy-free ingredients, or add a pinch of espresso to intensify the chocolate notes. If you’re craving a dessert that feels special but comes together with heart and patience, this is it. Try pairing a square with a scoop of vanilla or a cream-cheese whipped topping, and tell me how your family reacts. Happy baking, friends, and I can’t wait to hear which twist you try first—cream-cheese swirl on the inside, or a glossy top with a kiss of sea salt.

Red velvet brownies
Ingredients
Brownie Batter
- 0.5 cup Unsalted butter, melted
- 1.5 cup Granulated sugar
- 2 Large eggs
- 1 teaspoon Vanilla extract
- 0.5 cup Unsweetened cocoa powder
- 1 teaspoon Red food coloring
- 1 cup All-purpose flour
- 0.5 teaspoon Salt
Cream Cheese Swirl
- 4 ounces Cream cheese, softened
- 0.25 cup Granulated sugar
- 1 Egg yolk
- 0.5 teaspoon Vanilla extract
Instructions
Preparation Steps
- Preheat your oven to 350°F (175°C). Grease and flour an 8x8 inch baking pan, or line it with parchment paper.
- In a large bowl, whisk together the melted butter and granulated sugar until well combined.
- Beat in the eggs one at a time, then stir in the vanilla extract and red food coloring until the batter is a vibrant red.
- In a separate bowl, whisk together the flour and salt.
- Gradually add the dry ingredients to the wet ingredients, mixing until just combined. Do not overmix.
- Prepare the cream cheese swirl: In a small bowl, beat together the softened cream cheese and granulated sugar until smooth. Stir in the egg yolk and vanilla extract until just combined.
- Pour about two-thirds of the brownie batter into the prepared baking pan.
- Dollop spoonfuls of the cream cheese mixture over the brownie batter. Then, pour the remaining brownie batter over the cream cheese. Use a knife or skewer to swirl the cream cheese into the brownie batter.
- Bake for 25-30 minutes, or until a toothpick inserted into the center comes out with moist crumbs attached (not wet batter).
- Let the brownies cool completely in the pan before cutting into squares.


