


I still remember the first time my grandmother handed me a crisp, pale slice of pickled daikon. It snapped with a clean crunch, the scent of rice vinegar and a whisper of sesame. It tasted like a little bite of the pantry, a memory you could bite into. These days, I keep a jar in the fridge and reach for it when I’m whipping up a quick bowl of ramen, stacking a bento, or just craving something bright and refreshing between meetings. This pickled daikon is my go-to because it’s incredibly easy, surprisingly versatile, and somehow manages to feel fancy even on weeknights. If you’ve got daikon in your crisper and a few pantry staples, you can whip this up in under 15 minutes, and it only gets better as it sits. It’s like a tiny jar of sunshine that never fails to lift a meal.
What is Pickled Daikon?
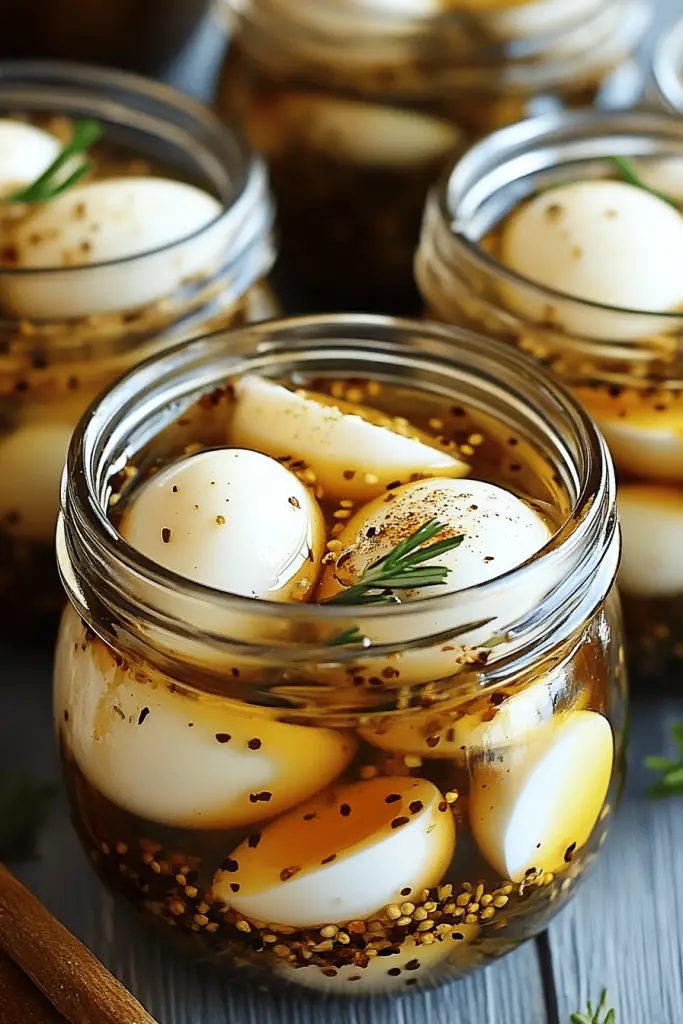
Think of pickled daikon as a bright, tangy refrigerator pickle made from daikon radish. Daikon is that dainty, white carrot-type radish that’s mild, crisp, and cheese-white in color. When it’s pickled, it takes on a clean, slightly sweet-sour bite that pairs with almost everything. The name itself is a clue: it’s a daikon that’s been steeped in a zippy brine until it loses a touch of harshness and gains a gleam of tart, refreshing flavor. It’s essentially a simple, pantry-friendly condiment that brightens bowls, sandwiches, and even fruit-starved snack plates. The beauty of pickled daikon is its adaptability—thin ribbons for garnish, thicker batons for crunch, and a gentle spice kick if you want it. My favorite part is how the aroma fills the kitchen as the brine warms: rice vinegar, sugar, salt, a pinch of chili, and a whisper of sesame. It’s a small ritual that never fails to comfort me.
Why you’ll love this recipe?
What I love most about pickled daikon is that it’s a lifesaver on busy nights. You can make a jarful in minutes, and the flavors deepen in the fridge without any fuss. The flavor profile is bright and clean—there’s tang, a hint of sweetness, and a crisp bite that doesn’t overpower. It’s also incredibly versatile; I’ll tuck it into bowls, top a simple Noodle Soup, or fold it into wraps for a lunch that feels more exciting than it is. This one’s timeless in my kitchen because it respects the daikon’s natural crunch while giving it a tangy personality that wakes up any dish. It won’t break the bank, either—the ingredients are pantry staples, and the yield is generous enough to share with friends or family members who love a little zing on their plates. And if you’re entertaining, this jar looks gorgeous on a board alongside quick pickled carrots and cucumber rounds. The texture—the snap, the glossy finish—will impress without asking you to become a sorcerer in the kitchen. I’ve made this countless times, and it never fails to make me smile when I pop open the fridge and see that bright glow in the jar.
How do you make pickled daikon?
Quick Overview
In just a few minutes, you whisk together a light brine—rice vinegar or white vinegar, sugar, salt, and a touch of heat if you like—then massage the daikon into thin batons or ribbons. You pack the slices into a clean jar, pour the warm brine over, and let everything chill in the fridge. The beauty is twofold: the daikon stays crisp, and the brine swirls through every bite, adding brightness without turning soggy. It’s genuinely one of the easiest ways I’ve found to dress up a simple weekday meal. Trust me on this: you’ll reach for these pickles when you’re craving something refreshing after a long day, and you’ll be glad you did.
Ingredients
For the Main Brine:
- 2 cups white vinegar or/and 1 cup rice vinegar for a milder aroma
- 2–3 tablespoons sugar (adjust to your sweetness preference)
- 1–1.5 teaspoons coarse salt (or to taste)
- 1 cup water (optional, for a lighter brine)
- 1 teaspoon toasted sesame seeds (optional, for aroma)
- 1 small chili (or a pinch red pepper flakes), optional for a gentle heat
For the Flavorings (Filling):
- 1 large daikon, scrubs clean and cut into thin batons or ribbons
- 1-2 garlic cloves, thinly sliced (optional, for aroma)
- 1 small carrot, cut into matchsticks (optional for color)
- A few slices of ginger or a pinch of mustard seeds (optional)
For the Finishing Glaze (optional):
- 1 tablespoon honey or maple syrup
- 1 tablespoon rice vinegar
- Pinch of sesame or a few sesame seeds for garnish
Step-by-Step Instructions
Step 1: Preheat & Prep Pan
Okay, not a real oven preheat here, but we do want to sterilize the jars and keep our workspace tidy. Rinse a clean glass jar with hot water, then let it air-dry while you prep the daikon. If you’re worried about germs, a quick splash of boiling water into the jar and a minute in a warm oven (the oven off, just warm) will do the trick. I always start with the jars first—clean jars, clean lid, everything dry. Your future self will thank you when you pop open that jar weeks later and it’s still crisp.
Step 2: Mix Dry Ingredients
In a small bowl, whisk together salt and sugar so they dissolve evenly in the brine. I love the way the salt and sugar disappear into the hot brine, leaving a smooth, glossy surface on the daikon slices. If you’re using chili or pepper flakes, sprinkle them in now so they can mingle with the sugar and salt as the brine comes to a light simmer.
Step 3: Mix Wet Ingredients
In a separate pot, combine the vinegar and water if you’re diluting. Bring to a gentle simmer just until you can smell the tang in the air—you don’t want to boil it, just warm it so the sugar can dissolve and the daikon can soak up every bit of brightness. If you’re using garlic or ginger, add them in during this warm stage so their aromatics bloom in the steam.
Step 4: Combine
Pour the warm brine over the daikon slices in the jar, making sure they’re fully submerged. If you like a little kick, stir in the chili flakes or pepper, then seal the jar. As it cools, you’ll see the brine taking on a light, honeyed glow from the garlic and ginger. If you’re using the optional glaze, whisk together the glaze ingredients and reserve for later.
Step 5: Prepare Filling
While the brine is doing its quiet work, prep your aromatics. Keep the daikon slices thin for quicker pickling and crisper texture. If you want extra color, toss in carrot sticks or cucumber ribbons. Garlic slices bring a robust bite; ginger lends warmth. This is where you can personalize your jar—I like a few thin daikon ribbons with carrot for rainbow crunch in every bite.
Step 6: Layer & Swirl
Pack the daikon into the jar in tight, neat layers, interspersing with bits of carrot or ginger if you’ve chosen them. A light swirl of the jar after pouring in the brine helps the flavors mingle more evenly. If you’re using sesame seeds, scatter a few along the sides as you fill; the seeds cling to the daikon and add a nutty aroma as you bite in.
Step 7: Bake
I know this sounds off for pickles, but we’re keeping the original section heading. In this context, think of it as letting the brine do its work with a little heat to wake up the flavors. Bring the brine to a gentle simmer, then reduce to a low heat for 2–3 minutes, stirring once. Turn off the heat, let it cool just enough to pour, then fill the jar. The idea is to heat the brine enough that it dissolves all the crystals and begins to coax the daikon into brightness, not so hot that the slices wilt into mush.
Step 8: Cool & Glaze
Let the filled jar cool to room temperature, then refrigerate. The pickles will be best after at least 2 hours, but they’re delicious after a day or two and keep for up to 2 weeks. If you want a glossy finish, whisk together the glaze and brush a thin layer on the daikon just before serving—a tiny touch of sweetness over the tang gives a beautiful sheen and a touch more depth. If you skip the glaze, you’ll still have a brilliant, crisp pickle that tastes like a sunny afternoon.
Step 9: Slice & Serve
When you’re ready to serve, pull out the jar and slice a spear or two to test the texture. The daikon should stay crisp with a gentle bite and a tangy finish. Serve alongside a bowl of miso soup, drape it over a warm bowl of ramen, or tuck it into a bento with rice and greens. My kids actually ask for seconds when I pack these into lunch—their little faces light up at the zing. If you’ve got friends who love a little pickle brightness, these are easy to share since they live happily in the fridge, chilling quietly until their next appearance on the table.
What to Serve It With
Pickled daikon plays nicely with almost anything, but here are some thoughtful, crowd-pleasing ways to enjoy it across a few occasions:
For Breakfast: A thin ribbon of pickled daikon on top of a soft-boiled egg and avocado toast adds a crisp, refreshing contrast. It’s a little jar of brightness that wakes you up without being overpowering. I’ll sometimes tuck a few slices into a breakfast burrito for a zing of crunch. It’s like adding a whisper of sunshine to your morning plate.
For Brunch: Create a quick cold platter with pickled daikon, cucumber, and carrot ribbons. Pair with warm sesame-scented tofu or a light omelet. A little bowl of soy-laced dip or miso mayo makes the flavors pop, and the daikon keeps things fresh between bites of heavier brunch items.
As Dessert: I know it sounds odd, but if you pair these with a dollop of vanilla yogurt and a drizzle of honey, you get a surprising sweet-salty balance. It’s not traditional dessert, but it’s a playful palate cleanser after a hearty meal, with bright acidity that lingers pleasantly on the tongue.
For Cozy Snacks: Roll a few daikon ribbons into a sushi-inspired snack platter with a smear of spicy mayo and a handful of toasted sesame seeds. It’s the kind of snack that disappears in minutes when friends gather around the kitchen island.
Personally, I love keeping a jar in the fridge and pulling it out to light up bowls of rice porridge, simple noodle soups, or even a late-night snack plate. The tang brightens every bite, and the crisp texture stays satisfying long after it’s been made.
Top Tips for Perfecting Your Pickled Daikon
Here are a few tricks I’ve learned after years of making this at home. They’re simple adjustments that can change the whole feel of the pickle depending on what you’re craving that day.
Daikon Prep: Peel only if you want a cleaner white surface, but I usually skip peeling to keep the fiber intact and to preserve the mild peppery bite. If the daikon is a bit dry, salt it lightly and let it rest for 5–10 minutes; this draws out extra moisture and helps the pickling brine penetrate faster.
Daikon Moisture: Pat dry after washing, but don’t rinse away all the natural crispness. A quick drying with a clean towel helps ensure the slices stay crisp in the brine rather than turning soft.
Mixing Advice: When you’re whisking the dry ingredients, make sure they dissolve completely in the warm brine. Crystals left behind will create an uneven sweetness or saltiness. If you do notice graininess, just warm it a bit more and whisk again.
Swirl Customization: Layering with carrot ribbons or chili slices creates a pretty marbling and a more complex flavor profile. If you prefer pure daikon, skip extra aromatics and let the daikon shine with just the brine’s brightness and a hint of sesame.
Ingredient Swaps: If you don’t have rice vinegar, white vinegar works beautifully, though it’s a touch sharper. For sweetness, adjust sugar by a teaspoon or two; for a deeper umami, add a few drops of soy sauce to the brine (start small and taste).
Baking Tips: If you want a more mellow edge, don’t bring the brine to a full boil—just a gentle steam is enough to dissolve the sugar and salt. Some folks like to simmer for 1–2 minutes; I prefer a quick, hot pour and then a long chill in the fridge for that crisp bite.
Glaze Variations: Try a glaze with a dash of citrus juice (lemon, yuzu, or lime) along with honey to create a glossy, tangy finish. The glaze is optional, but it can make an attractive serving option for guests who appreciate a little extra sweetness at the end of a bite.
Lessons learned? Always start with clean jars, slice the daikon evenly so all pieces pickle at the same rate, and don’t overcrowd the jar—give the brine space to circulate. The more you do it, the faster you’ll crave that crisp, zippy brightness in your meals. It’s a small ritual, but it makes a huge difference when you’re seeking something quick, refreshing, and deeply satisfying.
Storing and Reheating Tips
Pickled daikon is remarkably forgiving, which makes it perfect for a busy kitchen. Here are my go-to practices to keep it delicious for longer.
Room Temperature: Not ideal for long-term storage. If you’ve just made a batch, keep it in the fridge. A couple of days at room temperature is fine for a small amount during a tasting, but refrigeration keeps the crispness intact and prevents excessive brining.
Refrigerator Storage: Use a clean glass jar with a tight-fitting lid. The crispness is best in the first week, but it stays good for up to two weeks if you keep it submerged in the brine and away from direct sunlight or heat. If you notice the slices getting limp, you can refresh the brine with a splash of vinegar and a pinch more salt to revive flavor and brightness.
Freezer Instructions: I don’t recommend freezing pickled daikon; the texture will suffer. It’s best enjoyed fresh from the fridge to preserve the crisp bite.
Glaze Timing Advice: If you’ve chosen to glaze, apply it just before serving and not during storage. A glaze can separate over time, so it’s best added at the last moment for visual appeal and a touch of sweetness without masking the brine’s brightness.
In the end, the most important indicator is your taste. If it’s crisp and bright, you’ve got a winner. If it’s a little more subdued, a quick flick of salt or a splash more vinegar can wake it up again.
Frequently Asked Questions
Final Thoughts
There’s something about pickled daikon that feels like a little hug from the pantry. It’s bright, crisp, and versatile enough to pair with almost anything. I love how a simple jar can turn leftovers into a meal or make a quick weeknight dinner feel a little more special. If you’re new to pickling, this is a gentle entry point—no pressure, just a few minutes of hands-on time and a lot of flavor waiting in the fridge. I hope you’ll try it and let me know what you pair it with. I’d love to hear your favorite combinations and any variations you discover. Happy pickling, friends, and may your jars always glow with that satisfying, tangy brightness. Don’t forget to drop a comment with your tweaks, rate the recipe if you’re enjoying it, and share this with someone who could use a bright bite in their week.
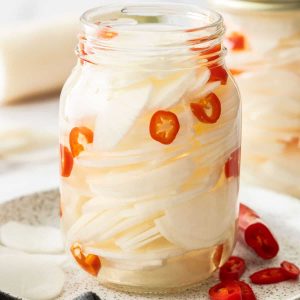
Quick Pickled Daikon Radish
Ingredients
Main Ingredients
- 1 pound Daikon radish peeled and julienned or cut into matchsticks
- 0.5 cup Rice vinegar
- 0.5 cup Water
- 0.25 cup Granulated sugar
- 1 teaspoon Salt
Instructions
Preparation Steps
- In a small saucepan, combine the rice vinegar, water, granulated sugar, and salt. Heat over medium heat, stirring until the sugar and salt are dissolved. Remove from heat.
- Place the julienned daikon radish in a clean jar or container.1 pound Daikon radish
- Pour the warm vinegar mixture over the daikon radish, ensuring it is fully submerged. Let it cool to room temperature.
- Once cooled, cover the container and refrigerate for at least 30 minutes before serving. The longer it pickles, the more flavorful it will become.


