


There are some recipes that just *feel* like home, you know? The kind that fill your kitchen with the most amazing aroma, make your family gather around, and disappear in what feels like mere seconds. For me, that’s this incredible peanut butter sheet cake. It’s not fancy, it’s not complicated, but oh my goodness, it is pure, unadulterated joy in cake form. I’ve made this so many times, through countless family gatherings, weeknight dessert emergencies, and even just those random cravings for something deeply satisfying. It’s the kind of cake that reminds me of my grandmother’s kitchen, but with a twist that’s all my own. If you’ve ever loved a classic Chocolate Sheet Cake, get ready, because this peanut butter version is going to blow you away. It’s truly a lifesaver.
What is a peanut butter sheet cake?
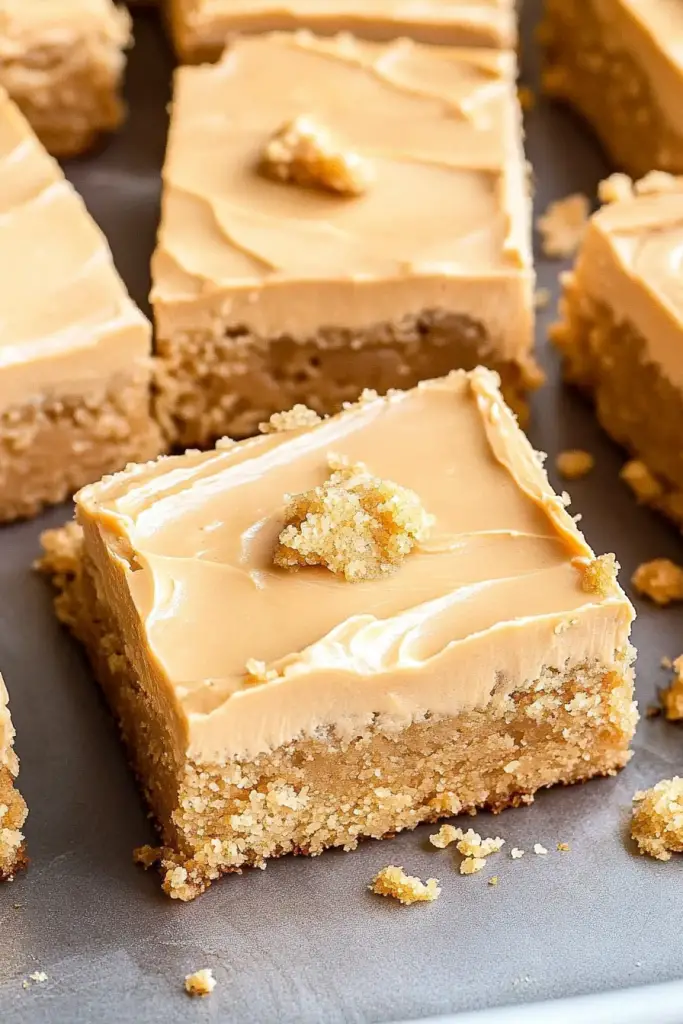
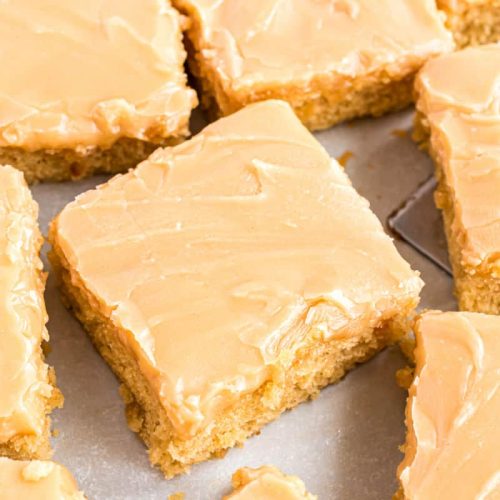
So, what exactly is a Peanut Butter sheet cake? Think of it as your favorite chocolate sheet cake’s slightly more adventurous, incredibly delicious cousin. It’s a tender, moist cake baked in a single, generously sized baking pan (usually a 9×13 inch pan, hence “sheet cake”). The magic happens because it’s infused with that unmistakable, comforting flavor of peanut butter right in the batter. And then, to top it all off, it’s usually finished with a luscious, often peanut butter-infused, frosting or glaze that hardens just slightly, creating this delightful contrast in textures. It’s essentially a hug in cake form, designed for sharing and pure enjoyment without any fuss. It’s the kind of dessert that doesn’t require a special occasion, but honestly, it makes any day feel special.
Why you’ll love this recipe?
Honestly, where do I even begin with why this Peanut Butter sheet cake is a winner? First off, the flavor is just out of this world. It’s that perfect balance of sweet and salty, with the rich, nutty goodness of peanut butter coming through in every single bite. It’s not cloyingly sweet, which is something I really appreciate. The texture is also divine – it’s unbelievably moist and tender, almost melt-in-your-mouth. This is thanks to a couple of little tricks I’ve picked up over the years that I’ll share with you.
Beyond the taste, the sheer simplicity of this cake is a huge selling point. You can whip up the batter in one bowl (yes, really!) and get it into the oven in less time than it takes to preheat your oven for some other cakes. This is a lifesaver on busy weeknights when the craving hits hard, or when you suddenly realize you need a dessert for tomorrow. It’s incredibly budget-friendly too, using pantry staples that most of us already have on hand. No fancy ingredients or last-minute trips to specialty stores needed!
And the versatility! While it’s absolutely perfect on its own, you can dress it up or down. Serve it warm with a scoop of vanilla ice cream, or let it cool completely and enjoy its fudgy goodness. It’s also fantastic for potlucks and parties because it travels so well and feeds a crowd. It’s similar to a classic chocolate cake in its ease, but the Peanut Butter flavor profile makes it stand out in the best way. What I love most about this is that it always delivers. It never fails to make people happy, and that’s the best kind of recipe to have in your arsenal.
How do I make a peanut butter sheet cake?
Quick Overview
This recipe is designed for maximum flavor and minimum fuss. You’ll mix up a simple batter, pour it into a prepared baking pan, and bake until golden. While it bakes, you’ll whip up a quick, irresistible glaze. Once the cake is cooled slightly, the glaze gets poured over, creating a beautiful finish and an extra layer of deliciousness. It’s incredibly straightforward, and I promise, even if you’re new to baking, you’ll nail this one on the first try. The whole process, from start to finish, is surprisingly fast.
Ingredients
For the Main Batter:
2 cups all-purpose flour: Make sure it’s fresh and not expired. I usually sift mine just for good measure, but it’s not strictly necessary if your flour isn’t lumpy.
2 cups granulated sugar: This provides sweetness and moisture. You could experiment with a little less if you prefer a less sweet cake, but I find this balance is just right.
1 teaspoon baking soda: This is crucial for lift and creating that tender crumb.
1 teaspoon salt: Enhances all the other flavors, especially the peanut butter and chocolate if you add those in.
1/2 cup (1 stick) unsalted butter, softened: Softened butter creams better with sugar, leading to a lighter cake.
1/2 cup creamy peanut butter: Use your favorite brand! I prefer a classic creamy peanut butter for this. Natural peanut butter can sometimes separate, so a standard processed one works best for consistency here.
2 large eggs: Room temperature eggs incorporate better into the batter.
1 teaspoon vanilla extract: Pure vanilla extract makes a big difference in flavor depth.
1 cup buttermilk: This is my secret weapon for moist cakes! It adds a subtle tang and reacts with the baking soda for extra tenderness. If you don’t have buttermilk, you can make a substitute by adding 1 tablespoon of lemon juice or white vinegar to 1 cup of milk, letting it sit for 5-10 minutes.
1/2 cup vegetable oil: Or any neutral-flavored oil like canola. This adds even more moisture and keeps the cake incredibly soft for days.
For the Filling (Optional but Highly Recommended!):
1/2 cup creamy peanut butter
1/4 cup packed light brown sugar
1/4 cup all-purpose flour
1/2 teaspoon cinnamon (optional, but so good!)
For the Glaze:
1/2 cup (1 stick) unsalted butter
1/3 cup creamy peanut butter
1 teaspoon vanilla extract
3-4 cups powdered sugar: Start with 3 cups and add more until you reach your desired consistency. Sifting it can help prevent lumps.
2-4 tablespoons milk or heavy cream: For thinning the glaze to the perfect drizzling consistency.
Step-by-Step Instructions
Step 1: Preheat & Prep Pan
First things first, preheat your oven to 350°F (175°C). Grease and flour a 9×13 inch baking pan really well. You can also line it with parchment paper, leaving an overhang on the sides. This makes lifting the cake out so much easier later on, and ensures no sticky bits get left behind. I always give my pans an extra good greasing – no one wants a cake stuck in the pan!
Step 2: Mix Dry Ingredients
In a large bowl, whisk together the 2 cups of all-purpose flour, 2 cups of granulated sugar, 1 teaspoon of baking soda, and 1 teaspoon of salt. Give it a good whisk until everything is well combined. This ensures the leavening agent and salt are evenly distributed, which is key for an even bake.
Step 3: Mix Wet Ingredients
In a separate medium bowl, or in the bowl of your stand mixer, cream together the softened 1/2 cup of butter and 1/2 cup of peanut butter until smooth and fluffy. Then, beat in the 2 large eggs, one at a time, followed by the 1 teaspoon of vanilla extract. Make sure to scrape down the sides of the bowl as you go.
Step 4: Combine
Now, add about half of the dry ingredients to the wet ingredients and mix on low speed until just combined. Then, pour in the 1 cup of buttermilk and the 1/2 cup of vegetable oil. Mix again until just incorporated. Finally, add the remaining dry ingredients and mix on low speed until the batter is smooth and there are no streaks of flour. Be careful not to overmix here; overmixing can lead to a tough cake. We want it tender!
Step 5: Prepare Filling
If you’re using the filling, it’s super easy. In a small bowl, just stir together the 1/2 cup peanut butter, 1/4 cup brown sugar, 1/4 cup flour, and the optional 1/2 teaspoon cinnamon until it forms a crumbly mixture. This adds another delightful layer of peanut butter flavor and a slightly different texture.
Step 6: Layer & Swirl
Pour about half of the cake batter into your prepared 9×13 inch pan and spread it evenly. If you’re using the filling, sprinkle it evenly over the batter. Then, carefully pour the remaining cake batter over the filling (or directly onto the first layer if you skipped the filling). You can gently swirl the batter a bit with a knife or toothpick if you want to create some interesting patterns, especially if you’ve added the filling. Don’t over-swirl, though, or the layers will just blend together!
Step 7: Bake
Bake in your preheated oven for 30-35 minutes, or until a wooden skewer or toothpick inserted into the center comes out clean. Keep an eye on it, as oven temperatures can vary. You want it cooked through but still wonderfully moist.
Step 8: Cool & Glaze
Let the cake cool in the pan on a wire rack for about 15-20 minutes. While it’s cooling, make the glaze. In a medium saucepan over low heat, melt the 1/2 cup butter and 1/3 cup peanut butter together. Stir until smooth. Remove from heat and whisk in the 1 teaspoon vanilla extract. Gradually whisk in the powdered sugar, starting with 3 cups, alternating with a tablespoon or two of milk or cream, until you reach a pourable but not too thin consistency. It should be thick enough to coat the cake but still spreadable. Once the cake has cooled slightly, pour the warm glaze over the top, spreading it evenly to the edges. The glaze will set up a bit as it cools.
Step 9: Slice & Serve
Allow the glaze to set for at least another 15-20 minutes before slicing. This cake is delicious served warm, at room temperature, or even slightly chilled. Cut into squares and enjoy! It’s fantastic on its own, but even better with a tall glass of cold milk or a hot cup of coffee.
What to Serve It With
This peanut butter sheet cake is so versatile, it works for pretty much any occasion!
For Breakfast: I know, it sounds decadent, but a thin slice of this cake is actually amazing with a strong cup of coffee to start the day. The sweetness isn’t overpowering, and the nutty flavor is so comforting. It’s like a little treat to kick off your morning. It also pairs beautifully with a simple fruit salad to balance things out.
For Brunch: For a more elegant brunch spread, I like to cut it into smaller, neat squares. Serve it alongside some fresh berries or a dollop of whipped cream. A mimosa or a nice cup of tea would be perfect beverage pairings. It adds that touch of indulgence without being too heavy.
As Dessert: This is where it truly shines! For a decadent after-dinner treat, serve a warm slice with a scoop of good quality vanilla bean ice cream. The contrast of warm cake and cold ice cream is just heavenly. A drizzle of chocolate sauce or some chopped roasted peanuts on top would also be a fantastic addition.
For Cozy Snacks: This is my go-to for those chilly evenings when you just need something comforting. Cut a generous slice, curl up on the couch with a mug of hot chocolate or a warm glass of milk. It’s pure, simple bliss. My kids absolutely adore it as an after-school snack, and honestly, so do I!
My family also has a tradition of having this cake after Sunday dinner. It’s become our little ritual, and the smell of it baking always signals that it’s time to relax and connect. We’ve tried it with other nut butters in the glaze, like almond butter, and it’s surprisingly delicious too, though nothing beats the classic peanut butter for me.
Top Tips for Perfecting Your Peanut Butter Sheet Cake
I’ve made this peanut butter sheet cake more times than I can count, and through all those bakes, I’ve picked up a few tricks that I think really elevate it. These little bits of wisdom have saved me from a few baking mishaps over the years!
Zucchini Prep: Now, you might have noticed I didn’t put zucchini in this recipe, but that’s a mistake I made early on! I once tried to add shredded zucchini to a peanut butter cake, thinking it would make it even moister. However, I didn’t squeeze out enough water, and the cake ended up dense and gummy. So, my advice is to stick to the tested recipe here, or if you *do* want to experiment with adding something like grated zucchini or applesauce, be sure to squeeze out as much moisture as possible. For this specific recipe, though, the oil and buttermilk do all the work to keep it perfectly moist!
Mixing Advice: The biggest enemy of a tender cake is overmixing. Once you add the flour, you want to mix only until *just* combined. You’ll see streaks of flour disappear, and then stop. Overmixing develops the gluten in the flour, which can make your cake tough and chewy, and we definitely don’t want that. The batter should be thick but smooth. I always use the lowest speed on my mixer for the final incorporation of dry ingredients.
Swirl Customization: If you decide to add that delicious peanut butter filling (and I highly recommend you do!), don’t go crazy with the swirling. A few gentle passes with a knife or a toothpick will create lovely marbled patterns. If you swirl too much, the peanut butter mixture will just blend into the batter, and you’ll lose that distinct layer. Sometimes I even just dot the filling over the first layer of batter and then pour the second layer over, letting the baking process do some of the melding.
Ingredient Swaps: While this recipe is fantastic as written, I know some of you like to experiment. For a dairy-free version, you can absolutely use a non-dairy milk (like almond or soy milk) with the vinegar/lemon juice trick for the buttermilk, and ensure your butter is a dairy-free alternative. I’ve also had success using a good quality dairy-free butter substitute in the glaze. For a slightly deeper flavor, you could try using a mix of all-purpose and whole wheat flour, but use only about a quarter of the whole wheat to avoid a dense texture.
Baking Tips: Always trust your oven, but a good rule of thumb is the toothpick test. If it comes out with wet batter clinging to it, it needs more time. If it comes out clean with just a few moist crumbs, it’s perfect. If it comes out totally dry, it might be slightly overbaked. I usually place my cake pan in the center of the oven to ensure even heating. Sometimes, if the top is browning too quickly, I’ll loosely tent it with foil for the last 10 minutes of baking.
Glaze Variations: The glaze is pretty forgiving. If it seems too thick, add milk or cream a teaspoon at a time until it’s pourable. If it’s too thin, whisk in a bit more powdered sugar. For an extra flavor punch, you can add a tablespoon of cocoa powder to the glaze for a chocolate-peanut butter swirl effect, or even a pinch of sea salt right before pouring for a salted caramel-like finish.
Storing and Reheating Tips
One of the best things about a sheet cake is how well it keeps! It’s truly designed for making ahead and enjoying over several days, which is fantastic.
Room Temperature: Once the glaze has fully set, you can store the cake right in the baking pan, covered tightly with plastic wrap or a lid. It will stay wonderfully moist and delicious at room temperature for about 2-3 days. Make sure the room isn’t too warm, though, as that can affect the glaze. I usually keep it on the counter if I know we’ll be finishing it off within a couple of days.
Refrigerator Storage: If you want to keep it fresh for longer, or if your kitchen tends to be warm, the refrigerator is your best bet. Again, keep it covered tightly in its pan or transfer it to an airtight container. It should be good in the fridge for up to a week. The glaze might firm up a bit more in the fridge, which is perfectly fine.
Freezer Instructions: Yes, you can absolutely freeze this cake! Once it’s completely cooled and the glaze has set, wrap the entire cake tightly in plastic wrap, then in aluminum foil, or place it in a freezer-safe container. It can be frozen for up to 2-3 months. Thaw it overnight in the refrigerator, and then let it sit at room temperature for about 30 minutes to an hour before serving. The texture holds up remarkably well!
Glaze Timing Advice: For the best results when storing, I recommend applying the glaze once the cake has cooled for at least 20-30 minutes. If you glaze a piping hot cake, the glaze will just melt and run off. If you plan to freeze it, it’s often easier to glaze it *after* thawing, or just before serving if you’ve frozen the unfrosted cake. However, if you glaze it before freezing, just ensure it’s fully set and well-wrapped.
Frequently Asked Questions
Final Thoughts
So there you have it – my absolute favorite peanut butter sheet cake recipe. I truly believe this is a keeper, the kind of recipe you’ll pull out again and again for comfort, celebration, or just because. It’s got that perfect balance of rich peanut butter flavor, incredibly moist texture, and that glorious sweet glaze. What I love most is how accessible it is. It doesn’t require a fancy kitchen or a ton of complicated steps, but the result is a dessert that tastes like it came from a high-end bakery.
If you enjoy this recipe, you might also want to check out my classic chocolate sheet cake or my no-bake peanut butter bars – they’re equally crowd-pleasing! Making this cake always brings me so much joy, and I genuinely hope it brings you and your loved ones just as much happiness. I can’t wait to hear how yours turns out, so please leave a comment below and share your experience or any fun variations you try! Happy baking!
Peanut Butter Sheet Cake
Ingredients
Cake Ingredients
- 0.75 cup unsalted butter softened
- 1.5 cup granulated sugar
- 2 large eggs
- 0.5 cup peanut butter creamy
- 1 teaspoon vanilla extract
- 1.5 cup all-purpose flour
- 1 teaspoon baking soda
- 0.25 teaspoon salt
- 0.5 cup buttermilk
Peanut Butter Frosting
- 0.5 cup unsalted butter softened
- 0.5 cup peanut butter creamy
- 3 cup powdered sugar
- 0.25 cup milk
- 1 teaspoon vanilla extract
Instructions
Cake Preparation
- Preheat oven to 350 degrees F (175 degrees C). Grease and flour a 9x13 inch baking pan.
- In a large bowl, cream together the softened butter and granulated sugar until light and fluffy.0.75 cup unsalted butter
- Beat in the eggs one at a time, then stir in the peanut butter and vanilla extract.0.75 cup unsalted butter
- In a separate bowl, whisk together the flour, baking soda, and salt.0.75 cup unsalted butter
- Gradually add the dry ingredients to the wet ingredients, alternating with the buttermilk, beginning and ending with the dry ingredients. Mix until just combined.0.75 cup unsalted butter
- Pour the batter into the prepared pan and spread evenly.
- Bake for 25-30 minutes, or until a wooden skewer inserted into the center comes out clean.
Frosting Preparation
- While the cake is baking, prepare the frosting. In a medium bowl, beat together the softened butter and peanut butter until smooth.0.75 cup unsalted butter
- Gradually beat in the powdered sugar, alternating with the milk, until smooth and creamy. Stir in the vanilla extract.0.75 cup unsalted butter
- Once the cake is slightly cooled, spread the frosting evenly over the top.


