


Oh, friends, do I have a treat for you today! This isn’t just any recipe; this is a little piece of pure joy, a hug in truffle form. I remember the first time I stumbled upon a recipe for what we now affectionately call Payday Truffles in my house. It was a particularly tough week, you know the kind where the to-do list just keeps growing and growing, and all you crave is a little moment of sweetness without a lot of fuss. I was scrolling through old recipe cards, the kind with smudges and faded ink that tell their own stories, and this one jumped out. It promised something rich, something decadent, and something surprisingly simple. And honestly, it delivered tenfold. These Payday Truffles are my absolute go-to when I need a quick fix of pure happiness. They remind me of those childhood Candy Bars, but with a homemade warmth that just can’t be beaten. They’re incredibly easy, which is a huge win in my book, and they always, *always* disappear faster than I can make them. If you’re looking for that perfect little something sweet to brighten your day, or to impress a friend without breaking a sweat, you’ve found it.
What is a payday truffle?
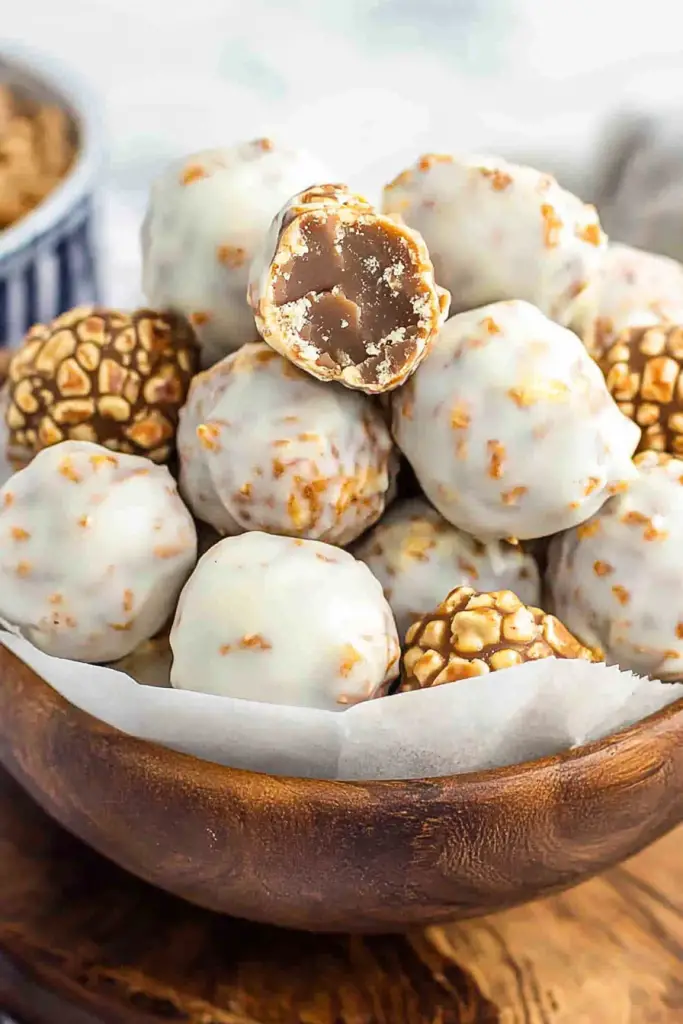
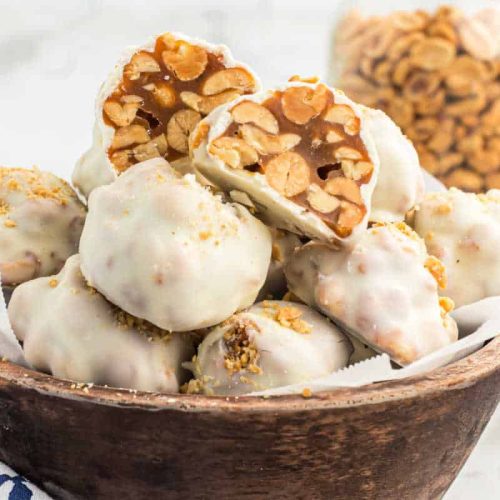
So, what exactly are these magical little bites of heaven? Think of Payday Truffles as a deconstructed, elevated, and oh-so-much-more-delicious version of that classic candy bar. You know, the one with the crunchy peanuts and the chewy caramel goodness? We’re taking those irresistible flavors and transforming them into smooth, melt-in-your-mouth truffles. They’re essentially a rich, creamy ganache base infused with the salty crunch of peanuts and swirled with a gooey, sweet caramel. The “Payday” comes from the fact that they feel like such a decadent treat, almost like you’re indulging in something you *really* earned after a long week – hence, a payday treat! It’s not overly complicated; it’s just a smart combination of ingredients that work together in perfect harmony. They are small but mighty, packing a huge flavor punch that’s both comforting and exciting. It’s the kind of treat that makes you pause for a moment, close your eyes, and just savor. It’s essentially pure, unadulterated deliciousness in a bite-sized package.
Why you’ll love this recipe?
I know you will love this recipe, but I know you will too.flavor is just out of this world. You get that perfect balance of sweet and salty. The rich, creamy chocolate base is beautifully complemented by the slightly chewy, buttery caramel, and then BAM! You hit those crunchy, roasted peanuts. It’s a symphony of textures and tastes in every single bite. It’s truly addictive in the best possible way. And the simplicity? Oh my goodness, it’s a lifesaver. You don’t need any fancy equipment or complicated techniques. Most of the magic happens with just a few bowls and some stirring. It’s the kind of recipe that makes you feel like a baking pro, even if you’re just starting out. Plus, let’s talk about Cost-efficiency: What is the best way to measure cost-efficiency?. The ingredients are all pretty standard pantry staples, and you don’t need a huge quantity of anything to make a big batch. These are perfect for when you want something special without spending a fortune. And the versatility! You can absolutely customize these Payday Truffles to your heart’s content. I’ll get into some ideas later, but imagine adding a touch of sea salt on top, or even a hint of espresso powder to the chocolate. They’re fantastic for gifting, for potlucks, or just for having on hand for that 3 pm craving. What I love most about this recipe is that it’s so forgiving. Even if you’re not a super precise baker, these truffles turn out beautifully every single time. They’re far simpler than making a traditional Payday bar from scratch, and in my opinion, even more satisfying.
How to Make Payday Truffles
Quick Overview
The process for these Payday Truffles is wonderfully straightforward. You’ll start by making a luscious chocolate ganache, then fold in your crunchy peanuts. Separately, you’ll whip up a quick, gooey caramel. We’ll then combine these elements, chill them down until they’re scoopable, and then roll them into little balls. Finally, a quick dip in melted chocolate seals the deal, adding that extra layer of indulgence. It’s a few steps, but each one is easy peasy and the result is so, so worth it. Trust me, you’ll be amazed at how quickly these come together.
Ingredients
For the Chocolate Base:
12 ounces good quality semi-sweet chocolate, finely chopped (I prefer a bar over chips for a smoother melt)
1 cup heavy cream
2 tablespoons unsalted butter, softened
1 teaspoon vanilla extract
1/2 teaspoon fine sea salt (adjust to your taste preference)
For the Peanut Crunch:
1 cup dry roasted, salted peanuts, roughly chopped (the saltiness is key here!)
Optional: A pinch of extra flaky sea salt for finishing
For the Caramel Swirl:
1 cup granulated sugar
1/4 cup water
1/2 cup heavy cream, warmed (important for smooth incorporation)
2 tablespoons unsalted butter, cut into cubes
1 teaspoon vanilla extract
For the Chocolate Coating (Optional, but recommended!):
8 ounces good quality semi-sweet or milk chocolate, chopped (depending on your preference)
Step-by-Step Instructions
Step 1: Preheat & Prep Pan
This recipe doesn’t require baking in an oven, but we do need to get our chilling station ready. Line a large baking sheet with parchment paper or wax paper. This will prevent the truffles from sticking once they’re formed and chilled. Make sure you have enough space in your refrigerator or freezer for this sheet.
Step 2: Mix Dry Ingredients
While there aren’t many ‘dry’ ingredients in the traditional sense for the base, we’ll combine our chopped peanuts and salt here in a small bowl. Give them a quick mix. I like to chop them just enough so you still get a satisfying crunch but they’re not too big to roll into a truffle. Set this aside.
Step 3: Mix Wet Ingredients
In a medium saucepan, gently heat the heavy cream over medium-low heat until it just begins to simmer around the edges. Don’t let it boil rapidly. While the cream is heating, place your finely chopped chocolate in a heatproof bowl. Once the cream is warm, carefully pour it over the chocolate. Let it sit undisturbed for about 5 minutes to allow the heat to melt the chocolate. Then, using a whisk or a rubber spatula, gently stir from the center outwards until the ganache is smooth, glossy, and completely combined. Stir in the softened butter, vanilla extract, and sea salt until everything is beautifully incorporated and the mixture is silky.
Step 4: Combine
Now, it’s time to introduce the peanuts to our luscious chocolate ganache. Gently fold the chopped peanuts into the chocolate mixture. The goal here is to distribute them evenly without overmixing. You want to ensure every truffle gets a good amount of peanut crunch!
Step 5: Prepare Filling
Let’s make that gorgeous caramel. In a clean, heavy-bottomed saucepan, combine the granulated sugar and water. Stir just to moisten the sugar. Place over medium heat and cook, without stirring, until the sugar dissolves and the mixture turns a beautiful amber color. This can take a little while, so be patient. Swirl the pan occasionally if needed for even cooking. Once it reaches a nice caramel color, carefully and slowly whisk in the warmed heavy cream. Be cautious, as it will bubble up vigorously! Continue whisking until smooth. Remove from heat and whisk in the butter and vanilla extract until the caramel is glossy and luscious. Let it cool slightly.
Step 6: Layer & Swirl
Now for the fun part! Pour about half of the chocolate-peanut mixture into your prepared baking sheet. Drizzle about half of the slightly cooled caramel over the top. Then, carefully spread the remaining chocolate-peanut mixture over the caramel. Drizzle the rest of the caramel on top. Using a skewer or a toothpick, gently swirl the caramel into the chocolate layer to create beautiful patterns. Don’t over-swirl, you want distinct ribbons of caramel.
Step 7: Bake
These truffles don’t actually bake in the oven. Instead, we’ll chill them to set. Place the baking sheet in the freezer for about 30-45 minutes, or in the refrigerator for about 1.5-2 hours, until the mixture is firm enough to scoop and roll. Once firm, scoop out portions using a small cookie scoop or two spoons, and roll them into roughly 1-inch balls. Place the formed truffle balls back onto the parchment-lined baking sheet.
Step 8: Cool & Glaze
Once all your truffles are rolled, place the baking sheet back into the freezer for another 15-20 minutes to firm them up one last time before coating. This helps the melted chocolate adhere better. Melt your coating chocolate (either in a double boiler or in the microwave in 30-second intervals, stirring in between). Dip each chilled truffle into the melted chocolate using a fork or a dipping tool. Let any excess chocolate drip off, then place the coated truffles back onto the parchment paper. If you like, sprinkle a tiny pinch of flaky sea salt on top of each truffle while the chocolate is still wet. Let them set completely at room temperature or pop them back in the fridge for a few minutes if you’re impatient (like me!).
Step 9: Slice & Serve
Once the chocolate coating has fully hardened, your Payday Truffles are ready to be enjoyed! You can serve them right away. They are perfect at room temperature, allowing the ganache and caramel to be wonderfully soft and gooey. If you’ve had them chilling, give them a few minutes on the counter to reach their prime texture.
What to Serve It With
These Payday Truffles are so wonderfully versatile, they can truly fit into any occasion! For breakfast, imagine enjoying one (or maybe two!) with a steaming mug of coffee. The rich chocolate and salty peanuts are a delightful wake-up call, a little sweet indulgence to start your day off right. They’re surprisingly good alongside a flaky croissant too! For brunch, they make an elegant addition to any dessert platter. Arrange them artfully on a tiered stand with some fresh berries or a dollop of whipped cream. They pair beautifully with mimosas or a light sparkling rosé. As a quick dessert after dinner, they are simply perfect. Serve them with a scoop of vanilla bean Ice Cream for an epic chocolate-peanut-caramel sundae experience, or alongside a rich espresso. And for those cozy snack moments? These are your best friends. Curl up on the couch with a good book and a handful of these. They’re fantastic with a glass of cold milk, or even a warming hot chocolate on a chilly evening. My kids always ask for these when they have friends over, and they disappear in minutes! They’re also a fantastic little edible gift. I often wrap a few in a cute little bag with a ribbon for neighbors or teachers.
Top Tips for Perfecting Your Payday Truffles
After making these Payday Truffles more times than I can count, I’ve picked up a few tricks that I think will really help you achieve truffle perfection. For the Peanut Prep, make sure you’re using dry-roasted, salted peanuts. The roasting brings out their flavor, and the salt is crucial for that signature Payday taste. When chopping them, I find a rough chop is best – you want distinct pieces for that lovely crunch, not a fine powder. If you love a little extra salty kick, a sprinkle of flaky sea salt on top right after dipping is a game-changer. Regarding Mixing Advice, when you’re folding the peanuts into the ganache, be gentle. You want them evenly distributed, but you don’t want to break them down too much. For the caramel, the key to a smooth sauce is warming your cream *before* adding it to the cooked sugar. This prevents seizing. If your caramel does get a bit lumpy, don’t panic! You can often whisk it over low heat until smooth again. When it comes to the Swirl Customization, less is more when you’re swirling. You want those beautiful ribbons of caramel peeking through, not a muddy mess. A simple toothpick or skewer makes intricate patterns easy. For Ingredient Swaps, if you’re not a fan of peanuts, you could try chopped almonds or even pecans, though it won’t be a true “Payday” truffle. For the chocolate, feel free to experiment! Milk chocolate ganache with Dark Chocolate coating, or vice versa, can offer different flavor profiles. Just ensure you’re using good quality chocolate; it makes a big difference. For Baking Tips (or in this case, chilling tips!), make sure your mixture is firm enough to roll before you start. If it’s too soft, they’ll be messy. A quick trip to the freezer is your best friend here. If your kitchen is very warm, you might find you need to chill the rolled balls for longer before dipping. And for the Glaze Variations, if you don’t want to do a full chocolate dip, you can always just dust the chilled truffle balls with cocoa powder, powdered sugar, or even some crushed peanuts for a simpler finish. Another option is to drizzle a bit more caramel on top instead of a full dip.
Storing and Reheating Tips
These Payday Truffles are pretty resilient, which is another reason I adore them. For Room Temperature storage, if they haven’t been fully dipped in chocolate, I’d say they’re best enjoyed within 2-3 days, kept in an airtight container in a cool, dry place. If they are fully chocolate-dipped, they can last a bit longer, maybe up to 5 days, again in an airtight container. The chocolate coating helps preserve them. For Refrigerator Storage, this is my preferred method for longer keeping. Store them in an airtight container with parchment paper or wax paper between layers to prevent sticking. They’ll stay fresh and delicious for about 1 to 2 weeks. Just let them sit out for about 10-15 minutes before serving to take the chill off and reach that perfect gooey texture. Freezer Instructions are also a go! If you’ve made a huge batch and want to save them for later, wrap the fully set truffles tightly in plastic wrap, then place them in a freezer-safe bag or container. They can last for up to 2-3 months. To thaw, transfer them to the refrigerator overnight, then let them come to room temperature for about 30 minutes before enjoying. For Glaze Timing Advice, it’s always best to dip and fully set the chocolate coating before storing them in the fridge or freezer. If you’re planning to gift them, dipping them the day before is ideal.
Frequently Asked Questions
Final Thoughts
So there you have it – my beloved Payday Truffles! I truly hope you give these a try. They’re more than just a sweet treat; they’re a little moment of happiness, a quick escape from the everyday hustle. The combination of creamy chocolate, salty peanuts, and that luscious caramel is just pure magic. They’re perfect for when you need a quick fix, a delightful edible gift, or just something to brighten your day. I find myself making them time and time again, and they never fail to bring smiles. If you love this recipe, you might also enjoy my [link to another popular recipe, e.g., Salted Caramel Brownies] for more sweet and salty delights! Please, please let me know how yours turn out in the comments below! I’d love to hear about any variations you tried or any special occasions you made them for. Sharing your creations makes my day. Happy baking (and even happier eating)!
Payday Truffles
Ingredients
Main Ingredients
- 1 cup creamy peanut butter
- 0.5 cup butter softened
- 0.5 cup light brown sugar packed
- 2 cups powdered sugar
- 1 cup chopped salted peanuts
- 1 cup milk chocolate chips
- 1 tablespoon vegetable oil
Instructions
Preparation Steps
- In a large bowl, beat the peanut butter, softened butter, and brown sugar until smooth.
- Gradually add the powdered sugar and mix until well combined. The mixture will be thick.
- Stir in the chopped peanuts.
- Roll the mixture into small balls, about 1 inch in diameter. Place them on a parchment-lined baking sheet.
- Freeze the balls for about 15-20 minutes, or until firm.
- In a microwave-safe bowl, melt the milk chocolate chips with the vegetable oil. Microwave in 30-second intervals, stirring in between, until smooth.
- Dip each frozen peanut butter ball into the melted chocolate, ensuring it's fully coated. Use a fork to lift and let excess chocolate drip off.
- Place the coated truffles back on the parchment-lined baking sheet.
- Refrigerate for at least 30 minutes, or until the chocolate has set.


